Advertisement
Quick Links
Project
Ember
th
VERSION 2.1 USER MANUAL – April 15
2016
WWW.GARAGE1217.COM
WARNING:
Although Project Ember runs at a generally safe 48VDC, Injury from improper assembly is quite possible. The main danger
comes from installing the polarized capacitors backwards as they can only be installed in one direction much like a battery
(more detail on capacitor installation comes later in this manual) If a capacitor is installed backwards, it may burst resulting
in burns or eye injury. If you are not experienced in electronics or electronic kit assembly, it would be wise to have an
experienced electronics person review your work before powering the unit on. Upon first power up, wear eye
protection and be wary of any burning smells or electrical noises such as loud pops or buzzes
If using low impedance headphones with power ratings of 300mW or lower, there is a chance you could blow out the drivers
if left playing at high levels – unattended. At high power levels an SPL of over 120dB may be reached in efficient
headphones which is harmful to your hearing. Project Ember is a very high powered headphone amplifier – use caution and
common sense. High output headphone amplifiers like Ember are designed to power very demanding headphones or
provide all the headroom you could want with more efficient designs, not to see if you can get your jawbone to rattle.
GARAGE1217.COM IS NOT RESPONSIBLE OR LIABLE FOR INJURY, PROPERTY LOSS OR DAMAGE AS THE RESULT OF ASSEMBLY OR USE OF THIS "DO IT YOURSELF" KIT. EMBER IS
CONSIDERED A HOBBY LEVEL PRODUCT. IT CONTAINS NO ELECTRICAL CERTIFICATIONS AND IS NOT ADVERTISED AS SUCH. USE AT YOUR OWN RISK.
Advertisement

Subscribe to Our Youtube Channel
Related Manuals for Garage1217 project ember

Summary of Contents for Garage1217 project ember
- Page 1 GARAGE1217.COM IS NOT RESPONSIBLE OR LIABLE FOR INJURY, PROPERTY LOSS OR DAMAGE AS THE RESULT OF ASSEMBLY OR USE OF THIS “DO IT YOURSELF” KIT. EMBER IS...
-
Page 2: Specifications
- THD: > 0.010% (dependent on tube) 300Ω 765mW 600mW 390mW - Suitable for: 16-600Ω Headphones, 32-600Ω recommended 600Ω 390mW 360mW 270mW Tubes / Valves that can be used in Project Ember 6V TUBES: 12V TUBES: 12V TUBES CONTINUED: 6922 5751 E181CC 5814 7308 E183CC... - Page 3 Project Ember Thank you for purchasing the Project Ember Headphone Amplifier Kit. This kit requires minimal electronics and soldering knowledge. The layout is easy to follow and setup is a snap! Please make sure to follow the instructions outlined in this guide and you will be enjoying your amp in no time. First, lets go over the tools and items required...
- Page 4 Project Ember Bottom Chassis Prep / Final Chassis Assembly: - ONCE THE PCB HAS BEEN ASSEMBLED, ASSEMBLE EACH OF THE 4 RUBBER FEET AS THUMB SCREW SET IT ONTO THE FOUR THREADS SHOWN, ATTACHING EACH FOOT TO THE GRAY STICKING OUT OF THE BOTTOM GRAY SMOKED ACRYLIC BOTTOM CHASSIS ACRYLIC CHASSIS THAT YOU CLEAR ACRYLIC TOP...
- Page 5 - If load testing Project Ember, it is not recommended to attach a dummy load with a value below 15Ω when testing at full output power for a long periods. Heatsinks and the output devices at the bottom will become quite hot during testing. The amplifier will go into thermal protection when chip temperatures of 150oC are reached.
-
Page 6: Assembly Guide
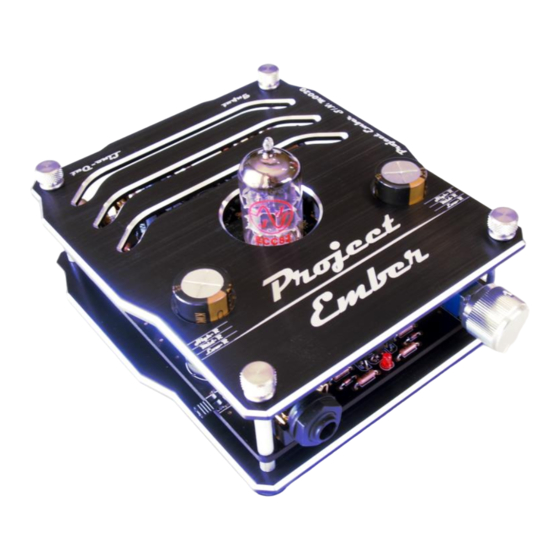
Project Ember Assembly Guide POWER SWITCH POWER RCA LINE-OUT RCA LINE-IN JACK ADJUSTABLE INPUT GAIN MODULE AND JUMPERS LED ON/OFF LED COLOR CHANGING TRIMMERS INPUT CAPACITOR / RESISTOR BYPASS OUTPUT RESISTANCE JUMPERS VOLUME PROTECTION CIRCUIT LED ¼” - 6.3MM POTENTIOMETER HEADPHONE JACK WHEN THE AMPLIFIER IS TURNED ON, THIS LED WILL LIGHT FOR... - Page 7 Project Ember STEP 1: POPULATE ALL SMALL COMPONENTS ON THE BOARD SUCH AS RESISTORS, RIGHT ANGLE JUMPERS, DIODES AND SMALL CAPACITORS. THROUGHOUT YOUR BUILD, ALWAYS INSTALL THE SMALLER PARTS FIRST, WORKING YOUR WAY UP TO THE LARGER COMPONENTS PAY CLOSE ATTENTION TO THE GRAY BAND ON EACH DIODE AS THEY ARE DIRECTIONAL...
- Page 8 Project Ember STEP 2: POPULATE ALL MID SIZE COMPONENTS SUCH AS RCA’S, POLARIZED CAPACITORS MUST BE INSTALLED IN THE CORRECT DIRECTION (WILL HAVE A STRIPE DOWN THE SIDE POWER COMPONENTS, SMALL CAPACITORS, TUBE SOCKET, DESIGNATING POLARITY) INSTALL THIS STRIPE FACING THE RELAYS, TRIMMERS AND SO FORTH FLAT SPOT ON THE CAPACITOR OUTLINE ON THE BOARD CORRECT...
- Page 9 Project Ember INSTALLING THE SMD INDUCTOR INSTALLING AN SMD DEVICE IS ACTUALLY QUITE SIMPLE – HOWEVER MANY WORRY THAT IT IS DIFFICULT. ALL YOU NEED TO DO IS FOLLOW A FEW SIMPLE STEPS IN ORDER FOR THE INSTALLATION TO BE A SUCCESS. 1.
- Page 10 Project Ember VOLPOT GROUNDING GROUNDING THE VOLUME POTENTIOMETER IS REQUIRED AS WITHOUT IT, THE AMPLIFIER MAY BE SUBJECTED TO NOISE / INTERFERENCE. THE IMAGES ARE OF THE PREVIOUS GENERATION SUNRISE, HOWEVER THE GROUNDING PRINCIPAL IS EXACTLY THE SAME. FIRST, INSERT A WIRE LEAD INTO THE RIGHT SIDE VIA NEXT TO THE VOLPOT AND SOLDER IN PLACE.
- Page 11 Project Ember STEP 3: POPULATE ALL LARGE SIZE COMPONENTS SUCH AS LARGE CAPACITORS, TO220 DIODE AND HEADPHONE JACK POSITION THE TO220 DIODE EXACTLY AS SHOWN...
- Page 12 Project Ember COMPLETED EMBER 2.1 LAYOUT...
- Page 13 Project Ember Project Ember has several jumpers settings to customize the amp the way you would like it. Below gives you the details on what these jumper settings do. BOTH LEFT AND RIGHT SIDE JUMPERS SHOULD BE EQUAL IN SETTING...
- Page 14 GREEN Another feature of Project Ember is an adjustable RGB (RED GREEN BLUE) LED under the tube. RGB LED’s can produce almost any color desirable. We understand this is not an audiophile feature or a feature that has anything to do with the sound of the amplifier.
- Page 15 Project Ember Jacks Resistors J1 = HEADPHONE JACK X 1 R1 = SM 100K X 1 J2 = TUBE SOCKET X 1 R2 = SM 470K X 1 J3 = BLACK RCA JACK X 2 R3 = SM 10K X 3...
Need help?
Do you have a question about the project ember and is the answer not in the manual?
Questions and answers