Advertisement
Available languages
Available languages
Quick Links
USER MANUAL Portable Music System with PLL Radio Cassette and USB
HANDLEIDING Draagbaar muzieksysteem met PLL radio, cassette en USB
BENUTZERHANDBUCH Tragbares Musiksystem mit PLL‐Radio/Kassette und USB
MODE D'EMPLOI Lecteur de musique portable avec radiocassette PLL et port USB
MANUAL DEL USUARIO Sistema de música portátil con radiocasete PLL y USB
Version: 1.0
MODEL: SCD‐680
PORTABLE MUSIC SYSTEM
WITH PLL RADIO CASSETTTE
AND USB
Advertisement

Subscribe to Our Youtube Channel
Related Manuals for LENCO SCD-680

Summary of Contents for LENCO SCD-680
- Page 1 MODEL: SCD‐680 PORTABLE MUSIC SYSTEM WITH PLL RADIO CASSETTTE AND USB USER MANUAL Portable Music System with PLL Radio Cassette and USB HANDLEIDING Draagbaar muzieksysteem met PLL radio, cassette en USB BENUTZERHANDBUCH Tragbares Musiksystem mit PLL‐Radio/Kassette und USB MODE D'EMPLOI Lecteur de musique portable avec radiocassette PLL et port USB MANUAL DEL USUARIO Sistema de música portátil con radiocasete PLL y USB Version: 1.0...
-
Page 2: Table Of Contents
Index English ....................................3 Nederlands ..................................11 Deutsch ....................................19 Français ....................................28 Español ....................................36 Version: 1.0... -
Page 3: English
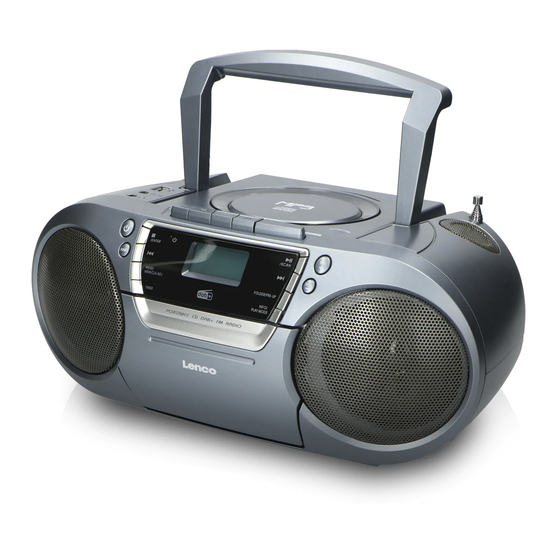
English Portable Music System with PLL Radio Cassette and USB CAUTION RISK OF ELECTRIC SHOCK DO NOT OPEN CAUTION: TO REDUCE THE RISK OF ELECTRIC SHOCK The lighting flash and The exclamation point DO NOT REMOVE COVER (OR BACK). NO USER arrow head within the within the triangle is a SERVICIABLE PARTS INSIDE. REFER SERVICING TO triangle is warning sign warning sign alerting you QUALIFIED SERVICE PERSONNEL. alerting you of dangerous of important instructions voltage inside the product accompanying the product IMPORTANT SAFETY INSTRUCTIONS: 1. Read the instructions. All uses guidelines must be read before start device. 2. Keep the instructions for future use. 3. Attention, use and security guidelines must be respected. 4. The device must not be used near water or be put in contact with moisture. 5. Make sure has no liquid is spilled on device and device openings. 6. Move device carefully, avoid shocks. 7. - Page 4 22. Attention should be drawn to the environmental aspects of battery disposal; 23. The use of apparatus in moderate climates CLASS 1 LASER PRODUCT LOCATION OF CONTROL USB socket Aux in socket 3.5mm headphone jack Cassette button Handle FM antenna CD door open/close LCD display Function button 10) Stop /Enter button 11) Skip/Tuning down button 12) Menu/Mem/clock‐adjust button 13) Timer button 14) Volume up/down button 15) Cassette door 16) Standby LED 17) On/Off button 18) Play/pause ...
- Page 5 DC connection For DC operation, please insert 8 pcs size C (UM‐2) battery to battery compartment and remove the AC plug from AC outlet then disconnect the AC cord from AC socket. Since unit will draw little power consumption during standby mode, suggest uninstall the battery during standby mode. Setting the clock Set unit in standby mode. Press and hold the “Menu/Mem/clk‐adj” button (12), display will show 24hour, press Skip down (11) or Skip up (19) button to select 12 or 24 hrs format, then press “Menu/Mem/clk‐adj” button (12) to confirm, the hour digit will flash on LCD display (8) Press the Skip down (11) or Skip up (19) button to set the correct hour. Press the “Menu/Mem/clk‐adj” button (12) to store the hour then minute digit will flash. Press the Skip down (11) or Skip up ...
- Page 6 Hints for best reception:‐ FM: the receiver has rod antenna (6) hanging at the rear cabinet. It should be totally extended for best reception. Radio data system (RDS) This is the features to display the information which released from the radio broadcast and will showed on LCD display step by step as below by pressing the Play mode/info button (21) continuously. Radio text program type frequency mono/stereo time date Digital audio broadcasting (DAB) radio Set the unit to DAB mode by press Function button (9). Press the Play/pause /Scan button (18) once, unit will start to full scan from range 11b‐12d one time. Press Skip down (11) or Skip up (19) button to select your desired DAB channel then press “Stop/Enter” button (10) to confirm the selected channel. Press the Play mode/info button (21) continuously to check the below info released by DAB. signal strength program type Group name frequency signal error transfer rate time date Adjust volume knob (14) for the desired volume level. Dynamic range control This apparatus provide three dynamic range mode to match different program type in DAB mode. In DAB mode, press “Menu/Mem/clk‐adj” button (12) to enter the “Menu”, then press Skip down (11) or Skip up (19) button to select “DRC”. Press “Stop/Enter” button (10) to enter the “DRC” setting, then press Skip down (11) or Skip up (19) button to select “DRC high/low/off” mode. Then press “Stop/Enter” button (10) to confirm the setting. In any state press “Menu/Mem/clk‐adj” button (12) to quit the setting mode Language setting This apparatus provide 4 language for FM/DAB operation display. In DAB/FM mode, press “Menu/Mem/clk‐adj” button (12) to enter the “Menu”, then press Skip down (11) or Skip up ...
- Page 7 2. If Play/Pause button (18) is pressed during playback, system go to pause mode and the pause indicator will light up at the LCD display (8). Press again to resume normal playback. Stop mode If Stop button (10) is pressed during play or pause mode. Go to stop mode and display total number of track on the LCD display (8). Skip mode (skip up /skip down ) During play mode, if skip up button (19) is pressed it will go to next track and display the track no. During play mode, if Skip down button (11) is pressed, it will go back to the beginning of the track, same track no. After step 2, press skip down button (11) again, it will go to the previous track and play beginning of the track. For MP3 disc/file Place the MP3‐CD to CD compartment. After focus search is performing, the total number of track will be shown on the LCD display (8). Press Skip up or Skip down (11/19) button to select the track number. When the desired track and album is being selected, press the “Play/Pause ” button (18) to start playback. ...
- Page 8 Press “ Stop ” button twice (10) at CD stop mode to cancel all programmed memory until the “Prog” indicator disappear on LCD display (8). For MP3 disc/file, press the “Folder up” button (20) to select the 1 track of next folder directly and hence to speed up the song selection. The programming mode will automatically stop if no button is being pressed in a period of about 30 seconds after pressing the Memory button (12). Remark:‐ MP3 track format requirement:‐ Bit rate: 32 kbps~320kbps, sampling rate: 32kHz, 44.1kHz and 48 kHz decodable The performance of playing MP3 disc is various from the quality of recording disc and the method of recording. Furthermore, the searching lead‐time for MP3‐CD is longer than normal CD due to difference format. Playback of MP3 song via USB storage media Connecting The system is able to decode and playback all MP3 file which stored in the memory media with USB connecting port. Set the system at Standby mode first or other function except USB mode. Plug‐in the USB pen‐drive with the face up & make sure it going into completely. Connecting the USB upside down or backwards could damage the audio system or the storage media (USB thumb driver). Check to be sure the direction is correct before connection. Turn on the unit again by On/off button (17) and set press Function button (9) to select USB mode. The system will start reading the storage media automatically after connecting, and LCD display (8) will show the total number of MP3 files being detected. Repeat the same playback procedure as playing CD/MP3 disc as above. Remark The system can detect and read the file under MP3 format only at USB mode but not other music file format. If connect the system to MP3 player via the USB socket, due to variances in file system format, some MP3 player may not be able to play via the USB socket. This is not a malfunction of the system. USB port does not support connection with USB extension cable and is not designed for communication with computer directly Due to ErP stage two requirement and protect the environment (for European market only). The unit will switch to ...
- Page 9 During the alarm on mode, press the “On/off” button (17) will switch off the system. Due to display size limitation, timer icon “ ” will not appear on LCD during operate FM/DAB mode Remark (for Europe market only): Due to ErP stage two requirement and protect the environment. The unit will switch to standby mode automatically once no any music playing over 15 minutes. Guarantee Lenco offers service and warranty in accordance with the European law, which means that in case of repairs (both during and after the warranty period) you should contact your local dealer. Important note: It is not possible to send products that need repairs to Lenco directly. Important note: If this unit is opened or accessed by a non‐official service center in any way, the warranty expires. This device is not suitable for professional use. In case of professional use, all warranty obligations of the manufacturer will be voided. Disclaimer Updates to Firmware and/or hardware components are made regularly. Therefore some of the instruction, ...
- Page 10 CE Marking Products with the CE marking comply with the EMC Directive (2014/30/EU) and the Low Voltage Directive (2014/35/EU) issued by the Commission of the European Community. Hereby, Lenco Benelux BV, Thermiekstraat 1a, 6361 HB Nuth, The Netherlands, declares that this product is in compliance with the essential requirements and other relevant provisions of Directive 1999/5/EC. The declaration of conformity may be consulted via techdoc@lenco.com Service For more information and helpdesk support, please visit www.lenco.com Lenco Benelux BV, Thermiekstraat 1a, 6361 HB, The Netherlands. Version: 1.0...
-
Page 11: Nederlands
Nederlands Draagbaar muzieksysteem met PLL radio, cassette en USB LET OP RISICO OP ELEKTRISCHE SCHOKKEN OPEN HET APPARAAT NIET LET OP: OM HET RISICO OP ELEKTRISCHE SCHOKKEN TE Het bliksemschichtsymbool Het uitroepteken binnenin de VOORKOMEN, NOOIT DE BEHUIZING (OF ACHTERZIJDE) in een driehoek is bedoeld driehoek is bedoeld om u te OPENEN. GEEN INTERNE ONDERDELEN DIE U ZELF KUNT om u te wijzen op de wijzen op de aanwezigheid REPAREREN. LAAT ALLE REPARATIES DOOR BEVOEGD aanwezigheid van gevaarlijke van belangrijke instructies ONDERHOUDSPERSONEEL UITVOEREN. spanning in het product meegeleverd met het product BELANGRIJKE VEILIGHEIDSVOORSCHRIFTEN: 1. Lees de instructies. Lees alle instructies voor gebruik door voordat u het apparaat gebruikt. 2. Bewaar de instructies voor toekomstig gebruik. 3. Let op, gebruiks‐ en veiligheidsrichtlijnen moeten worden gerespecteerd. 4. Het apparaat mag niet gebruikt worden in de buurt van water of in contact komen met vocht. 5. Zorg ervoor dat er geen vloeistof wordt gemorst op het apparaat en in openingen van het apparaat. 6. ... - Page 12 20. De ventilatie mag niet worden gehinderd door de ventilatieopeningen af te dekken met voorwerpen zoals kranten, tafelkleden, gordijnen etc. 21. Plaats geen bronnen met een open vlam, zoals brandende kaarsen, op het apparaat. 22. Aandacht voor het milieu is nodig bij het verwijderen van de batterijen. 23. Gebruik het apparaat in gematigde klimaten. KLASSE 1 LASERPRODUCT PLAATSING VAN BEDIENINGSELEMENTEN 1) USB‐aansluiting 2) Aux‐ingang 3) 3,5 mm hoofdtelefoonuitgang 4) Cassettetoets 5) Handvat 6) FM‐antenne 7) CD‐klepje openen/sluiten 8) LCD‐scherm 9) Functietoets 10) Stop /Entertoets 11) Vorige/Tuner omlaag ‐toets 12) ...
- Page 13 Aansluiting 1. Steek het ene uiteinde van het afneembare netsnoer in de netsnoeraansluiting (22) en het andere uiteinde in het stopcontact. 2. Wanneer u het apparaat voor het eerst aansluit op het stopcontact, zet het zich automatisch op stand‐by en zal de stand‐by‐led oplichten. De stand‐by‐led zal oplichten ...
- Page 14 2. Druk op de toets “Stop/Enter” (10) om de “Scan setting” (Scaninstelling) te openen en druk vervolgens op de toetsen Vorige/Omlaag (11) of Volgende/Omhoog (19) om “Strong station only” (Alleen sterke zenders) te selecteren. Druk vervolgens op de toets “Stop/Enter” (10) om uw instelling te bevestigen. 3. Voer opnieuw de automatische afstemprocedure uit zoals hierboven staat beschreven. FM‐ en FM‐stereo‐ontvangst Het apparaat staat standaard op Mono in de FM‐modus. Zet daarom als u een FM‐stereosignaal ontvangt, de FM‐modus op Stereo door te drukken op de Menu‐toets (12), druk dan op de toetsen Vorige/Omlaag (11) of Volgende/Omhoog (19) om de Audio setting (Audio‐instellingen) te selecteren, druk op de Enter‐toets (10) en druk opnieuw op de toetsen Vorige/Omlaag (11) of Volgende/Omhoog (19) om FM stereo te selecteren, druk vervolgens op de Enter‐toets (10) om te bevestigen. Als het stereosignaal zwak en lawaaierig is. Het is best de FM‐modus via dezelfde procedure te wijzigen. Tips voor optimale ontvangst:‐ FM: de ontvanger heeft een ingebouwde fm‐draadantenne (6) die aan de achterkant hangt. Deze moet volledig worden uitgerold voor optimale ontvangst. Radio Data Systeem (RDS) Dit is de informatie die wordt meegestuurd met een radiosignaal en op de lcd‐display verschijnt en stap voor stap getoond kan worden door meerdere keren op de toets Play mode/info (21) te drukken. Radiotekst programmatype frequentie mono/stereo tijd datum Digital audio broadcasting (DAB) radio 1. Schakel het apparaat in DAB‐modus door op de Functietoets (9) te drukken. 2. Druk eenmaal op de toets Start/Pauze /Scan (18) en het apparaat zal eenmaal een volledige scan starten vanaf het ...
- Page 15 4. Druk nogmaals op de toets “Stop/Enter” (10) om het oproepen van de zender te bevestigen. DAB/FM terugstellen: Als u graag alle FM/DAB‐geprogrammeerde stationsgeheugens wilt wissen, volg dan de volgende instructies. 1. Stel het apparaat in op DAB‐ of FM‐modus, druk op de toets “Menu/Mem/clk‐adj” (12) om het “Menu” te openen en druk vervolgens op de toetsen Vorige/Omlaag (11) of Volgende/Omhoog (19) om “System” (Systeem) te selecteren. 2. Druk op de toets “Stop/Enter” (10) om de instelling “System” (Systeem) te openen en druk vervolgens op de toetsen Vorige/Omlaag (11) of Volgende/Omhoog (19) om “Factory reset” (Fabrieksinstelling) te selecteren. Druk vervolgens op de toets “Stop/Enter” (10) om de fabrieksinstelling te bevestigen. 3. Het apparaat zal alle geprogrammeerde stationsgeheugens wissen; u kunt de stationsprogrammering vervolgens opnieuw uitvoeren zoals hierboven beschreven. CD/mp3‐disks afspelen Aan de slag 1. Druk op Functieknop (9) om “CD” te selecteren. 2. Druk op cd‐klepje openen/sluiten (7) om het cd‐klepje te openen. Plaats een cd‐disk in de houder en sluit het cd‐klepje. 3. De geplaatste disk wordt automatisch gelezen. Het totale aantal tracks wordt gelezen. Start/Pauzemodus 1. Druk in gestopte modus op de toets Start/Pauze (18) om de eerste track af te spelen. 2. ...
- Page 16 Voor mp3‐disks/bestanden (1) Herhaal 1 (2) Herhaal 1 map Herhaal alle Random (5) Uitgeschakelde tracks modus Indicator Afspeelmodus op de lcd‐display Herhaal enkele track Rep 1 Herhaal enkele map Rep F Herhaal alle tracks Rep A Random Rand Uitgeschakelde modus ‐‐‐‐‐‐‐‐‐‐‐‐‐‐‐‐‐ Herhaald afspelen U kunt met deze functie de gewenste tracks of map herhaald afspelen. Willekeurig afspelen U kunt met deze functie alle tracks in een willekeurige volgorde afspelen. CD/mp3‐disks programmeren U kunt bij het gebruik van een disk tot 20 tracks programmeren om in elke volgorde af te spelen. Zorg ervoor op de Stoptoets te drukken voordat u deze functie gebruikt. 1. Stel het apparaat in op cd‐modus. 2. Druk op de Geheugentoets (12), “P01 & T000” zal op de lcd‐display (8) verschijnen. 3. ...
- Page 17 De USB‐poort ondersteunt geen aansluitingen met een USB‐verlengkabel en is niet bedoeld voor directe communicatie met een computer Vanwege de vereisten van de ERP tweede fase en de bescherming van het milieu (alleen voor de Europese markt), zal het apparaat automatisch naar de stand‐bymodus overschakelen zodra er meer dan 15 minuten geen muziek afgespeeld wordt. Het verwijderen van de USB Om de USB te verwijderen, dient u eerst het apparaat uit te schakelen of de functiemodus op cd‐modus of afstemmodus in te stellen. Voor de USB‐poort – loskoppelen door deze direct uit de USB‐poort te trekken. Naar tapes luisteren Algemene bediening Stop/uitwerptoets Druk op Stop om de cassettewerking volledig te stoppen. Druk nogmaals op Stop om het cassettedeurtje te openen. Vooruitspoeltoets en Druk hierop om de cassette snel vooruit of achteruit te spoelen. Druk op de Stop/uitwerptoets en de Terugspoeltoets cassettewerking stopt. Starttoets Druk op Start om de cassette af te spelen. Pauzetoets Druk op Pauze om de cassette tijdelijk te stoppen. Druk nogmaals in om het afspelen te hervatten. Afspelen Selecteer “Tape” (Cassette) via de Functietoets (9) Plaats de cassette in het apparaat. Druk op de Starttoets om het afspelen te beginnen. Pas de Volumeknop (14) aan tot het gewenste volumeniveau. ...
- Page 18 (Afgedankte Elektrische en Elektronische Apparatuur). CE‐markering Producten met een CE‐keurmerk houden zich aan de EMC‐richtlijn (2014/30/EU) en de Richtlijn voor Lage Voltage (2014/35/EU) uitgegeven door de Europese Commissie. Hierbij verklaart Lenco Benelux BV, Thermiekstraat 1a, 6361 HB Nuth, Nederland, dat dit product voldoet aan de essentiële eisen en andere relevante bepalingen van Richtlijn 1999/5/EU. De conformiteitsverklaring kan worden geraadpleegd op techdoc@lenco.com Service Bezoek voor meer informatie en helpdeskondersteuning www.lenco.com Lenco Benelux BV, Thermiekstraat 1a, 6361 HB, Nederland. Versie: 1.0...
-
Page 19: Deutsch
Deutsch Tragbares Musiksystem mit PLL‐Radio/Kassette und USB ACHTUNG STROMSCHLAGGEFAHR NICHT ÖFFNEN ACHTUNG: NIEMALS DIE ABDECKUNG (ODER Das Warnzeichen „Blitz mit Das Hinweiszeichen RÜCKSEITE) DES GERÄTS ÖFFNEN, UM DIE GEFAHR Pfeil im Dreieck“ warnt vor „Ausrufezeichen im EINES ELEKTRISCHEN SCHOCKS ZU VERRINGERN. gefährlichen Spannungen Dreieck“ kennzeichnet KEINE DURCH DEN ANWENDER WARTBAREN TEILE IM im Inneren des Produkts. wichtige Anweisungen INNEREN DES GERÄTS. LASSEN SIE DAS GERÄT DURCH bezüglich des Produkts QUALIFIZIERTES FACHPERSONAL WARTEN. WICHTIGE SICHERHEITSHINWEISE: 1. Lesen Sie alle Anweisungen. Lesen Sie vor der Inbetriebnahme des Geräts alle Benutzungshinweise durch. 2. Bewahren Sie die Anweisungen für spätere Referenzen auf. 3. Beachten Sie alle Warnungen und befolgen Sie alle Sicherheits‐ und Benutzungsrichtlinien. 4. Verwenden Sie das Gerät nicht in der Nähe von Wasser und vermeiden Sie, dass das Gerät Feuchtigkeit ausgesetzt wird. 5. ... - Page 20 17. Die Batterie darf keiner extremen Hitze wie z.B. Sonnenschein, Feuer o.ä. ausgesetzt werden. 18. Das Hören von Musik mit Kopfhörern bei übermäßiger Lautstärke kann zu Hörschäden führen. 19. Für eine ausreichende Kühlung des Geräts ist um dieses herum mindestens ein Freiraum von 150 – 180 mm zu lassen; 20. Die Kühlung darf nicht durch Bedecken der Lüftungsschlitze mit Gegenständen wie Zeitungen, Tischdecken, Gardinen usw. behindert werden; 21. Stellen Sie kein offenes Feuer, wie z.B. angezündete Kerzen, auf das Gerät. 22. Bei der Batterieentsorgung sind die Entsorgungsvorschriften einzuhalten. 23. Verwenden Sie das Gerät in moderaten Klimazonen. LASER‐GERÄT DER KLASSE 1 TASTEN UND FUNKTIONEN 1) USB‐Port 2) AUX‐IN‐Eingang 3) 3,5 mm Kopfhörerbuchse 4) Kassetten‐Tasten 5) Handgriff 6) UKW‐Antenne 7) CD‐Fach öffnen/schließen 8) LCD‐Anzeige 9) Funktionstaste 10) ...
- Page 21 Vorsichtsmaßnahmen beim Gebrauch Aufbau Packen Sie alle Teile aus und entfernen Sie danach die Schutzmaterialien. Schließen Sie das Gerät nicht eher an das Netz an, bevor Sie die Netzspannung überprüft haben und alle anderen notwendigen Verbindungen hergestellt sind‐ Bedecken Sie die Lüftungsschlitze nicht und vergewissern Sie sich, dass um das Gerät herum einige cm Platz für die Kühlung gelassen wurden. Verbinden 1. Verbinden Sie das eine Ende des abziehbaren Netzkabels mit dem AC‐Netzanschluss (22) und das andere mit einer Netzsteckdose. ...
- Page 22 Radiosendersuche wird beendet, wenn ein Radiosender gefunden wurde. Drücken Sie die Taste „Springen/Abstimmen abwärts“ (11) einmal und danach die „Scan“‐Taste (18), wird das Gerät automatisch abwärts scannen. Beim Empfang eines Radiodatensystem‐ (RDS) Sendesignals aktualisiert das Gerät die Uhrzeit automatisch. 3. Stellen Sie die gewünschte Lautstärke mit der Taste „Lautstärke lauter/leiser“ (14) ein. UKW‐Sendersuchlaufeinstellung Bei der automatischen Sendersuche werden u.U. viele schwache Radiosender gefunden. Durch Auswahl von „strong station only“ (nur starke Radiosender) können alle schwachen Radiosender ausgefiltert werden. 1. Drücken Sie im UKW‐Mode die Taste „Menu/Mem/clk‐adj” (12), um in das Menü zu gelangen und danach zur Auswahl von „Scan setting“ (Sendersuchlaufeinstellung) die Taste „Springen/Abstimmen abwärts“ (11) oder „Springen/Abstimmen aufwärts“ (19). 2. Drücken Sie die Taste „Stopp/Enter“ (10), um zu „Scan setting“ (Sendersuchlaufeinstellung) zu wechseln. Drücken Sie danach die Taste springen abwärts (11) oder springen aufwärts (19), um „Strong station only“ (nur starke Radiosender) auszuwählen. Drücken Sie danach zur Bestätigung die Taste „Stopp/Enter” (10). 3. Wiederholen Sie das Scannen erneut wie oben beschrieben. Empfang von UKW & UKW‐Stereo Die Standardeinstellung des Geräts für den UKW‐Modus ist Mono. Deshalb ist es notwendig, beim Empfang eines UKW‐Stereosignals den UKW‐Modus durch: Drücken der Menu‐Taste (12), Drücken der Taste abwärts springen (11) oder aufwärts springen (19) für die Auswahl von Audio setting (Audioeinstellungen), Drücken der Enter‐Taste (10), erneutes Drücken der Taste abwärts springen (11) oder aufwärts springen ...
- Page 23 2. Drücken Sie die Taste “Stopp/Enter” (10), um zu “language” (Sprache) zu wechseln. Drücken Sie danach die Taste springen abwärts (11) oder springen aufwärts (19), um eine der Sprachen “English/French/German/Italian” (Englisch/Französisch/Deutsch/Italienisch) auszuwählen. Drücken Sie danach zur Bestätigung die Taste „Stopp/Enter” (10). 3. Der Einstellungsmodus kann jederzeit durch Drücken der Taste „Menu/Mem/clk‐adj” (12) beendet werden. Sendestationen speichern Sie können im Stationsspeicher bis zu 20 Radiosendestationen (10 x UKW/10 x DAB) speichern. 1. Wechseln Sie in den UKW/DAB‐Modus. 2. Wählen Sie über die „manuelle“ oder die „automatische“ Sendersuchmethode Ihren gewünschten Sender aus. 3. Halten Sie die Taste „Mem/clk‐adj” (12) zur Aktivierung des Speicherungsmodus gedrückt. 4. Wählen Sie den gewünschten Speicherplatz für den Sender durch Drücken der Taste „Springen/Abstimmen abwärts“ (11) oder der Taste „Springen/Abstimmen aufwärts“ (19) aus. 5. Drücken Sie zur Bestätigung die Taste „Stopp/Enter” (10). 6. Wiederholen Sie die Schritte 2 bis 5 zur Abspeicherung weiterer Sendestationen. ...
- Page 24 Anmerkung Durch Drücken der Taste „Folder up “ (20) am Gerät kann direkt in die höherliegende MP3‐Verzeichnisebene gewechselt werden. Die Titelnummer wird im LCD‐Display (8) angezeigt und nach Drücken der Taste „Wiedergabe/Pause“ (18) startet die Wiedergabe. Wiederholungs‐/Zufallsmodus Drücken Sie während der Wiedergabe die Taste „Play mode” (21), um eine der Wiederholungs‐ und Zufallsfunktionen Einzeltitel/ Einzelverzeichnis (nur MP3) oder alle Titel auszuwählen. Die Wiedergabe kann in den nachfolgend aufgeführten Modi erfolgen: Für CD (2) (1) Wiederhole Alle Titel (3) Zufall (4) Aus Titel wiederholen Anzeige‐LED ...
- Page 25 MP3‐Wiedergabe mittels USB‐Speichermedium Verbindung Das Gerät kann alle MP3‐Dateien, die sich auf dem mit dem USB‐Slot verbundenen Speichermedium befinden, dekodieren und wiedergeben. 1. Das system in den bereitschaftsmodus oder einen anderen modus (ausser sd oder USB) schalten. 2. Stecken Sie einen USB‐Stick mit der Vorderseite nach oben in den USB‐Port. Der USB‐Stick ist vollständig einzuschieben. Ein Verbinden des USB‐Sticks mit dem „Gesicht“ nach oben bzw. falschherum kann Audiosystem oder Speichermedium (USB‐Flash‐Drive) zerstören. Prüfen sie vor dem anschluss die richtige richtung. 3. Schalten Sie das Gerät mittels der EIN/AUS‐Taste (17) wieder ein. Drücken Sie anschließend die Funktionstaste (9), um in den USB‐Modus zu wechseln. Das System liest nach dem Anschluss automatisch das Speichermedium ein. Auf dem LCD‐Display (8) wird die Gesamtanzahl der gefundenen MP3‐Dateien angezeigt. 4. Die Wiedergabe erfolgt auf dieselbe Weise wie bereits für die Wiedergabe von CDs/MP3‐CDs erläutert wurde. Anmerkung Das Gerät kann nur MP3‐Dateien und keine anderen Musikformate im USB‐Modus finden und lesen. Wenn Sie einen MP3‐Player an den USB‐Port des Systems anschließen, kann es aufgrund der unterschiedlichen Dateisystemformate vorkommen, dass einige MP3‐Player nicht über den USB‐Port angesprochen werden können. Hierbei handelt es sich nicht um eine Fehlfunktion des Geräts. Der USB‐Port unterstützt keinen Anschluss über USB‐Verlängerungskabel und ist auch nicht für die direkte Kommunikation mit Computern vorgesehen. Das Gerät erfüllt ErP II und schützt die Umwelt (nur für den europäischen Markt). Wird mehr als 15 Minuten keine Musik wiedergegeben, wechselt das Gerät automatisch in den Standby‐Modus. Entfernen von USB‐Geräten Schalten Sie das Gerät aus oder wechseln Sie entweder in den CD‐ oder den Tuner‐Modus, bevor Sie den USB‐Datenträger abziehen. Für USB‐Slot – nicht durch direktes Herausziehen aus dem USB‐Slot entfernen. Kassettenwiedergabe Allgemeine Bedienung Stopp‐/Auswurf‐Taste Durch Drücken dieser Taste beenden Sie alle Kassettenoperationen. Ein nochmaliges Drücken öffnet das Kassettenfach. Schnelles Drücken Sie diese Taste, um die Kassette entweder schnell vor‐ oder zurückzuspulen. Durch Drücken der ...
- Page 26 Sie haben ungefähr 4 Sekunden Zeit für die Einstellung des Alarms. Wurde innerhalb dieses Zeitfensters keine Taste gedrückt, kehrt das Gerät automatisch in den Normal‐Modus zurück. Wird der Wecksound wiedergegeben, können Sie durch Drücken der „EIN/AUS“‐Taste (17) den Wecksound ausschalten. Aufgrund der begrenzten Displaygröße wird das Timer‐Symbol „ ” während des Betriebs im UKW/DAB‐Modus nicht im LCD‐Display (8) angezeigt. Anmerkung (nur EU): Das Gerät erfüllt ErP II und schützt die Umwelt Wird mehr als 15 Minuten keine Musik wiedergegeben, wechselt das Gerät automatisch in den Standby‐Modus. Garantie Lenco bietet Leistungen und Garantien im Einklang mit Europäischem Recht. Im Falle von Reparaturen (sowohl während als auch nach Ablauf der Garantiezeit) sollten Sie deshalb Ihren Einzelhändler kontaktieren. Wichtiger Hinweis: Es ist nicht möglich, Geräte für Reparaturen direkt an Lenco zu schicken. Wichtiger Hinweis: Falls dieses Gerät von einem nicht autorisierten Kundendienst geöffnet oder darauf zugegriffen wird, erlischt die Garantie. Dieses Gerät ist nicht für professionelle Zwecke geeignet. Falls das Gerät für professionelle Zwecke eingesetzt wird, erlöschen alle Garantieverpflichtungen seitens des Herstellers. ...
- Page 27 Dabei helfen Sie, natürliche Ressourcen zu schonen und Umweltschutzstandards zur Verwertung und Entsorgung von Altgeräten aufrecht zu halten (Waste Electrical and Electronic Equipment Directive). CE‐Kennzeichen Produkte mit der CE Kennzeichnung entsprechen der EMV‐Richtlinie (2014/30/EU) und der Niederspannungsrichtlinie (2014/35/EU), herausgegeben von der Kommission der Europäischen Gemeinschaft. Lenco Benelux BV, Thermiekstraat 1a, 6361 HB Nuth, Die Niederlande, erklärt hiermit, dass dieses Produkt den grundlegenden Anforderungen und anderen Vorschriften der Richtlinie 1999/5/EC entspricht. Die Konformitätserklärung ist erhältlich unter techdoc@lenco.com Service Weitere Informationen und Unterstützung erhalten Sie unter www.lenco.com Lenco Benelux BV, Thermiekstraat 1a, 6361 HB, Die Niederlande. Version: 1.0...
-
Page 28: Français
Français Lecteur de musique portable avec radiocassette PLL et port USB ATTENTION RISQUE DE DÉCHARGE ÉLECTRIQUE NE PAS OUVRIR ATTENTION : POUR ÉVITER TOUT RISQUE DE L'éclair avec une tête Le point d'exclamation DÉCHARGE ÉLECTRIQUE, NE DÉMONTEZ AUCUN fléchée dans le triangle est dans le triangle est un signe PANNEAU. NE CONTIENT AUCUN ÉLÉMENT un signe d'avertissement d'avertissement vous qui signale une tension alertant d'instructions RÉPARABLE PAR L’UTILISATEUR. CONFIEZ TOUTE dangereuse à l'intérieur de importantes accompagnant RÉPARATION À UN PERSONNEL QUALIFIÉ. l'appareil. le produit. CONSIGNES DE SÉCURITÉ IMPORTANTES : 1. Lisez les instructions. Lisez toutes les instructions avant de démarrer l’appareil. 2. Conservez ces instructions, car vous pourriez avoir besoin de les relire. 3. Attention, observez les instructions d’utilisation et de sécurité. 4. L'appareil ne doit pas être utilisé à proximité d'eau ni être en contact avec l’humidité. 5. ... - Page 29 21. Ne posez pas de source de flamme nue, telle qu’une bougie allumée, sur l’appareil. 22. Veuillez considérer les questions environnementales lors de la mise au rebut des piles. 23. Utilisez l’appareil sous un climat tempéré. PRODUIT LASER DE CLASSE 1 EMPLACEMENT DES TOUCHES 1) Port USB 2) Fiche AUX IN 3) Prise casque de 3,5 mm 4) Touche pour la cassette 5) Poignée 6) Antenne FM 7) Ouverture/fermeture de la porte de CD 8) Écran LCD 9) Touche Function 10) Touche Arrêt /Enter 11) Touche Précédent 12) Touche Menu/Mem/clock‐adjust 13) Touche Timer 14) ...
- Page 30 Branchements 1. Branchez une extrémité du cordon d'alimentation amovible à la prise CA (22) et l’autre extrémité à la prise secteur. 2. Lorsque vous branchez l’appareil pour la première fois sur le secteur, il se met en mode veille. Le témoin de veille s’allume. 3. Allumez l’appareil en appuyant sur la touche « Marche/Veille » (17). Si le rétroéclairage de l’écran LCD (8) est allumé, cela signifie que l’alimentation est normale. Le système est désormais prêt à lire de la musique. Branchement CC Pour le fonctionnement CC, installez 8 piles de type C (UM‐2) dans le compartiment à piles et débranchez la fiche CA de la prise CA puis débranchez le cordon CA de la prise secteur. Étant donné que l'appareil consomme un peu d'énergie en mode veille, il est conseillé de sortir les piles en mode veille. Réglage de l’horloge 1. Placez l’appareil en mode veille. 2. Maintenez enfoncée la touche « Menu/Mem/clk‐adj » (12), l'écran affiche « 24hour » (24 heures), appuyez sur la touche Précédent (11) ou Suivant ...
- Page 31 2. Appuyez sur la touche (10) « Arrêt/Enter » pour accéder au réglage « Scan setting (paramètre du balayage) », puis appuyez sur la touche Précédent (11) ou Suivant (19) pour sélectionner « Strong stations only (stations à fort signal uniquement) ». Ensuite, appuyez sur la touche (10) « Arrêt/Enter » pour confirmer le réglage. 3. Recommencez l’opération de syntonisation automatique comme décrit ci‐dessus. Réception FM et FM stéréo En mode FM, l'appareil sera par défaut en Mono. Ainsi, si un signal stéréo FM set reçu, réglez le mode FM sur Stéréo en appuyant sur la touche Menu (12), appuyez ensuite sur la touche Précédent (11) ou Suivant (19) pour sélectionner Audio setting (Réglage auto), appuyez sur la touche Enter (10), puis rappuyez sur Précédent (11) ou Suivant (19) pour sélectionner FM stereo (Stéréo FM), puis appuyez sur la touche Enter (10) pour valider. Quand le signal stéréo est faible et bruyant, il est préférable de passer en mode FM par la même procédure. Conseils pour une meilleure réception :‐ FM : le récepteur a une antenne filaire (6) accrochée à l'arrière de l'appareil. Elle doit être entièrement déployée pour une meilleure réception. Réception RDS (radiodiffusion de données de service) Cette fonctionnalité permet d’afficher les informations envoyées par le diffuseur de radio sur l'écran LCD étape par étape comme ci‐dessous en maintenant enfoncée la touche Play mode/info (21). Texte radio type de programme fréquence mono/stéréo heure date Radio à radiodiffusion audionumérique (DAB) 1. Réglez l'appareil en mode DAB en appuyant sur la touche Function (9). 2. Appuyez une fois sur la touche (18) Lecture/pause /Scan, l’appareil lancera une fois l’analyse complète de la plage ...
- Page 32 Réinitialisation DAB/FM : Si vous souhaitez effacer toutes les stations FM/DAB mémorisées, procédez comme ci‐dessous. 1. En mode DAB ou FM, appuyez sur la touche (12) « Menu/Mem/clk‐adj » pour entrer dans le « Menu », puis appuyez sur la touche Précédent (11) ou Suivant (19) pour sélectionner « System (Système) ». 2. Appuyez sur la touche (10) « Arrêt/Enter » pour entrer dans le réglage « System (Système) », puis appuyez sur la touche Précédent (11) ou Suivant (19) pour sélectionner « Factory reset (Réglage d’usine) ». Ensuite, appuyez sur la touche (10) « Arrêt/Enter » pour confirmer le réglage d’usine. 3. L'appareil effacera toutes les stations mémorisées. Ensuite, vous devrez mémoriser à nouveau des stations comme indiqué ci‐dessus. Lecture de CD/disque MP3 Préparatifs 1. Appuyez sur la touche Function (9) pour sélectionner le mode CD. 2. Ouvrez la porte du CD en appuyant sur la touche (7) ouverture/fermeture de la porte du compartiment à CD. Placez un CD dans le compartiment et fermez la porte de CD. 3. Une recherche performante focalisée est effectuée si le disque est à l’intérieur. Le nombre total de titres est lu. Mode Lecture/Pause 1. Si la touche Lecture/Pause (18) est enfoncée à l’arrêt, le premier titre est joué. 2. Si la touche Lecture/Pause ...
- Page 33 Pour un fichier/disque MP3 (1) Répéter 1 piste (2) Répéter 1 dossier (3) Répéter tous les titres (4) Aléatoire (5) Mode inactif Indicateur Mode de lecture Sur l'écran LCD ...
- Page 34 Le port USB ne prend pas en charge une connexion via un prolongateur USB et n’est pas conçu pour une communication directe avec un ordinateur En raison de la directive ErP et pour protéger l’environnement (uniquement pour le marché européen), l'appareil se mettra en veille automatiquement au bout de 15 minutes sans lecture audio. Débrancher un clé USB Pour retirer la clé USB, éteignez l’appareil ou passez d’abord le mode de fonctionnement à celui de CD ou de syntonisation. Débranchez directement la clé du port USB. Écouter une cassette Fonctionnement général Touche Arrêt/Éjection Enfoncez pour arrêter la platine. Appuyez de nouveau pour ouvrir la porte de cassette. Touche Avance rapide Appuyez pour rembobiner rapidement vers l'avant ou l’arrière. Appuyez pour arrêter/éjecter la clé, la et Touche Retour bobine de cassette cesse de tourner. rapide Touche Lecture Appuyez pour commencer la lecture de la cassette. Touche Pause Appuyez sur pour arrêter la cassette temporairement. Appuyez de nouveau pour reprendre la lecture. Lecture Sélectionnez « Tape » (Cassette) à l’aide de la touche de fonction (9) Mettez la cassette. Appuyez sur la touche Lecture pour lancer la lecture. Utilisez la touche (14) pour monter/baisser le volume au niveau désiré. ...
- Page 35 électriques et autres batteries. En agissant de la sorte, vous contribuerez à la préservation des ressources naturelles et à l’amélioration des niveaux de protection environnementale concernant le traitement et la destruction des déchets électriques (directive sur les déchets des équipements électriques et électroniques). Marquage CE Les produits avec la marque CE sont conformes à la directive CEM (2014/30/EU) et à la directive basse tension (2014/35/EU) émises par la commission de la communauté européenne. Par la présente, Lenco Benelux BV, Thermiekstraat 1a, 6361 HB Nuth, Pays‐Bas, déclare que ce produit est conforme aux exigences principales et autres clauses applicables de la Directive 1999/5/CE. La déclaration de conformité peut être consultée au lien : techdoc@lenco.com Service après‐vente Pour en savoir plus et obtenir de l’assistance, visitez www.lenco.com Lenco Benelux BV, Thermiekstraat 1a, 6361 HB, Pays‐Bas. Version : 1.0...
-
Page 36: Español
Español Sistema de música portátil con radiocasete PLL y USB PRECAUCIÓN RIESGO DE DESCARGA ELÉCTRICA NO ABRIR ¡PRECAUCIÓN! NO QUITE LA CUBIERTA NI LA PARTE El relámpago con cabeza de El signo de exclamación TRASERA PARA REDUCIR EL RIESGO DE DESCARGAS flecha dentro de un dentro de un triángulo es ELÉCTRICAS. NO HAY PIEZA UTILIZABLES POR EL triángulo es una señal de una señal de advertencia advertencia alertándole de alertándole de instrucciones USUARIO EN SU INTERIOR. REMITA LAS tensión peligrosa dentro importantes que REPARACIONES AL PERSONAL CUALIFICADO. del producto acompañan al producto INSTRUCCIONES IMPORTANTES DE SEGURIDAD: 1. Lea las instrucciones. Debe leer todas las directrices de uso antes de encender el dispositivo. 2. Conserve las instrucciones para consultas futuras. 3. Debe respetar las directrices de atención, uso y seguridad. 4. No se debe usar el dispositivo cerca de agua ni ponerlo en contacto con humedad. 5. ... - Page 37 20. No se debe impedir la ventilación cubriendo las aberturas de ventilación con elementos como periódicos, manteles, cortinas, etc. 21. No se deben colocar fuentes de llama, como velas encendidas, sobre este aparato. 22. Se debe prestar atención a los aspctos medioambientales sobre la eliminación de baterías. 23. Use el aparato en climas moderados. PRODUCTO LÁSER DE CLASE 1 LOCALIZACIÓN DE LOS CONTROLES 1) Puerto USB 2) Toma de entrada auxiliar 3) Toma de auriculares de 3.5mm 4) Botón de casete 5) Asa 6) Antena FM 7) Abrir/cerrar puerta del CD 8) Pantalla LCD 9) Botón de función 10) Botón Parada /Enter 11) Botón Saltar/Sintonizar hacia abajo 12) Botón Menu/Mem/clock‐adjust 13) Botón Timer 14) ...
- Page 38 No cubra ninguna ventilación y asegúrese de que hay un espacio de varios centímetros alrededor de la unidad para su ventilación. Conexión 1. Conecte el extremo del cable de alimentación extraíble a la toma CA (22) y el otro extremo a la salida CA. 2. Cuando conecte por primera vez la unidad a la corriente eléctrica, la unidad entrará en modo en espera. Se iluminará el LED de modo en espera. 3. Encienda la unidad pulsando el botón “Encendido/En espera” (17). Si la pantalla LCD (8) está encendida con retroiluminación, indica que la alimentación es normal. Ahora el sistema está listo para reproducir música. Conexión CC Para utilizar alimentación por CC, introduzca 8 pilas de tamaño C (UM‐2) en el compartimento para pilas y retire el enchufe CA de la salida CA y, a continuación, desconecte el cable de corriente de la toma eléctrica. Como la unidad tiene un bajo consumo eléctrico durante el modo de espera, se recomienda extraer la batería mientras se utiliza en modo de espera. ...
- Page 39 emisoras con una señal fuerte para filtrar las emisoras con señal débil. 1. En modo FM, pulse el botón “Menu/Mem/clk‐adj” (12) para entrar en “Menu”, y posteriormente pulse el botón Saltar hacia abajo (11) o Saltar hacia arriba (19) para seleccionar “Scan setting (Configuración de búsqueda)”. 2. Pulse el botón “Stop/Enter” (10) para entrar en “Scan setting (Configuración de búsqueda)”; posteriormente, pulse el botón Saltar hacia abajo (11) o Saltar hacia arriba (19) para seleccionar “Strong station only (Sólo emisoras fuertes)”. Posteriormente, pulse el botón “Stop/Enter” (10) para confirmar la configuración. 3. Vuelva a realizar la sintonización automática según los pasos que aparecen arriba. Recepción De FM y FM estéreo La unidad se encenderá en modo FM mono de forma predeterminada. Por tanto, si recibe una señal FM estéreo débil, cambie al modo FM estéreo pulsando el botón Menu (12) y, a continuación, pulse el botón Saltar hacia abajo (11) o Saltar hacia arriba (19) para seleccionar Audio setting (Ajustes de audio). Pulse el botón Enter (10) y pulse otra vez Saltar hacia abajo (11) o Saltar hacia arriba (19) para seleccionar FM stereo (FM estéreo) y, a continuación, pulse el botón Enter (10) para confirmar. Si la señal estéreo es débil y tiene interferencias, es preferible cambiar al modo FM siguiendo el mismo procedimiento. Consejos para una mejor recepción:‐ FM: El receptor dispone de una antena de varilla (6) que cuelga de la carcasa posterior. Debe extenderse completamente para conseguir la mejor recepción. Sistema de datos de radio (RDS) ...
- Page 40 Recordar emisoras presintonizadas 1. Fije el modo FM/DAB 2. Pulse el botón Pre‐up (20) para recuperar la emisora almacenada. 3. Pulse el botón Saltar hacia abajo (11) o Saltar hacia arriba (19) para seleccionar la emisora recuperada que desee. 4. Vuelva a pulsar “Stop/Enter” (10) para confirmar la emisora recuperada. Reinicio de DAB/FM: Si desea eliminar todas las emisoras FM/DAB programadas, siga estos pasos. 1. Fije el modo DAB o FM; pulse “Menu/Mem/clk‐adj” (12) para entrar en “Menu”, a continuación, pulse el botón Saltar hacia abajo (11) o Saltar hacia arriba (19) para seleccionar “System (Sistema)”. 2. ...
- Page 41 Para disco/archivo MP3 (1) Repetir 1 (2) Repetir carpeta 1 (3) Repetir todas las pistas (4) Aleat (5) Modo desconectado Indicador Modo reproducción en la pantalla LCD Repetir una sola pista Repetir 1 Repetir una sola carpeta Repetir F Repetir todas las pistas Repetir A ...
- Page 42 El puerto USB no es compatible con alargadores USB ni está diseñado para comunicarse directamente con un ordenador Debido a los requisitos de la fase dos de ErP y para proteger el medio ambiente (solo en el mercado europeo), la unidad pasará automáticamente a modo en espera cuando no reproduzca música durante más de 15 minutos. Extraer el USB Para retirar el USB, apague la alimentación o cambie el modo de función a bien CD o radio. Para el puerto USB – desconéctelo sacándolo directamente de la toma USB. Escuchar una cinta Funcionamiento general Tecla Púlselo para detener el funcionamiento de la pletina. Vuélvalo a pulsar para abrir la puerta del casete. parada/expulsión Tecla avance rápido y Púlsela para iniciar el rebobinado rápido hacia delante o hacia atrás Pulse la tecla Stop/Expulsar y la rebobinado rápido bobina del cassette dejará de girar. Tecla reproducción Púlselo para iniciar la reproducción de la cinta. Tecla Pausa Púlselo para detener el funcionamiento de la cinta temporalmente. Vuélvalo a pulsar para reanudar la reproducción. Reproducción Seleccione “Tape (Cinta)” mediante el botón función (9) Introduzca la cinta de casete. ...
- Page 43 Eléctricos y Electrónicos). Marca CE Los productos con la marca CE cumplen con la Directiva EMC (2014/30/EU) y con la Directiva de Bajas Tensiones (2014/35/EU) emitida por la Comisión de la Unión Europea. Por la presente, Lenco Benelux BV, Thermiekstraat 1a, 6361 HB Nuth, Países Bajos, declara que este producto cumple con las exigencias esenciales y otras provisiones relevantes de la Directiva 1999/5/EC. La declaración de conformidad puede consultarse en techdoc@lenco.com Servicio Para obtener más información y soporte del departamento técnico, por favor, visite la página web www.lenco.com ...
Need help?
Do you have a question about the SCD-680 and is the answer not in the manual?
Questions and answers