Table of Contents
Advertisement
Advertisement
Table of Contents

Related Manuals for BEIN IRHD-1000S/XX

Summary of Contents for BEIN IRHD-1000S/XX
- Page 1 IRHD-1000S/XX The default password is 0000. Le mot de passe par défaut est 0000.
-
Page 3: Notice
Notice Notice Warranty The warranty does not cover parts which may become defective due to misuse Thank you for purchasing a HUMAX product. Please read this user’s manual of the information contained in this manual. carefully to be able to safely install, use and maintain the product at maximum performance. -
Page 4: For Your Safety
For Your Safety For Your Safety periods of time. This will prevent damage to the • Do not modify or process the power cord or plug unit due to lightning and power-surges. arbitrarily. 8. EXTRANEOUS OBJECTS • Do not bend or twist the power cord. Safety Instructions •... -
Page 5: Table Of Contents
Contents & Accessories Contents Accessories Notice ................1 Factory Default System ................20 For Your Safety ..............2 Appendix................21 Contents & Accessories ..........3 User’s Manual Specification Contents Trouble Shooting User’s Manual Accessories HUMAX Customer Support Quick Start Guide ............4 Error Messages Remote Control Smartcard Front &... -
Page 6: Quick Start Guide
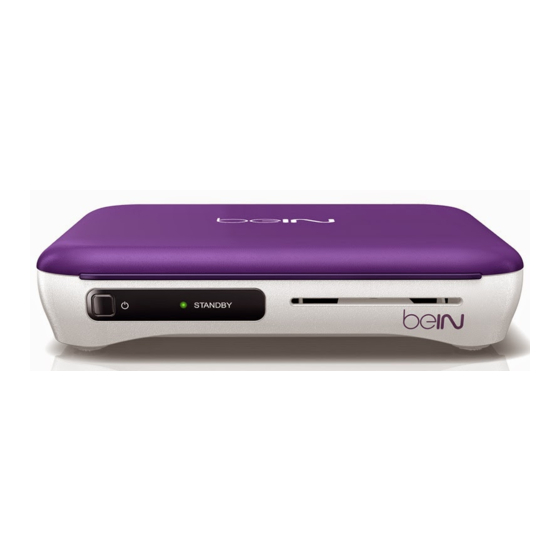
Quick Start Guide Front & Rear Inserting the Smartcard 1. Hold the Smartcard horizontally Note: The image may differ from the actual product. with the electronic chip facing downwards. 2. Insert the Smartcard into the slot. STANDBY Switches between operation and standby modes Smartcard Slot STANDBY LED Red light is emitted when the... -
Page 7: Remote Control
Mutes audio batteries. Please respect the environment and prevalling regulations! Batteries must be collected separately from other refuse! Before you beIN Displays the main menu dispose of batteries, ask your dealer whether they are subject to Changes the channel or page... -
Page 8: Remote Control
Quick Start Guide Remote Control Inserting Batteries Switches between operation and STANDBY standby modes Insert the batteries matching the plus(+) and minus(-) at each end. Displays the channel and programme infomration Switches between TV and radio TV/RADIO modes NUMERIC (0-9) FAV. -
Page 9: Connections
Quick Start Guide Connections Connecting the Antenna Connect the aerial to the LNB IN. This section describes how to connect your product to match your particular devices and to gain optimum signal quality. Connecting the TV Warning: Connect all devices before you plug any power cords into the wall outlet. Always turn off the product, 2-1 Using an HDMI cable TV and other devices before you connect or disconnect any cables. -
Page 10: Wizard
The installation wizard operates automatically when you power on the product for the first time or do factory default in menu. 4. Search Channels 1. Language • beIN Sports: Search the beIN sports channels only. Select the appropriate language from • Automatic Search: Search all the list. -
Page 11: Managing Channels
Managing Channels Programme Information (i-Plate) Icons Locked Programme The i-plate is an information banner that is displayed for a few seconds whenever you change channels. Press the i button while you watch a Scrambled Programme programme to display the i-plate. Press the EXIT button to hide it. Parental level Channel number and name HD Pregramme... -
Page 12: Channel List
• The default password is 0000. If you have forgotten your password, please contact your local distributor. Changing Group • To edit multiple channels, go to beIN > Settings > Edit Channels. Press the button to display the list of the selected channel ... -
Page 13: Edit Channels
: Locked channel, : Scrambled channel (CAS icons) • Press the TV/RADIO button to switch between TV and Radio groups. • Press the beIN or EXIT button to exit. Press the BACK button to return to the previous screen. GB11... - Page 14 Import Channels from USB • Press the TV/RADIO button to switch between TV and Radio groups. • Press the beIN or EXIT button to exit. Press the BACK button to return to the You can bring channel database from your hard disk drive.
-
Page 15: Tv Guide
Press the GUIDE button. 2. Press the OK button again to exit the TV guide and watch the programme. • Press the beIN button and select TV Guide. Setting Reminders Information of the selected programme 1. Select a future programme and press the OK button. -
Page 16: Finding Programmes
TV Guide Finding Programmes Scheduling Reminders Find will help you find the programmes more specifically according to the Schedule shows you the list of reminders and helps you manage them. keyword or genre. Schedule ES’HAIL(25.5E) Find ES’HAIL(25.5E) New Reminder New Keyword Guide Find Schedule... -
Page 17: Preferences
Preferences Preferences Parental Control Audio Setting • Maturity Rating: You can block the programme if the • Digital Audio Output: You can select the digital audio Channel List programme is above the age limit. signal output. TV Guide • Change STB Password: Enter a new password. •... -
Page 18: Installation
Installation Search Channels [Fixed Antenna] Installation (Fixed Antenna) Settings Installation allows you to configure your antenna and search the TV and radio channels. Antenna Type Select your antenna type. > Settings > Installation Fixed Antenna SCD Antenna Press the RED button and select Fixed Antenna. Motor Antenna Select OK to save and exit. -
Page 19: Search Channels [Scd Antenna]
Installation Search Channels [SCD Antenna] Installation (SCD Antenna) Settings Single Cable Distribution enables the delivery of broadcast programming over a single cable to multiple users Antenna Type eliminating the numerous cables required to support other electronics devices. Select your antenna type. Fixed Antenna If you are using more than one satellite receiver, set one receiver at a time and turn off the others while setting. -
Page 20: Search Channels [Motor Antenna]
Installation Search Channels [Motor Antenna] Installation (Motor Antenna) Settings You can set the position of the satellites when you use a motor antenna for efficient channel search. Antenna Type Select your antenna type. > Settings > Installation Fixed Antenna SCD Antenna Press the RED button and select Motor Antenna. -
Page 21: Software Update (Ota)
Installation Software Update Position Setting Limit Setting Installation (Motor Antenna) Search Channels Settings Installation (Motor Antenna) Search Channels Satellite Astra1 (19.2E) Limit Position West Transponder 12722, H, 22000, 2/3 > Settings > Installation > Software update Motor Driving Continuous Driving Size... -
Page 22: System
System System System Information You can view the system information. Channel List TV Guide Signal Detection Settings You can check the signal strength and quality of the searched channels. Preferences Edit Channels IRDETO Software Update Installation System You can update the software when available. System Information Conditional Access Signal Detection... -
Page 23: Appendix
Appendix Specification Tuner & Channel Physical Specification No. of Tuners Size 165 x 36 x 150(mm) Input Connector F-Type, IEC 169-24, Female Weight (Net) 250g Frequency Range 950 MHz to 2150 MHz Operating Temp 0 °C to +45 °C Signal Level -25 to -69dBm Storage Humidity -10 ºC to +70 ºC... -
Page 24: Trouble Shooting
Appendix Trouble Shooting • Replace the LNB with a new one in case it is damaged or out of order. • Install the antenna in an obstacle-free place. Before contacting the customer service centre, make sure to read the tips •... - Page 25 Appendix • Check in the menu that you have a valid subscription to the channels you telephone number is on the website. want to view. E-mail: callcenterME@humaxdigital.com • Make sure that the Smartcard or CI-Module is not damaged. Middle East 11.
-
Page 26: Error Messages
Appendix Error Messages Error messages Possible causes What to do Error messages Possible causes What to do Make sure you have The satellite dish is not Adjust the dish alignment. No access a subscription to the pointing at the satellite. channel. - Page 27 Appendix Glossary LNB (Low Noise Block) TSR (Time Shifted Recording) CVBS (Composite Video Baseband Signal) A device that is mounted on an arm facing your satellite A function that records the present programme A technology for transmitting video signals via a cable. dish, focusing on satellite signals.
-
Page 28: Open Source Software Notice
Appendix 1. You may copy and distribute verbatim copies of the Program’s source Program), the recipient automatically receives a license from the original a pointer to where the full notice is found. Open Source Software Notice code as you receive it, in any medium, provided that you conspicuously licensor to copy, distribute or modify the Program subject to these terms One line to give the program’s name and a brief idea of what it does. - Page 29 Appendix Public License, applies to certain designated libraries, and is quite different optional: if the application does not supply it, the square root function functions into the executable, and (2) will operate properly with a modified 13. The Free Software Foundation may publish revised and/or new from the ordinary General Public License.
-
Page 30: Warranty Certificate
< CONDITIONS The HUMAX Warranty is valid for a period of one year from the date of first purchase. In the event that this product fails to function properly during the warranty period, the retailer or distributor will make this product capable of operating for the purpose Warranty Certificate of which it was designed, without charging for labour and parts. - Page 31 achat et de la conserver avec vos données personnelles, conjointement avec votre preuve d'achat. Ces informations nous permettront de mieux répondre à vos attentes. < CONDITIONS DE GARANTIE Certificat de garantie Conservez le certificat conjointement avec la facture ou le reçu original dans un endroit sûr.
Need help?
Do you have a question about the IRHD-1000S/XX and is the answer not in the manual?
Questions and answers