
Summary of Contents for Haefely Hipotronics DDX 9101
- Page 1 PD Detector DDX-9101 System Operation Operating Instructions HAEFELY TEST AG DDX 9101 PD Detector Version 1.15.0 4843098 Operating Instructions Page 1...
- Page 2 System Operation PD Detector DDX-9101 Revision History Version Date Comments V1.2.0 15/10/01 Initial release of the document V1.2.1 25/10/01 Document modified include information regarding Remote control network settings screen V1.3.0 28/11/01 Modifications to the discharge calibration procedure to clarify method V 1.4.0 07/01/02 Release of version 1.4.0 of the DDX9101 software.
- Page 3 PD Detector DDX-9101 System Operation Warning! This system is designed to operate with hazardous voltages. It is imperative that this manual is read and understood before attempting to operate the DDX-9101 Partial Discharge Detector. Only persons who are duly authorised to do so, and who have been correctly trained in the safe operation of High Voltage systems must operate this equipment.
-
Page 4: Table Of Contents
System Operation PD Detector DDX-9101 Contents Instrument Description ..............7 1.1. Introduction ...................... 7 1.2. Technical Data ....................7 1.2.1. General Technical Data ....................... 7 1.3. Connection To The Mains ................8 System Installation ................9 2.1. General Notes ....................9 2.2. - Page 5 5.1.2. Use DHCP ......................... 40 5.1.3. IP Address ......................... 40 5.1.4. Mask ..........................41 Remote Software for DDX 9101 (optional) – System Operation .. 43 6.1. Installing the remote software ................. 43 6.2. Starting the remote software ................43 6.3.
- Page 6 System Operation PD Detector DDX-9101 7.5.11. Other Displays ........................73 7.6. Set system properties ..................74 7.6.1. Allow Voltage Cal ......................74 7.6.2. Snapshot Image Size ......................74 7.6.3. File Paths........................... 74 7.6.4. Enable Detector Settings Save ..................75 Report ....................75 8.1.
-
Page 7: Instrument Description
PD Detector DDX-9101 System Operation 1. Instrument Description 1.1. Introduction The DDX-9101 partial discharge detector is designed to replace traditional analogue detectors in those applications where the additional cost of a true digital discharge detector cannot be justified or where the complexity of measurement of such an instrument is not required. -
Page 8: Connection To The Mains
System Operation PD Detector DDX-9101 Low Pass Filter Settings 100,200,300,400,500 Input Attenuation Range 0 to 75dB in 5dB steps Measurement System Minimum Maximum Units Voltage Measurement Impedance k Full Scale Input Voltage VPeak 7.07 VRMS Voltage Measurement IEC-60 Dynamic Range % FSD Uncertainty of Scale Factor Over Dynamic Range Voltage Measurement Linearity Error... -
Page 9: System Installation
PD Detector DDX-9101 System Operation 2. System Installation 2.1. General Notes The correct installation of a partial discharge measuring system requires the balancing of two conflicting demands: the arrangement of the test circuit to maximise the measurement circuit and the arrangement of the test circuit to minimise the risk of damage from flash-over. -
Page 10: Connection To Tettex 9230 Coupling Capacitor With Aqs 9110A
System Operation PD Detector DDX-9101 The Network connector (3) provides connection to a 10BaseT Ethernet network utilising the TCP/IP protocol. If this is being used to connect to a single PC, the PC must be running on the same mains supply as the DDX-9101 and the two must be bonded together with a suitable braid ground/earth strap of less than 50cm length. -
Page 11: Connection To Tettex-Robinson Universal Quadripole System
PD Detector DDX-9101 System Operation A “Star” grounding/earthing scheme should be used for the system with the star point formed at the ground terminal of the Quadripole. Where the detector is being used with a power supply control system and is sharing a housing, it is recommended that steps are taken to prevent the formation of ground loops that could compromise the system performance and the flashover resistance of the system. -
Page 12: Connection To Hipotronics Psf Systems
System Operation PD Detector DDX-9101 2.5. Connection To Hipotronics PSF Systems Figure 2.4 Connection to Hipotronics PSF The Method if connecting the DDX-9101 to a Hipotronics PSF is shown in Figure 2.3. It is essential that the PSF used is of the PSFxx/y/DDX type (where xx is the rating in kV and y is the value in nF). If the PSF is not of the /DDX type (Part numbers PSFxx/y or PSFxx/y/700 for example) contact the Hipotronics factory for information on upgrading the PSF to the correct specification. - Page 13 PD Detector DDX-9101 System Operation determined from the “Max Current, Unbal.” column, the closest one with the required rating should be used: Tuning Capacitance Max Current. Input Unit To Use Min. Typ. Max. Unbal. Bal. 25pF 100pF 701/1 30mA 250mA 25pF 100pF 400pF...
-
Page 14: Connection To A Robinson Type 701 Input Unit, Balanced Mode
System Operation PD Detector DDX-9101 Figure 2.5 Connection to A Robinson 701 – Unbalanced Mode Note: The “System Earth” terminal on the rear of the DDX-9101 provides the connection to connect the DDX-9101 to the system ground “Star” point described above. It does not provide a grounding/earthing path for the rest of the system. - Page 15 PD Detector DDX-9101 System Operation Figure 2.6 Connection to A Robinson 701 – Balanced Mode The connection is virtually identical to the unbalanced mode, apart from two samples are used rather than one sample and a blocking capacitor. One sample is connected to the start of the primary winding, while the other connects to the finish.
-
Page 16: Ensuring Compliance With Iec-60270 And The Internal Calibrator
System Operation PD Detector DDX-9101 2.8. Ensuring Compliance With IEC-60270 and the Internal Calibrator If the system is supplied with the internal calibration stepwave generator installed, the combined system will only be compliant with section 6 of IEC-60270 once the performance tests have been performed and the calibration system as a whole (step-wave generator, injection capacitor and connecting cables) has been shown to meet the requirements of the standard. -
Page 17: System Operation
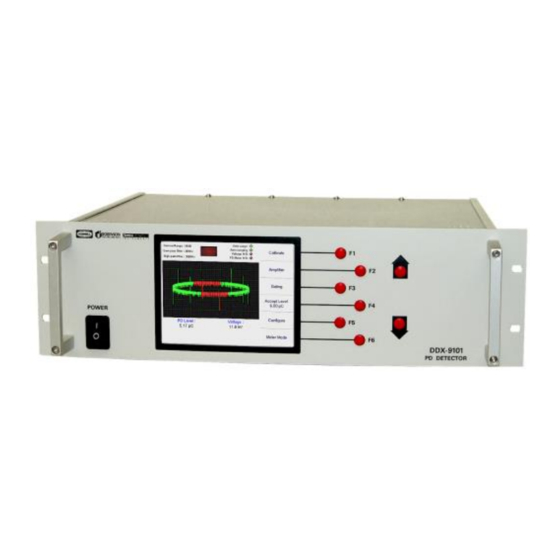
PD Detector DDX-9101 System Operation 3. System Operation 3.1. Front Panel Controls Mounting Holes. The unit provides four mounting holes spaced according to DIN41494 to allow the unit to be mounted into a standard 19” rack unit. Protective Handles. The handles make it easy to mount the unit into a cabinet. They also provide protection from glancing blows and accidental key presses caused by the passage of people or equipment. -
Page 18: System Operating Modes
System Operation PD Detector DDX-9101 The unit is switched off using the ‘0’ end of the power switch. The system has been configured so the normal requirements of the Windows™ operating system for an orderly shutdown sequence are not required. It can be shut down at any time without adverse effect. 3.3. -
Page 19: Status Area Indicators
PD Detector DDX-9101 System Operation In all cases the display consists of three areas: the status area at the top of the screen, the menu option buttons down the side of the screen and the results area. The status area indicates the current status of the instrument, especially the measurement system. -
Page 20: Pd Meter Display Types
System Operation PD Detector DDX-9101 The PD overrange warning indicates when the PD measurement is close to full scale and there is a risk of the measurement being inaccurate (reading at 90% of maximum for the range). A higher gain range should be chosen in this situation. 3.4.2. -
Page 21: Entering Values
PD Detector DDX-9101 System Operation The display shape is set in the configuration menu screen. The scope display has a graticule to allow measurements to be made on individual pulse heights. The major divisions are spaced as 1cm intervals while the lesser divisions are at 2mm intervals. The discharge activity display itself is shown in two colours. - Page 22 System Operation PD Detector DDX-9101 0, 1, 2, 3, 4, 5, 6, 7, 8, 9, . For the locked mode password, the sequence is longer: 0 to 9, . A to Z, a to z, special characters Pressing “Up” moves the character up through the list (1 becomes 2, 9 becomes ‘.’ and so on) while the “Down”...
-
Page 23: Meter Mode Main Menu
PD Detector DDX-9101 System Operation Insert Inserts an additional character between existing characters. The currently highlighted character and everything to the right of it is moved up one space. A new character, set at either 0 or space depending on the type of entry window is inserted and the highlight is placed on this character ready for it to be set using the “Up”... -
Page 24: Locked Mode Main Menu
System Operation PD Detector DDX-9101 system has experienced a flash-over or transient event. The actual menu displayed depends on whether the calibrator option is fitted or not. This is determined automatically by the system on start-up. Amplifier The Amplifier menu option allows the user to set up the amplifier for optimum measurement performance Gating The DDX-9101 detector has a phase based gating (windowing) function that allows... -
Page 25: Setting Up The Amplifier Characteristics
PD Detector DDX-9101 System Operation Level The level control allows the injected current. The current output magnitude is indicated on the button and on the status display at the top of the screen. The actual values depend on the value of calibration injection capacitor that is used. For the standard 100pF injection capacitor, the sequence is 1pC-2pC-5pC-10pC-20pC-50pC-100pC- 200pC-500pC-1000pC. -
Page 26: Setting Up The Gating System
System Operation PD Detector DDX-9101 system (for example resonances within the HV transformer). To adjust the lower cut off, press the “Lower Cut Off” button. The system places a yellow highlight ring around the button to indicate it is selected. The setting can then be adjusted using the “Up” and “Down”... -
Page 27: Setting Up The Metering Mode
PD Detector DDX-9101 System Operation and Down buttons can then be used to set the width of the gate. The same accelerating function as used on the Gate Start is provided, so rapid and fine adjustment is possible. The range of the gate width depends on the mode selected. In single mode, it is 0... -
Page 28: Calibrating Systems With The Internal Calibrator Option
System Operation PD Detector DDX-9101 mode, switch on the calibrator and allow the meter reading to settle before starting the calibration process. Calibration is started by pressing the “Calibrate” button on the main menu. This displays the Calibration value selection screen (see Figure 3.7). Using this, the operator sets the value the calibrator has been set to. - Page 29 PD Detector DDX-9101 System Operation possible to the failure threshold for the tests to be performed. It is recommended that the calibration level is no greater than three times the desired measurement level or less than a third of the required measurement level.
-
Page 30: Calibrating From An External Calibrator, Internal Calibrator Installed
System Operation PD Detector DDX-9101 3.9.3. Calibrating From an External Calibrator, Internal Calibrator Installed It is possible to use an external calibrator to calibrate the system even if the internal stepwave generator option is installed. To perform a calibration in this manner, turn off the internal calibrator. Form the main menu press “Calibrate”... -
Page 31: Setting The Language
PD Detector DDX-9101 System Operation The configuration screen shows all the available configuration options for the system. The option to be set is selected using the “Previous” and “Next” menu buttons. When the required option is highlighted, pressing the “Select” button to change the option. The way “Select” operates depends on the option that is selected. -
Page 32: Setting The Calibration Injection Capacitance
System Operation PD Detector DDX-9101 Select the language that is required using the “Previous” and “Next” buttons. Once the required language has been selected (indicated by the blue highlight) press “OK” to select the language. The system displays a message indicating that the language has been changed and that the new language will be used next time the system is started. -
Page 33: Setting The Scope Display Mode
PD Detector DDX-9101 System Operation mode on or off, press the “Next” or “Previous” button until the “System Protection” box is highlighted. This indicates the current system protection level (either “Locked” or “Unlocked”). To change the protection level the “Select” button is pressed. This toggles the display between “Locked” and “Unlocked”. If the mode is set to “Unlocked”... -
Page 34: Setting The Pd Meter Display Mode
System Operation PD Detector DDX-9101 To set the voltmeter display mode, press “Previous” or “Next” until the “Display Voltmeter” option is highlighted. The mode is set by pressing the “Select” button until the desired mode (“On” or “Off”) is shown. This will be used when the Configuration screen is exited using the “Back” button. ... -
Page 35: Correcting For Phase Shift On The Voltmeter
PD Detector DDX-9101 System Operation Once the voltmeter measurement mode has been set the system displays a value entry box (see section 3.4.4) requesting that the maximum voltage is set. This represents the maximum value that can be measured on the voltmeter. It is used to set the full-scale deflection on the Analogue meter or on the bargraph (in Digital Meter mode) and should be set at the maximum operating voltage of the HV system. -
Page 36: Internal Calibrator Setup
System Operation PD Detector DDX-9101 Before setting the phase correction, it is necessary to measure the clockwise phase shift that is being experienced. The required correction factor is calculated by multiplying the required phase shift (in degrees) by 2.844. Enter the factory set up screen thus: Enter configuration screen Set the “Lock Password”... -
Page 37: Calibrator Setup Using A Reference Calibrator
PD Detector DDX-9101 System Operation THERE ARE TWO METHODS OF PERFORMING THE CALIBRATION – VIA A REFERENCE CALIBRATOR OR USING A RESISTOR AND DIGITAL OSCILLOSCOPE. The calibration step-wave generator and injection capacitance must be set up and certified as a single entity. - Page 38 System Operation PD Detector DDX-9101 D. Connect a 50resistor from the output of the injection capacitor to ground, connect a digital oscilloscope across the resistor. If the oscilloscope has a 50 internal termination, this can be used and the scope just connected from the output of the injection capacitor to ground.
-
Page 39: Remote Control Network Options
PD Detector DDX-9101 System Operation 5. Remote Control Network options This menu is only available to authorised personnel and is accessible only when the system is in “Locked” mode. Before accessing the Remote Network Control options, ensure you consult the network administrator to determine whether dynamic DHCP is used, and if not, the required IP address and Subnet Mask values for the instrument. -
Page 40: Use Dhcp
System Operation PD Detector DDX-9101 The current IP address assigned to the instrument and the version number of the software are displayed at the top of the screen. The changeable items are shown below. 5.1.1. This is a unique identification string that allows an instrument to be identified when it is on a network. Any combination of letters or numbers can be used. -
Page 41: Mask
PD Detector DDX-9101 System Operation Figure 5.2 – Setting IP Address To move the cursor from number to number, click on the Previous or Next buttons. This will move the highlight over one of the 4 sets of numbers used to create the IP address. Each of the 4 numbers should be between 0 and 255. - Page 42 System Operation PD Detector DDX-9101 Figure 5.3 – Subnet Mask To move the cursor from number to number, click on the Previous or Next buttons. This will move the highlight over one of the 4 sets of numbers used to create the Subnet Mask. Each of these 4 numbers should be between 0 and 255.
-
Page 43: Remote Software For Ddx 9101 (Optional) - System Operation
PD Detector DDX-9101 System Operation Remote Software for DDX 9101 (optional) – System Operation 6.1. Installing the remote software The remote software is supplied on CD-ROM. To install the software, place the CD into the CD-ROM drive. The setup application should run automatically. If it does not run "Setup.exe" from the CD-ROM. -
Page 44: Remote Software Layout
System Operation PD Detector DDX-9101 6.3. Remote software layout 6.3.1. Main window The Remote Software consists of a main window which contains a Display, Control and NQP form for each detector as well as several control forms. Toolbar Control windows Detector windows 6.3.2. -
Page 45: Prepare A Test
PD Detector DDX-9101 System Operation 7. Print Results. This prints the HTML test report. It is only enabled when test results are available. 8. Export Results. This exports the test results to a text file for use with other applications. 9. - Page 46 System Operation PD Detector DDX-9101 Selecting And Sequencing The Detectors For A Test The first stage in setting up a test is to select the detectors to be used for the test and the sequence in which they appear in the test report. The "Available Detectors" box and the "Detectors To Use" box between them show all detectors that are registered for use with this software (See "Registering Detectors With The Software") and that are currently connected to it.
-
Page 47: Test Information
PD Detector DDX-9101 System Operation seconds must be less than 60. Errors will be reported if invalid values are set. If the test is intended to run for an unlimited or undefined duration, the "User Halts Test" box must be clicked, in order to stop the test. This disables the test duration edit boxes. - Page 48 System Operation PD Detector DDX-9101 Test Information Fields The user can set max. six test information fields for a test. These allow the user to enter parameters or identifiers for the test such as the test component type or the serial number of the unit under test. For each filed there is an edit box where the title of the field is entered.
-
Page 49: Html Report
PD Detector DDX-9101 System Operation 6.4.3. HTML report The HTML report screen is selected by clicking on the "HTML Report" tab towards the top of the window. It displays the HTML report setup screen: The settings on this window determine how the test result grid is set up and how the data is displayed on the HTML test report. - Page 50 System Operation PD Detector DDX-9101 Show Real Time When this is checked, the first column of the results table will show the actual time that each measurement was taken. If it is cleared only the time elapsed since the start of the test is shown. Show All Test Voltages When checked, the voltage recorded on each detector at each measurement will be shown.
-
Page 51: Regulator Voltage Profile
PD Detector DDX-9101 System Operation 6.4.4. Regulator voltage profile The regulator voltage profile test setup is selected by clicking on the "Voltage Profile" tab towards the top of the window. As per default no regulator is available for the system. This displays the voltage profile test setup parameters: Selecting The Regulator For A Test This stage of setting up a test is used when you have regulator whose voltage profile you want controlled... -
Page 52: Run A Test
System Operation PD Detector DDX-9101 Removing the Regulator from the test To remove the regulator from the test, click on the left arrow button . This will remove it from the "Regulator To Use" box. Manual Control If a tick is entered in "Manual Control" then the selected regulator in "Regulator To Use" will be under user control and the test duration will be controlled from the "General"... -
Page 53: Calibrating The Detectors
PD Detector DDX-9101 System Operation 6.5.1. Calibrating the detectors Before running a test, each detector to be used for the test should be calibrated. Failure to do so may result in erroneous or invalid measurements. It is the responsibility of the user to ensure that the instruments are correctly calibrated. - Page 54 System Operation PD Detector DDX-9101 Calibration validity Once the PD level has been calibrated the Calibration Complete message appears. The system may be closed down and restarted with the same setup and the calibration will still be valid even if the Check Detector Calibration message appears.
-
Page 55: Start The Test
PD Detector DDX-9101 System Operation WARNING: Due to the fact that this calibration can be accessed and changed by the user, HAEFELY TEST AG takes no responsibility for wrong indication or resulting damages in equipment or DUTs due to wrong handling or calibration of the voltage measurement. Furthermore this voltage measurement is meant to be used for the voltage information to be used in the PD charts and not to control or run the high-voltage system. -
Page 56: Running An Nqp Test
System Operation PD Detector DDX-9101 The test control window can be brought to the front of the display by pressing the button on the main toolbar. If there is no test defined the user information fields on the test control window will be blank, and the test status window will show "No Test Loaded". - Page 57 PD Detector DDX-9101 System Operation When generating reports the data in the test information fields on the test control form are used. These can be edited at any time and the information will be included on any subsequent NQP report. NQP tests are started by pressing the "Start the Analysis"...
-
Page 58: Print Results
System Operation PD Detector DDX-9101 6.5.4. Print results Once the test procedure has completed, a message box is displayed requesting whether a test report is to be generated: If the test is to be re-run or the results are to be discarded, click "No". If the results are to be kept, click "Yes", this will generate a test report in the HTML report window, which can be printed out. -
Page 59: Remote Software For Ddx 9101 (Optional) - System Control And Settings
PD Detector DDX-9101 System Operation Remote Software for DDX 9101 (optional) – System Control and Settings 7.1. Detector display window 7.1.1. Window Size The Detector Display window can be shown as a large window or a small window. The small window being useful on multi-phase systems where several Detector Display windows are open at the same time. -
Page 60: Controls
System Operation PD Detector DDX-9101 PD and RIV PD only RIV only 7.1.3. Controls The Detector Display window for each detector shows the partial discharge magnitude, the measured voltage and the RIV level as recorded by that detector. It also shows a copy of the pulse display that is produced by the detector showing the phase resolved discharge activity. -
Page 61: Setting The Display Shape
PD Detector DDX-9101 System Operation The caption at the top of the window shows the detector name and the connection state of the corresponding detector. For normal operation this will be connected. If the software is trying to establish a connection to a detector, it will indicate “Connecting to <detector name>”. -
Page 62: Taking A Snapshot
System Operation PD Detector DDX-9101 Ellipse - Conventional elliptical display ½ Cycle - The display is shown as a line whose length corresponds to a ½ cycle Full Cycle - The display is shown as a line whose length corresponds to a cycle Divided - As ½... -
Page 63: Showing And Hiding The Display Controls
PD Detector DDX-9101 System Operation 7.1.6. Showing and Hiding the Display Controls Pressing the "Show Controls" button causes the Detector Control window to be restored and become the active window. Pressing the "Hide Controls" button causes the Display Control window to be minimised. 7.1.7. -
Page 64: Communications Status Indication
System Operation PD Detector DDX-9101 7.2.2. Communications Status Indication At the lower right of the Detector Control window is the communications status indicator. This should be flickering between a green ‘T’ on a red background and a red ‘R’ on a green background showing when the remote control software is transmitting data to the detector and receiving data from it. -
Page 65: Controlling The Gates
PD Detector DDX-9101 System Operation Some systems are built-in with predefined hardware filters and for such systems, the software screen may look like the one shown below. If the test system is subject to short bursts of transients, setting the PD meter to “Slow mode” can help to alleviate the problems. - Page 66 System Operation PD Detector DDX-9101 The voltage calibration controls are only enabled when the Allow Voltage Calibration option is set. This is normally not the case and these controls are disabled by default. If the voltage calibration controls are disabled, they can be enable by selecting the option System Properties from Setup System Properties, check the box gain the label –...
-
Page 67: Capture Controls
PD Detector DDX-9101 System Operation 7.3.4. Capture Controls The capture controls allow the user to adjust the effective update rate of the display. Increasing the number of cycles to display increases the effective persistence of the display, but reduces the update rate. -
Page 68: Display Measurement Type
System Operation PD Detector DDX-9101 7.4.1. Display Measurement Type The Display Measurement Type options are used for setting the visibility of the PD and RIV measurements shown on the Detector Display window. See the section Detector Display Window -> Hiding Unused Measurement 7.4.2. -
Page 69: Nqp Analysis Module
PD Detector DDX-9101 System Operation Enter a Name and Description for the settings. Press Save to save the settings. Enter the same name as an existing set of settings to overwrite them. To delete a set of settings highlight the entry in the list and press the Delete button. To restore a set of settings highlight the entry in the list an press the Restore button. -
Page 70: View Commands
System Operation PD Detector DDX-9101 2D plot Display 2D plot 3D plot Display 3D plot. 7.5.5. View Commands Command Description Zoom In Zoom in on the chart Zoom Out Zoom out on the chart Zoom All Show all the chart Zoom Window Drag a window to zoom in or out. -
Page 71: Detector Panel
PD Detector DDX-9101 System Operation 7.5.7. Detector Panel The detector panel shows information about the captured data. 7.5.8. File Panel The File panel shows information about the data loaded from file. The data properties show the setting used when the data was captured. 7.5.9. -
Page 72: Time Spliced Data Displays
System Operation PD Detector DDX-9101 Fig 1. Data display with no filter threshold set (default Fig 2 Data display with filter threshold set to 1pC. threshold is 0 pC). (All pulses below 1pC are suppressed). 7.5.10. Time Spliced Data Displays The data recorded can be split into several time frames and pattern in each time frame can be either displayed or subjected to further analysis. -
Page 73: Other Displays
PD Detector DDX-9101 System Operation 7.5.11. Other Displays NQP module allows real-time display of difference of data being captured against previously recorded or files data. In the example below, it is graphically illustrated how such a display in certain cases can help in separating out the PD and noise patterns of approximately the same amplitude. -
Page 74: Set System Properties
System Operation PD Detector DDX-9101 7.6. Set system properties The system properties are set up using the System Properties dialogue box. This is selected from the menu by selecting "Setup" then "Set System Properties". Any changes made to the settings are stored by clicking "OK" and will be used next time the system is run. -
Page 75: Enable Detector Settings Save
PD Detector DDX-9101 System Operation 7.6.4. Enable Detector Settings Save The Enable Detector Settings Save checkbox shows/hides the Save and restore settings controls on the Preferences tab of the Detector Control window. Report The software produces data that can be used to generate test reports or export the data to other applications for more detailed analysis or to build a measurement database. -
Page 76: Tabular Results
System Operation PD Detector DDX-9101 There will be as many snapshot JPEG files as there were snapshots taken during the test. If the test report is to be moved to another location, all the files with the same root filename must be copied to the same directory, otherwise it will not be possible to reproduce the test report correctly. - Page 77 PD Detector DDX-9101 System Operation This shows all the snapshots that have been gathered. Below the snapshot image, the number of snapshots gathered and the details of this snapshot are shown. To view the different snapshots, press the "Next" and "Prev." buttons to move through the list. "Next" is disabled when the end of the list is reached.
Need help?
Do you have a question about the DDX 9101 and is the answer not in the manual?
Questions and answers