
Summary of Contents for MAKINEX TE1000-AVR
- Page 1 Makinex Jackhammer Trolley with Hilti Breaker TE1000-AVR & TE1500-AVR OPERATOR’S MANUAL REV0915...
-
Page 2: Table Of Contents
CONTENTS ABOUT THIS MANUAL ..............2 Key Terms ................... 2 Disclaimer ..................3 PRODUCT INFORMATION ..............4 Safety Information ................ 4 General Safety Instructions ............4 SAFETY STICKERS ................6 WARRANTY ..................7 Warranty Exclusions: ..............9 Responsibility of the consumer under this Limited Warranty: ..10 Claim Procedure: ............... -
Page 3: About This Manual
ABOUT THIS MANUAL This manual is designed to provide the user with the information required to operate and maintain the Jack Hammer Trolley correctly and safely. Key Terms READ CAREFULLY – refers to important information that should be paid careful READ attention. -
Page 4: Disclaimer
Disclaimer MAKINEX, and its affiliates, takes no responsibility for any damage, injury or death resulting from the incorrect or unsafe use of this machine. Use of this machine should be undertaken by competent persons only. It is the operators’ responsibility to... -
Page 5: Product Information
PRODUCT INFORMATION Safety Information General Safety Instructions Throughout this document there are several safety warnings. The user should read through this complete document before using the Jack Hammer Trolley. Ensure you read all information contained in this manual before using the Jack Hammer READ Trolley CAREFULLY... - Page 6 Stay alert, watch what you are doing and use common sense when operating a power tool. Do not use a power tool while you are tired and under the influence of drugs, alcohol or medication. A moment of inattention while operating power tools may result in serious personal injury.
-
Page 7: Safety Stickers
SAFETY STICKERS There is a safety and information panel provided on the front of the Jack Hammer Trolley to alert the user of potential safety risks/hazards. Please read and adhere to all instructions on the Unit. It is forbidden to remove any safety or instructional stickers or panels from the Jack PROHIBITED Hammer Trolley... -
Page 9: Warranty
WARRANTY In order to take advantage of the MAKINEX limited warranty, you must have maintenance performed according to the schedule (contained in relevant owner’s manual supplied with this product), by an authorised MAKINEX dealer or MAKINEX service technician. You are free to have your MAKINEX product serviced by any... -
Page 10: Warranty Exclusions
WARRANTY: (Ex-factory/ Reseller premise) MAKINEX warrants to the original purchaser: MAKINEX provides a Limited One Year Warranty that applies to Jack Hammer Trolley only (this excludes the Jack Hammer and any other attachments and consumables). Any unauthorized repair or part replacement will void warranty. -
Page 11: Responsibility Of The Consumer Under This Limited Warranty
Manufacturer. It is the responsibility (and cost) of MAKINEX or our appointed agent to return the machine to be repaired or replaced under warranty to the consumer- this is valid for domestic territories... - Page 12 Australian consumer etc.) Where the specific warranty component (e.g. Jack hammer) is under a Manufacturer’s warranty other than MAKINEX (e.g.Hilti), the consumer can either contact MAKINEX or the applicable Manufacturer for repairs where such warranty was registered with that manufacturer at purchase.
-
Page 13: Warranty Contact Information
For service and ordering parts, please call AUS: 1300 795 953 or +61 2 9460 8071 USA: 855-625-4639 EUROPE: +31 (0)6 24881203 or +31 (0)6 50841849 Or your nearest MAKINEX distributor We have very knowledgeable, experienced staff to assist you with help and advice. -
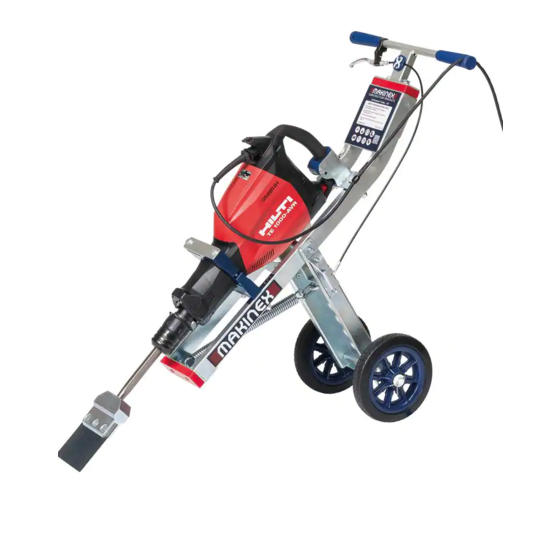
Page 14: Product Description And Specifications
PRODUCT DESCRIPTION AND SPECIFICATIONS The versatile Jackhammer Trolley packs a punch, saving you a lot of hard work and effort. Let the Jackhammer Trolley take the workload of your back! No more struggling or bending trying to handle heavy hammers, the trolley takes the pain out of demolition and renovation. -
Page 15: Product Specifications
Product Specifications HEIGHT WHEN RAISED 1100mm/43.3’’ HEIGHT WHEN LOWERED 600mm/23.6’’ OVERALL WIDTH 510mm/20’’ OVERALL LENGTH 1100mm/43.3’’ ANGLE OF ADJUSTMENT 73° (93° closed, 20° open) WEIGHT (WITHOUT 28kg/62lb JACKHAMMER) -
Page 16: Instructions For Use
STEP 1 – Assembling the trolley Tools Required 17mm socket Phillips head screwdriver 19mm socket Pliers Shifter Instructions 1. You should have the parts pictured below: Makinex Hilti TE1000 Hilti Clamp Jackhammer sold separately... - Page 17 2. Attach the handle to the frame with the two mounting bolts provided. 3. Next, attach both wheels on the axle with the parts provided...
- Page 18 Brake Lever Adjustment Instructions 1. Ensure cable is not kinked anywhere along its length 2. Tighten retaining screw with pliers 3. Tighten adjustment screw to remove slack from the cable. Note that some slack in the mechanism is normal.
-
Page 19: Fitting A Hilti Te1000 Jack Hammer
Fitting a HILTI TE1000 Jack Hammer 1. Adjust the trolley to its lowest position as shown and place the bottom end onto a platform that allows the trolley to be horizontal to the ground. 2. Distinguish the correct mounting holes that are needed to mount the Hilti TE1000 Jack hammer. - Page 20 Use the Hilti Clamping set provided and assemble the front area as per diagram with the front blocks. NOTE: Please do not tighten until the back end is fitted on also...
- Page 21 Set up the back of the jack hammer with the back mounting blocks provided. Please refer to the above diagram. NOTE: Please take care during assembly and DO NOT over tighten block sets!
- Page 22 Position the electrical cord from the Jack hammer to the indicated positions to guide it away from any possible crush points Location 2 Location 1...
-
Page 23: Step 2 - Using The Hammer Trolley
STEP 2 – Using the Hammer Trolley Ensure the machine is switched OFF before plugging in WARNING Ensure Moil is correctly inserted and locked in position before use CAUTION 1. Ensure Hammer is secure in clamping mechanism and cannot rotate. 2. -
Page 24: Step 3 - Servicing The Hammer Trolley
STEP 3 – Servicing the Hammer Trolley Every Use: Inspect frame for damage Ensure bolts are secure Every 6 Months: Adjust brake lever to eliminate free-play o See page 13 for details Lubricate brake lever cable o Drip oil from the top of the cable so it runs through the cable housing o Use light weight oil;... -
Page 25: Appendices
APPENDICES A. JACK HAMMER TROLLEY PARTS BREAK DOWN B. BLOCK SETS BREAKDOWN C. JACK HAMMER TROLLEY - HAZARD ASSESSMENT D. BLOCK SET PART SELECTION DETAILS E. SALES AND SPARES F. JACK HAMMER MANUAL (WHEN PURCHASED) -
Page 26: Appendix A - Jht Parts Breakdown
Appendix A – JHT PARTS BREAKDOWN www.makinexusa.com Makinex Support #: US 407-446-1966 , 407-826-0000... - Page 27 Makinex Support #: US 407-446-1966 , 407-826-0000...
-
Page 28: Appendix B - Block Sets Break Down
Appendix B – BLOCK SETS BREAK DOWN... -
Page 29: Appendix C - Hazard Assessement
Appendix C – HAZARD ASSESSEMENT... -
Page 30: Appendix D- Service And Spares
For service and ordering parts, please call AUS: 1300 795 953 or +61 2 9460 8071 USA: 855-625-4639 EUROPE: +31 (0)6 24881203 or +31 (0)6 50841849 Or your nearest MAKINEX distributor We have very knowledgeable, experienced staff to assist you with help and advice. W makinex.com... -
Page 31: Appendix E - Jack Hammer Manuals
Appendix E – JACK HAMMER MANUALS Refer to your Hilti Jack Hammer manual for safety and operation instructions.
Need help?
Do you have a question about the TE1000-AVR and is the answer not in the manual?
Questions and answers