Table of Contents
Advertisement
Advertisement
Table of Contents

Summary of Contents for HOPPER JOEY DISH
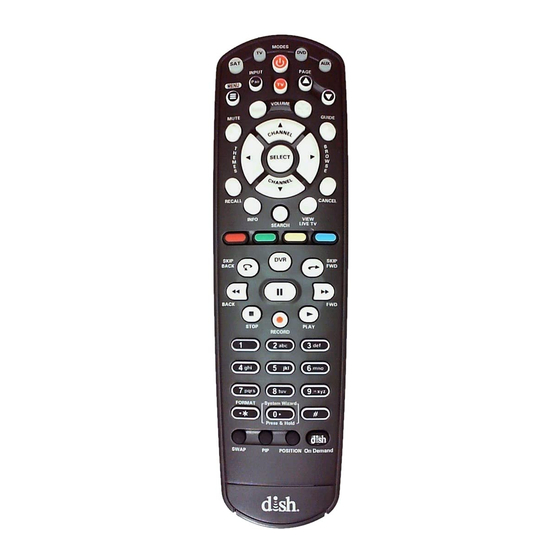
- Page 1 REMOTE USER GUIDE...
-
Page 2: Safety Instructions
90 Inverness Drive Circle East, Englewood, Colorado 80112. Document Number: 188891 Printed in DISH Network is a registered trademark of DISH Network L.L.C. All product names, trade names, or corporate names mentioned in this User Guide are acknowledged to be the... -
Page 3: Insert The Batteries
Insert the Batteries Pull the remote battery cover off. Insert 4 AAA batteries, making sure to match the plus (+) ends with the plus markings on the battery case. Replace the remote battery cover. - Page 4 Pairing Remote to Hopper or Joey For the remote to work with either Hopper or Joey, it must be paired. Use the following procedure to pair the remote. Verify the antenna is installed on the back of your Hopper. Joeys have an internal antenna.
- Page 5 Backing up Remote or Receiver Settings After setting up the remote and the receiver, you can back up your settings. If you back up your settings, you can restore them if the settings are ever lost or if you replace your remote or receiver. Note: If your batteries are low, replace them before beginning the following steps.
- Page 6 Restoring Remote or Receiver Settings If you should lose settings that have been backed up (see Backing Up Remote or Receiver Settings on page 3) or if you replace your remote or receiver, you can restore the remote and receiver settings. Press and hold SYSTEM WIZARD until the System Wizard screen appears.
-
Page 7: Sat Mode
SAT Mode To use the features described in this section, make sure you are in SAT mode by pressing the SAT Mode button. Note: Some features may not be available depending on your receiver model. Power & TV Power Top button turns the receiver on/off Press this Bottom button turns the TV on/off Pair/Input... - Page 8 TV Mode To use the features described in this section, make sure you are in TV mode by pressing the TV Mode button. Remote programming is required. Note: The remote has Limited Mode enabled, which means only the Volume, Mute, and TV Power buttons work in TV Mode (see Enabling or Disabling Limited Mode on page 21).
-
Page 9: Dvd Mode
DVD Mode To use the features described in this section, make sure you are in DVD mode by pressing the DVD Mode button. You can use this mode to operate a DVD player, a Blu-ray Disc (BD) player, or a VCR. Remote programming is required. -
Page 10: Dvr Functions
DVR Functions • Displays a list of recorded programs. • Plays a live or recorded program. • Pauses a live or recorded program. • Stops recording a program or playing a recorded program. • Records a program. • Press BACK once to reverse the program four times as fast as normal play. - Page 11 DVR Functions, continued • Press FWD (Forward) once to fast- forward through the program four times normal speed. Press FWD twice to forward at 15 times normal speed, three times to forward at 60 times normal speed, and four times to forward at 300 times normal speed.
- Page 12 Using Remote Button Shortcuts In addition to their normal functions, some buttons on your remote control have special shortcut functions. These shortcuts are enabled while navigating the on-screen Electronic Program Guide (EPG) or viewing the scrollable list of events. DVR Buttons The following table lists some of these shortcuts for the gray set of buttons...
- Page 13 Using Remote Button Shortcuts, continued Colored Buttons The following table lists some of the shortcuts for the colored set of buttons on your remote control. Note: Scheduled updates to your receiver software may add to or modify these shortcuts. Buttons From Live TV Elsewhere Jumps to menu bar...
- Page 14 Programming Remote to Control Another Device There are three ways that you can program your DISH Network remote to control another device, such as a TV, DVD, BD, VCR, audio receiver, or amplifier: • Scanning the Remote Database • Entering a Code •...
- Page 15 Programming Remote to Control Another Device, continued Scanning the Remote Database Scan the remote database to find codes for another device, such as a TV, DVD, BD, or VCR. Turn the device and receiver on. Press MENU and select the Settings tile. From the Settings screen, select Remote Manager.
- Page 16 Programming Remote to Control Another Device, continued Scanning the Remote Database, continued Scroll the Sort By: (or Sort by Aux Device:) list to position the selected option within the blue highlight bar. Highlight device’s name Brand in the Brand: list and RadioShack select Next.
- Page 17 Programming Remote to Control Another Device, continued Scanning the Remote Database, continued Using the remote, turn the device on and try some other remote buttons to make sure they work. When finished, press and release SAT to switch modes. If the code worked for other buttons, select Yes and continue to step 11.
- Page 18 Programming Remote to Control Another Device, continued Entering a Code If you know a device’s code, you can enter the code directly. Turn the device and receiver on. Press MENU and select the Settings tile. From the Settings screen, select Remote Manager.
- Page 19 Entering a Code, continued Using the on-screen keypad, XXXX enter the four-digit code for your device. Select Next. Note: The three-digit device codes used by other DISH Network remote controls CLEAR cannot be used. Next Select Yes to save the code.
-
Page 20: Learning Codes
Programming Remote to Control Another Device, continued Learning Codes Another way to program codes from one remote to another is the Learning Codes procedure. Turn the device and receiver on. Press MENU and select the Settings tile. From the Settings screen, select Remote Manager. - Page 21 Programming Remote to Control Another Device, continued Learning Codes, continued Follow the instructions given on the screen. When finished, press any Mode button to save commands and exit this screen. To cancel without saving, do not press any button on either remote for at least 20 seconds.
- Page 22 Displaying Device Code To identify the device code that your remote control is using, complete the following steps: Press MENU, select Settings tile, and then select Remote Manager. The Home screen for your current remote control displays. If you used the Look Up option, the brand name of the device is listed in parentheses after the code.
- Page 23 Enabling or Disabling Limited Mode Limited Mode locks out all the device mode operations except for the device’s Power, Mute, and Volume. This prevents you from accidentally tuning away from satellite programming. The following steps describe how to enable Limited Mode on the remote and how to disable Limited Mode.
-
Page 24: Locating A Lost Remote
Locating a Lost Remote If you are unable to find the remote, try this feature for locating it. Activate your receiver’s front LOCATE Hopper: REMOTE panel controls and touch LOCATE REMOTE. Joey: LOCATE REMOTE If the missing remote control is paired to this receiver and within range, there should be a series of tones you can hear to help you find... -
Page 25: Avoiding Rf Interference
Avoiding RF Interference Because your remote control uses UHF 2G (2.4 GHz ISM band) radio frequencies (RF), you might experience interference from other devices transmitting nearby. The instructions in this section describe how to avoid such conflicts. Adjusting the Antenna The Hopper communicates with its remote control(s) through an UHF 2G antenna connected to the Remote Antenna input on it’s back panel. - Page 26 Control Amplifier Volume When the remote is set up to operate your TV, the MUTE and VOLUME buttons adjust your TV volume when in SAT mode. When the remote is also set up to operate a remote-controllable audio receiver or amplifier (usually in AUX Mode), use these steps to program the remote to control the amplifier’s volume.
- Page 27 Control TV Volume Use this procedure to change from having the remote adjust the volume of an audio receiver or amplifier to having the remote adjust the TV’s volume. When the remote control is set up to operate your TV, the MUTE and VOLUME buttons adjust your TV volume when in SAT mode.
-
Page 28: Troubleshooting
Follow the instructions on page 1. • Make sure you have a direct line of sight between the remote and the receiver. • Visit www.dish.com/support. When you press a button on the remote control, the equipment doesn’t do what you expect. - Page 29 Troubleshooting, continued Your remote control does not work well when controlling the Hopper or the Joey. What to do: Move your receiver to different locations. For best results, place the receiver as high as possible, above all other equipment in your entertainment center.
- Page 30 Troubleshooting, continued Your remote control isn’t working. What to do: Make sure the remote control is in the correct mode (SAT, TV, DVD, or AUX). Change the batteries as described on page 1. Your UHF 2G remote control does not work well from far away.
-
Page 31: Limited Warranty
Proof of Purchase to be out of warranty. This warranty extends only to the original user (“you,” “your”) of the DISH Network remote control and is limited to the purchase price of the remote control. EchoStar Technologies L.L.C., formerly known as EchoStar Technologies Corporation, and its affiliated companies (“we,”... -
Page 32: Accessory Warranty
A one- year warranty becomes effective upon the activation of the DISH system or date of purchase, if bought separately. A proof of purchase is required to verify the purchase date. If an accessory has an expired warranty, no exchange will be issued. -
Page 33: Regulatory Factors
Regulatory Factors This device complies with Part 15 of FCC Rules. Operation is subject to the following two conditions: 1. This device may not cause harmful interference, 2. This device must accept any interference received, including interference that may cause undesired operation. Changes or modifications to this device may void your authority to operate this equipment. - Page 34 DISH Network’s Exchange Programs DISH Network offers two options if you need to replace your remote control--the Advanced Exchange Program and the Post Receipt Exchange Program. Advanced Exchange Program The Advanced Exchange Program allows you to have a replacement remote shipped immediately to you.
- Page 35 Notes...
- Page 36 Notes...
- Page 37 Notes...
- Page 38 Notes...
-
Page 39: Reference Table
Reference Table Write down the inputs, TV, VCR, DVD player, BD player, and stereo equipment codes as you program them for future reference. Input for Programming TV Code DVD/VCR/BD Player Code Auxiliary Equipment Code Auxiliary Device Type To display your remote codes, see page 20 for instructions. - Page 40 For all your customer needs, go to www.dish.com/chat or call the Customer Service Center at 1-800-333-DISH (3474) 188891...
Need help?
Do you have a question about the DISH and is the answer not in the manual?
Questions and answers