
Related Manuals for PlayNetwork Combo C400


Summary of Contents for PlayNetwork Combo C400
- Page 1 TECHNICAL MANUAL Please Read Please Read Before Installation Before Installation TECHNICAL MANUAL PLAC400MANUAL...
-
Page 2: Table Of Contents
Contents Using this Manual ..............................3 Read These Instructions ............................ 5 Safety Precautions ........................... 5 Installing Combo ............................5 Unit Functions ................................7 Unit Operation ................................ 7 Power & Standby............................. 7 Content Updates ............................8 Display ................................8 Buttons ................................9 Menu Functions ............................9 Software Updates ............................ -
Page 3: Using This Manual
Using this Manual This document serves as a guide for the safe installation of PlayNetwork’s Combo™ C400 music player. Before installing and operating the Combo player, please read all of the following safety and operating instructions carefully and completely. Keep this manual in a safe place for future reference. Questions or comments may be submitted anytime toll free by calling 1-888-567-PLAY (7529). -
Page 4: Front View
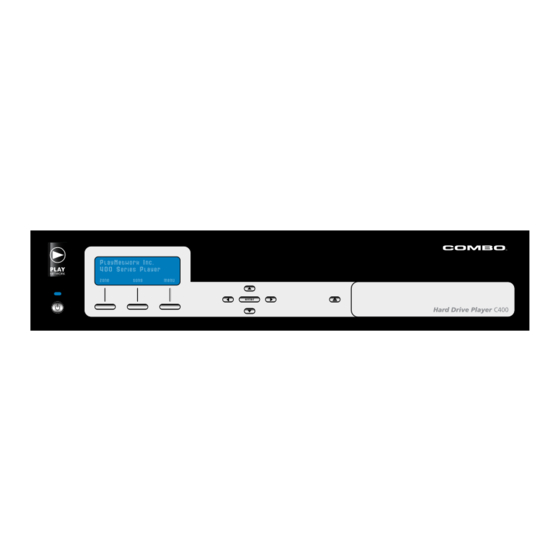
COMBO C400 HARD DRIVE PLAYER ™ FEATURES AND CONTROLS Front View: A. Power/Standby Button B. Shortcut Keys C. CD-ROM Drive D. Navigation Buttons E. Power On Indicator F. LCD Display G. CD-ROM Disc Load/Eject Power On Indicator LCD Display Navigation Buttons Power/ Standby CD-ROM Disc Load/ Eject CD-ROM Drive... -
Page 5: Read These Instructions
Should anything fall into the cover, unplug the unit and have it checked by a qualified PlayNetwork technician before operating it further. • Do not install near any heat sources such as radiators, heat registers, stoves, or other apparatuses that produce heat. - Page 6 • Do not stack non-PlayNetwork objects on top of player as this may impede proper heat ventilation of the Combo player. Leave at least six inches of clearance on both sides of the unit for adequate ventilation.
-
Page 7: Unit Functions
Unit Functions The Combo C400 player is a digital-quality hard-drive based player with single- or dual-zone playback technology that features the following functions: • “Hands-free” media content for 24-hours a day, 7 days a week. The Combo player will automatically begin play upon power-up and will continue playback until the unit is powered down or placed in standby. -
Page 8: Content Updates
CD Richmix / CD PlayDisc Update Load a PlayNetwork CD-Rom disc by pressing the Disc Load / Unload Button and place the disc in the tray (printed side face up), and press the button again. The player will process the CD-Rom and begin to play music within 30 seconds. -
Page 9: Buttons
Buttons The Combo player has the following button groups to control operation: • Power/Standby – This button can be used to power up the unit, put it in standby, or power it down. • Navigation & Enter • During normal operation, pressing any of the navigation buttons will bring the Main Menu to the display. - Page 10 Program advance can be enabled or disabled for each business location for a single store zone, depending on your service contract with PlayNetwork. If the feature is enabled for your location, you can override the normal programming in the displayed zone and advance to the next program in the playlist by selecting Next Program from either menu.
-
Page 11: Restart Playlist
To view the date currently set on the Combo player, select the View/Set Date Main Menu’s Setup list. To change the date you must insert a Set Date Disc from PlayNetwork into the player and set the date within the allowed range. If you do not have a Set Date Disc, call your local dealer or Customer Service as directed on the last page of this document to request one. - Page 12 To access these troubleshooting steps, select “Troubleshooting” from either menu’s Help list. After trying the recommended steps, give PlayNetwork’s Customer Service a call by selecting “Customer Service” from either Menu’s Help list to display the phone number. This display will remain until the ENTER, “<”...
-
Page 13: Software Updates
Software Update disc. For standalone updates, load the PlayNetwork Softward Update CD-ROM disc by pressing the Disc Load/Eject button and place the disc in the tray (label side up), and press teh button again to load the CD. -
Page 14: Cleaning And Maintenance
Unit Warranty The Combo player is covered under a limited, one-year warranty. This warranty is valid only if an authorized PlayNetwork technician performs service. Please refer to your Music Service Agreement for details. PlayNetwork Customer Service Locate the Customer Service number by selecting Help from either menu. - Page 15 © 2009 PlayNetwork Inc. All rights reserved. Combo and AutoPlay are trademarks and PlayNetwork and the PlayNetwork logo are registered trademarks of PlayNetwork Inc. or its affiliates in the U.S. and certain other countries. All other trademarks mentioned in this document are the property of their respective owners.
Need help?
Do you have a question about the Combo C400 and is the answer not in the manual?
Questions and answers