Table of Contents
Advertisement
Advertisement
Table of Contents

Summary of Contents for INMOVEMENT DYNAMIC DESK
- Page 1 Operation Manual M051-00K103-0001 REV A...
-
Page 2: Customer Service
Customer Service 1 (844) 6IN-MOVE (844-646-6683) Should you have any questions, please call your inmovement representative or call our customer service department toll-free number,1 (844) 646-6683 Monday - Friday, 7:00 A.M. - 6:00 P.M., Central Time. -
Page 3: Table Of Contents
9.5 USING AND TESTING THE SAFETY STOP PULL CORD 9.6 HOW TO OBTAIN PRODUCT SERVICE SPECIFICATIONS WARRANTY © 2015 InMovement is a registered servicemark of Brunswick Corporation. Gym Wipes® is a registered trademark of The 2XL Corporation. PureGreen 24 is a trademark of Pure Green. - Page 4 Before using this product, it is essential to read this ENTIRE operation manual and ALL installation instructions. It describes equipment setup and instructs members on how to use it correctly and safely. Avant d’utiliser ce produit, il est indispensable de lire ce manuel d’utilisation dans son INTÉGRALITÉ, ainsi que TOUTES les instructions d’installations.
- Page 5 Dynamic Desk See “Specifi cations” in this manual for product specifi c features. Statement of Purpose: The Dynamic Desk is an exercise machine that enables users to walk in place on a moving surface. InMovement STRONGLY recommends seeing a physician for a complete medical exam before undertaking an exer- cise program, particularly if the user has a family history of high blood pressure or heart disease, is over the age of 45, smokes, has high cholesterol, is obese, or has not exercised regularly in the past year.
-
Page 6: Safety Instructions
The Dynamic Desk has immobilization lockout software. Activate the soft- ware lockout when the Dynamic Desk is not in use. Refer to Immobilizing the Dynamic Desk in Section 4 for information on how to immoblilze the Dynamic Desk. Keep the instructions out of the reach of children. - Page 7 Keep the power cord away from heated surfaces. Do not pull the equipment by the power cord or use the cord as a handle. Do not run the power cord on the fl oor under or along the side of the Dynamic Desk. Refer to last assembly step for proper power cord routing.
- Page 8 Le Dynamic Desk est équipé d’un système de blocage logiciel. Ce dernier ne doit être activé que lorsque l’appareil n’est pas en service. Consultez la section 4 pour obtenir de plus amples informations sur l’immobilisation du Dynamic Desk. Conservez ces instructions hors de portée des enfants.
- Page 9 Dynamic Desk ou sous ce dernier. Référez-vous à la dernière étape de l’assemblage pour acheminer correctement le cordon d’alimentation. Ne montez et ne descendez jamais du Dynamic Desk lorsqu’il est en mouvement. En cas d’urgence, si vous trébuchez par exemple, saisissez le poste et placez les pieds sur les plates-formes latérales.
-
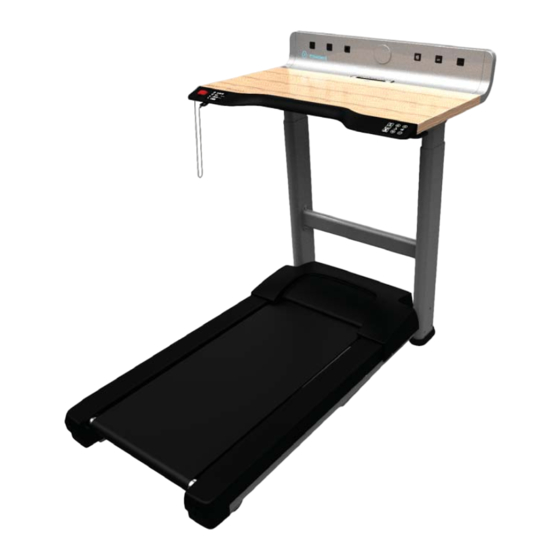
Page 10: Dynamic Desk Illustration
DYNAMIC DESK DESIGN ILLUSTRATION AC Power Supply USB Port RJ45 Desktop Table Integrated User Controls Monitor Mount Palm Rest (behind cover) Integrated Display Emergency Emergency Stop Stop Lanyard Magnet Walking Belt / Walking Deck Leveler... -
Page 11: Assembly
ASSEMBLY For safety, and to save time and effort, read this Owner’s Manual completely before installing the Dynamic Desk. Place the Dynamic Desk near where it will be used before beginning the unpacking procedure. Unpacking The Dynamic Desk arrives in two boxes: Box 1 contains the Dynamic Desk base frame. - Page 12 BOX 1 BOX 2...
- Page 13 Power Cable...
- Page 14 Signal Cable RJ45 Cable...
- Page 15 DO NOT CRUSH CABLES!
- Page 16 Signal Cable RJ45 Cable Cables Underneath Desktop...
- Page 17 Connect Signal Cables Turn Power Strip ON Connect RJ45 Cables Connect AC Power Cable...
- Page 20 MAKE SURE ALL HARDWARE IS TIGHT TIGHTEN IN ORDER SHOWN...
- Page 21 Turn Power ON Initialize Actuators Press and hold the Lower Desktop Height Down Arrow key until the desktop reaches the lowest position. Release. Press and hold the Lower Desktop Height Down Arrow for 5-10 seconds. The desk will automatically run approximately 5 mm out again and then slowly in again. Only release the Lower Desktop Height Down Arrow key when the movement has completely stopped.
-
Page 22: Setup
If it will not fi t an electrical outlet, have a proper outlet installed by a qualifi ed electrician. Power Switch Located on the front panel at the base of the Dynamic Desk, the ON/OFF switch has two position - “I” (one) for ON and “0” (zero) for OFF. - Page 23 The Dynamic Desk may now be moved on its front platform wheels by raising the back of the product and pushing / pulling. Do not attempt to move the Dynamic Desk by pushing or pulling on the deck, uprights, or desktop.
-
Page 24: Integrated Console Display & User Controls
INTEGRATED CONSOLE DISPLAY & USER CONTROLS The integrated display is located on the left hand side of the desktop ledge and shows the following session data: Time: Current session duration Speed: Current speed Distance: Distance walked Steps: Number of steps taken 2:30:30 20.30 23000... -
Page 25: User Controls
User Controls The user controls are located on the right hand side of the desktop ledge and control the following basic operations of the Dynamic Desk: PAUSE STOP GO: Press to begin moving the belt at 0.3 mph and start a session. -
Page 26: Back Ledge Connection & Attachment Options
BACK LEDGE CONNECTION & ATTACHMENT OPTIONS The Back Ledge of the Dynamic Desk provides the user with several connection and attachment options. USB Ports (Quantity: 2) AC Power Receptacles (Quantity: 3) RJ45 Ethernet Cable Receptacle (Quantity: 1) Monitor Mounting Attachment:... -
Page 27: Ergonomics
Here are some tips to help you maintain the best neutral posture while at the Dynamic Desk: 1. Chest should always remain open with shoul- ders back and the upper arms should be kept close to the body. -
Page 28: Settings & Diagnostics Menu
SETTINGS & DIAGNOSTICS MENUS Entering Settings Menu Press and hold down the STOP key and SPEED DOWN ARROW key for three plus seconds. The display will beep consecutively three times and display the text “SEt” in the Time Window. Press the GO key to toggle between UNITS and MAXIMUM SPEED setting. Press the SPEED UP and DOWN keys to change setting. -
Page 29: Service & Technical Data
You may be in “Energy Saver Mode”. Press the GO button to see if the user controls turn on. Check to see if the Dynamic Desk is plugged in and if the ON/OFF switch is on. If the The Dynamic Desk does not... -
Page 30: Preventive Maintenance Tips
N’utilisez pas l’appareil tant que les pièces défectueuses n’ont pas été réparées ou remplacées. The following preventive maintenance tips will keep the Dynamic Desk operating at peak performance: IMPORTANT: TURN THE DYNAMIC DESK OFF AND UNPLUG PRIOR TO PERFORMING ANY MAINTENANCE! Inspect the power cord. -
Page 31: How To Adjust And Tension The Walking Belt On The Dynamic Desk
(four quarter-turns per side). 3. Set the Dynamic Desk at 2.0-mph (3.2 kph) and get on to make sure the belt no longer slips. Also, check the walk- ing belt’s tracking. If the walking belt drifts to the left or right see Tracking (Centering) an Existing or New Walking belt. -
Page 32: Tracking (Centering) A New Walking Belt
Customer Support Services. 9.5 Using and Testing the Safety Stop Pull Cord During operation of the Dynamic Desk, the lanyard on the Safety Stop pull cord should be attached to an item of the user’s clothing. While the Dynamic Desk is ON and the console display is active remove the Safety Stop pull cord from the Dynamic Desk. -
Page 33: Specifications
SPECIFICATIONS Designed Use: Commercial Maximum User Weight: 350 lbs. / 159 kg Speed Range: 0.3 - 4.0 mph (0.48 - 6.4 kph) in 0.1 increments Default: 2 mph (3.2 kph ) Adjustable Height Range: 36 in. - 48 in. (91.44 cm - 121.92 cm) Step-up Height: 7 in. -
Page 34: Warranty
If the Product or any warranted part must be returned to a information. Reference your name, address and the serial num- service facility for repairs, InMovement will pay all shipping and ber of your Product (consoles and frames have separate serial insurance charges during the warranty period (within the United numbers).
Need help?
Do you have a question about the DYNAMIC DESK and is the answer not in the manual?
Questions and answers