
Summary of Contents for Sheng Jay Automation Technologies SJ-AK49
- Page 1 SJ-AK49 High Definition and touch Camcorder High definition 2CH Car DVR /Speed Camera /Radar Detector/Security-Tracker-Photo Quick user guide...
-
Page 2: Table Of Contents
Content Product Feature ............2 Caution ............... 5 Apearance ..............6 Learning the remote control ........8 Reset the default settings ........... 9 Install Car Holder ............11 Screen function information - Video recording mode .................. 12 Screen capabilities information - file playback mode .................. - Page 3 Authorized Number ..........33 SOS – Send MMS Message ........35 GPS real-time position tracking via server ....36 Security Alarm ............39 Security Alarm sensitivity ......... 40 Time Zone ..............40 Geo-Fence ..............41 Cellular Positioning ........... 44 Low-voltage alert ............44 Photo shot ..............
- Page 5 This document and information is intended solely for authorized hang Jay Automation Technologies Co., Ltd. customers as permitted by Sheng Jay Automation Technologies Co., Ltd. and for the limited purposes set forth herein. The incorrect installation or utilization could cause damageto device or user.
-
Page 6: Product Feature
Product Feature 140 super degree wide angle, the visual range is wider 15% than the other similar products in the electronic community. Humanity operation interface uses all-touch-control, you can operate video, photograph, mute switch, emergency protection enforcement files by fingers immediately; 2.4 Inches super wide screen, frame shade design, and good sharpness make all information and functions are just at a glance. - Page 7 G-Sensor detect and switch on film protection automatically, recording key files by full guarantee. Supporting optional outer type GPS locating speed camera detector, it can display locations, on the screen and voice release speed camera, maximum speed limit, speed and coordinate the information, strengthening vehicle detection protection capacity, and reducing speeding fines.
- Page 8 Speed Camera Detector Italerts you kinds of speed cameras. Radar Detector and database are built-in L869. GPS system starts to work after being turned on. The front panel displays your direction and GPS time. Vehicle monitoring system Highly sensitive GPS chip andlocalization sensors can trace your position and send the location where you are to the cellphone or IP address.
-
Page 9: Caution
Caution ● Please set up all the function options before you start to drive the car, in order to assure drive safety, please avoid operating while driving. ● Please keep the lens clean, do not touch the lens by something contains oil or water, that would cause the lens become dirty and blurred, so the quality of recording will be lower. -
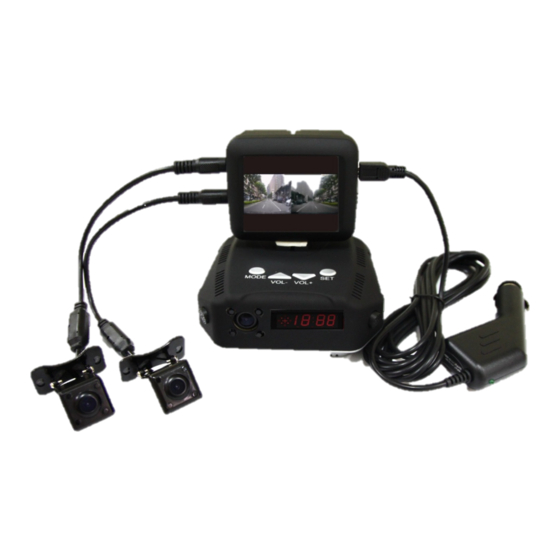
Page 10: Apearance
Apearance 2.4 Inches Touch screen Cradle slot Second shot Jack Power on/off Micro SD card slot AV OUT LED pilot lamp... - Page 11 Hardware Use tool to take out SIM card socket Insert the SIM card, with the chip side on the top. Please remember to remove the PIN code in your SIM card before setting. Set Micro SD card in your SJ-L869. The Micro SD card supports up to 2G.
-
Page 12: Learning The Remote Control
Learning the remote control security mode off security mode on Undefined SOS urgent button Hold the LK key on the interface of SJ-L869 for 5 seconds until L/K being light on. Press any key of the remote controller. The device buzz four times, when it has learnt the controller.Up to 4 remote controllers supported. -
Page 13: Reset The Default Settings
Remote Controller buzz table Type Beep frequency 1 time The device c an recei ve no mor e remot e c o n t r o l ( R e c e i v e d o v e r f o u r p i e c e s ) 4 times The remote control received successfully 1 time... - Page 14 Motor power c Rear lens Lens extension Cradle cable RFremote-co USB extension Car Charger User CD ntrol cable...
-
Page 15: Install Car Holder
Begin using the product Once the packaging is opened, insert SD Card, the product can be directly c onnected to get in to start with using the power cord. Please choose the appropriate SD Card (recommended to use 4GB, access spe ed above Class6). -
Page 16: Screen Function Information - Video Recording Mode
A. Insert the buckle of the car holder into the back fixed slot. (As shown in the picture below) B. After completing the foregoing step, it is recommended that adsorbed on th e front windshield behind the rearview mirror. C. After you confirm the location, press the fixed frame of the sucker down, and check that all components and sucker are firm again. - Page 17 Tap the center of the screen for stop or start the recording function Video Enter the main recording mode menu Recording Single / dual indicator screen (blinking) The current file properties Recording sound (protection, function write-protected, or General) Recoding Time File lock...
-
Page 18: Screen Capabilities Information - File Playback Mode
Current filing Focal Distance date and time Motion Detection Manual Digital Zoom Zoom in / Zoom out Screen capabilities information - file playback mode... -
Page 19: Playback - Delete
Playback - Delete... - Page 20 Previous/Rew File playback mode Next/ Fast Current file Forward number File Locked Play / stop Play/Pause Enter main menu Current archive Delete options video resolution Current filing date and time...
-
Page 21: Main Menu
Main Menu Rec mode Playback Setup... -
Page 22: System Setup
System setup Video set Lens Selection: Motion Detection: Protect: Adjust the sensitiv Two lenses、front lens an When device detected a ity of G-sensor an d rear lens. movement in front of th d it will detect th e lens, it will record for e strength of the a minute if that is turn car's collision... -
Page 23: General Setup
General setup Version After the f i r m w a r e version show up, click the screen t o go back to setup menu. (Depending on the actual version) Touch Calibration The following steps can be corrected if the touch screen is not accurate. -
Page 24: An Emergency Force To Protect
Step 1 Step 2 Finished An emergency force to protect This device has G-sensor automatic collision detection, to start the function of file re-recorded protection, and provides user manual touch emergency protecti on; if you press the function keys in the video recording mode, there is a ke y graphic appears at the top left corner of the screen. -
Page 25: Link Tv Output Video Audio
G-Sensor Gravity sensor: automatically detects collisions with vehicles forced t o protect files In the system set up > video settings options,G-sensor ( accelerometer ) featur e defaults to "" ( Which means open and is a general sensitivity ), the pract ical effect is as follows: (1) Automatically record unexpected events, log files, file protection mechanism set out in the former. - Page 26 Executethe Setup file in CD, open the setup interface, and click next. Enter the password 「sja」 with lowercase and click Next. You can also select the destination location and click Next.
- Page 27 Install it inthe following Start Menu folder, You can designate any name you like, set it as SJ-L869, and click Next to continue. reate desktop icon,and click Next.
- Page 28 Click install to continue with the installation. Click Finish to exit Setup.
- Page 29 Link the set-up port of SJ-L869 by USB extension cable, the computer would search Driver automatically. Click automatic set-up software to continue.
- Page 30 Waiting for searching. Select SJA-SJ-L869 in the list and click Next.
- Page 31 Click keep setting.
- Page 32 Click Finished, you can find the execution files on desktop, clic k it to enter the setting...
- Page 34 Software Setting Please install the file of dotNetFx40 in the CDif you can use software settings. Run the “SJ-L869.exe” Connect the USB extension cable to SJ-L869 and your computer.
-
Page 35: Multimedia Message Setting
Multimedia Message Setting SOS、siren will send a multimedia message to the phone number you register. You have to finish the multimedia register. The message setting different according different telecommunications Please acquire the correctsetting with the SIM card telecommunications. How to Set Click “Connect”... - Page 36 Key in the SIM card settingmobile number in authorized number No.2 /No.3/No.4 Click “Set” to save your personal setting Click “Disconnect” ※You can click the list to find the SIM card telecommunication and use the setting built in multimedia message setting.
-
Page 37: Authorized Number
Authorized Number Security alarm、SOS alarm、Low battery alert SMS and SD Card warning SMS will be sent to the authorized number Only authorized number can change the L869 setting via SMS. The unauthorized number will not get any reply from L869 How to set 1. - Page 38 3. Click “Set” to save your personal setting 4. Click “Disconnect” SOS number table Function 順序 Ultrasonic/ Send to the 1 pressure / Vibration authorized number SOS-message Send the2 authorized number Without Micro Card Only send authorized number Low battery warning Only send authorized number...
-
Page 39: Sos - Send Mms Message
SOS – Send MMS Message Press SOS button on the remote controller to make vide call to authorized number. The L869 will call to second authorize number first. If second authorized number does not pick the phone, L869 call next (third) authorized number. -
Page 40: Gps Real-Time Position Tracking Via Server
GPS real-time position tracking via server L869 sends data to the remote server by GPRS continuously. User can see the real-time status of SJ-869 on the server ※ Before it work, please confirm that the CPRS of your SIM card has been activated with the telecommunication. - Page 41 How to set Device ID Name an ID for the device. The device ID will be show on Server. 2-12 bits upper and lower case English letters allowed. APN Name Input APN of the SIM card to activate the GPRS. Please contact your SIM card provider to get the APN.
- Page 42 Server IP_1 Set an IP address and port for your server. If Server IP_1 link is failed or input column is empty, device auto-connect to Server IP_2 Device server connection priority DNS > IP 1 >IP 2 Server IP_2 Set the backup IP address and port for your server. The server IP_2 will assign an IP address to the device, when it received a connect request.
-
Page 43: Security Alarm
Security Alarm Press the “Security key”on the remote controller to activate the security system If one of security sensor has been triggered, the L869 will send a picture to authorized number to notice the car owner while detecting any unusual invasion. Authorized number pick the phone call and press key “5”... -
Page 44: Security Alarm Sensitivity
Connect Start the sensor you want to use, ultrasonic,air pressure orvibration. Save setting ※You have to complete MMS Message Setting before Alarm Settings Security Alarm sensitivity You can change the sensitivity of the sensor by adjusting the VR Right turn is sensitivity high, Left turn is sensitivity low Time Zone Set your time zone in your area... -
Page 45: Geo-Fence
Geo-Fence GEO-Fence is a virtual perimeter for a real-world geographic area. You can set 5 GEO-Fences for the L869. Geo-fence can be a predefined set of boundaries by user; the boundaries could be set from 100 meter to 25.5 KM. If you come into or out of the Geo-fence (boundaries), L869 will send a message “GEO-Fence ALARM”by SMS to user. - Page 46 OFF: Disable the GEO-Fence function Select the Group 1- 5 Choose your location on the Map Map Zoom in Double click mouse left key or Mouse scroll wheel forward Zoom out Double click mouse right key or Mouse scroll wheel backward Mark your location Click a location that you wanted on the map, and you can see a red balloon on it.
- Page 47 Define the Radius of your location Define the radius of marked position Define range from 0 to255 (per 100 M). Put 3 digital numbers to define the radius of the GEO-Fence. EX: 100 = 10 Km Alarm Type Disable: Disable this group Enter: when enter this area alarm Leave: when leave this area alarm...
-
Page 48: Cellular Positioning
Set the GEO-Fence range Click view Display all group setting to ensure you get the all Geo-fence you needed 10. Click the set Save Cellular Positioning When L869 is indoor or the GPS signal is too weak, L869 will use base station to position and send based station information to the ALARM number. -
Page 49: Photo Shot
Photo shot Photo shot When SOS or Alarm activated, the external cameras will totally take two photos. You can find your photo in Picture folder in the micro SD card... -
Page 50: Sms Configuration
※ When the micro SD card memory is 80 % full, the L869 will send a SMS message to the first authorized number. SMS Configuration Authorize number Security alarm、SOS alarm、Low battery alert SMS and SD Card warning SMS will be sent to authorized number SMS: AUTHOR:number Use “/”... - Page 51 Check the current location the L869. L869 will send a Google Map link to the SMS sender SMS: LOCATION L869 reply “TRACKING PLEASE WAIT” and Google Map link Security alarm on Activate Security mode SMS: ALARM ON L869 reply: ALARM ON ok Security alarm off Deactivate Security mode.
Need help?
Do you have a question about the SJ-AK49 and is the answer not in the manual?
Questions and answers