Table of Contents
Advertisement
Quick Links
4CH Digital Wireless Security System
Model: 8107JU
EU Environmental Protection
Waste electrical products should
not be disposed of with household
waste. Please recycle where
facilities exist. Check with your
local authority or retailer for
recycling advice.
Model: 8107JU
Version 1.0
Please read this user manual carefully before using this product.
Failure to understand operation procedures may result in injury.
Advertisement
Table of Contents

Subscribe to Our Youtube Channel
Summary of Contents for REDLINE SECURITY 8107JU
- Page 1 4CH Digital Wireless Security System Model: 8107JU EU Environmental Protection Waste electrical products should not be disposed of with household waste. Please recycle where facilities exist. Check with your local authority or retailer for recycling advice. Model: 8107JU Version 1.0 Please read this user manual carefully before using this product.
-
Page 2: Table Of Contents
Welcome Welcome Features This product is a household monitoring recording device. It consists Packing List of four cameras installed at entrances/e xits of the home and one Structure DVR receiver with a 7-inch LCD monitor . The four-split screen of the receiver can display the monitoring pictures of four accessed Installation cameras. -
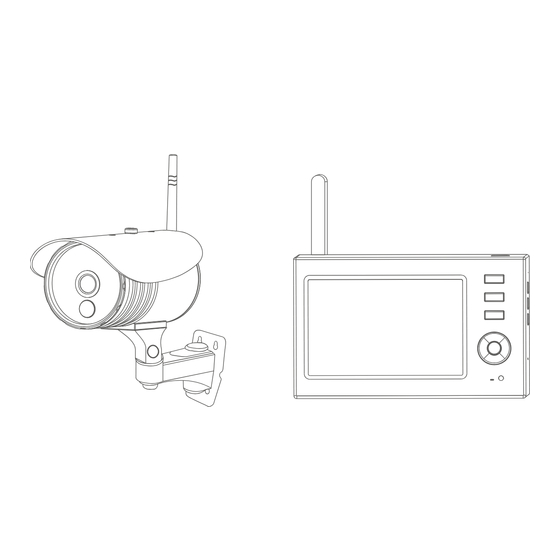
Page 3: Structure
Structure Installation 1. Install the camera at the proper monitoring location. and screw up the bracket. Camera Antenna The rain cover Antenna Socket Infrared LEDs Pair Button Lens PIR sensor Power Indicator Link Indicator Bracket Power Input Upright installation 2. Install the receiver at a proper location. Positioned on a level plane. -
Page 4: Operations
Operations After successful pairing, the following real-time monitoring picture appears: Basic operations ● Connect the camera to the power supply . The power Indicator Picture display area Picture display area on the back is turned on. 2013/11/15/09:30 2013/11/15/09:30 Picture display area Picture display area Time stamp 2013/11/15/09:30... -
Page 5: Video Recording
◆ Motion Detection Recording: ◆ Video recording ● If there is object motion detected by any accessed camera recording can be triggered. The specific steps are as follows: ◆ Manual Recording: ◆ 1. Press the MENU button to enter the setting interface; 1. -
Page 6: Playback
Playback Video Output ● ● You can connect the receiver to a larger monitor/TV to monitor 1. In the real time status, press the button to enter playback video more clearly. interface; 2. Press the button to select the folder; 3. -
Page 7: Network
Language ● Network Sets and views the network information. Date / Time Sets the system time and date. 1. Press the OK button to enter; Language Sets the system language. 2. Press the button to select language and then press the Sets to stop recording or overwrite the earliest video record when the Record Mode storage medium is full. -
Page 8: Storage For Recording
Storage for Recording Scan Mode Period ● ● 1. Press the OK button to enter; 1. Press the OK button to enter; 2. Press the button to select “SD Card” or “USB Device”; 2. Press the button to select; 3. Press the OK button to confirm and exit. 3. -
Page 9: Power Saving Mode
Power Saving Mode PIR Recording ● ● If there is human motion detected by any accessed camera, 1. Press the OK button to enter; recording can be triggered. For specific steps, see Page 08. 2. Press the button to select “Time Interval” or “Wake up on Motion”... -
Page 10: Pairing
Remarks: Pairing ● If pairing fails, the system prompts “Pairing failed”. Please After pairing, the camera is not affected by interference of other perform pairing again. frequencies. 1. Press the button to select “Pairing”, press the OK button to enter: Activation ●... -
Page 11: Alarm Setting
Operations for Android Client PIP Setting Quality Resolution Size ● Connect network High High Insert the receiver in the pedestal, and connect with the base Medium power. Then connect the outer net. T urn on the receiver. Notice: When The Pedestal and the receiver to be hot-swappable, the receiver is easy to restart. - Page 12 View image ● 1. Click the Settings and enter settings interface. add new camera. 3. Click the icon, the image will display on the smart phone. 2. When RX and mobile phone can normally connect to outer net. you just need to input Device ID to the client. or scan the QR code to get the Device ID.
-
Page 13: Operations For Ios Apple Client
Setting Push Notification Operations for iOS Apple Client ● 1. T urn on the push notification function on the receiver, enter ● Connect network Main Menu => System => Network => Push Notifica tion, receiver screen displays the following: Insert the receiver in the pedestal, and connect with the base power. - Page 14 ● View image 3. T o view the video image, you need to choose the right title in the Device list, then click the line to enter the monitoring mode. 1. Click the APP and enter “Device list” interface. Click the icon to add new camera.
-
Page 15: Specifications
Setting Push Notification Specifications ● 1. T urn on the push notification function on the receiver, enter Parameter Items Main Menu => System => Network => Push Notifica tion, 1/ -inch color CMOS Imaging Sensor receiver screen displays the following: Video Resolution 656 x 488 Viewing Angle... -
Page 16: Faq
Troubleshooting 1. Why the screen doesn’t display any monitoring picture after Symptoms Solutions the camera is connected? Confirm the adapters of receiver and camera connect Answer: 1. Please check whether “ Active” is set to “ON”. No display 2. Please check whether pairing succeeds. Re-pair the camera and receiver.
Need help?
Do you have a question about the 8107JU and is the answer not in the manual?
Questions and answers