Table of Contents
Advertisement
Advertisement
Table of Contents

Related Manuals for Mad Catz rat 6


Summary of Contents for Mad Catz rat 6
- Page 1 PRODUCT GUIDE – Version 1.0...
-
Page 2: Table Of Contents
4. Mad Catz RAT FLUX Software for Windows ............. 10 FLUX Programming Overview .................... 12 Quick Programming of the Mad Catz Default Profile ........... 13 Profile Management ......................... 16 Create your own Profile ......................17 Custom Command Creation ....................21 Create a Simple Custom Command ................ -
Page 3: Introduction
The original RATs set the benchmark for PC gaming peripheral design, engineering, and functionality with their launch back in 2010. For 2016, Mad Catz are delivering an upgraded range of seven products, to consumers that demand the best possible hardware for gaming. -
Page 4: Feature Overview
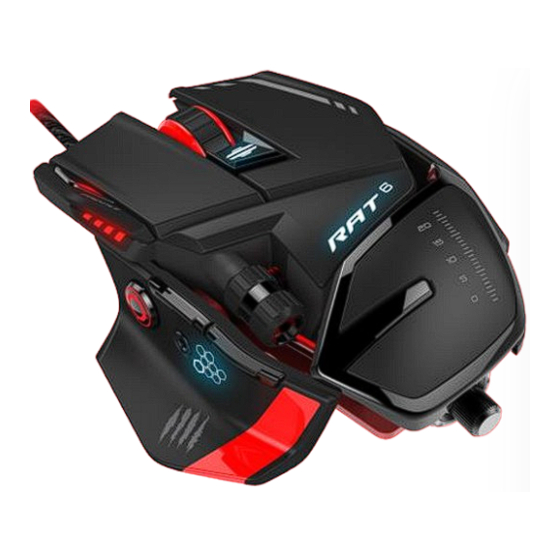
2. Feature Overview This section will provide you with an overview of all of the controls, indicators and features that make up the product. Controls and Indicators RAT6 has 11 programmable controls, these are highlighted red in the below image. -
Page 5: What Is A Profile, And How Does The On-Board Memory Work
What is a profile, and how does the on-board memory work? All of the additional functions and programmable controls can be used to your advantage when coupled with our FLUX software interface. FLUX can be used to create button mapping profiles, consisting of crucial commands for your favourite games and apps. -
Page 6: Precision Aim
Precision Aim Precision Aim is an important feature of the RAT series. By adjusting the Precision Aim slider in the software, the gamer can press and hold the button to slow their cursor movement to help steady their aim for that crucial shot. On RAT6, you can also make the cursor go quicker when the button is pressed. -
Page 7: Dynamic Ergonomics
Dynamic Ergonomics The ability to alter one product to suit a variety of different hand shapes and grip styles, is a core pillar of the RAT range. On RAT6, both the length of the palm rest and the weight can be adjusted. The adjustable palm is invaluable for getting the product to feel just right in your hand. - Page 8 The weight of the product can also be adjusted for people who prefer a lighter product, or slightly heavier. The baseline weight of the product is 125g. A further 18g can be added via the three 6g weights. Changing weights is a simple case of removing the end cap and spring, setting the correct weight, and then replacing the spring and end cap.
-
Page 9: First-Time Setup And Software Installation
3. First-Time Setup and Software Installation RAT6 can be used as a basic mouse when plugged into a PC via USB. However, if you would like to configure button response, and the performance of the sensor, both the product driver and software application will need to be downloaded and installed. -
Page 10: Mad Catz Rat 6 Flux Tm Software For Windows
4. Mad Catz RAT FLUX Software for Windows RAT6 A powerful software application for is supplied for Window users. As well as offering first-line support and setup tips, the software’s two key functions are to allow the user to configure the performance settings of the product and to create game-specific profiles. -
Page 11: Before You Begin
Only the software application for the product needs to be installed. RAT6 is driverless. Profiles are stored locally in Public\Documents\Mad Catz\RAT6 folder. Profiles are stored as .pr0 and .xml files and can be transferred to other computers that have the... -
Page 12: Flux Programming Overview
FLUX Programming Overview The following section will take guide you through the layout of the user interface and how each element operates. When you first load up FLUX, it will look like this: Key Elements: 1. In the top right hand corner (next to Minimize and Close), is a handy indicator to tell you what Profile Slot is currently selected on the RAT. -
Page 13: Quick Programming Of The Mad Catz Default Profile
Quick Programming of the Mad Catz Default Profile When you first load up the software, the profile presented for editing is the Mad Catz Default Profile. The default profile is great for applying commands that make browsing the Internet and controlling media, quick and intuitive. - Page 14 To remove a command from a button, hover your RAT cursor over the callout. When the cross appears, left- click it. Once you are happy with the assignments, click the Apply button.
- Page 15 This will reveal the Profile Menu and allow you to select a memory slot for the profile. Click Upload, and the assignments will now be active on the RAT.
-
Page 16: Profile Management
2. At the top of the Profile Menu is the Create New button. When this is clicked a blank untitled profile is added to the list. 3. Below the Create New button is the entry for the Mad Catz Default profile. The profile name is also highlighted red. This means that the profile is currently selected for editing. -
Page 17: Create Your Own Profile
Create your own Profile Click the Create New button. It will generate a new untitled profile. It will be automatically selected for you to begin editing. Right-click the profile to reveal the context menu and select Rename. Enter the desired profile name and hit enter on your keyboard. - Page 18 You can now assign commands to the buttons across all the profile modes. If you find that the Command Library is too difficult to view or navigate, you have two options: 1. Hide the profile menu. Now that your new profile is selected for editing, it will not change until you select a different profile.
- Page 19 You can now Apply the profile and start gaming. Before you do, here are the explanations for the additional options in the Profile Context Menu. Link to Program – This will open up a file explorer window. You will need to browse to, and select, the .exe file that is associated with the game or application you want the profile to be associated with.
- Page 20 Select a memory slot and then click the Upload button to make the programming active on the RAT.
-
Page 21: Custom Command Creation
For example, the command for selecting a Pistol in Battlefield could be an image of the pistol itself. The default command icon is the Mad Catz slash logo. Click the icon box to open up a file explorer window. You can now browse to the image you want to add to the command. - Page 22 and adjust keypress timings. You can also program every aspect of a physical key press. We define these as Press (button down), Repeat (button held), and Release (button up). 4. Underneath the Icon Box resides the Command Creation area. a. Playback Mode. This defines how the command is output or ‘played’ when the button is pressed. When set to closed, the entire key press string of a command will be played, even if you quickly press and release the button.
-
Page 23: Create A Simple Custom Command
Create a Simple Custom Command In this example, I have typed the name of the command, moved my cursor into the Command area and pressed the number 2 on my keyboard, and then clicked in the icon area to browse to the image I want associated with the command. -
Page 24: Create A Complex Custom Command
Create a Complex Custom Command In this example, we will run through the creation of a multi-keypress command that takes into account the timing between keypress events. I want to create a command for Battlefield, that when activated, will get my Sniper Rifle out and then put me in the Prone position. - Page 25 Firstly, you can simply type in the desired ms delay. Secondly, you can drag a slider to the desired delay. Finally, you can select a preset delay from one of the option buttons. Once you are happy with your timing delay, you ...
-
Page 26: Using The System Tray Icon
Using the System Tray Icon The system tray icon is a quick and convenient way to access FLUX and activate profiles without having to load the interface. If you left-click the icon, the FLUX interface will open. If you right-click the icon, a profile menu will appear. From here you can quickly upload profiles to the RAT, or clear existing memory slots. -
Page 27: Flux Settings Overview
FLUX Settings Overview The Settings page allows you to access and adjust the key performance values of the product, such as D.P.I. and report rate. These options are also stored in the internal memory of the RAT. Key Elements: 1. Settings are split into two types: a. -
Page 28: Response
D.P.I. Response Set the tracking resolution of the sensor. Each profile can contain up to four unique D.P.I. values. Both X and Y axes can be independently configured to suit the exact requirements of the game. Each D.P.I. level is native to the sensor. This means that no interpolation or any other additional onboard processing is used to achieve a certain D.P.I. -
Page 29: Switch
D.P.I. Switch By default, the D.P.I. rocker switch is used to select up to four D.P.I. levels indicated by the 4 red LEDs. These functions, along with D.P.I. Cycle (that only takes up one button) can be assigned to any of the programmable buttons on the RAT. -
Page 30: Multiplier
D.P.I. Multiplier This is a new feature, designed to give an additional performance boost to the sensor response. Selecting a value on this page will multiply the data counts from the sensor to boost the overall D.P.I. If you want unaltered sensor data, keep the setting at the default setting of 1. -
Page 31: Precision Aim
Precision Aim By default, the large thumb button is set to Precision Aim and will cut the sensor speed to 400 D.P.I. This function can be assigned to any of the programmable buttons on the RAT. To do so, simply select the preferred button from the drop down menu. -
Page 32: Poll Rate
Poll Rate This setting determines how often input data is sent to the host computer. A higher value means faster data updates up to 1 ms (1000Hz). -
Page 33: Angle Snap
Angle Snap This is a feature within the sensor firmware that, when turned on, can correct tiny deviations in sensor movement. This can be beneficial in CAD/CAM applications where sometimes it is necessary to draw straight lines. However, when gaming, it is often better to have no interference between the movement of your hand and what gets reports to the PC and the game. -
Page 34: Lift-Off Height
Lift-Off Height The Lift-Off height is crucial for ensuring the sensor is tracking correctly on your surface. It can also affect unwanted cursor movement if you lift the RAT a lot during gaming. We recommend: Smooth or Metallic Surfaces – 0.3 mm ... -
Page 35: Indicator Brightness
Indicator Brightness This setting allows you to alter the brightness of both the Profile LED and the D.P.I. Level LEDs. -
Page 36: Flux Kameleon Overview
FLUX Kameleon Overview The Kameleon page allows you to customize the look and behaviour of the RGB LEDs. These lighting configurations are per-profile, so can change depending on what game or application you are using. Key Elements: 1. The left hand side of the page shows a picture of the RAT with a call out to each of the Kameleon lighting zones on the product. -
Page 37: Configuring The Kameleon Lighting Zones
Configuring the Kameleon Lighting Zones Left-click a Lighting Zone call out and then choose a colour for the zone. Repeat until all zones are set as you want them. Next, select an effect from the drop down menu. Effects may have different options associated with them. For example, the Rainbow effect allows you to set the speed and the brightness of the effect. -
Page 38: Cloud Storage Backup
Cloud Storage Backup FLUX can work in tandem with most popular cloud storage services (Drop Box, OneDrive, Google Drive etc.). This is really useful for keeping your profiles backed up. In addition, if you use your RAT on multiple PCs, you can always access and use the same profiles. - Page 39 Now you can access the cloud folder from within the software. Click the folder to open it. Once the folder is open, you can create and edit profiles, and they will remain consistent across multiple computers that are using the same cloud service. Click the back button to navigate back out to the main profile folder on your system.
-
Page 40: Product Questions
1. Does the product support firmware updates? Yes. The product is firmware update compatible. If there are any updates to the firmware, Mad Catz will release a firmware update application to update the product. 2. Can the Profile button be programmed? ...
Need help?
Do you have a question about the rat 6 and is the answer not in the manual?
Questions and answers