
Subscribe to Our Youtube Channel
Summary of Contents for 3D Factories EASY 3D MAKER
- Page 1 Thank you for chooding our 3D printer Before any manipulation with the printer carefully read this user guide U S E R ‘ S G U I D E T Y P E : E A S Y 3 D M A K E R - 1 - VERSION: 1.9.2012 ©...
- Page 2 IMPORTANT SAFETY NOTICE: 1. CAUSING DAMAGE A 3D PRINTER DUE TO FAILURE OF FOLLOWING INSTRUCTION IN THIS USER MANUAL, EXPIRING THE WARRANTY VOID. 2. SECOND MATERIAL FOR DAMAGES AND PERSONAL INJURY CAUSED BY THE PRINTER MISAPPLICATION IN VIOLATION OF THIS USER'S MANUALS OR FAILURE TO SAFETY REGULATIONS IS FULLY RESPONSIBLE USER OF THIS DEVICE.
-
Page 3: Table Of Contents
CONTENT PAGE 1. PACKAGE CONTENTS 2. DESCRIPTION OF PARTS 3. EQUIPMENT TO PRINT 4. MINIMUM PC REQUIREMENTS 5. INSTALL SOFTWARE – G3DMAKER 6. PRINTER CONNECTION 7. TURN ON - OFF MACHINE 8. BEFORE PRINT 8.1 PRINT BED 8.2 REMOVING OF DEBRIS 8.3 PRINT BAD CALIBRATION 8.4 CONTROL OF PRINT BED FLATNESS 8.5 NOZZLE CLEARING... -
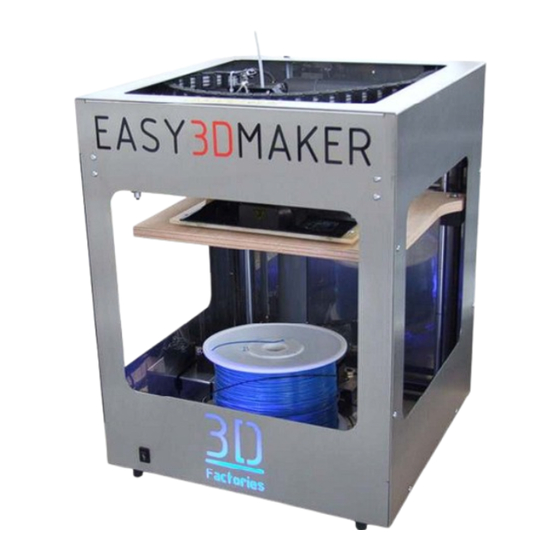
Page 4: Description Of Parts
2. DESCRIPTION OF PATRS EXTRUDER AXIS Y AXIS X PRINT BED AXIS Z SPOOL OF MATERIAL 3. EQUIPMENT TO PRINT All equipments is possible order via our distributost or in the special shops. For model removing from the print bed and for cleaning of bed use knife (with caution) of spatula. - 4 - VERSION: 1.9.2012 ©... -
Page 5: Minimum Pc Requirements
4. MINIMUM PC REQUIREMENTS Intel Cel. 2,8 GHz RAM 1 GB Intel HD Graphics or better HDD 50GB Keyboard, mause, USB port Windows XP and newer + FRAMEWORK 3.5 and newer 5. POSTUP INSTALACE OBSLUŽNÉHO SOFTWARU G3DMAKER Put CD into and CD reader on your compiuter and follow the instruction. If process will not start find on CD G3DMAKER_setup.exe and double click on it. -
Page 6: Before Print
8. PŘÍPRAVA PŘED TISKEM Before print is necessary do this few steps. Please pay attention to this. • Doublecheck if the print bed is clean • Remove all debris and rests of material • Doublecheck if the print bed is put in the right way and strongly attached •... -
Page 7: Print
Remove material carefully avoid to damage of print bed Scratching the surface, which occurs during the operation is not reason for impossibility to print. Print quality is affected and the risk of damage to your printer comes with deeper grooves, pits and uneven print surface. - Page 8 TURN OFF THE MACHINE CALIBRATION PROCEDURE IS PERFORMED IN PRINTER disconnected from electricity! First put the paper on the print bed. Set screws so that the paper is just touching the nozzle. ATTENTION - PAPER must move a little freely! Do this for 3 position and be used to check again. Crossing the nozzle into the appropriate positions perform manually.
- Page 9 8.5 TRYSKA A ČIŠTĚNÍ TRYSKY SAFETY WARNING! o the nozzle flowing molten material coating layers. Nozzle temperature can reach up to 280 ° C, please observe caution. o To print ran correctly, it is necessary to keep the nozzle clean. o Do not touch the print head when the machine Danger of burns! o Clean the print nozzles always turned off the machine and when the print nozzle has cooled down for about 30 minutes after the last press and switched off.
- Page 10 UPOROZNĚNÍ ! Do not use other then recomendet materials. The printer can be damage. 9.2 ZAVEDENÍ STRUNY A VÝMĚNA STRUNY (BARVY, MATERIÁLU) Ze zásobníku ve spodní části stroje je vyvedeno vedení struny (bílá trubička) do tiskové hlavy extrudéru. Konec struny upravte dle obrázku a nasuňte do vedení. Leadership strings (white tube) out of the extruder and pull the string about 10 cm so that sticking out of the tube.
- Page 11 REPLACEMENT STRINGS FOR CHANGE MATERIAL AND COLOR When replacing strings proceed similarly as that of a new line with the following procedure: First Cut off above the extruder and the rest of the original material is removed from the line (tube) away.
- Page 12 9.5 VYJMUTÍ MODELU Z TISKÁRNY For better access to print flat scroll to the bottom position. Using a knife or spatula peel first corner base layer of the model, and then gradually podeberte and remove the entire model. If there is to fuse the model to the motherboard and it is difficult to peel off the model it is possible to remove the entire board for better access to the model.
- Page 13 CLEANING AND MAINTENANCE UTER SHEATH PRINTER WITH A DRY CLOTH . XY AXES EEP CLEAN AND FREE FROM DUST AXIS PERIODICALLY LUBRICATE WITH SILICONE OIL EFORE DELETING WIPE WITH A DRY CLOTH OR TOWEL SO THAT YOU GET RID OF DUST AND DIRT CREWS AND GUIDE RODS TREAT THE SAME WAY N THE CASE OF IMPURITIES ON THE...
- Page 14 HECK THE NOZZLE HEIGHT ADJUSTMENT F THE NOZZLE IS TOO LOW THE MATERIAL IS APPLIED INCORRECTLY IT BREAKS UP INTO THE NOZZLE AND IT BREAKS HE NOZZLE IS TOO HIGH ATERIAL FORM ROLLER COMES OUT OF THE NOZZLE AND FORMS A WAVE DEALLY NESTLED NOZZLE ZANACHÁVÁ...
Need help?
Do you have a question about the EASY 3D MAKER and is the answer not in the manual?
Questions and answers