
Summary of Contents for MOTORSCAN MEMOBIKE 6050
- Page 1 OPERATING INSTRUCTIONS TECH SUPPORT HOTLINE +1 (888) 665-8804 x1 support@svd.tools...
- Page 2 OPERATING INSTRUCTIONS MS6050EN Mod. 6050_EN First Edition February 2014 A.Cavalca Release 01 February 2016 A.Cavalca Release 02 March 2016 A.Cavalca Any printed or digital reproduction of this manual is forbidden without the authorization of the copyright holder. Printing the digital version of this manual is permitted only for the purpose of producing a back-up copy for the user of the product.
- Page 3 MS6050EN OPERATING INSTRUCTIONS Dear Customer, This product is part of the MOTORSCAN ® family of products. It is the result of many years of research and development. The EOS S.r.l. Motorscan® Division is glad to have you as a customer.
- Page 4 OPERATING INSTRUCTIONS MS6050EN Blank Page...
-
Page 5: Table Of Contents
MS6050EN OPERATING INSTRUCTIONS INDEX INDEX ............................i INTRODUCTION ......................... 1 INSTALLATION ........................4 OPERATING INFORMATION ..................... 4 SYMBOLS ........................... 6 1.0.0 - PRODUCT DESCRIPTION ..................7 1.1.0 - GENERAL ........................ 7 1.2.0 - SPECIFICATIONS ....................7 1.3.0 - FRONT / CONNECTIONS VIEW ................8 1.4.0 - KEYBOARD VIEW .................... -
Page 6: Index
OPERATING INSTRUCTIONS MS6050EN 4.1.5 - “MESSAGE” SCREEN ................... 74 4.1.6 - “MULTIPLE SELECTION” SCREEN ..............74 4.1.7 - “PARAMETERS TABLE” SCREEN ................ 75 4.2.0 - TYPES OF DIAGNOSTICS ..................76 4.2.1 - SERIAL COMMUNICATION................... 76 4.2.2 - BLINKING CODES ....................76 4.2.3 - DISPLAY CODES .................... -
Page 7: Introduction
INTRODUCTION This manual is an integral part of the product. Read these instructions carefully before using the tool and keep them in a safe place. EOS S.r.l. Motorscan® Division apologizes for any errors in the text. Brand names and products mentioned in the document are registered brands of the relevant owners. - Page 8 MOD: 6050 MS6050EN IMPORTANT INFORMATION ABOUT PERSONAL SAFETY GENERAL SAFETY IN THE WORKSHOP. DANGER OF SUFFOCATION GASOLINE ENGINES Exhaust gases from gasoline vehicles contain Carbon Monoxide, a colorless and odorless gas which, in case of inhalation, can cause serious physical injury or death. When working under a vehicle, be very careful.
- Page 9 MS6050EN MOD:6050 DANGER OF BURNS Some of the components in engines (exhaust gas manifold, etc.) can become very hot, as can certain sensors. Remember to never touch these parts. SAFETY MEASURES: Wear protective gloves. Never allow the test instrument connection wires to rest on or near hot parts.
-
Page 10: Installation
MOD: 6050 MS6050EN DANGER OF ASFIXIATION If subjected to high temperatures (over 250 °C or owing to fire outbreaks), exhaust gas hoses may release highly toxic gases. SAFETY MEASURES: Immediately contact a physician if such gas is inhaled. Use neoprene or PVC gloves to eliminate combustion residuals. Fire residuals can be neutralized with a calcium hydroxide solution. - Page 11 Only use neutral detergents and a soft, slightly moistened cloth. IMPORTANT INFORMATION ABOUT PRODUCT SAFETY This MOTORSCAN® product provides a high level of protection against the risk of electric shock. The installer is responsible for connecting it to a correctly grounded electrical socket. Seek technical assistance before using an adapter or extension cable.
-
Page 12: Symbols
MOD: 6050 MS6050EN SYMBOLS Symbols used in the DEVICE: ALTERNATING CURRENT GROUND PROTECTION CONSULT THE INSTRUCTION MANUAL RISK OF BURNS RISK OF ELECTROCUTION NEVER ATTEMPT TO REMOVE THE COVER (operation only to be carried out by qualified technicians) CE CONFORMITY MARK It indicates compliance with the relevant European Union Directives. -
Page 13: Product Description
MS6050EN MOD. 6050 1.0 - PRODUCT DESCRIPTION 1.1 - GENERAL The 6050 is a compact, user-friendly scan tool. This state-of-the-art technology that allows diagnostics on all types of motorcycle communication protocols. The tool comes in a handy carrying case, to protect the tool and carry diagnostic cables. 1.2 - SPECIFICATIONS Cortex M3 (96 Mhz) RAM Memory... -
Page 14: Front / Connections View
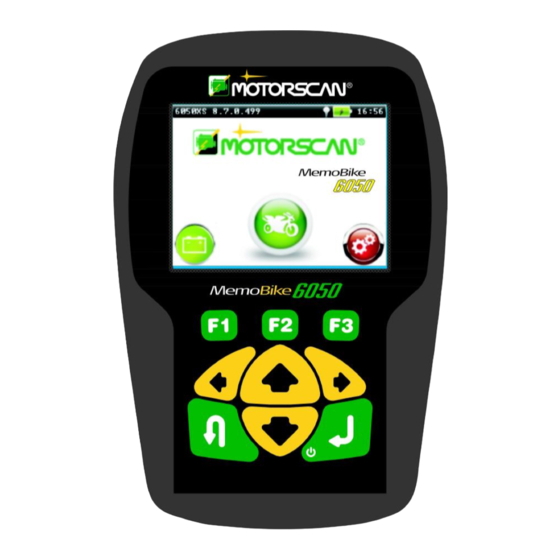
MOD. 6050 MS6050EN 1.3 - FRONT / CONNECTIONS VIEW 1 ) LED LIGHT TO ILLUMINATE THE VEHICLE DIAGNOSTC SOCKET 2 ) USB INTERFACE FOR COMPUTER OR POWER SUPPLY CONNECTION 3 ) GRAPHIC DISPLAY 4 ) KEYBOARD 5 ) HD DB26 HD INTERFACE FOR DIAGNOSTIC CABLE CONNECTION OPERATING INSTRUCTIONS... -
Page 15: Keyboard View
MS6050EN MOD. 6050 1.4 - KEYBOARD VIEW 6 ) F1, F2, F3, KEYS : USE FUNCTION KEYS AS INSTRUCTED BY THE SOFTWARE. 7 ) KEYS : TO BROWSE THE SELECTION LIST OR TO MOVE THE CURSOR. 8 ) ENTER –... -
Page 16: Standard Accessories
MOD. 6050 MS6050EN 1.5 - STANDARD ACCESSORIES Next to each motorcycle model in the “Vehicles List” you can find the part number for the cable required for a particular function. DESCRIPTION and PART NUMBER PICTURE Carrying case Code: 22ST5600KP3*A Scan tool Part number: SL6050 AC/DC power supply Part number:... - Page 17 MS6050EN MOD. 6050 DESCRIPTION and PART NUMBER PICTURE USB/Power cable Part number: 116000004 Master Cable Part number: Required for the use of the slave cables. Battery power cable Part number: “Universal” Cable Applications: Aprilia , Benelli, BMW Cagiva , Harley Davidson , Honda Hyosung, Kawasaki , Kymco, Malaguti...
-
Page 18: Optional
MOD. 6050 MS6050EN 1.6 - OPTIONAL The part number for the cable required for a particular function is next to each motorcycle model in the “Vehicles List”. Exact cables included vary by kit. Consult distributor. DESCRIPTION and PART N°. PICTURE KAWASAKI 4 Pin Slave Cable Part number: KAWASAKI 8 Pin Slave Cable... - Page 19 MS6050EN MOD. 6050 DESCRIPTION and PART N°. PICTURE HONDA 2 Pin Slave Cable Applications: Honda HISS systems. Part number: SUZUKI 6 Pin Slave Cable Part number: SUZUKI 4 Pin Slave Cable Part number: YAMAHA 3 Pin Slave Cable Applications: Malaguti and Yamaha.
- Page 20 MOD. 6050 MS6050EN DESCRIPTION and PART N°. PICTURE CAGIVA 10 Pin Slave Cable Part number: BMW Slave Cable Part number: Harley-Davidson Slave Cable Applications: Harley-Davidson and Buell Part number: Except CAN -BUS systems OBDII Slave Cable Applications: Triumph Part number: OPERATING INSTRUCTIONS...
- Page 21 MS6050EN MOD. 6050 DESCRIPTION and PART N°. PICTURE Packard Slave Cable Applications: Aprilia , Bimota , Cagiva Derbi, Ducati, Garelli, Gas Gas, Gilera, KVN Motor, Laverda, Malaguti , Moto Guzzi, Moto Morini, MV Agusta , Piaggio, Sherco, Vespa, Voxan Part number: Only Marelli systems APRILIA/DITECH Slave Cable Applications: Aprilia Ditech system.
- Page 22 MOD. 6050 MS6050EN DESCRIPTION and PART N°. PICTURE PEUGEOT Slave Cable Part number: KYMCO Slave Cable Part number: KAWASAKI 4 Pin/2007 Slave Cable Part number: BRP Slave Cable Part number: OPERATING INSTRUCTIONS...
- Page 23 MS6050EN MOD. 6050 DESCRIPTION and PART N°. PICTURE KAWASAKI REG. INJ. Slave Cable Part number: BENELLI 6 Pin Slave Cable Part number: DUCATI CAN 4 Pin Slave Cable Part number: KAWASAKI 6 Pin Slave Cable Part number: OPERATING INSTRUCTIONS...
- Page 24 MOD. 6050 MS6050EN DESCRIPTION and PART N°. PICTURE KAWASAKI MY 2010 6 Pin Slave Cable Part number: SYM 3 Pin Slave Cable Part number: POLARIS 8 Pin Slave Cable Part number: WALBRO SYSTEM Slave Cable Applications: Aprilia and Bimota with Walbro systems.
- Page 25 MS6050EN MOD. 6050 DESCRIPTION and PART N°. PICTURE HARLEY-DAVIDSON CAN 6 Pin Slave Cable Applications: Harley-Davidson with CAN- BUS systems. Part number: BMW Slave Cable Part number MV AGUSTA CAN 4 Pin Slave Cable Applications: MV Agusta with CAN-BUS systems. Part number: WARNING: do not use on HONDA systems.
- Page 26 MOD. 6050 MS6050EN DESCRIPTION and PART N°. PICTURE KYMCO CAN 4 Pin Slave Cable Applications: Kymco systems Code: DAELIM CAN 4 Pin Slave Cable Applications: Daelim systems Code: HARLEY DV CAN 6 Pin Slave Cable Applications: Harley Dv systems Code: HUSQVARNA 6 Pin Slave Cable Applications: Husqvarna systems Code:...
- Page 27 MS6050EN MOD. 6050 DESCRIPTION and PART N°. PICTURE KTM injection regulation Slave Cable Applications: KTM systems Code: BENELLI Kee Way 6 Pin Slave Cable Applications: Benelli kee way systems Code: OPERATING INSTRUCTIONS...
-
Page 28: Connecting
MOD. 6050 MS6050EN 2.0 - CONNECTING WARNING! NEVER CONNECT THE TWO CLIPS (RED AND YELLOW) ON THE 522 CABLE TO THE BATTERY. WHEN STARTING A DIAGNOSTIC PROCEDURE ON A MOTORCYCLE, THE VCC CLAMPS ON THE 051 CABLE MUST BE CONNECTED ONLY TO THE BATTERY ON THE MOTORCYCLE BEING TESTED. -
Page 29: Powering The Tool
MS6050EN MOD. 6050 2.1 - POWERING THE TOOL To turn the tool on, press the ENTER key. 2.2 - MOTORCYCLE IDENTIFICATION To start the diagnostic procedure, identify in the VEHICLES LIST the correct diagnostic cable for the motorcycle being worked on (see Vehicles List). Note: there may be several ways (with different cables) to connect to each bike. - Page 30 MOD. 6050 MS6050EN Follow the connection procedures below: VEHICLE LIST CABLES PART SECTION CODE NUMBER Connecting to the motorcycle using “UNIVERSAL” cable (section 1.5). 525 + 520 Connecting to the motorcycle using BMW SLAVE cable (section 1.6). 525 + 051 + 520 Powering the tool (section 1.5).
- Page 31 MS6050EN MOD. 6050 541 + 520 551 + 520 557 + 051 + 520 562 + 051 + 520 OPERATING INSTRUCTIONS...
-
Page 32: Connecting To The Motorcycle Using A Master/Slave Cable
MOD. 6050 MS6050EN 2.3 - CONNECTING TO THE MOTORCYCLE USING A MASTER/SLAVE CABLE Connect the 520 MASTER cable to the tool. Connect the 14 pin connector on the MASTER cable to the SLAVE cable indicated in the vehicles list. If the SLAVE cable has a power jack, connect the 051 cable also. Connect the clamps to the battery terminals on the vehicle being tested (red clamp on the positive terminal and black clamp on the negative terminal). -
Page 33: Connecting To The Motorcycle Using The "Universal" Cable
MS6050EN MOD. 6050 2.4 - CONNECTING TO THE MOTORCYCLE USING THE “UNIVERSAL” CABLE If the correct cable is missing, or when it is explicitly indicated in the “VEHICLE LIST”, use the universal cable: Connect the 522 cable to the tool. Connect the VCC clamps to the battery terminals on the vehicle being tested (red clamp on the positive terminal and black clamp on the negative terminal). -
Page 34: Connecting To The Motorcycle Using Bmw Slave Cable
MOD. 6050 MS6050EN 2.5 - CONNECTING TO THE MOTORCYCLE USING BMW SLAVE CABLE Connect the MASTER SL010520 cable to the tool. Connect the 14 pins connector on the MASTER cable to the SLAVE cable 525. If the 051 cable is indicated in the vehicle list, connect it to the jack on the SLAVE cable and to the battery terminals on the vehicle being tested (red clamp on the positive terminal and black clamp on the negative terminal). -
Page 35: Operation
136050UK MOD. 6050 3.0 - OPERATION After connecting the tool to the diagnostic socket or to the power supply, the following screen is displayed: Select the central icon motorcycle logo , using the left and right arrow keys and confirm with ENTER Key. -
Page 36: Setup Menu
MOD. 6050 136050UK 3.1 - SETUP MENU Select the SETUP icon (gears logo) using the left and right arrow keys and confirm with ENTER. The menu shown below appears on the scan tool: USER ID: Set the User Name, Garage/ Workshop name and Contact (for printing reports) OPERATING INSTRUCTIONS... - Page 37 136050UK MOD. 6050 Use the up and down arrow keys to modify the selection and confirm with ENTER. Navigate the virtual keyboard with the arrow keys, select the single characters with ENTER and confirm the text entered using the F3 key. View the scanner’s serial number.
-
Page 38: Setting Menu
MOD. 6050 136050UK Press ENTER to return to the Setup menu. SCREENSHOT MANAGEMENT: Browse the SD memory section where screenshots, acquired are saved. Refer to the “Screenshot Management” paragraph. SETTING MENU : Software device settings. Refer to the “Metting Menu” paragraph REPORT : Generated a printed report of the screenshots saved. - Page 39 136050UK MOD. 6050 SET TIME & DATE: Set time and date display. To set time and date answer YES to the confirmation message and use the following boxes to change the values: OPERATING INSTRUCTIONS...
- Page 40 MOD. 6050 136050UK Use the up and down arrow keys to change the value of the highlighted digit, and the left and right arrow keys to change the cursor position. Confirm the new value with the F3 key. To interrupt the procedure, press ESC. At the end, the following confirmation screen appears: Select YES to confirm the new data or NO to discard the change.
- Page 41 136050UK MOD. 6050 Select the desired language using the arrow keys and save the new selection with ENTER or discard the change using the ESC key. MEASUREMENT UNITS: Function switches between the English/ Imperial measurement system (°F, mi, mph, in Hg) and the Standard International System (°C, km, km/h, mmHg).
- Page 42 MOD. 6050 136050UK VOLUME: Speaker volume and key-beep ON/OFF settings Select the desired function (Speaker Volume or Key Beep), using the up and down arrow keys. Change the current value using the left and right arrow keys. Save the new value using the ENTER key or discard the changes using the ESC key.
-
Page 43: Screenshot Management
136050UK MOD. 6050 HARDWARE INFO: Boot/firmware versions and internal memory data display Press any key to return to the Setting menu. 3.2.1 - SCREENSHOT MANAGEMENT Anytime the F2 key is pressed a snapshot is taken of all items displayed in the screen. To review the pictures saved, select the “Screenshot management”... -
Page 44: Report
MOD. 6050 136050UK To display the desired bitmap, select the file in the list and confirm with ENTER. The bitmap with the superimposed text “File BMP” (lower right corner) is shown: Press any key to return to the folder selection menu. 3.2.2 - REPORT Anytime the F2 key is pressed a snapshot is taken of all items displayed in the screen. - Page 45 136050UK MOD. 6050 OPERATING INSTRUCTIONS...
- Page 46 MOD. 6050 136050UK Select the screenshots to be added to the printable report using ENTER key and confirm multiple selections with F3 key. The file Report@HH_MM_SS.ps (PostScript standard) will be generated in the SD sub-folder “YYYY_MM_DD” of the “Print” folder. The complete path of the report generated is: Print\YYYY_MM_DD\ Report@HH_MM_SS.ps.
-
Page 47: Battery Information Screen
136050UK MOD. 6050 3.3 - BATTERY INFORMATION SCREEN Select the Battery information icon (battery logo) using the left and right arrow keys and confirm with ENTER The screen shown below appears in the scan tool display: The previous screen displays on the left side the current power source: motorcycle battery, USB or none. - Page 48 MOD. 6050 136050UK When the device is connected to the PC or to the external power supply, the power source comes from the USB interface and the battery screen changes as follows: Press any key to return to the Start-up menu. OPERATING INSTRUCTIONS...
- Page 49 136050UK MOD. 6050 3.4 - DIAGNOSTIC FUNCTIONS After selecting the make of the motorcycle to be tested, the diagnostic function selection menu appears. The menu being displayed is not always the same. It varies by the manufacturer selected in the "MAIN MENU".
- Page 50 MOD. 6050 136050UK HANDLEBAR CONTROLS: Diagnosing the ECU controlling the handlebar controls DATA LOGGER: Function that allows the storage, and the next visualization, of a parameters set during a test session. ELECTRIC TRACTION: Diagnosing the ECU controlling the electric traction SUSPENSION Diagnosing the ECU controlling the suspension.
-
Page 51: Dtc Global Search
136050UK MOD. 6050 3.4 - DTC GLOBAL SEARCH If a vehicle is equipped with a BUS network, interconnecting more than one ECU, the DTC global search function allows the user to easily and quickly check and erase all the fault codes stored in the vehicle ECUs. - Page 52 MOD. 6050 136050UK Visualization of the systems on which execute the search. At the end of the search is displayed the list of systems that contain errors. Procedures to the errors reading as the chapter “READING STORED FAULTS”. Select “Erasing global DTCs” and the following confirmation message appears: Confirm the erasing procedure by selecting ✔or to stop by selecting ✘.
- Page 53 136050UK MOD. 6050 WARNING! BY CONFIRMING THE ERASE GLOBAL DTCs PROCEDURE, ALL FAULT CODES STORED IN THE VEHICLE ECUs WILL BE IRREVERSIBLY ERASED A confirmation message appears at the end of the erasing procedure OPERATING INSTRUCTIONS...
-
Page 54: Data Logger
MOD. 6050 136050UK 3.4.1 - DATA LOGGER In the function “Data Logger”, selecting “Acquisition” You can proceed with the storage of parameters of test run at the moment: OPERATING INSTRUCTIONS... - Page 55 136050UK MOD. 6050 Using the key select a list of parameters (18 max. simultaneously). Push F3. In the following screen is displayed a pre-calculation of sampling frequency and of maximum duration of data acquisition. NOTE: DATA VARY, DEPENDING ON THE SYSTEM ON THE VEHICLE AND THE NUMBER OF PARAMETERS SELECTED N°...
- Page 56 MOD. 6050 136050UK After the acquisition the parameters can be displayed (also if in the meantime the instrument has been switched off and re-switched on): Frequency of samples Acquisition Sample counter update. time increase or decrease frequency of update. OPERATING INSTRUCTIONS...
- Page 57 136050UK MOD. 6050 OPERATING INSTRUCTIONS...
- Page 58 MOD. 6050 136050UK OPERATING INSTRUCTIONS...
-
Page 59: Selecting The Search Mode For Systems Installed
136050UK MOD. 6050 3.5 - SELECTING THE SEARCH MODE FOR SYSTEMS INSTALLED After selecting the diagnostic module, select the mode for searching for systems installed on the motorcycle and for connecting to the motorcycle: MANUAL SEARCH: search for systems and connect by selecting motorcycle model or ECU. AUTOMATIC SEARCH: only for systems equipped with serial communication. -
Page 60: Manual Search By Vehicle Selection
MOD. 6050 136050UK 3.5.2 - MANUAL SEARCH BY VEHICLE SELECTION This function lists the models covered for the manufacturer selected, and supported by the current software version. Selecting the model of the motorcycle to work on brings up the following screens: OPERATING INSTRUCTIONS... - Page 61 136050UK MOD. 6050 MODEL: Name of the selected motorcycle TYPE OF DIAGNOSTICS: Type of diagnostics supported by the system on the model selected. The types of diagnostics supported by the tool are the following: Serial communication; Blinking codes; Display codes; Manual procedure.
- Page 62 MOD. 6050 136050UK Screens for the selected system are displayed, indicating the status and connections, if any, of the diagnostic cable and of the key. WARNING! WRONG CONNECTIONS CAN IRREPARABLY DAMAGE THE TOOL. OPERATING INSTRUCTIONS...
- Page 63 136050UK MOD. 6050 If the ECU is equipped with serial communication, a connection is attempted. If the ECU search is successfully, a screen appears similar to the one below. If the search fails, a screen appears similar to the one below. OPERATING INSTRUCTIONS...
-
Page 64: Manual Search By Ecu Selection
MOD. 6050 136050UK 3.5.3 - MANUAL SEARCH BY ECU SELECTION This function lists the ECUs for the manufacturer selected and supported by the current software version installed on the scanner. After selecting the ECU for the motorcycle being tested, the selection is confirmed. After selecting PROCEED, further instructions are displayed (see examples). - Page 65 136050UK MOD. 6050 WARNING! WRONG CONNECTIONS CAN IRREPARABLY DAMAGE THE TOOL. If the ECU is equipped with serial communication, a connection is attempted. If the ECU search is successful, a screen appears similar to the one below. OPERATING INSTRUCTIONS...
- Page 66 MOD. 6050 136050UK If the search is negative, error messages are displayed. OPERATING INSTRUCTIONS...
-
Page 67: Automatic Search Connection
136050UK MOD. 6050 3.5.4 - AUTOMATIC SEARCH CONNECTION Use this function to connect automatically to the selected manufacturer if that manufacturer supports automatic connection. The user should be familiar with the position, type of diagnostic socket and connection instructions beforehand. WARNING! WRONG CONNECTIONS CAN IRREPARABLY DAMAGE THE TOOL. - Page 68 MOD. 6050 136050UK If the automatic search fails, an error message is displayed. OPERATING INSTRUCTIONS...
-
Page 69: Ecu Menu
136050UK MOD. 6050 3.6 - ECU MENU If the system search is successful, a menu appears similar to the one below. NOTE: Nome items in the ECU menu might be not be shown. Not all manufacturers support all functions. ECU DATA: select to display the ECU data. PARAMETERS: select to display the parameters and live data supported by the ECU. -
Page 70: Ecu Data
MOD. 6050 136050UK 3.6.1 - ECU DATA By selecting "ECU data" from the "ECU MENU", a screen appears similar to the one below. 3.6.2 - PARAMETERS By selecting “Parameters” from the "ECU MENU", the list of parameters supported is displayed. Using the key select a list of parameters (the maximum number of parameters simultaneously displayed may change, depending on the font size selected). -
Page 71: Reading Stored Faults
136050UK MOD. 6050 After confirming the selection, a table (see below) displays the data in real time. Use the arrows ( ) to move the cursor to scroll long texts. Push the F3 key to display live data on further parameters supported by the ECU. 3.6.3 - READING STORED FAULTS Select “Reading stored faults”... - Page 72 MOD. 6050 136050UK If faults are present in the ECU, a screen appears similar to the one below, indicating the number of saved DTCs. Press to display the list including code and description of faults stored. Selecting an item from the above list brings up a screen for the specific fault, with additional information, as in the following image.
-
Page 73: Erasing Stored Faults
136050UK MOD. 6050 3.6.4 - ERASING STORED FAULTS Selecting "Erasing stored faults" in the "ECU MENU" deletes faults stored in the ECU. Confirm the erasing procedure by selecting ✔or to stop by selecting ✘. WARNING! BY CONFIRMING THE ERASING STORED FAULT PROCEDURE, ALL FAULT CODES STORED IN THE ECU WILL BE IRREVERSIBLY ERASED Once the procedure has been completed, the status is displayed. -
Page 74: Diagnostic Procedures
MOD. 6050 136050UK 3.6.5 - DIAGNOSTIC PROCEDURES Select "Diagnostic procedures" in the "ECU MENU", to display the list of tests of components controlled by the ECU and supported by the scan tool. Selecting a diagnostic procedure in the menu starts the test in question. Press to stop the test, before the automatic end (option not always available) When the diagnostic procedure is complete, the result of the test is displayed. -
Page 75: Configurations
136050UK MOD. 6050 3.6.6 - CONFIGURATIONS Select "Configurations" in the "ECU MENU" to display the list of setup and adjustment operations controlled by the ECU and supported by the scan tool. Selecting an item from the list starts the process. For some setup operations, confirm by selecting ✔... - Page 76 MOD. 6050 136050UK The following screen shows an example of a supported setup function. When the setup or adjustment procedure is complete, the result is displayed. OPERATING INSTRUCTIONS...
-
Page 77: Appendix
136050UK MOD. 6050 4.0 – APPENDIX 4.1 – SCREEN T This section describes the main types of screens displayed when using the diagnostic software. The screens shown in the following sections are examples and may be subject to modification. 4.1.1 - “START-UP” SCREEN LED light status. -
Page 78: Menu" Screen
MOD. 6050 136050UK 4.1.2 - “MENU” SCREEN Selection frame Selection arrow direction The “MENU” screen is for selecting an item from a list. The functions of navigation keys are described below: return to the previous screen. select the item indicated. move the selection arrow up 1 item. -
Page 79: Proceed - Exit" Screen
136050UK MOD. 6050 4.1.3 - “PROCEED - EXIT” SCREEN Highlighted item ✘ Use the “PROCEED – EXIT” command to continue by selecting ✔or to stop by selecting The functions of navigation keys are described below: confirm the highlighted item. move the selection to the left. move the selection to the right. -
Page 80: Message" Screen
MOD. 6050 136050UK 4.1.5 “MESSAGE” SCREEN The “MESSAGE” screen displays a message. The functions of navigation keys are described below: display the next message or screen. 4.1.6 “MULTIPLE SELECTION” SCREEN Selection background The “MULTIPLE SELECTION” screen allows one or more options to be selected from a list. The functions of navigation keys are described below: return to the previous screen. -
Page 81: Parameters Table" Screen
136050UK MOD. 6050 4.1.7 - “PARAMETERS TABLE” SCREEN The "PARAMETERS TABLE" screen displays live data from the ECU. To scroll the long texts, press the arrow key ( ) once. The functions of navigation keys are described below: return to the parameters selection menu. move the enabling cursor up 1 line. -
Page 82: Types Of Diagnostics
MOD. 6050 136050UK 4.2 - TYPES OF DIAGNOSTICS 4.2.1 - SERIAL COMMUNICATION Serial communication is the most advanced diagnostics mode. A communication handshake is established automatically between the scan tool and the ECU. This type of diagnostic capability also allows the display of live data from the ECU and may support the adjustment of certain functions. -
Page 83: Display Codes
4.2.4 - MANUAL PROCEDURE Some diagnostics functions can be activated with manual procedures and are described by the scanner on a case by case basis. EOS S.r.l. Motorscan® Division Smart Vehicle Diagnostics LLC Tel. +39 0521 631411 Tel. +1 888 665 8804 www.motorscan.com...
Need help?
Do you have a question about the MEMOBIKE 6050 and is the answer not in the manual?
Questions and answers
L’écran d’allumage tourne en boucle et affiche « optimisation please wait » et ça recommence que faire ?
Connector pinout diagram