
Related Manuals for Ice Whack N Win

Summary of Contents for Ice Whack N Win
- Page 1 Whack N Win Service Manual Innovative Concepts in Entertainment, INC 10123 Main Street Clarence, NY 14031 WWW.ICEGAME.COM (716) 759-0360 I.C.E. Tech Support...
-
Page 2: Table Of Contents
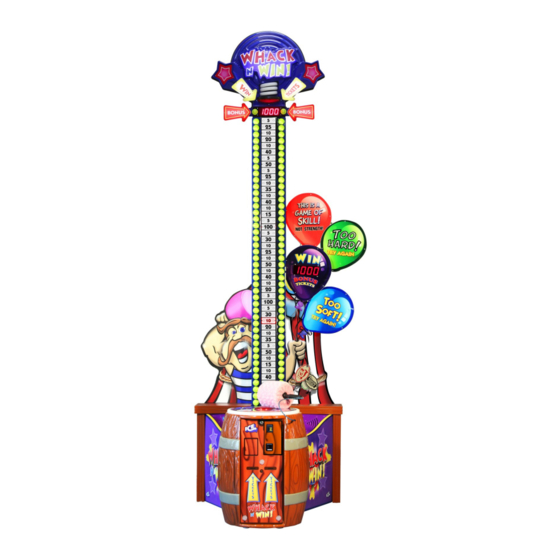
Table of Contents Safety and Warnings Game Assembly 4 - 8 Programming Tower Score Charts Sensitivity Calibration Service Upper Marquee Access Changing Tower Score Values Power Supply Piezo Assembly replacement Tower Lighting Spare Parts List Warranty Revision G 8/19/2014... -
Page 3: Safety And Warnings
SAFETY AND WARNINGS BEFORE YOU BEGIN WARNING: WHEN INSTALLING THIS GAME, A GROUNDED A.C. RECEPTACLE MUST BE USED. FAILURE TO DO SO COULD RESULT IN INJURY TO YOURSELF OR OTHERS. FAILURE TO USE A GROUNDED RECEPTACLE COULD ALSO CAUSE IMPROPER GAME OPERATION, OR DAMAGE TO THE ELECTRONICS. NOTE: THIS GAME IS INTENDED FOR INDOOR USE ONLY. - Page 4 Step 1: Open bottom access panel to expose main board. Remove lower light housing panel to access wiring. Remove the upper light housing panel. ICE part 6004 QTY 5 8-32 x 1/2 PPHMS (Black) Step 2: Install 2 1/4—20 x 1 1/4 bolts half way in the light housing’s guide tabs as shown with short arrows.
- Page 5 Step 3: Cut the wire tie shown and all the other below. This will allow you to take one connector harness at a time and insert it through to the bottom where the main board is located. Be careful not to snag and disconnect any other of the other wire harnesses while doing so.
- Page 6 Step 5: While holding the upper light housing remove the two 1/4-20 x 1-1/4 screws using a # 3 Phillips screw driver on each side and slide the light housing down being careful not to pinch any of the wire harnesses. Attach the light housing using four flat screws on each side (only one side is shown in the diagram).
- Page 7 Step 8: Step 7: From the back of the game, attach the right Attach the Bonus Marquee using four Allen bolts. Replace side balloons using three Allen bolts and the access panel door. washers. 6211 1/4-20 x 1 1/4(3) black bolts 6212 1/4 x 3/4 flat washer black 6799 1/4 x 7/8 (4) black bolts 6212 1/4 x 3/4 flat washer black...
- Page 8 Step 10: Connect the light housing harnesses to J23, J24, and J25. The harnesses are labeled. Final: Align the Playfield score graphic and Clear protective shield together and attach using 18 Phillip screws. You will need to remove the protective film from the plastic before you install. Start at the top and continue down in pairs.
-
Page 9: Programming
Tower Score Chart being used. The display at the top shows the software version. If you want to change the cost of the game, then contact ICE Service Department to order a new Score Chart Tower. -
Page 10: Tower Score Charts
Option Sensitivity Do not alter this option unless you review the section titled “How to Calibrate the Hit Pad sensitivity”. Decreasing this value in- creases the sensitivity of the hit pad. Increasing this value will decrease the sensitivity of the hit pad. PAYOUT OPTIONS: Bonus Window Picture a garage door open and how easy it would be to throw a ball into the garage. - Page 12 How to Check if your game is in Calibration. Step 1: Coin up the game. Marquee Display (Change Value) Increasing Value = Less Rebound Step 2: Using the Mallet to strike the “Hit Pad” as hard Decreasing Value = More Rebound as you can! (See Illustration).
- Page 13 Accessing Upper LED light strips and Display Board To gain access to the electronics found inside the upper marquee, you will need to remove the upper marquee. Remove the four 1/4-20 x 7/8 bolts and washers holding the marquee in place (1). Open the back access door and unplug the harness (2 + 3).
- Page 14 Changing the Tower Score Card’s Values To change the Tower Score Card, remove the plastic shield and old Tower Score Card. Starting from the top, reinstall the silver Phillips screws. Power the game on and press the program button. Cycle through the options until option 11 is displayed.
-
Page 15: Power Supply
GAME POWER SUPPLIES There are two power supplies located at the back of the game. The IA2010 power supply provides the +12 DC volts to the game board, lights, and outer Fun lights. The WN2010 power supply provides the +5 DC voltage for the game logic and center LEDs. - Page 16 E00869WNX +5 volt LED Lights are mounted with the red w/brown wire loop at the top, over the mounting screw. HAND TIGHT PLASTIC NUTS! DO NOT USE POWER TOOLS TO INSTALL!! E00843 +12 volt LED Fun Lights. To access the bulb, unscrew the plastic cover.
-
Page 17: Spare Parts List
Spare Parts List Harnesses: Electronics: WN2051HX HARNESS (MAIN) E00418WNAX ASY (WHITE 27 LED TAPE STRIP) WN2052HX HARNESS (COIN DOOR) E00724WNAX ASY (RGB 81 LED TAPE STRIP) WN2060LX HARNESS (DC POWER) E00724WNBX ASY (RGB 54 LED TAPE STRIP) WN2063LX HARNESS (5V DC POWER) E00724WNX ASY (RGB 27 LED TAPE STRIP) WN2064LX... -
Page 18: Warranty
I.C.E. Inc, at the customer’s expense, within 30 days. After 30 days a 15% re-stocking fee will ap- ply to all returns. ICE distributors are independent, privately owned and operated. In their judgment, they may sell parts and/or accessories other than those manufactured by I.C.E. Inc. We cannot be responsible for the quality, suitability or safety of any non-I.C.E. - Page 19 orange/black red x 2 brown/red black x 2 #E00788WNA X DUAL WHI TE LE D TAPE S TRI P STA R LED STA R LED orange orange/black x 2 orange/whi te orange blue/whi te green/whi te black black #E00418WNX WHI TE LE D TAPE ST RI P #E00418WNX WHI TE LE D TAPE ST RI P orange/whi te x 2 black...
- Page 20 RED x 3, RED x 3, RED x 2 ORANGE/WHI TE REQUIRED 12VDC BLACK x 2, BLACK x 2 ORANGE x 2 WN1000X (2 OF 2) WHACK N WIN BLUE x 2 BLUE PART NO. TITLE 5VDC POWER RED & RED/BLACK...
Need help?
Do you have a question about the Whack N Win and is the answer not in the manual?
Questions and answers