Table of Contents
Advertisement
Quick Links
PRODUCT SPECIFICATIONS
Rating:
Amperes:
Speed:
Impact speed:
Torque:
Square drive:
Weight:
Need Assistance?
Call us on our toll free customer support line:
1-866-349-8665
Technical questions
Replacement parts
Parts missing from package
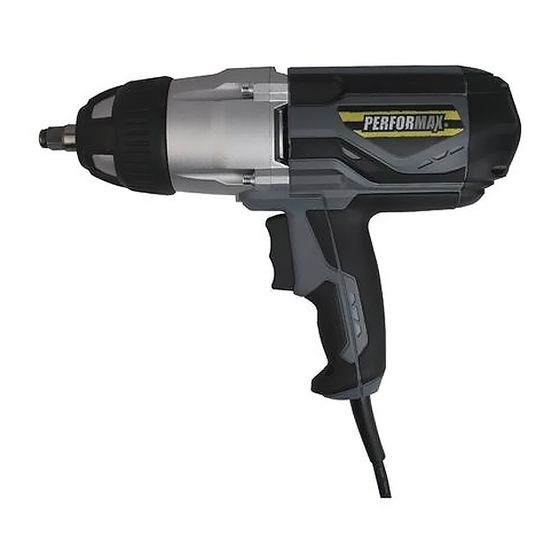
8.5A IMPACT WRENCH
120 V AC, 60 Hz
8.5 A
2,600 RPM (no load)
2,700 BPM
440 ft/lbs in reverse
320 ft/lbs in forward
1/2"
9 lb 8 oz (4.3 kg)
241-9891
Owner's Manual
Advertisement
Table of Contents

Summary of Contents for Performax 241-9891
-
Page 1: Product Specifications
8.5A IMPACT WRENCH 241-9891 Owner’s Manual PRODUCT SPECIFICATIONS Rating: 120 V AC, 60 Hz Amperes: 8.5 A Speed: 2,600 RPM (no load) Impact speed: 2,700 BPM Torque: 440 ft/lbs in reverse 320 ft/lbs in forward Square drive: 1/2" Weight: 9 lb 8 oz (4.3 kg) -
Page 2: Table Of Contents
TABLE OF CONTENTS Product specifications ………….……………………………………………………. Table of contents ……………………………………………………………………... General safety warnings …………………………………………………………….. 3–4 Eye, ear & lung protection …………………………………………………………… 3–4 Electrical safety ………………………………………………………………………. Power tool safety ……………………………………………………………………... 5–6 General safety rules ………………………………………………………………….. Work area safety ………………………………………………………………….….. Electrical safety ………………………………………………………………………. Personal safety ……………………………………………………………………….. -
Page 3: General Safety Warnings
GENERAL SAFETY WARNINGS WARNING: Before using this tool or any of its accessories, read this manual and follow all Safety Rules and Operating Instructions. The important precautions, safeguards and instructions appearing in this manual are not meant to cover all possible situations. It must be understood that common sense and caution are factors which cannot be built into the product. -
Page 4: Electrical Safety
GENERAL SAFETY WARNINGS WEAR A DUST MASK THAT IS DESIGNED TO BE USED WHEN OPERATING A POWER TOOL IN A DUSTY ENVIRONMENT. WARNING: Dust that is created by power sanding, sawing, grinding, drilling, and other construction activities may contain chemicals that are known to cause cancer, birth defects. -
Page 5: Power Tool Safety
POWER TOOL SAFETY When operating a power tool outdoors, use WARNING: Read all safety warnings an extension cord suitable for outdoor use. and instructions. Failure to follow the warnings Use of a cord suitable for outdoor use reduces and instructions may result in electric shock, fire the risk of electric shock. -
Page 6: Power Tool Use And Care
POWER TOOL SAFETY Personal safety – cont’d Use the power tool, accessories and tool bits etc. in accordance with these instructions, taking into account the working conditions If devices are provided for the connection of and the work to be performed. Use of the dust extraction and collection facilities, power tool for operations different from those ensure these are connected and properly... -
Page 7: Specific Safety Rules
SPECIFIC SAFETY RULES WARNING: Before each use, check the impact sockets and Know your impact wrench. Read the Owner’s Manual carefully. Learn accessories for excessive wear or cracks. Worn the tool’s applications and limitations, as or damaged sockets or accessories may shatter and possibly cause serious injury. -
Page 8: Extension Cord Safety
EXTENSION CORD SAFETY WARNING: Keep the extension cord MINIMUM GAUGE (AWG) clear of the work area. Position the cord so EXTENSION CORDS (120 V use only) that it will not get caught on the workpiece, a tool, or any other obstruction while the power Amperage tool is in use. -
Page 9: Symbols
SYMBOLS WARNING: Some of the following symbols may appear on the impact wrench. Study these symbols and learn their meaning. Proper interpretation of these symbols will allow for more efficient and safer operation of this tool. Volts Direct current Amperes No load speed Hertz Alternating or direct... -
Page 10: Know Your Impact Wrench
KNOW YOUR IMPACT WRENCH Air vents Motor end ½" square drive Air vents Handle Forward/reverse trigger switch ACCESSORIES AVAILABLE ACCESSORIES Before using any accessory, carefully read the instructions or the owner’s manual for the WARNING: accessory. Use only accessories that ... -
Page 11: Assembly And Operation
ASSEMBLY AND OPERATION INSTALLING IMPACT SOCKETS WARNING WARNING: Use only impact sockets and accessories that are designed for use For safety reasons, the operator must with an impact wrench. Do not use chrome read the sections of this Owner’s Manual plated sockets and accessories. -
Page 12: Tightening Wheel Nuts
ASSEMBLY AND OPERATION REMOVING FASTENERS – cont’d TIGHTENING WHEEL NUTS Place impact socket (3) onto the wheel nut. This impact wrench can be used to tighten wheel nuts and other fasteners. NOTE: Make sure the socket is fully engaged with the nut to avoid potentially Install the correct size of impact socket on damaging the socket or the wheel nut. - Page 13 ASSEMBLY AND OPERATION TIGHTENING WHEEL NUTS – cont’d NOTE: Release the trigger switch IMMEDIATELY when the impact mechanism “rattles”. Proceed with tightening the remaining wheel nuts as noted above. WARNING: Tighten the wheel nuts in the sequence outlined in Fig. 4 for 4 stud wheel patterns and Fig.
-
Page 14: Maintenance
MAINTENANCE GENERAL REMOVING MOTOR BRUSHES WARNING: Motor brushes are a normal wear item and will When servicing, use only require replacing periodically depending upon identical replacement parts. Use of any other the amount the tool is used. The following part may create a hazard or cause product information outlines the general procedure for damage. -
Page 15: Installing New Motor Brushes
MAINTENANCE Removing worn brushes – cont’d INSTALLING NEW MOTOR BRUSHES NOTE: Pay attention to the position of the Once the old carbon brush has been braided copper brush wire (8) (Fig. 8). When the removed, use a SOFT DRY brush to new carbon brush is reinstalled, the braided carefully remove all grinding dust from the brush wire MUST be placed in exactly the same... -
Page 16: Exploded View
EXPLODED VIEW... -
Page 17: Parts List
PARTS LIST WARNING: When servicing, use only original equipment replacement parts. The use of any other parts may create a safety hazard or cause damage to the impact wrench. Any attempt to repair or replace electrical parts on this impact wrench may create a safety hazard unless repairs are performed by a qualified technician. - Page 18 PARTS LIST Key # Part # Part Name Quantity 2010090082 Ring gear 3140020132 Oil seal ring 2020020050 Gear box 3190010023 Felt seal ring 4010010055 Bearing 6001 2RS 1010180015 Rotor 4010010048 Bearing 608 RS 3140040001 Bearing boot 3150050094 Air deflector 4003010122 ST3.9×70 Screws 3150160214 Stator spacer...
-
Page 19: Warranty
® back to your nearest MENARDS® retail store. At its discretion, PERFORMAX agrees to have the tool or any defective part(s) repaired or replaced with the ®...
Need help?
Do you have a question about the 241-9891 and is the answer not in the manual?
Questions and answers