Table of Contents
Advertisement
Quick Links
Advertisement
Table of Contents

Summary of Contents for Huaxin HS108
- Page 1 User manual Digital Pressure Gauge HS108...
-
Page 2: Safety Information
HUAXIN reserve the rights to change the contents or form of these operating instructions at any time without prior notice having been given. - Page 3 The calibration should be carried out under a standard calibration condition The calibration should be carried out under a standard calibration condition, such as the standard gauge must be accuracy 3 times of HS108, ambient temperature (20±2) ℃ . Symbols Symbols used on the product and in the menu...
-
Page 4: Table Of Contents
Claim Safety information 1. Summary - 1 - 2. Technical Spec - 2 - 3. Working Principle - 4 - 4. Install Operation - 4 - 4.1. Basic structure - 4 - 4.2. Button&terminal Introduction - 5 - 4.3. Display - 6 - 4.4. -
Page 5: Summary
Every HS108 pass the high and lower temperature aging,so it could assure the products more accurate and reliable.the product combines a variety of accuracy levels to meet the customer requirments.it provides an accurate,reliable and economic solution for pressure application. -
Page 6: Technical Spec
2.Technical Specification Model Temperature HS108 Digital Pressure Gauge Compensated temperature: -10°C to 50°C Accuracy Operating temperature:-10°C to 50°C ±0.025% F.S Humidity: <95% ±0.05% F.S Storing temperature:-20°C to 70°C ±0.1%F.S Pressure connection Gauge types 1/4NPT male Gauge pressure M20×1.5 male Compound pressure... - Page 7 Gauge pressure Pressure Range Accuracy Media (psi) HS108-1 (0-10) (0-0.7) 0.025,0.05,0.1 HS108-2 (0-15) (0-1) 0.025,0.05,0.1 HS108-3 (0-30) (0-2) 0.025,0.05,0.1 HS108-4 (0-60) (0-4) 0.025,0.05,0.1 HS108-5 (0-100) (0-7) 0.025,0.05,0.1 HS108-6 (0-200) (0-14) 0.025,0.05,0.1 HS108-7 (0-300) (0-20) 0.025,0.05,0.1 HS108-8 (0-500) (0-35) 0.025,0.05,0.1 HS108-9...
-
Page 8: Working Principle
3.Working Principle Apply pressure to the pressure transducer,it outputs a electrical signal. First the corresponding electrical signal will be amplified.and then it will be converted to digital data by A/D converter.Then the microprocessor sequentially collects data to modify and correct,the final result will be displayed on the LCD Display Transducer... -
Page 9: Button&Terminal Introduction
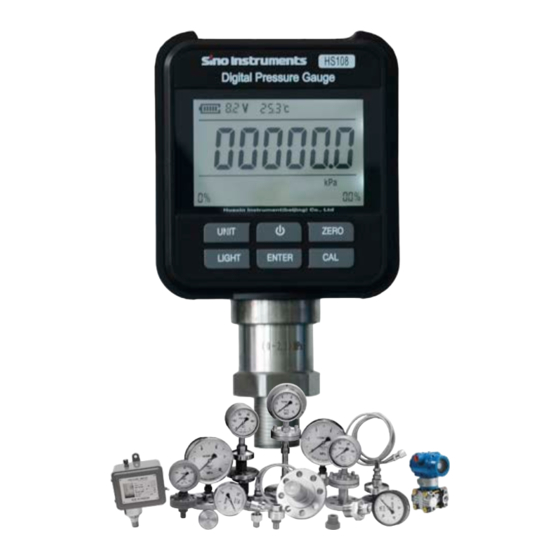
1.Back cover insert 13.Lock nut 2.Front cover 14.Press cover 3.Key-press panel 15.Hole press cover 4.Button switch 16.Support pad for sensor 5.Power strip 17.Reinforcing pad for sensor 6.Front view window 18.Sensor × 7.LCD 19.O-ring 9 8.PCB 20.High pressure sealing 9.Plugging terminal panel 21.Check ring 19 ×... -
Page 10: Display
Pressure display:displays data and menu. Units:9 pressure units selectable Bar graph:displays the pressure process 4.4 Installation method Connect gauge under test and HS108 on the pressure comparator. According to calibration regulation, make HS108 as standard gauge to finish the whole calibration process. -
Page 11: The Max/Min Valve Display
Connecting pressure generator Open to air Connecting pressure generator High pressure Low pressure 4.6 The Max/Min valve display (1) In Measuring interface,press ENTER;enter into basic setting interface of Min value. (2) Press ENTER again,enter into basic setting interface of Max value. (3) Press ENTER once more and get back to the Measuring interface. -
Page 12: Temperature Modification Display
(3) Press CAL,enter into the Unit choose interface(Unit flashing). At this time, the unit displayed is client measuring interface unit. maybe that is not match with the unit kPa in above pic. (4) Press Zero and choose the Unit you need.( if you choose the unit Pa) Remark :Displaying unit,Pa 、... -
Page 13: Com Communication Setting
(5) If you modify the activated value ,press ZERO and display“- ”(flashing).If you do not need modify activated values,please enter into next step directly. (Minus) Press CAL,next character located in activated interface (Flashing) When decimal point bit flashing, press ZERO for setting decimal point. When the number flashing, press LIGHT for decreasing number from 9 to 0,press ZERO for increasing number from 0 to 9. -
Page 14: Digital Display Setting
(2) Press CAL,enter into the Unit interfac. (3) Press ZERO key,and selecting menu,enter into setting interface below. (4) Press CAL,switching ON/OFF. ON-1(Automatic)and ON-2(Semi-automatic) (5) Press LIGHT twice continuously .and back to the measuring interface. 4.10 Digital Display setting (1)In Measuring interface,Press CAL key,enter into basic setting interface. (2) Press CAL,enter into the Unit interface. -
Page 15: Backlight Time Adjustment
(5) Press LIGHT twice continuously,and back to the measuring interface. 4.11 Backlight time adjustment (1)In Measuring interface,press CAL key,enter into basic setting interface. (2) Press CAL,enter into the Unit interface. (3) Press ZERO(Press 6times zero),and selecting menu, enter into (4) Press CAL key,the interface display in cycle:ON/15-S/30-S/45- S/60-S(UNIT:SECOND). -
Page 16: Displaying Speed Set
(4) Press CAL key,the interface display in cycle:OFF/15/30/45/60/90/1 20(UNIT:MINUTE). (5) Press LIGHT twice continuously ,and back to the measuring interface. 4.13 Displaying speed set (1))In Measuring interface,press CAL key,enter into basic setting interface. (2) Press CAL,enter into the Unit interface. (3) Press ZERO (Press 8times zero), find “speed”. -
Page 17: Factory Reset
(5) Press Light twice continuously.and back to the measuring interface. 5 . Calibration The calibration should be carried out under a standard calibration condition, such as the standard gauge must be accuracy 3 times of HS108, ambient temperature (20±2) ℃ . 5.1 Pressure Low point, High Point Calibration... - Page 18 (1) Pressure input add low point standard pressure. (2) Waitting for pressure stability. (3) In Measuring interface,Press CAL,enter into basic setting interface. (4) Press ZERO key,enter into pressure low point, high Point calibration Interface. (5) Press CAL,enter into pressure low point calibration(Press ZERO button,enter into pressure high point calibration)interface.
-
Page 19: Clear Two Point Modification Value
(13) Press CAL,enter into high point calibration data modify interface. (14) Refer“4.8(7) step of Temperatue modification displaying” and amend high point pressure data ( if the gauge had stored data,that do not amend,you may press CAL directly). (15)Press CAL input data, waiting for standard pressure stability;Press ENTER,save high point calibration data and return high point calibration interface. -
Page 20: Clearing Clear Zero Value
5.3 Clearing clear zero value (1) In Measuring interface,Press CAL once time,and then press ZERO twice,that will display below. (2) Press CAL once time,that will display below. (3) Press ENTER once time,the interface have not any change.the clear is over. (4) Press LIGHT twice,saving and returning measuring interface. -
Page 21: Clear Temperature Modification Value
(2) The using environment had to satisfied the manual demand,the user can operate by manual. (3) Make sure the normal display,the screen shows the upper limit of HS108.if it does not match with the label on the gauge,pls contract with supplier. (4) HS108 adopt the built-in DC7.4V rechargeable lithium battery. -
Page 22: Attention Items
6.2 Attention items (1) Pls operate under the manual. HS108 is high precision measuring instrument, please don't free to beat, shock,disassemble and poke the metal diaphragm of sensor and pressure hole with sharp ware. Self-disassembling is forbidden. Please don't use it in high temperature and high humidity environment.With improvement of technology,the products performance... - Page 23 HUAXIN Products series Digital Pressure Gauge HX601/HS108 Intelligent Pressure Calibrator HS602 Pressure Comparator HS700(-0.5-0.5)bar HS701(-0.95-6)bar HS702(-0.95-16/25)bar HS703(-0.95-40/60)bar HS720(0-140)bar HS704(0-160/250)bar HS705/HS705A(0-600/700)bar HS710/HS710A(0-600/700)bar HS706(0-1600/2500)bar Electrical Pressure Comparator HS318L(0-600)bar 5pcs output HS316L(0-25)bar 5pcs output HS317L(0-60)bar 5pcs output HS315(-0.95-0)bar 2pcs output HS316(0-25)bar 3pcs output...
Need help?
Do you have a question about the HS108 and is the answer not in the manual?
Questions and answers