Table of Contents
Advertisement
Available languages
Available languages
Quick Links
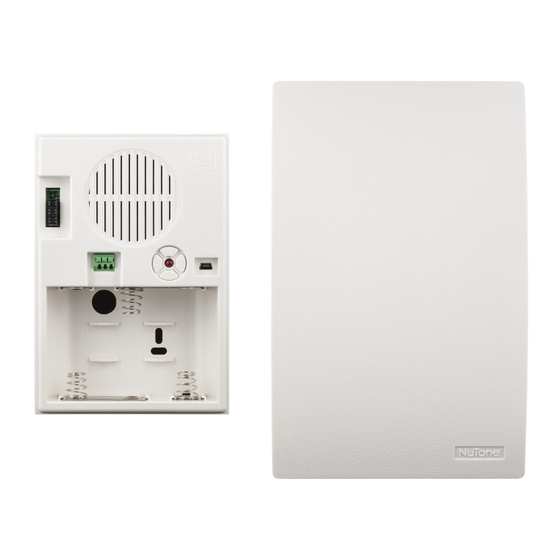
LA600WH WIRED /
WIRELESS DOOR CHIME
To register this product, visit: www.nutone.com
THIS PACKAGE INCLUDES:
n Wired / Wireless Door Chime with MP3 upload capability
n Decorative White Chime Cover
n USB Cable
n Mounting Hardware
n Pushbutton Diode (required for wired installation)
Door chime comes with eight pre-loaded sounds. Prior to installation,
upload desired MP3 sound files.
1.
Remove chime cover (B) from chime base (A). You may need to
insert a finger into the large hole on the back of the chime base.
(Figure 1)
A
UPLOAD MP3 TUNES
1. Insert a USB Mini cable end into the doorbell mechanism USB jack
(C). (Figure 1)
2. Insert the remaining larger USB cable end into a USB port on your
computer.
3. On your WINDOWS computer,
• Select "Start" in the bottom corner of your Desktop.
• Select "My Computer"
• Select the new device detected. (The drive "D:" , "E:" , etc. will vary
from computer to computer).
• Select the device.
• You will now see a window that contains several mp3 files. These
are the tunes that are pre-installed on your doorbell mechanism.
• Search your computer for other mp3 songs that you wish to play
on your doorbell mechanism when activated. Note: Files must be
in mp3 format.
• Once you have located those files, simply "COPY" the file and
"PASTE" it into the folder that contains the pre-installed doorbell
files.
• Confirm that the transfered files are complete.
4. Remove USB cable and proceed to one of the following sections.
B
C
FIGURE 1
INSTALLATION & OPERATING INSTRUCTIONS
READ AND SAVE THESE INSTRUCTIONS
NEW WIRED CHIME INSTALLATION
WARNING
•
TO REDUCE THE RISK OF FIRE, ELECTRIC SHOCK, OR INJURY TO
PERSONS, OBSERVE THE FOLLOWING:
•
Use this unit only in the manner intended by the manufacturer. If you have
questions, contact the manufacturer at the address or telephone number
listed in the warranty.
•
Before servicing or cleaning unit, switch power off at service panel and
lock the service disconnecting means to prevent power from being
switched on accidentally. When the service disconnecting means cannot
be locked, securely fasten a prominent warning device, such as a tag,
to the service panel.
•
Installation work and electrical wiring must be done by a qualified
person(s) in accordance with all applicable codes and standards, including
fire-rated construction codes and standards.
•
When cutting or drilling into wall or ceiling, do not damage electrical wiring
and other hidden utilities.
•
Use NuTone
16 volt transformer with a minimum rating of 10 VA (purchase
®
separately).
•
When stapling wires to studs or joists, do not allow staples to cut through
wire insulation.
1.
Mount the transformer to a junction box (attic location is not
recommended) or circuit breaker box.
2. Connect house power leads to transformer leads: black to black,
white to white, ground to green. (Figure 2)
WIRES
TO
CHIME
3. Route 2-conductor 18-22 gauge wire from the transformer screw
terminals and from the pushbutton terminals to the chime location. (Figure
SCREWLESS
WIRING CONNECTOR
ON CHIME BASE
3)
4. Label all wires at chime location in the following manner:
"F" – Front Pushbutton Wire
"T" – Transformer Wire
"R" – Rear Pushbutton Wire (if installed)
1
SUPPLY
WIRE
WIRING DIAGRAM
REAR DOOR PUSHBUTTON
TRANSFORMER
FRONT DOOR
PUSHBUTTON WITH
DIODE INSTALLED
FIGURE 2
120 VAC
WIRING
FIGURE 3
Advertisement
Table of Contents

Subscribe to Our Youtube Channel
Related Manuals for NuTone la600wh


Summary of Contents for NuTone la600wh
-
Page 1: Wiring Diagram
WIRELESS DOOR CHIME WARNING • TO REDUCE THE RISK OF FIRE, ELECTRIC SHOCK, OR INJURY TO To register this product, visit: www.nutone.com PERSONS, OBSERVE THE FOLLOWING: • Use this unit only in the manner intended by the manufacturer. If you have... - Page 2 5. The chime can be installed vertically or horizontally. Determine your INSTALL WIRED PUSHBUTTONS preferred orientation. Locate the arrows on the front of the chime base. Make sure one of the arrows is pointing up. (Figure 4) Power to transformer should be disconnected during pushbutton installation. 6. Bring wires through the circular wire hole (D) in chime base. (Figure 4) A diode must be added to the front door pushbutton so that power Mount chime base to wall using screws provided.
- Page 3 WIRELESS CHIME INSTALLATION b. Verify proper installation of batteries in chime mechanism and pushbutton(s). c. Check condition of batteries in chime mechanism and Unobstructed wireless operating range: Up to 100 feet. pushbutton(s). Replace if required. NOTE: Wireless pushbutton sold separately. Refer to installation 4.
-
Page 4: Adjust Volume
TO, IMPLIED WARRANTIES OF MERCHANTABILITY OR FITNESS FOR A PARTICULAR PURPOSE. During this one-year period, NuTone will, at its option, repair or replace, without charge, any product or part which is found to be defective under normal use and service. - Page 5 O LESIONES PERSONALES, SIGA LAS SIGUIENTES PRECAUCIONES: • Para registrar este producto, visite: www.nutone.com Use la unidad solo de la manera indicada por el fabricante. Si tiene preguntas, comuníquese con el fabricante a la dirección o al número telefónico que se incluye en la garantía.
- Page 6 5. El timbre se puede instalar de manera vertical u horizontal. Determine su INSTALE LOS BOTONES CABLEADOS orientación preferida. Encuentre las flechas en la parte delantera de la base del timbre. Asegúrese de que una de las flechas apunte hacia arriba. Mientras se instale el botón, se debe desconectar la electricidad que va (Figura 4) al transformador. 6. Pase los cables por el orificio circular (D) en la base del timbre. (Figura 4) Debe agregarse un diodo en el botón de la puerta delantera, de tal manera 7. Monte la base del timbre a la pared utilizando los tornillos suministrados.
- Page 7 INSTALACIÓN DEL TIMBRE b. Verifique la instalación adecuada de las pilas en el mecanismo del timbre y en los botones. INALÁMBRICO c. Verifique la condición de las pilas en el mecanismo del timbre y en los botones. Reemplace si se requiere. Alcance de operación inalámbrica sin obstrucciones: Hasta 100 pies (30 m).
- Page 8 Para tener derecho al servicio de la garantía, usted debe (a) notificar a NuTone a la dirección y número de teléfono que aparecen abajo, (b) proporcionar el número de modelo y la identificación de la pieza y (c) describir la naturaleza de cualquier defecto en el producto o pieza.
Need help?
Do you have a question about the la600wh and is the answer not in the manual?
Questions and answers