
Related Manuals for Urbini Turni


Summary of Contents for Urbini Turni
- Page 1 Turni www.urbinibaby.com Read all instructions carefully before use and keep them for future reference. Lea todas las instrucciones detenidamente antes de usarlo y guárdelas como referencia futura. ©2016 IM0105A 3/2016...
- Page 2 WARNING ADVERTENCIA Failure to follow these warnings and the instructions increases the risk of serious injury or death. PLEASE FOLLOW ALL TO AVOID STRESS AND TO INSTRUCTIONS AND KEEP PREVENT A HAZARDOUS USER GUIDE FOR FUTURE UNSTABLE, CONDITION ON USE. STROLLER, stroller is intended for a child who weighs up to ADULT ASSEMBLY REQUIRED.
- Page 3 INFANT CAR SEAT WITH THIS carry a child. STROLLER: NEVER LET A CHILD stand on - ONLY USE THE URBINI SONTI any part of the stroller. Child INFANT car seat with the URBINI could fall and be injured. TURNI STROLLER.
- Page 4 WARNING ADVERTENCIA No observar estas advertencias y las instrucciones aumenta el riesgo de sufrir lesiones serias o la muerte. POR FAVOR, SIGA TODAS LAS PARA PREVENIR QUE EL INSTRUCCIONES Y GUARDE LA COCHECITO ESTÉ EN UNA GUÍA DEL USUARIO PARA USO CONDICIÓN PELIGROSA E FUTURO.
- Page 5 - SOLAMENTE USE EL asiento de automóvil para bebé URBINI EVITE QUE LOS DEDOS SONTI con el COCHECITO URBINI QUEDEN ATRAPADOS EN TURNI. EL COCHECITO: Tenga cuidado cuando abre y - NUNCA use ningún asiento de cierra el cochecito.
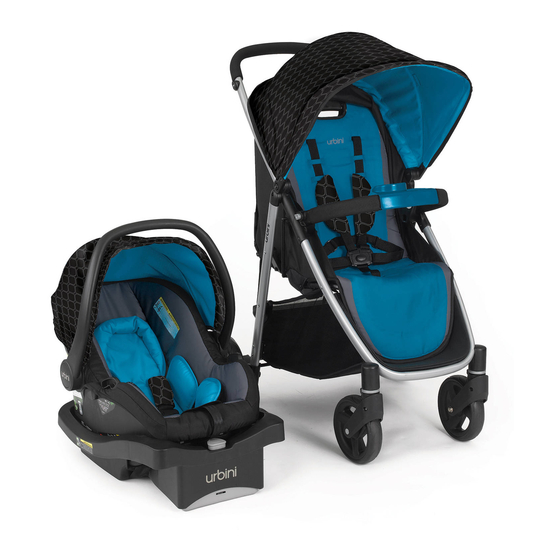
- Page 6 Parts / Piezas Please check that you have all the Por favor, verifique que tenga todas parts shown below before las piezas ilustradas abajo antes de assembling product. If you are armar el producto. Si falta alguna missing any parts, please contact pieza, por favor llame a Servicio al Customer Service at 1-888-569-7288.
- Page 7 Assembly / Ensamblaje Unlock the storage latch. Destrabe la trabe de almacenamiento. CHECK TO MAKE sure the stroller is locked in the fully open position before using it. VERIFIQUE PARA ASEGURARSE de que el cochecito esté trabado en CLICK! la posición completamente ¡CLIC! abierta antes de usarlo.
- Page 8 Front Wheels / Ruedas delanteras To attach front wheels, push wheel onto front leg tube until it clicks into place. Repeat on other side. Pull on wheels to make sure both of them are attached. Para instalar las ruedas delanteras, CLICK! empuje la rueda en el tubo de la pata ¡CLIC!
- Page 9 Rear Wheels (cont.) / Ruedas traseras (cont.) Push straight side of pin through axle hole. Pin will separate around the axle. Empuje el lado recto del pasador por el agujero del eje. El pasador separará alrededor del eje. Attach hubcaps to both wheels once the washer and hairpin are attached.
- Page 10 Armbar / Barra para los brazos To attach armbar, push arm bar onto CLICK! stroller until it clicks into place. ¡CLIC! Para sujetar la barra para los brazos, empuje la barra para los brazos hacia el cochecito hasta que se trabe en su CLICK! lugar.
- Page 11 Brakes / Frenos WARNING Always lock both brakes. Make sure brakes WARNING are on by trying to push the stroller. ADVERTENCIA Trabe siempre ambos frenos. ADVERTENCIA Asegúrese que los frenos estén activados tratando de empujar el cochecito. To lock, press lever DOWN on both brake levers.
- Page 12 Cup Holder / Apoyavasos To attach cup holder, rotate cup holder and slide down on the mount as shown. Para sujetar el apoyavasos, gírelo y deslícelo hacia abajo en el montante como se indica. CLICK! ¡CLIC! Canopy - Forward Facing Use / Uso de la capota orientada hacia adelante To open or close canopy, push to the front or the rear of the stroller as...
- Page 13 Canopy - Rear Facing Use / Uso de la capota orientada hacia atrás Armbar MUST be removed to extend canopy. Press buttons on sides of armbar and remove armbar from stroller. Se DEBE sacar la barra para los brazos para extender la capota. Oprima los botones en los costados de la barra para los brazos y sáquela del cochecito.
- Page 14 Reclining Seat for Forward-facing Use / Para reclinar el asiento en la posición orientada hacia adelante The stroller seat is reversible to allow your child to sit in a forward facing position or rear facing position. To recline seat to be in forward facing position, squeeze handle at top of seat and recline seat to...
- Page 15 Reclining Rear Seat for Rear Facing Use / Para reclinar el asiento en la posición orientada hacia atrás Armbar MUST be removed to recline seat. Press buttons on sides of arm- bar and remove armbar from stroller. Se DEBE sacar la barra para los brazos para reclinar el asiento.
- Page 16 Reclined Carriage Position / Posición reclinada del cochecito WARNING Child may slip into leg openings and strangle. Never use seat in a reclined carriage position unless the flaps are fastened to close off the leg ADVERTENCIA WARNING opening. El niño podría caerse por las ADVERTENCIA aberturas para las piernas y estrangularse.
- Page 17 Rotate legrest up to access the flaps for the reclined carriage position. Gire el apoyapié hacia arriba para lograr el acceso a las aletas de la posición reclinada del cochecito. Unfasten flaps and thread through the strap loops on the sides of the seat covering as shown in Destrabe las aletas y páselas por los nudos de la cinta en los costados...
- Page 18 Adjusting Harness ( Front seat ) / Ajuste del arnés (Asiento delantero) To attach the harness and waist straps to the crotch buckle, slide shoulder straps A onto the waist buckles B as shown, then click them into the crotch buckle. Para sujetar el arnés y las correas para la cintura a la hebilla de la entrepierna, deslice las correas del hombro A por...
- Page 19 Changing Shoulder Strap Position / Cambiar la posición de la correa del hombro To change shoulder strap height positions, push the retainer through the loops on the seat pad into the desired set of slots that are closest to your child’s shoulder. Repeat with other harness strap.
- Page 20 Adjusting Harness ( Rear Facing Seat Position) / Ajuste del arnés – posición del asiento orientada hacia atrás To attach the waist straps to the crotch buckle, insert the buckles A into the crotch strap as shown. Para sujetar las correas de la cintura con la hebilla de la entrepierna, inserte las hebillas A en la correa de la entrepierna como se...
- Page 21 Folding Stroller / Cómo plegar el cochecito DO NOT fold stroller when stroller seat is in the rear-facing position. Make sure the front wheels are facing forward. Pull up on the fold strap under the pocket in the seating area as shown. NO pliegue el cochecito cuando el asiento del cochecito esté...
- Page 22 WARNING ADVERTENCIA USING THE URBINI SONTI INFANT CAR SEAT WITH THIS STROLLER: - ONLY USE THE URBINI SONTI INFANT CAR SEAT with the URBINI TURNI STROLLER. - NEVER use any other manufacturer’s car seats with this stroller. - ALWAYS CHECK to make sure the car seat is securely latched into the car seat mounts by lifting up on it.
- Page 23 Recline the stroller seat back to its lowest position. Squeeze handle at top of seat and recline seat as shown. Recline el respaldo del asiento del cochecito hasta la posición más baja en la posición. Oprima la manija de arriba del asiento y recline el asiento como se indica.
- Page 24 CHECK to make sure carseat is fully latched into the car seat mounts on each side of the stroller by lifting up on it. VERIFIQUE para tener la seguridad de que el asiento de automóvil esté completamente trabado en los montajes del asiento de automóvil en cada costado del cochecito levántandolo hacia arriba.
- Page 25 Care and Cleaning FOR WASHING INSTRUCTIONS, REFER TO YOUR CARE TAG on your seat pad. NEVER use BLEACH. TO CLEAN STROLLER FRAME, use a damp cloth with household soap and warm water. NEVER use BLEACH or detergent. BEFORE USING STROLLER ALWAYS CHECK for any missing parts , torn material or if it is broken or damaged.
- Page 26 Notes / Notas...
- Page 27 Notes / Notas...
- Page 28 Replacement Parts and Warranty Information For customer service, warranty information or replacement parts, please call us at 1-888-569-7288 or visit us online at www.urbinibaby.com Información sobre la garantía y piezas de repuesto Para obtener servicio al cliente, información sobre la garantía o piezas de repuesto, en los EE.UU.
Need help?
Do you have a question about the Turni and is the answer not in the manual?
Questions and answers