Table of Contents
Advertisement
Quick Links
Advertisement
Table of Contents

Related Manuals for Nikkai a37hf

Summary of Contents for Nikkai a37hf
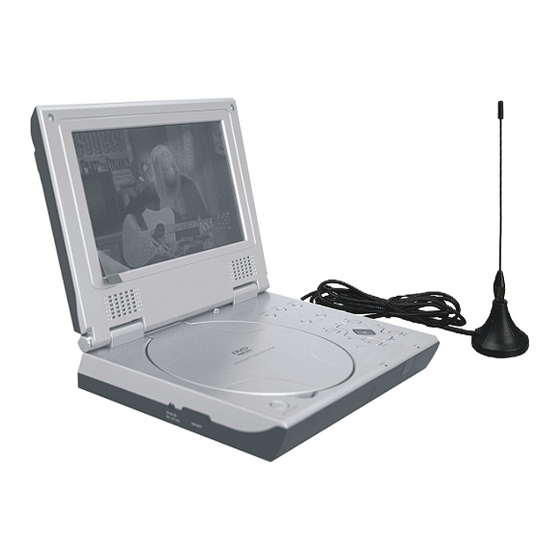
- Page 1 Portable Player with DVB-T Owner s Manual English J P E G...
-
Page 2: Safety Information
SAFETY INFORMATION TO REDUCE THE RISK OF FIRE AND ELECTRIC SHOCK, DO NOT EXPOSE THIS UNIT TO RAIN OR MOISTURE. Read and Follow Instructions- All the safety and operation instructions should be CAUTION To reduce the read before the video product is operated. Follow all operating instructions. risk of fire and electric shock, do Retain Instructions- The safety and operating instructions should be retained for not remove the cover (or back) of... - Page 3 SAFETY INFORMATION Cleaning- Unplug this video product from the wall outlet before cleaning. Attachments- Do not use attachments unless recommended by the video product Do not use liquid cleaners or aerosol cleaners. Use a damp cloth for cleaning. manufacturer as they may cause hazards. Objects that may touch dangerous voltage points or "short-out"...
-
Page 4: Features
FEATURES DVB-T features: LCD TFT Display Auto scan DVD,CD,MPEG 4,Picture CD JPEG compatible Manual scan CD-R, CD-RW capable Parental control Channel protect USB connection Channel remap (only support USB flash disk) Channel reserve 7 Inch TFT LCD Other features: Polymer rechargeable battery, one fully Electronic anti-shock charged battery can last for 2.5 hours Intelligent charge while playing... -
Page 5: Table Of Contents
CONTENTS Page FUNCTION BUTTONS SAFETY INFORMATION FEATURES [ Play/Pause/Stop],[Search], [ Slow ] ,[Repeat] [A-B] ,[ LCD Set Up ] , [ Zoom],[GOTO ] , 13-14 [ Program ] ,[Display],[FAV],[EPG] 14-16 INTRODUCTION ON SCREEN DISPLAY About the player Main body DVD mode Side CD mode Remote control... -
Page 6: Introduction
INTRODUCTION LOADING BATTERIES INTO THE REMOTE CONTROL Unpack the unit. Read through this owner's manual before installation and use. Take out the protecting plastic film of battery . Connect the system, make sure the connections are secured. Inserting a battery in the remote control Pull the battery compartment cover. -
Page 7: About The Player
INTRODUCTION About the player Main body TFT Setup Setup menu Select DVD/DVB/USB mode SETUP TFT SETUP MODE Volume down J P E G Volume UP VOL - Play/Pause Stop PORTABLE DVD PLAYER Cursor(Up/Down/Left/Right) In DVD mode: CH - Up/Down:Skip Forward/Backward In DVB mode: Left/Right:Channel Up/Down TITLE... -
Page 8: Side
INTRODUCTION Side AV IN OUT COAXIAL PHONE RF IN R IN Earphone Output AV Input/Output USB Slot Coaxial Output ON/OFF DC IN 12V Open DC input Power Switch (In working mode, push the button to the right to turn off the unit) -
Page 9: Remote Control
INTRODUCTION Remote control AV IN/OUT DVD/DVB/USB mode select AV in/AV out select MODE Numeric entry Goto GOTO CLEAR Clear the last entry Return to the upper menu Return to DVD disc menu C H + Enter Cursor:Up/Down/Left/Right ENTER (Up/Down:Channel Up/Down in DVB mode) Stop Play/Pause C H -... -
Page 10: System Connection
SYSTEM CONNECTION System Connection Digital decode Amplifier Stereo Amplifier To Coaxial input Audio cable white Centre Front Left Front Right Subwoofer Surround Left Surround Right ....Video cable ...................... -
Page 11: Connecting To External Power
SYSTEM CONNECTION Connecting to External Power Connecting to Car Power ON/OFF ON/OFF DC IN 12V DC IN 12V Automotive DC adaptor output Connect part 1 with 2, Insert the plug into outlet, then the unit will be Connect this unit to DC adaptor output on the car . in standby status. -
Page 12: Getting Started
GETTING STARTED AV Mode Choose mode The player is equipped with two AV modes: AV IN Switch on the player and AV OUT. Factory default of the unit is to AV OUT. Connect with adaptor. AV IN/OUT Press to switch between these two modes. Open the top cover of unit to suitable angle AV IN/OUT AV IN mode:... -
Page 13: Dvd Mode
GETTING STARTED DVD Mode Load a disc If a DVD Disc Menu appears on screen Press " PUSH OPEN" button on the panel to Press ENTER button on the remote (or on the open the disc tray. PUSH OPEN unit) to start playback. Load a disc and close the disc tray. -
Page 14: Dvb Mode
GETTING STARTED DVB Mode (FREEVIEW) Press the MODE button on the remote to enter DVB mode,then the DVB logo will display on the TV screen. MODE Auto Scan 00:00 -- DVB-T Setup Page -- Area Time Zone Press SETUP button to enter the setup menu. Parental Age Channel Setup Highlight... -
Page 15: Manual Scan
GETTING STARTED Manual Scan 00:00 In Channel Setup menu, -- Channel Setup-- press the UP or DOWN cursor button to highlight the Manual Scan, Auto Scan Manual Scan Start and press the ENTER button to select. Adjust Channel Channel Remap Reserve Channel Highlight the Start item,press the ENTER button to enter the manual scan setting menu. -
Page 16: Usb Mode
GETTING STARTED USB mode Insert a USB stick to the USB slot in the unit. Press the MODE button to select USB mode, an On Screen Display (OSD) indicator will appear on the TV screen, which displays the file information and operation status. Playback 00:00 00:00... -
Page 17: Function Buttons
FUNCTION BUTTONS Play / Pause / Stop Slow Forward/Backward SLOW Press PLAY / PAUSE button to switch the player Press SLOW button to play slow forward/backward. between PLAY or PAUSE mode. Repeat pressing the button to change slow forward or backward speed: (Slow Forward) Press STOP button to stop in two modes:... -
Page 18: [A-B] ,[ Lcd Set Up ] , [ Zoom],[Goto ]
FUNCTION BUTTONS ZOOM To repeat playback of a desired section: ZOOM Press the ZOOM button to enlarge viewable picture. During playback, Press the button repeatedly to change the zoom scale: 1) Press the A-B button at the beginning of the desired section "A". -
Page 19: [ Program ] ,[Display],[Fav],[Epg]
FUNCTION BUTTONS PROGRAM CD disc Program to play a DVD and CD disc in a desired sequence automatically. Press the GOTO button to select GOTO mode. GOTO Input desired time of the disc Disc Go To :--:-- mm:ss (Minute : Second) DVD program menu Track Go To :--:-- Input desired time of the track... - Page 20 FUNCTION BUTTONS DISPLAY CD program menu This button has different functions in DVD or DVB mode. Load a CD disc. In DVD mode: PROGRAM Press PROGRAM button, DISPLAY Press DISPLAY button to switch the OSD indicator on or off. the CD program menu will appear. Use numeric key to input the track numbers, There are different OSD indicators for different types of Repeat inputting the track numbers until...
- Page 21 FUNCTION BUTTONS To view a different channel,press the UP or DOWN cursor means this is a deleted channel; button to highlight your desired channel, then press the means this is a locked channel; ENTER button to confirm the selection. means this is a scrambled channel; Press the LEFT cursor button to return to the EPG menu.
-
Page 22: On Screen Display
ON SCREEN DISPLAY An On Screen Display (OSD) indicator will be displayed at the upper part of the LCD when certain functions are executed. The OSD indicator is a user friendly interface designed for displaying the status of the playback. When a different disc is loaded (DVD, CD ,MPEG 4, Picture CD ), the OSD indicator bar will be different. -
Page 23: Mpeg 4 Mode
ON SCREEN DISPLAY OSD-Kodak Picture CD mode OSD-MPEG 4 mode Playback status Disc files current files / Playback status total files 00:00 00:00 006/058 Disc files Current folder Folder ABC\ current files / total files ABCDE 00:00 00:00 ED1245 006/76 TT-321 Current folder \Folder ABC\... -
Page 24: Dvd Setup Menu
DVD SETUP MENU Various features of the player can be adj u sted in the SETUP menu: 00:00 Press SETUP button to enter SETUP menu . -- Audio Setup Page -- Speaker Setup Highlight the desired icon ,press ENTER button to SPDIF Setup Dolby Digital Setup activate the setting sub menu. -
Page 25: Quality
DVD SETUP MENU Quality Parental Control Sharpness: High/Medium/Low Playback of some DVDs can b e limited according to pre-determined level. Brightness: -20~ +20 1. KID SAFE Contrast: -16~ +16 2. G Gamma: High/Medium/Low/None 3. PG 4. PG 13 Hue: -9~ +9 5. -
Page 26: Password Setup
DVD SETUP MENU Password Setup DVB-T Setup Enter this menu to setup Password Mode On/Off. Enter this menu to set the Area,Time Zone,Parental Age and Channel Setup. 00:00 -- Password Setup Page -- 00:00 Password Mode -- DVB-T Setup Page -- Password Area Time Zone... -
Page 27: Channel Setup
DVD SETUP MENU Press Yellow button to set protected channel, you will Channel Setup be asked to input a pas sword to set parental protection. Parental Protected Enter this menu to auto scan,manual scan,adjust P l e a s e i n p u t t h e channels,remap channels and reserve channels. -
Page 28: Troubleshooting
TROUBLESHOOTING Should your Portable DVD player develop a problem, please check below before requesting service: Symptom Check and Action The disc cover isn't closed.Close the disc cover. No loading The unit is on CVBS input mode.Press AV IN/OUT button to switch to AV OUT Mode. The parental control is applying.Clear the parental control or change to the other grade. -
Page 29: Specifications
SPECIFICATIONS Type of Disc MPEG 4 Kodak Picture CD CD-R / CD-RW Tuner&Channel R F INPUT CONNECTOR X 1 (IEC-TYPE,IEC169-2,FEMALE) FREQUENCY RANGE: 470MHZ~862 MHZ(UHF) SIGNAL LEVEL: -15~-70dbm Video Format MPEG -2,MPEG-4 MPEG 1, LAYER 1, LAYER 2 , LAYER 3 Audio Format Signal Output TV System:... - Page 30 SPECIFICATIONS Video (composite) output X 1 Output Terminals Down Mix Stereo output (Left and Right) X 1 Coaxial output X 1 Earphone jack X 1 AVinput Input Terminals F input USB Slot(only supports USB flash disk) DC input 12 V 1.5 A Body size: W200 x D145 x H40mm Dimensions...
Need help?
Do you have a question about the a37hf and is the answer not in the manual?
Questions and answers