Advertisement
Quick Links
Advertisement

Subscribe to Our Youtube Channel
Related Manuals for Xtreem FlyeEye


Summary of Contents for Xtreem FlyeEye
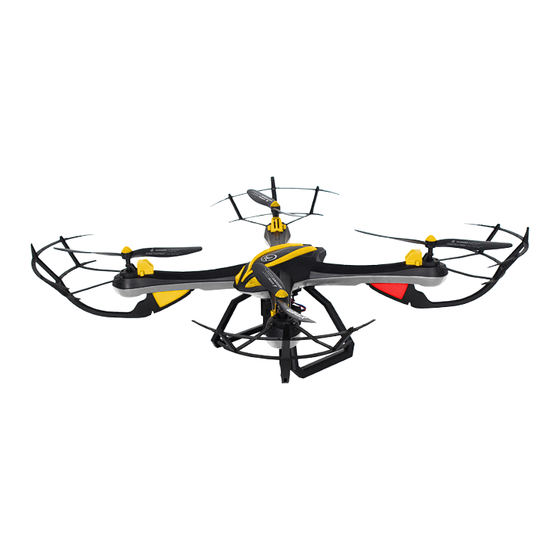
- Page 1 VIDEO DRONE THAT’S YOUR EYE IN THE SKY INSTRUCTION MANUAL...
-
Page 2: Safety Precautions
SAFETY PRECAUTIONS NOTICE: Before using the Drone, read this instruction manual carefully, and obey all warnings and caution labels - seriously, it’s no fun if someone gets hurt. WARNING - DO NOT FLY IN RESTRICTED OR WARNING - THIS DRONE IS NOT INTENDED NO-FLY ZONES. - Page 3 SAFETY PRECAUTIONS The Drone is equipped with a Lithium Polymer battery. These kind of batteries are light and powerful, as their chemistry is based on lithium, a light and extremely volatile metal. SPECIAL LIPO BATTERY INSTRUCTIONS: • Never charge battery unattended. •...
- Page 4 YOUR CONTROLLER Get acquainted with your controller. Antenna Power LED Forward / Backward Trim Throttle Stick Direction Stick Video (up) Photo (down) Rotation Trim Sideway Trim Power Switch Speed Control 360° Flip Headless Flight Return Home Low = single beep Medium = double beep Hover High = triple beep...
- Page 5 INSTALL CONTROLLER BATTERIES Your controller requires 4 AA batteries (not included). Open the battery cover of the controller, insert 4 new “AA” (1.5V) alkaline batteries following the polarity markings (+ and -) inside the battery compartment, and then replace the battery cover. AA 1.5V AA 1.5V AA 1.5V...
- Page 6 PREPARE FOR FLIGHT Charge the Drone LiPo battery Plug the white (3-wire) connector on the LiPo battery into the charging connector on the charger, and then plug the charger into a power outlet. While charging, the charger LED will be solid red. When charging is complete, the charger LED turns green.
- Page 7 PREPARE FOR FLIGHT Install the Drone LiPo battery Once fully charged, plug the red (2-wire) connector on the LiPo battery to the drone’s power cable located inside the Drone battery compartment. Stow the LiPo battery and any excess cables inside the battery compartment, and then close the cover.
- Page 8 PREPARE FOR FLIGHT Attach the prop guards Prop guards prevent propellers from getting damaged or hurting someone, in case of collision. Use this screw type Note: Do not over-tighten screws as this can cause the mounting holes to deform. (under the arm) Optional front and rear LED covers can be fitted together with the prop guards under the arms of the Drone, if necessary.
- Page 9 PREPARE FOR FLIGHT Attach the landing gear The set of landing gear provides the Drone a stable platform and protects the bottom-mounted camera during takeoff and landing. Use this screw type...
- Page 10 PREPARE FOR FLIGHT Install the Drone camera The camera comes pre-fitted with a tilt mount. Simply attach the mount to the four screw posts located underneath the Drone and secure in place using screws. Once mounted, plug the camera’s power connector into the “CAMERA”...
- Page 11 PREPARE FOR FLIGHT Pair the controller Turn on the Drone and place it on a flat, level surface. Allow up to 10 seconds for the Drone’s digital gyroscope to stabilize automatically. Turn on the controller. Beginning from a neutral position, move the Throttle stick all the way up and then all the way down.
-
Page 12: Basic Flight Controls
BASIC FLIGHT CONTROLS The Throttle stick controls altitude (climb/descend) and rotation, while the Direction stick controls forward, backward, and side to side movements. Throttle stick Direction stick Small adjustments made slowly and carefully are the best way to get the Drone to fly well. -
Page 13: Capture Photos & Videos
CAPTURE PHOTOS & VIDEOS Capture awesome aerial action shots and videos with the HD camera. • To start recording a video, push the Video/Photo button up. While recording is in progress, the Drone’s rear LEDs will be blinking. To stop recording, push the Video/Photo button up again. •... -
Page 14: Return Home
RETURN HOME If you start to lose sight of the Drone during flight, simply press the Return Home button once and the Drone will automatically fly back towards the general vicinity of the controller. You can control the altitude using the Throttle stick, but any forward or backward movement with the Direction stick will deactivate... - Page 15 HOVER Hover mode is a great way for beginners to learn how to fly! This feature maintains the Drone at a consistent altitude while allowing you to rotate and control directional movements normally. Bring the Drone up to the altitude you want, then press the Hover button.
- Page 16 HEADLESS FLIGHT In Headless Flight Mode, the Drone will fly the direction you move the right stick, as seen from your viewpoint, no matter which way the nose is pointed. Push the right stick forward, and the Drone will fly away from you, or push the right stick backward and the Drone will head towards you.
- Page 17 360° FLIP Perform a 360° flip maneuver by pressing the 360° flip button and moving the Direction stick in the direction you want the Drone to flip. This stunt is best done at least 3 meters above ground in wide- open spaces that are free of obstructions.
- Page 18 HELP Propellers are spinning, but the Drone will not lift off the ground. • Check the propellers for any sign of damage. Bent or broken propellers should be replaced promptly with the spare propellers included in your package. • The Drone battery has insufficient power. Make sure the Drone battery has been fully recharged. The Drone keeps drifting in a certain direction during flight even in calm wind conditions.
- Page 19 How do I clean and maintain my Drone? • Regularly inspect and clean any dirt trapped around the propellers using a soft brush. Accumulation of dirt puts additional stress on the motor and may cause the propeller to spin unevenly or even stop spinning completely. •...
- Page 20 Any unit which proves defective during the stated period will be repaired without charge for parts or labour or replaced at the sole discretion of Xtreem. The end user is responsible for all freight charges incurred to send the product to Xtreem’s repair centres.
Need help?
Do you have a question about the FlyeEye and is the answer not in the manual?
Questions and answers