Table of Contents
Advertisement
Quick Links
Advertisement
Table of Contents

Summary of Contents for Solcon Solstart Plus 31
- Page 1 Ver. 29/04/2007...
-
Page 2: Table Of Contents
2 • Index Solcon’s Solstart Plus Instruction Manual INDEX Index ............................2 Safety & Warnings ......................... 3 2.1 Safety ............................3 2.2 Attention ..........................3 2.3 Warnings ..........................3 Technical Data ........................4 3.1 Introduction ..........................4 3.2 Rating and frames sizes......................4 3.3 Starter Selection ........................ -
Page 3: Safety & Warnings
3 • Safety & Warnings SAFETY & WARNINGS Safety Read this manual carefully before operating the equipment and follow its instructions. Installation, operation and maintenance should be in strict accordance with this manual, national codes and good practice. Installation or operation not performed in strict accordance with these instructions will void manufacturer’s warranty. -
Page 4: Technical Data
The Solstart Plus incorporate an internal protection to protect its heatsinks from over heating. Rating and frames sizes Solstart Plus Dimensions model WxHxD [mm] Solstart Plus 31 65x190x114 Solstart Plus 44 65x190x114 Solstart Plus 58 120x265x121 Solstart Plus 72 120x265x121... -
Page 5: Mains And Control Description
5 • Technical Data Mains and control description Mains Voltage (line to line)(Terminals/bars L1, L2, L3) 3.4.1 Four mains voltage levels are available: 208V, 400V, 480V, 600V. Note: 208V applies for 208V-10% up to 220V+15% 400V applies for 400V-10% up to 400V+15% 480V applies for 480V-10% up to 480V+15% 600V applies for 600V-10% up to 660V+15% Control Voltage (Terminals 1, 2) -
Page 6: Soft Starter Protections
6 • Technical Data Soft starter protections Electronic Overload 3.6.1 The built-in inverse time electronic overload becomes operational after 15 seconds. (This is the maximum starting time of the Solstart Plus). Trip current is factory set to 115% of Motor Full Load Current (from the setting on Motor FLC potentiometer), E.g. -
Page 7: Starter Selection Tables For Various Voltage Ratings
Motor kW Motor kW Motor kW @230V @400V @480V @600V [kW] [kW] [kW] [kW] Solstart Plus 31 18.5 Solstart Plus 44 12.5 Solstart Plus 58 Solstart Plus 72 Solstart Plus 85 Solstart Plus 105 Solstart Plus 145 Solstart Plus 170 ________________________________________________________________________________________________... -
Page 8: Ordering Information
8 • Technical Data Ordering Information 3.7.1 Solstart Plus 400- Full load Mains Control Options Front Current Voltage Voltage Panel Full load Current Specify Description Starter’s 31, 44, 58, 72, 85, 105, 145, 170 FLC [A] Mains Voltage Specify Description 208V 50/60Hz (208V-15% to 220V+10%) 400V 50/60Hz (400V-15% to 400V+10%) 480V 50/60Hz (480V-15% to 480V+10%) -
Page 9: Recommended Wiring Schemes
9 • Recommended Wiring Schemes RECOMMENDED WIRING SCHEMES Typical wiring diagram Control voltage and discrete input voltage from Control voltage and discrete input voltage from the different sources. same source. Notes: (1) - Use fuses for type 2 coordination. Refer to section 4.2.1 on page 10 (2) - Solstart Plus incorporates a universal power supply unit for DC and AC control voltage: 110- 230V 50/60Hz or 110-230VDC. -
Page 10: Short Circuit Protection
For “class 2 coordination”, protect the starter against a short circuit by thyristor protection fuses for I²t and fuses as in dictated in the following table: Solstart Plus Max. thyristor I BUSSMAN Model Sec] Rate Solstart Plus 31 4,000 FWP 90B Solstart Plus 44 9,100 FWP 125B Solstart Plus 58 18,600... -
Page 11: Dimensions
11 • Dimensions DIMENSIONS Solstart Plus 31, 44 Note: Mains voltage terminals: 16mm Solstart Plus 58, 72, 85, 105 ________________________________________________________________________________________________... -
Page 12: Installation
12 • Solstart Plus 145, 170 INSTALLATION WARNING! Do not interchange line and load connections Do not connect the Solstart Plus “Inside Delta” Prior to Installation Check that Motor’s Full Load Ampere (FLA) is lower than, or equal, to the starter’s Full Load Current (FLC) and that Mains and Control voltages are as indicated on the starter’s side label. -
Page 13: Temperature Range & Heat Dissipation
13 • Installation Note: For harsh environments (sewage treatment plants, etc.), it is recommended to order the starter with printed circuit board coating. Refer to section 3.7.1 on page 8 for ordering information. Temperature range & heat dissipation The starter is rated to operate over a temperature range of -10ºC (14ºF) to + 40ºC (104ºF). Relative non-condensed humidity inside the enclosure should not exceed 95%. -
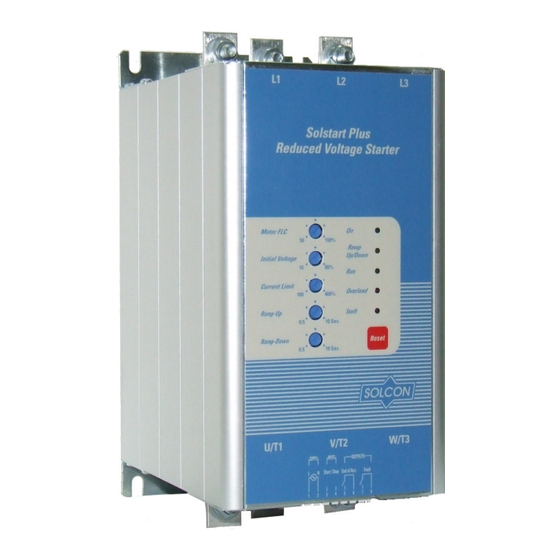
Page 14: Control Keypad
Motor FLA is the motor's Full Load Current rating as shown on its nameplate. FLC is the starter Full Load Current as shown on its label. Example: When starting a 27A motor using Solstart Plus 31: FLC% × Therefore set the FLC% to a reading of 87% (see Ex.) 87 % °... - Page 15 15 • Control Keypad Potentiometer Description Range Initial Voltage 10-80% Determines the initial voltage to the motor (torque is directly proportional to the square of the voltage). Range: 10-80% of nominal voltage. This adjustment also determines the inrush current and mechanical shock.
-
Page 16: Indication Leds And Reset Button
16 • Control Keypad Potentiometer Range Description Ramp Down 0.5-10 sec. Used to control deceleration of high friction loads. When Ramp-Down potentiometer is set, upon stop signal the starter output voltage is gradually ramped down. When "Ramp-down Time" is set to minimum, the motor will stop immediately. -
Page 17: Starting Procedure
17 • STARTING PROCEDURE STARTING PROCEDURE When mains voltage is connected to the Solstart Plus, even if control voltage is disconnected, full voltage may appear on the starter load terminals. Therefore, for isolation purposes, it is necessary to connect an isolating device before (upstream) the starter. -
Page 18: Standard Starting Procedure
18 • STARTING PROCEDURE Standard starting procedure 1. Set FLC (Motor Full Load Current) - according to calculation: Motor FLA × Starter F 2. Set other potentiometers according to system requirements (see next page for examples) 3. Connect Control Supply. On LED will lit. 4. -
Page 19: Examples Of Starting Curves
19 • STARTING PROCEDURE Apply Start command If acceleration time is too short, increase Motor acceleration time “Acceleration Time” setting and/or decrease C.L. to full speed is as (when decreasing CL, make sure motor increases required? speed gradually and does not stall). End of process Examples of starting curves Light loads... -
Page 20: Trouble Shooting
20 • TROUBLE SHOOTING Upon Start the voltage and current increase until current reaches Current Limit value. The voltage remains at this value until motor reaches nominal speed, where current starts to decrease, voltage continues to ramp-up to nominal. At this time, the motor should have smoothly accelerated to full speed. TROUBLE SHOOTING Upon fault –... -
Page 21: Warranty Claim And Fault Inquiry
21 • TROUBLE SHOOTING Warranty Claim and Fault Inquiry Representative Name: Country: Fax Number: Model Number And Build Example: 170 – 400 – 2 – 8 – S Options: Solstart Plus _ _ _ - _ _ _ - _ - __ +___ - _ Serial Number: Purchasing Date: Sale / Installation Date:... -
Page 22: Technical Specifications
22 • TECHNICAL SPECIFICATIONS TECHNICAL SPECIFICATIONS Environment Mains voltage Three phase, line to line, 208V-176-242 Vac 50 / 60 Hz 400V-340-440 Vac 50 / 60 Hz 480V-408-528 Vac 50 / 60 Hz 600V-510-660 Vac 50 / 60 Hz Control Voltage 110 –... - Page 23 N.O , 5A, 250VAC, 1250VA max. Solstart Plus up to 44A. N.O , 8A, 250VAC, 1800VA max. Solstart Plus 58A and up. Solcon Industries Ltd. TEL:972 4 9890311 FAX:972 4 9890233 POB 635 YOQNEAM ILLIT . 20692 ISRAEL. www.solcon.com; Technical support: office@solcon.com ________________________________________________________________________________________________...
Need help?
Do you have a question about the Solstart Plus 31 and is the answer not in the manual?
Questions and answers