
Related Manuals for Missile Works RRC3


Summary of Contents for Missile Works RRC3
- Page 1 RRC3 – Rocket Recovery Controller 3 User Manual Revision 1.60 Missile Works Corporation PO Box 1725, Lyons CO 80540 www.missileworks.com ...
-
Page 2: Primary Features
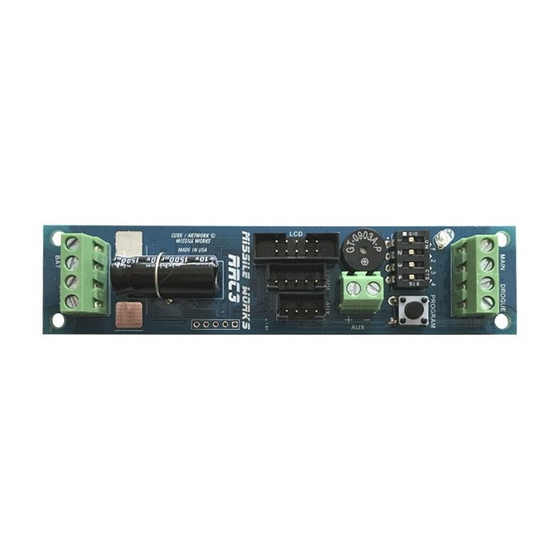
Introduction Overview The Rocket Recovery Controller 3 (RRC3) is a barometric dual‐deploy altimeter, with the features of high‐end units, at the cost of those with a more modest feature set. In addition to basic dual‐deploy capability, the RRC3 is a multi‐flight recording unit, allowing you to fly all day, without the need to stop and download data in between flights. Two‐stage (or dual) deployment is preferable to single parachute or streamer recovery systems for high‐power rocketry. Recovery of large, heavy rockets with a small parachute or streamer alone does not supply enough drag to safely recover the rocket without damage. An adequately sized parachute deployed at a high altitude may cause the rocket to drift out of the launch area, making recovery difficult if not impossible. Two stage (or dual) deployment recovery systems either separate the rocket airframe into two sections or eject a small drogue parachute or streamer at apogee, allowing the rocket to descend at a rapid yet controlled rate. When the rocket descends to a predetermined altitude above its initial launch elevation, it then deploys the main parachute, allowing the rocket to make a safe landing. Primary Features ● Drogue and Main outputs ● Configurable Deployment operations ● Configurable Main and Arming altitudes ● User‐selectable beep frequency ● Configurable third "Aux" output ● 15 flight memory @ ~28 minutes per flight ● Live data streaming and telemetry capability Specifications Microcontroller 16MHz 16‐bit MSP430 Series mCU Onboard Flight memory 8Mbit SST Flash Memory Pressure/Temperature sensor ... - Page 3 RRC3 System Options Computer USB interface board, for configuration and data download via mDACS PC software Bluetooth interface board for Smartphone configuration and data download LCD interface terminal for field configuration of unit and field review of flight data Combo GPS/Telemetry board for live downlink of location/data stream PerfectFlite DT2/DT3 interface adapter for the configuration/download from RRC3 Wiring harnesses for custom interface of Comm and Auxiliary Output Auxiliary Pyro Expansion board, providing additional output channels and timing Default Base Settings Arming Altitude 300’ AGL Main Deployment Altitude 500’ AGL Deployment Mode Drogue @ Apogee / Main @ AGL altitude Audio Options Continuity Beep ...
-
Page 4: Installation
Installation Altimeter Mounting The RRC3 does not have an “up” orientation, and can be mounted in any convenient orientation. It is important to mount the altimeter securely, preventing it from suffering damage during flight. When planning the layout of your altimeter bay, in addition to mounting the RRC3, be sure to provide secure mounting for the battery. An unsecured battery can break free during recovery events, resulting in damage to the altimeter. 4/40 screw hardware is recommended to mount the RRC3 onto the altimeter bay “sled” of the rocket. Nylon standoffs or insulated washers are also required to provide clearance for the barometric sensor located on the bottom side of the circuit board. The altimeter bay section used for the RRC3 must be a sealed chamber with a static pressure ports (see the next section for port sizing). The sealing of the chamber is necessary for several reasons: Isolates the electronics from the ejection‐charge heat, residue, and over‐pressure Isolates the electronics from the aerodynamic pressure and vacuum during flight Provides uniform static pressure equilibrium to ambient pressure during flight IMPORTANT: Inadequate sealing of the electronics bay or exposure of the electronics to ejection charge heat, BP residue, or pressure will cause the RRC3 to malfunction. IMPORTANT: Black powder residue is extremely corrosive to the circuit board and its components. Always clean off any inadvertent residue immediately to avoid long‐term damage to the unit. Static Pressure Ports Barometric altimeters require equalization of the air pressure inside the altimeter bay and the air pressure outside the rocket. To provide this, one or more static pressure ports are required. While one port can be used, to reduce spurious readings due to wind across a single port, multiple equally spaced ports is recommended. Static ports should be located where they are not affected by anything which can cause turbulence in the airflow over the port. This includes rail buttons, screw heads, nosecones and transitions – the farther the static port(s) can be located from such items, the better. ... - Page 5 The sizing of static port(s) requires that you first calculate the volume of the electronics bay as follows: Volume = Bay Radius (inches) x Bay Radius (inches) x Bay Length (inches) x 3.14 Next, use the appropriate single port formula to calculate the size of a single port: For volumes < 100 Single Port Diameter (inches) = Volume / 400 OR For volumes >= 100 Single Port Diameter = 2 x SQRT (Volume / 6397.71) If you plan to use multiple ports (recommended), determine how many ports to use (a minimum of 3 is recommended), then calculate the size of each port using these multi‐port formulas: Single Port Area = (Single Vent Diameter / 2) x (Single Vent Diameter / 2) x 3.14 Multi Port Diameter = 2 x SQRT ((Single Vent Area / # of holes) / 3.14) Power and Wiring Considerations The RRC3 is designed to be operated with a standard 9‐volt alkaline battery. Standard 9V alkalines are an optimal choice, providing an inexpensive and widely available battery type with secure snap connectors. Always purchase and use premium alkaline batteries. Other battery types can be used, including NiCd, NiMH, LiPo, or other battery chemistries. Your battery choice must source and maintain an absolute minimum of 3.5 volts, and also be limited to a maximum of 10 volts. It should be noted that 9V alkaline batteries can source a maximum discharge current of about 3 amps into a short. The Drogue, Main, and Aux outputs of the RRC3 are rated for 3A service. When using other batteries chemistries that can source higher discharge currents, users should ensure the output connections to the Drogue, Main, and Aux are not shorted, and the connected electronic match loads do not exceed 3A to avoid damaging the unit. The brownout capacitor is optimized to prevent an over‐current brownout condition when operating the RRC3 with a 9 volt battery. Lower battery voltages reduce the total brownout time capability of the capacitor. If you do choose to use a lower voltage battery than 9V, ensure your battery has adequate voltage/power reserve to prevent a brownout condition during flight due to a voltage dip, and that you pay extra attention to the loads required by your e‐matches. Nominal power consumption for the RRC3 is approximately 6ma. When beeping or flashing however, power consumption can jump up to ≈35ma. During Pre‐launch on the pad, and Post Flight after recovery, the altimeter will beep and flash the LED. During flight operations, the LED will illuminate when the velocity discriminator lockout conditions are active. IMPORTANT: Always use a battery system of 10 Volts or less to avoid damaging the RRC3 . IMPORTANT: Always load‐test your battery prior to flight to ensure adequate power reserve for reliable operation and ignition of the ejection charges. Inadequate sizing of an external battery system or high‐current demands on the battery system during event initiation may lead to power and processor brown‐out conditions, resulting in recovery failure. ...
- Page 6 In addition, it is important to pay attention to battery polarity – the positive terminal on the battery must be connected to the positive terminal (marked with a + sign) on the altimeter. Connecting the battery backwards will not damage the unit, however the altimeter won’t operate. Stranded 20‐22 AWG wire is recommended for the battery and power switch terminals. Power Switch Considerations In addition to providing a power source, a power switch should be connected to the switch terminals (next to the power terminals) on the altimeter. The switch used can be as simple as a pair of wires which are twisted together prior to flight (i.e. “twist and tape”), or as complex as a magnetically activated solid‐state switch. Switches which provided positive, bounce‐free contact, such as twisted wires, high quality rotary or lever switches, push on/off, and screw switches, are recommended for their simplicity and reliability. If you do use the “twist and tape” method, please use the following guidelines: Do Not poke the wires back into the airframe after making a connection. When the wires are poked back into the airframe, this creates a safety issue should the rocket need to be disarmed and removed from the pad for any reason, as it is difficult, if not impossible, to fish the wires back out of the hole. Maintain positive contact of the stripped wire ends while twisting them together to avoid power bobbles which can lead to brownouts or other undesired results, including potential output event activations due to potential undefined states of operation. It is best to tape the leads, after twisting them, then tape them to the airframe, or poke the end into another hole on the airframe, leaving a length of wire exposed and accessible on the outside of the airframe. If your using an “active” switch that sources power and is polarity dependent, the (+) battery power switch terminal is located adjacent to the battery negative terminal. The switched (+) power terminal is the other switch terminal. Drogue and Main Ejection Charge Connections The RRC3 is designed to be used with low current electric matches (Daveyfire, Oxral, MTEK, JTEK), or low current motor igniters (Quest Q2G2). It’s also extremely important that you pay attention and validate that you connect your drogue ejection charge to the drogue terminals and the main ejection charge to the main terminals. These terminals are clearly marked on the board with positive and negative designations. The RRC3 employs the use of an “Open Drain MosFET” device to activate the ejection charges. The battery voltage is always present on the (+) terminal while power is applied to the RRC3, and the (‐) terminal is a high resistance connection that prevents any current flow until the MosFET is gated on at the appropriate event time. ...
- Page 7 IMPORTANT: NEVER attach live ejection charges with the altimeter powered ON. Always connect live ejection charges with the altimeter powered OFF. Always pre‐measure your deployment charge matches or igniters for a nominal resistance and verify they are not shorted. A nominal resistance for a low current device should be in the range of 1 to 2 ohms. At the Pad At the launch pad, begin by placing your rocket on the pad/rail, and raising the rocket to the vertical (launch) position. Do not install the igniter at this time. Before you arm the altimeter, have bystanders remove themselves to a safe distance where they will not be injured, should the ejection charges fire prematurely. Turn on the arming switch for the altimeter, and listen for the startup sequence. The altimeter startup sequence is as follows : 1. 5 second long beep (init mode) 2. 10 second baro history init time (silence) 3. Settings beep (when enabled) or POST fault code beep (if a fault, see POST fault codes) 4. 10 second launch commit test time (silence) 5. Launch Detect mode (continuity beeps) a. A long beep indicates no continuity on any event terminal. b. One short beep indicates continuity on only the drogue terminal. c. Two short beeps indicate continuity on only the main terminal. d. Three short beeps indicate continuity on the main and drogue terminals. Assuming the altimeter beeps out the expected continuity status, your altimeter is ready for launch. At this point, you should install the igniter, connect the igniter leads, and leave the area. Should there be a need to remove the rocket from the pad, or otherwise change its position, begin by disconnecting and removing the igniter. Then, turn off the arming switch for the altimeter, and wait a minimum of 10 seconds after the altimeter stops beeping before moving the rocket. Analyzing Your Flight After your flight, the altimeter will beep/flash out your peak altitude using a "per digit" method. For example, let's say your rocket flew to a peak altitude of 2,340 feet. You'd hear the following beep sequence: beep‐beep (2), short pause ...
-
Page 8: Advanced Features And Operation
Short low tone beep (end of audio value report) Long pause (beeping will repeat) The altimeter will continue to beep as described until powered off. There are additional flight data items you can enable to beep after each flight (see the "Audio Options" setting in the Advanced Operation section). Operating Tips for Success Always pre‐test your altimeter as COMPLETELY as possible prior to every flight. This includes a test of the inputs, outputs, and baro system. These tests can be performed using the diagnostics capability of the RRC3 (see the Advanced Operation section). Always pre‐test your batteries before each flight and ensure they have adequate power capacity for the anticipated worst case flight profile, including unplanned “on‐the‐pad” waiting time. Always pre‐measure your deployment charge initiators. Measure them for a nominal resistance and verify they are not shorted. Proper port‐sizing creates ideal equilibrium rates. Ensure that your porting is compliant with the recommended sizing. Improperly sized porting or other leaks in the electronics bay can create parasitic pressure effects, impacting equilibrium rates and reliable recovery. Advanced Features and Operation The RRC3 provides a number of advanced features and operations while still maintaining and providing the basics of simple and reliable dual event recovery and peak altitude determination. These advanced features are easily accessible, but do not interfere or get in the way of the basic functions that the RRC3 provides. Dual Battery Wiring The RRC3 is designed to fly using 9V alkaline batteries in tandem with low current ematches for the drogue and main deployment charges. Should your application require higher current for output events, or your operating at lower battery voltages you might consider using a dual battery wiring setup. This method isolates the RRC3 Logic Battery power from the Drogue/Main Deployment charge power, thus eliminating any potential voltage brown‐out scenarios during event activation. The logic battery must comply with the 3.5VDC to 10VDC rating as mentioned in the specs; however your pyro battery may be any voltage up to an absolute maximum of 30VDC. It is also recommended when using this dual battery operation to first activate the RRC3 Logic Switch, and after verification of a successful boot, then activate the Pyro Switch. ... - Page 9 When using dual batteries, use the following wiring diagram as a guide. RRC3 Operational Modes The RRC3‐mini has several distinct modes throughout the course of its operation during flight and recovery. These modes of operation are identified by the function of the piezo and the LED, and the specific phase of flight. Power Up and Pre‐Launch Modes Power‐up Initialization Mode When power is first applied to the unit, it will provide a continuous 5‐second beep to indicate it has been switched on. During this 5‐second time period, the RRC3 is looking for a tap of the “Program” button (invoking the DIP Switch Operations Mode) The LED will remain on continuously during the Power‐up Initialization Mode. Baro History Initialization Mode After the Power‐up Initialization mode, the unit goes through a 10‐second baro initialization start‐up delay. The LED will flash on and off every 2 seconds while in this mode. This delay period allows barometric stabilization and establishes an initial barometric history. The RRC3 also looks for a “Host Connection” message from a host PC computer (attempting to connect in Host or Simulation Modes). These operations are covered in subsequent mDACS User Manual. ...
- Page 10 The Launch Commit Test is a 10 second test operation that is a “trial run” of the Launch Detect Mode, applying the currently programmed Arming Altitude against ambient conditions. Should ambient conditions be such that a Launch Detect condition is valid during this test period, the RRC3 will invoke a POST Code 8 condition (see above). During the Launch Commit Test, the LED flashes on and off at a 1 second rate. ...
- Page 11 In‐Flight Operational Modes Apogee Detection Mode While the RRC3 is actively sampling the barometric sensor to determine apogee and subsequent Drogue Event, both the LED and Piezo will be OFF. When the unit determines that apogee has occurred (by reaching a displacement velocity of 0 ft per second) it will initiate the Drogue Event. The Main Event may also activate at apogee based upon the configuration of the Deployment Mode setting (see the following “Base Settings” section if the manual for more details). Main Detection Mode After the RRC3 has detected apogee, it will transition to the Main Detection Mode. The unit will continue to sample barometric pressure during the descent phase of the flight until it reaches the designated Main Altitude setting. Landing Detection Mode Once the Main Event has occurred, the RRC3 starts monitoring for a Landing Event. The Landing Event occurs when current velocity > ‐3 ft. per second for a minimum of 2 seconds. Post‐Flight Operational Mode After Landing Detection, the RRC3 will report the peak altitude it measured during flight. The piezo and the ...
- Page 12 Beep Peak Flight Velocity Post‐Flight Setting Value + 8 Beep Time to Apogee (seconds) Post‐Flight Setting Value + 16 Disable all Audio Options Setting Value + 32 For example, if you wanted to beep the Pre‐Launch Battery Voltage (+1) and in addition, employ the use of the Pad Power Saver Mode (+4), you would set the Audio Options setting to (5). All of the audio option settings are basically self‐explanatory; the exception however is the Pad Power Saver Mode. If this option is enabled, the continuity beeping you hear initially in Launch Detect Mode will stop after 5 minutes. In place of continuity beeping, the altimeter will emit 1 short “beep” every 15 seconds to indicate it is armed and in launch detect mode, saving a lot of battery power for your inevitable pad wait time and subsequent flight. Audio / LCD / Telemetry Units Range: 1 to 4 / Default: 1 The Units setting determines how the RRC3 will report all the flight performance values. This setting applies to all forms of data reporting (the audio “beeping”, the data displayed on the optional LCD terminal, and the values transmitted in flight via the telemetry capability). Choose a setting that is most appropriate for you as follows: 1. Imperial Units (feet, deg F) / Velocity (feet per second / fps) 2. Metric Units (meters, deg C) / Velocity (Kilometers per hour / KPH) 3. Imperial Units (feet, deg F) / Velocity (Miles per hour /MPH) 4. Metric Units (meters, deg C) / Velocity (meters per second /mps) Low Voltage Lockout Level Range: 2 to 9 / Default: 2 This setting will validate the RRC3 battery voltage is above a minimum voltage level that’s appropriate for your battery system. A setting of (2) disables this lockout feature. If this lockout feature is enabled, and the battery voltage is at or below the specified setting, the unit will not arm itself for flight, and instead activate the POST fault code report mode (see the POST fault codes) Piezo Tone ...
- Page 13 Access to all the Base Settings is made available via the RRC3 DIP switch and pushbutton interface. The value of all these settings can be verified or reconfigured at any time without the use of the optional LCD Terminal or mDACS PC Software and USB Interface module. In addition to providing access to all these settings, the DIP switch and pushbutton interface can also provide access to the altimeter resident Flight Log data and an interactive Test Mode that can validate basic operational integrity of the RRC3 (these are covered in the subsequent manual section). DIP Switch 4 determines this basic selection of Settings access, or Flight Log/Test Mode access. To start a setting session, ensure the RRC3 is powered off, and that it has a battery and power switch attached and read. Also ensure the DIP switch 4 is in the OFF position. Apply power to the RRC3 by activating the power switch. You should hear the start of the 5 second “init” tone. At any point during this 5 second tone, tap the PROGRAM button. The beeper and LED should go out, and the unit will begin its Base Settings operation. The position of DIP Switches 1 thru 3 determines which of the 8 Base Settings that you want to verify, or re‐program. The Base Settings operation follows a simple process flow: 1. The RRC3 reads the position of DIP Switches. 2. The RRC3 beeps/flashes the current value of the associated setting. 3. The RRC3 pauses for 5 seconds, and then repeats Step 1. You can change DIP Switches 1 thru 3 at any time to select a new setting for verification. Using this process, you can validate the values of all 8 Base Settings. The DIP switch / Settings positions are: SW1 SW2 SW3 OFF OFF OFF Arming Altitude ON OFF OFF Main Deployment Altitude OFF ON OFF Deployment Mode ON ON OFF Audio Options ...
- Page 14 Done... Programming complete! Repeat the sequence again should you want to change it to something else, or select a new setting via DIP switch to verify or change. When you're done, simply power off the RRC3. It’s now ready to fly with the newly programmed settings. Accessing the RRC3 Flight Log via DIP switch and pushbutton As mentioned in the previous section, the DIP switch and pushbutton interface can also provide access to the altimeter resident Flight Log data. To start a Flight Log session, ensure the RRC3 is powered off, and that it has a battery and power switch attached and ready. Also ensure the DIP switch 4 is in the ON position. Apply power to the RRC3 by activating the power switch. You should hear the start of the 5 second “init” tone. At any point during this 5 second tone, tap the PROGRAM button. The beeper and LED should go out, and the unit will begin its Flight Log/Diagnostic operation. The position of DIP Switches 1 thru 3 determines which of the 6 Flight Log items that you want to review. The Flight Log/Diagnostic operation follows a simple process flow: 1. The RRC3 reads the position of DIP Switches. 2. The RRC3 beeps/flashes the value of the associated Flight Log/Diagnostic item(s). 3. The RRC3 pauses for 5 seconds, and then repeats Step 1. You can change DIP Switches 1 thru 3 at any time to select a new item for review. Using this process, you can review/select all 6 Flight Log items. The Flight Log DIP switch positions are: SW1 SW2 SW3 OFF OFF OFF Peak Altitude AGL ON OFF OFF Peak Velocity OFF ON OFF Time to Apogee ON ON OFF Total Descent Time ...
-
Page 15: Advanced Settings
Continuity on Auxiliary only 5 Short Beeps Continuity on Drogue and Auxiliary only 6 Short Beeps Continuity on Main and Auxiliary only 7 Short Beeps Continuity on Drogue, Main, and Auxiliary At any point during this diagnostic, if you tap the “Program” button, you will simultaneously activate all 3 outputs (Drogue, Main, and Auxiliary) for the standard 1 second activation time used by the Flight controls. IMPORTANT: ALWAYS USE EXTREME CAUTION and ensure that you have NO LIVE PYRO CHARGES attached to RRC3 when activating this Output test operation. Advanced Settings In addition to the 8 Base Settings mentioned in the previous manual section, the RRC3 provides a collection of Advanced Settings that control the operation of In‐Flight Telemetry, and the Auxiliary Output which can be used for a host of extended control operations. ... - Page 16 It should be noted that access to all of these settings is accomplished by use of the optional plug‐in LCD Terminal accessory, or by use of the USB Interface module and mDACS PC Software application only. These settings are unavailable through the DIP Switch interface. Usage of the LCD and mDACS interfaces are covered in their respective User Manuals. Flight Telemetry and Settings The RRC3 provides the ability to stream live telemetry data via the onboard 5‐pin Comm Port. The update rate and content of this data stream are configurable for many different applications, including data downlinking, data logging, or digital control of other onboard avionics devices. The data stream is output at user programmable intervals from the primary UART of the RRC3 mCU in a serial packet format as follows: ‐ 9600 BPS Asynchronous ‐ 8 Data bits ‐ No Parity bit ‐ 1 Stop bit All data items in the stream are in an ASCII format are individually comma delimited, and each packet is terminated via a standard Carriage Return character (0Dh). Data Controls This setting enables the telemetry stream feature of the RRC3. Set this according to the specific requirements for your data stream: LCD Setting Value Setting Description 0 No Telemetry / Disabled 1 Telemetry Pre‐Launch @ 0.5 sec packet update rate 2 Telemetry Pre‐Launch @ 1.0 sec packet update rate 3 Telemetry Post‐Launch @ 0.5 sec packet update rate 4 Telemetry Post‐Launch @ 1.0 sec packet update rate ...
- Page 17 Notes: ‐ Altitude, Velocity, and Temperature items are scaled and formatted according to the Audio / LCD / Telemetry Units setting. ‐ Even when some Data Items are omitted from the data stream, the Data Item Order precedence still remains as specified. ‐ Events are streamed using the “‐” character prior to the activation of the event, use an uppercase character while the event is ACTIVE, and use a lowercase character post‐activation. Comm Port Pinout The RRC3 Comm Port is reserved for connection with the USB‐IO, the BTMM Module, or a “tether connection’ to an RTx/GPS system. Here’s the Comm socket diagram if you’re interested in connecting in your own project: Aux Output Control Settings The Aux Output Control Settings provide an extremely flexible and capable collection of control options, allowing users to create a custom control sequence independent of the standard drogue and main functions performed by the RRC3. These settings provide a framework that allows you to design an output “control sequence” via the definition of a “serialized flow” of operations. With one exception, all Aux control sequences have a “trigger event” that initiates the control sequence. When this trigger event is valid/true, optional secondary and tertiary controls or conditionals are evaluated for validity as well. Access to the Aux Output Control Settings is only available via the optional plug‐in LCD Terminal accessory, or by use of the USB Interface module and mDACS PC Software application. Aux Output Control Sequence (OCS) The OCS (Output Control Sequence) setting is what defines the serialized control sequence used by the RRC3. It also serves as a master enable/disable feature, meaning that regardless of secondary and tertiary settings that may be defined, when the OCS is set to “Disabled”, the entire OCS operation is disabled. The OCS settings are as follows: ...
- Page 18 LCD Setting Value Setting Description 0 Disabled ‐ OCS and Aux Controls are inactive 1 LED Sync ‐ Syncs the Aux Output with the LED 2 Event Only ‐ Aux is activated by trigger event 3 Event ‐> Timer ‐ Aux is active via trigger and timer 4 Event ‐> Loop Comparator ‐ Aux is conditional using trigger and comparator 5 Event ‐> Timer ‐> Loop Comparator ‐ Aux requires all three conditionals 6 Event ‐> Loop Comparator ‐> Timer ‐ Aux requires all three conditionals 7 Event ‐> 1‐Shot Comparator ‐ Aux is conditional using trigger and comparator 8 Event ‐> Timer ‐> 1‐Shot Comparator ‐ Aux requires all three conditionals 9 ...
- Page 19 Event ‐> Timer ‐> 1‐Shot Comparator This Aux OCS setting combines the Trigger Event with an ensuing timer, and after expiration thereof, it evaluates the 1‐Shot Comparator operation. The timer starts immediately upon activation of the Trigger Event. When the timer interval expires, the Comparator is evaluated for validity just one time. If the comparator result is valid, then the Aux Output is activated. Event ‐> 1‐Shot Comparator ‐> Timer This Aux OCS setting combines the Trigger Event with an ensuing 1‐Shot Comparator, and after validation thereof, a timer operation begins. When the Trigger Event becomes active, the Comparator is evaluated only one time for validity. The timer starts immediately upon validity of the Comparator. When the timer interval expires, the Aux Output is activated. Auxiliary Trigger Event With the exception of the LED Sync operation, the trigger event is what initiates any Aux Output Control Sequence. The trigger event represents the specific phase of the RRC3 Flight that you want to apply the control sequence to. When that phase of the flight is reached, the Trigger Event is satisfied and the ensuing control sequence can be evaluated. The Trigger Events are as follows: LCD Setting Value Setting Description 0 Disabled ‐ No trigger event is defined 1 Launch ‐ Altitude > Arming Altitude and unit has not reached apogee 2 Apogee ‐ Apogee was detected and Altitude > Main Altitude 3 Main ‐ Main was deployed and unit has not landed 4 Landing ‐ Unit has landed Auxiliary Comparator Operation Whenever the Comparator is required by the active Aux OCS, an appropriate Comparator Operation setting is required as well. The Comparator Operation defines the specific comparison test made by the altimeter. By creating comparisons ...
- Page 20 Auxiliary Comparator Value (ACV) Just like the Comparator Operation setting, whenever the Comparator is required by the active Aux OCS, an appropriate Auxiliary Comparator Value (ACV) setting is required as well. The ACV establishes the specific value used by the altimeter in the aforementioned Comparator Operation. IMPORTANT: The ACV is always expressed as a multiple of 100 (i.e. a setting of 5 = a value of 500) IMPORTANT: A negative ACV is ONLY APPLICABLE to VELOCITY comparisons. The ACV has an adjustment range of ‐10 thru 999. Auxiliary Timer Interval Whenever the Timer is required by the active Aux OCS, an appropriate Timer Interval setting is required as well. This interval setting establishes the duration of the Aux OCS Timer. IMPORTANT: The Timer Interval is always expressed in tenths of seconds (i.e. a setting of 10 = a timer interval of 1 second). The Timer Interval has an adjustment range of 0 through 999. Auxiliary Output Control Value The Output Control Value determines how the Aux Output functions once it has been activated by a successful Aux OCS operation. There are 3 distinct functions that this setting can establish: Latched Output ‐ Once activated, the Aux Output will be maintained ON in a Latched‐On state until a subsequent power off of the RRC3. One‐Shot Output ‐ The Aux Output will activate one‐time with a duration of 1 second. This operation is identical to both the drogue and main outputs when they activate. Repeat Output ‐ When initially activated, the output will behave like the “One‐Shot” (on for 1 second, then off again), however it will delay for a specified interval and “Repeat” its activation cycle again. It repeats this cycle until a subsequent power off. The following table lists the Output Control Value settings: LCD Setting Value Setting Description 0 Latched Output 1 One‐Shot Output 2‐100 Repeat Output / Repeat Interval = Setting Value ‐ 1 ...
- Page 21 n/a Auxiliary Comparator Operation n/a Auxiliary Comparator Value (ACV) n/a Auxiliary Timer Interval n/a Auxiliary Output Control Value n/a Launch Activated Device Let’s say you are night launching and wanted to activate a secondary collection of lights or LED’s once the rocket is in flight. You can wire up external LED’s or lights to the Aux Terminals of the RRC3 for launch activated event. This example illustrates a continuously activated set of LED’s. Aux Output Control Sequence (OCS) Event Only Auxiliary Trigger Event Launch Auxiliary Comparator Operation n/a Auxiliary Comparator Value (ACV) n/a Auxiliary Timer Interval n/a ...
- Page 22 Apogee Auxiliary Comparator Operation n/a Auxiliary Comparator Value (ACV) n/a Auxiliary Timer Interval 50 (5.0 seconds) Auxiliary Output Control Value 1 (1‐Shot) Elevation Based Payload Deployment or Main Backup Event The RRC3 can actively monitor altitude after the Apogee or the Main event, and activate the Aux Output when a specific descent altitude level has been reached. We’ll illustrate a backup Main Event using an assumed 1500 ft AGL Main event , and a backup altitude of 1000 ft AGL. Aux Output Control Sequence (OCS) Event ‐> Loop Comparator Auxiliary Trigger Event Main Auxiliary Comparator Operation Alt <= ACV x 100 Auxiliary Comparator Value (ACV) 10 (1000 ft) Auxiliary Timer Interval ...
- Page 23 Once the altimeter has reached its “Arming Altitude” (ie. rocket is launched), it will write a 1 second (20 sample) pre‐launch ring buffer to flash memory to capture its pre‐launch pressure data. Temperature Data and Battery Voltage Data is recorded to flash memory at 1 Hz rates. These are instantaneous 1 Hz snapshots. The exception to this snapshot sampling method is applied to the Battery Voltage during the Drogue and Main events. The RRC3 performs a 20 Hz “low voltage” sample during the duration of these events and records this low voltage value. Because the sampling is asynchronous to the 20Hz baro data and event overlay, there may be some offset in timing when observing the low voltage value in relation to a given event. Pressure Altitude Conversion The RRC3 and the mDACS software both employ the NOAA “Pressure Altitude” calculation method to convert air pressure to an equivalent altitude. The formula is as follows: The web reference can be found here: http://www.srh.noaa.gov/images/epz/wxcalc/pressureAltitude.pdf mDACS Geopotential Altitude Conversion If you have accurate temperature for your ambient launch conditions and for your apogee temperatures and you know accurate ambient launch humidity conditions, you can apply the same Geopotential Altitude calculus used by NOAA radiosondes. The temperature data is interpolated linearly from launch to apogee and back down, and the humidity is applied as a constant throughout all the calculations. The Geopotential references can be in the Federal Meteorological Handbook No. 3, Appendix D. The web reference can be found here: http://www.ofcm.gov/fmh3/pdf/12‐app‐d.pdf mDACS Flight Simulator Pressure Conversion When the Flight Simulator runs, it feeds a 20 Hz stream of pressure data to the RRC3 in lieu of using the onboard pressure sensor. The simulation altitude to pressure conversion uses the NOAA Station Pressure calculation using a standard 29.92 in Hg sea‐level reference (Pa) as shown in the following formula: ...
-
Page 24: Product Warranty
The web reference can be found here: http://www.srh.noaa.gov/images/epz/wxcalc/stationPressure.pdf Pressure and Velocity Displacement Processing The RRC3 applies multiple filtering stages to the pressure data it collects in order to determine an equivalent displacement velocity. Pressure data oversampling is first performed by the pressure sensor using a 2048 sample average to derive a single pressure reading. This oversampled pressure data is then collected at a 50 Hz rate, then averaged again to derive a 20 Hz sample. The 20 Hz pressure is then run thru a recursive 21 element FIR filter kernel to produce the 20 Hz velocity data. To make the altimeter mach immune, additional velocity data discrimination processing is performed to ensure that anomalous velocity changes are ignored. Typically these pressure artifacts are most pronounced during velocity transitions from sonic to sub‐sonic speeds. Product Warranty Missile Works Corporation has exercised reasonable care in the design and manufacture of this product and warrants the original purchaser that the RRC3 is free of defects and that it will operate at a satisfactory level of performance for a period of one year from the original date of purchase. If the system fails to operate as specified, then return the unit (or units) within the warranty period for repair or replacement (at our discretion). The system must be returned by the original purchaser, and be free of modification or any other physical damage which renders the system inoperable. Upon repair of replacement of the unit, Missile Works Corporation will return the unit postage‐paid to the original purchaser. Product Disclaimer and Limit of Liability Because the use and application of this equipment are beyond our control, the purchaser or user agrees to hold harmless Missile Works Corporation and their agents from any and all claims, demands, actions, debts, liabilities, judgments, costs, and attorney fees arising out of, claimed on account of, or in any manner predicated upon loss or damage to property of, or injuries to or the death of any and all persons arising out of the use this equipment. Due to the nature of electronic devices, and the application and environments for those devices, the possibility of failure can never be totally ruled out. It is the responsibility of the purchaser or user of this equipment to properly test and simulate the actual conditions under which the device is intended to be used to ensure the highest degree of reliability and success. ...
Need help?
Do you have a question about the RRC3 and is the answer not in the manual?
Questions and answers