Table of Contents
Advertisement
Quick Links
PROTECTED UNDER ONE
OR MORE OF THE
FOLLOWING U.S. PATENTS:
6,171,267
5,743,864
REV: 07/11
® ® ® ®
Thumper
Model 1007CCV
Mechanical CPR System
Operation Manual
(Part Number 14799-02)
Manufactured in the USA by:
4717 Talon Court SE
Grand Rapids, MI 49512 USA
Tel: (800) 530 9939 or (616) 554 9696
Fax: (616) 554 3067
e-mail: mii@michiganinstruments.com
website:
www.michiganinstruments.com
1
Advertisement
Table of Contents

Summary of Contents for Thumper 1007CCV
- Page 1 ® ® ® ® Thumper Model 1007CCV Mechanical CPR System Operation Manual (Part Number 14799-02) Manufactured in the USA by: 4717 Talon Court SE PROTECTED UNDER ONE Grand Rapids, MI 49512 USA OR MORE OF THE Tel: (800) 530 9939 or (616) 554 9696 FOLLOWING U.S.
- Page 2 (Blank Page Intentional) REV: 07/11...
-
Page 3: Table Of Contents
Thumper Cardiopulmonary Resuscitator General Description ® Thumper System Components and Accessories ® Thumper Model 1007CCV Arm/Column/Base Assembly 10 Time Cycled Constant Flow Ventilator The BackBoard Mobile Oxygen Carrier (MOC) The Carrying/Storage Case Controls and Labeling SETUP AND OPERATION Precautions Recommendations Positioning the Patient ®... - Page 4 (Blank Page Intentional) REV: 07/11...
-
Page 5: Indication For Use
There are situations where CPR is not the appropriate method of intervention. Familiarity with accepted medical practices in your area is very important. Always consult local protocol for the ® proper integration of the Thumper into your cardiac arrest management regimen of care. Caution: Current American Heart Association guidelines do not recommend the use of mechanical CPR on infants and children. -
Page 6: Benefits Of Mechanical Cpr
BENEFITS OF MECHANICAL CPR With the purchase of the Thumper CPR System, you join thousands of health care ® professionals worldwide who benefit from the many advantages of mechanical CPR. These benefits are well recognized by key professional groups. The Advanced Cardiac Life Support... -
Page 7: General Warnings And Cautions
They are found in the Care, Cleaning, and Maintenance section of this manual. ® Caution: Submersion of the Thumper Arm in fresh, ocean, or pool water will cause infiltration of water into internal critical parts, corrosion and eventual operational failure. This also applies to inadvertent injection of water, as from a “wet”... - Page 8 (Blank Page Intentional) REV: 07/11...
-
Page 9: Thumper ® Cardiopulmonary Resuscitator
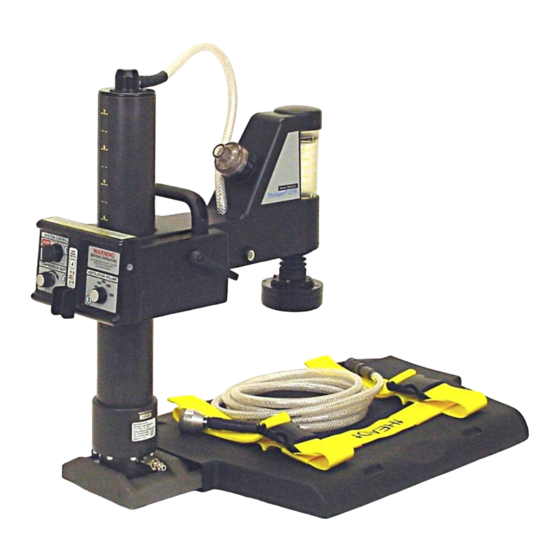
® The Thumper Model 1007CCV is a mechanical “automatic” CPR device that can be set up in seconds. It is powered by compressed oxygen and is electrically insulated, allowing it to be freely and safely used in conjunction with routine patient monitoring and defibrillation ®... -
Page 10: Thumper ® Model 1007Ccv Arm/Column/Base Assembly
® The Thumper Model 1007CCV incorporates an oxygen powered time cycled constant flow ventilator commonly known as a Patient Demand Valve (PDV) to deliver ventilation. Tidal volume can be set from 400ml to 1200ml with delivery synchronized to every 5 chest compression upstroke. -
Page 11: The Backboard
® ambulance to the hospital). One of the two outlets is dedicated to accept the Thumper Model 1007CCV O Supply Hose, while the other DISS outlet is available to supply other ®... -
Page 12: The Carrying/Storage Case
The Carrying/Storage Case The carrying/storage case is constructed of a durable Cordura 1000 denier nylon. The ® Thumper , BackBoard, O Supply Hose and code related supplies are stored in the case in a manner which permits immediate access to the device and facilitates easy setup at an emergency site. -
Page 13: Controls And Labeling
CONTROLS AND LABELING ® The Thumper Model 1007CCV’s controls are conveniently located in one area to assist the user. Refer to the following illustration for Figure references to the controls and labeling described Figure 5 Figure 7a Figure 6 Figure 7b... - Page 14 Refer to Figure 6 for an illustration of this label. ® The following controls operate the Thumper Model 1007CCV System: 1. SYSTEM CONTROL RUN/STOP (Control #1): This control allows the operator to turn on (RUN) chest compressions or turn off (STOP) chest compressions.
- Page 15 ® the Thumper Model 1007CCV (ON or OFF). The arrows on the label indicate the switch position for the desired mode. With the switch in the “up” or ON position, ventilation is delivered after every five compression cycles. With the switch in the “down” or OFF position, no ventilations are delivered.
- Page 16 (Blank Page Intentional) REV: 07/11...
-
Page 17: Precautions
6. When applying the Thumper® to an obese patient, place the arm of the patient around the Thumper® so that the Column is positioned near the arm pit of the patient. This will better facilitate positioning the Massager Pad directly over the patient’s sternum. -
Page 18: Positioning The Patient
Tight garments around the abdomen should be removed or loosened. 4. Manual CPR can begin on the patient immediately. There is no need to postpone CPR ® while waiting for Thumper deployment and application to the patient. REV: 07/11... -
Page 19: Thumper ® Model 1007Ccv Deployment
Pull slightly on the hose to ensure a secure connection. ® F. Attach the opposite end of the hose to the Thumper Supply Connector by inserting the hose connector while slightly turning it at the same time to align the hexagons then press firmly to attach. - Page 20 Arm is raised high enough on the Column to clear the patient’s chest. When a pause occurs ® during the manual CPR effort, grasp the Thumper with one hand at the Base of the Column, and the other by the Handle.
- Page 21 Column. The blue arrows indicate the depth required to provide the 20% A-P sternal deflection for the patient. ® Warning: Do NOT use the Thumper if the blue arrows indicate in the red area of the scale. NOTE: 2010 AHA Guidelines recommend for adult patients, a minimum compression depth of at least 2"...
- Page 22 Control #3 to 400ml. ® C. Activate the Thumper Model 1007CCV by first turning the RUN/STOP Control #1 to RUN. D. Rotate COMPRESSION DEPTH Control #2 slowly clockwise until sufficient compression depth is demonstrated by viewing the Piston at eye level. Increase the control until the...
- Page 23 Pressure Limit Alarm's relief ports, discontinue the use of the ® Thumper Model 1007CCV PDV / Breathing Hose Assembly. It is recommended to manually ventilate the patient until such time that a spare replacement alarm can be installed. Caution: If the maximum pressure limit is reached, the pre-set tidal volume may not be delivered to the patient.
- Page 24 ® The Thumper Model 1007CCV is electrically insulated and should cause no interference during routine cardiac monitoring or manual defibrillation. However, conductive fluids or gels may provide stray current paths. It is advised operators should not touch the ®...
- Page 25 , an abrupt and loud release of oxygen from the Column buffer will occur. ® This is intentional and required to purge the Thumper of its reserve oxygen and not to be interpreted as a leak. F. Remove the Breathing Hose/Non Re-breathing Valve from the patient and the PDV.
- Page 26 (Blank Page Intentional) REV: 07/11...
-
Page 27: Storage
For storage during normal transportation, the Carrying/Storage Case offers maximum protection for the device. It provides convenient storage for the basic components of the ® system and allows quick access to the Thumper at an emergency site. ® A Thumper that is stored assembled should be placed on a “crash cart”... - Page 28 (Blank Page Intentional) REV: 07/11...
-
Page 29: General Care
SECTION E CARE, CLEANING AND MAINTENANCE General Care ® Always store the Thumper Model 1007CCV in a clean, dry place. When not in use, storage ® is provided for the Thumper and BackBoard in the Carrying/Storage Case. Avoiding Contamination Contamination can enter the system through the O Supply Hose. - Page 30 #4 to the ON position. Attach the O Supply Hose to an energized oxygen source first then connect the opposite end to the Thumper®. With the device cycling, turn Control #1 to RUN and Control #3 to 1200ml. Allow the ventilator to cycle several times to blow out any remaining cleaning/disinfecting solution.
-
Page 31: Cleaning The Non Re-Breathing Valve
• For the dual carrier, it is recommended to have only one cylinder open when powering ® the Thumper . When the oxygen level is low, the other cylinder can then be opened and the low cylinder closed. • Refer to additional Warnings: listed in the General Warnings, Cautions and Notes section on the use of oxygen related equipment. -
Page 32: Periodic Preventive Maintenance
1. Shift check – A series of checks that should be done after each use and at the start of every shift. (See procedure below.) ® 2. Functional check – A complete visual and functional check of the Thumper . (See procedure below.) 3. -
Page 33: Shift Check
Supply Hose for kinks, cracks, cuts, worn hose or damaged connectors. Connect the O ® Supply Hose to the oxygen source first then connect it to the Thumper 6. Verify that the device cycles when the O Supply Hose is connected and the green Pressure Indicator at the top of the Column is functional. - Page 34 ® Shift Check of Thumper Model 1007CCV (Daily, or after each use) Date: ____/____/____ Shift: ___________ Location: __________ Serial Number:__________ Directions: (see procedure above). At the beginning of each shift, inspect the device. Indicate whether all requirements have been met. Note any corrective actions taken. Sign the form.
-
Page 35: Functional Check
Supply Hose to the oxygen source first. ® Check the operation of the O Supply Hose by connecting and disconnecting the Thumper end of the supply hose a few times. The connector should attach and release smoothly. Verify that the device cycles when the O Supply Hose is connected and the green Pressure Indicator at the top of the Column is functional. - Page 36 ® Functional Check of Thumper Model 1007CCV (Weekly, monthly, or per determined schedule) Date: ____/____/____ Shift: ___________ Location: __________ Serial Number:__________ Directions: (see procedure above). Per the determined schedule, inspect the device. Indicate whether all requirements have been met. Note any corrective actions taken. Sign the form.
-
Page 37: Troubleshooting Guide
TROUBLESHOOTING GUIDE: Should the device fail to operate properly at any time refer to the following Troubleshooting Guide. Disconnect the ventilator from the patient any time the unit does not appear to be operating properly. If unable to determine the cause of problem, contact Michigan Instruments for service. Indication Probable Cause(s) Solution... -
Page 38: Thumper ® Model 1007Ccv Detailed Specifications
-30 °C to 60 °C (-22 °F to 140 °F) - Humidity: 0 to 98% RH (non-condensing) - Water resistance per IPX standard 14.2.3 - Sealed piston shaft and bearing to disallow contamination ® ® ® ® Questions about the Thumper Model 1007CCV? Please call 1-800-530-9939. REV: 07/11... - Page 39 Thumper Model 1007CCV 14790-01 BackBoard w/straps 14850 Carrying/Storage Case Replacement Parts ® 14799-02 Thumper Model 1007CCV Operation Manual 15440 BackBoard Replacement “H” Strap Kit 14910 Supply Hose 10 Ft. 14950 Supply Hose 15 Ft. 14780 Massager Pad Assembly, Urethane 14669 Breathing Hose –...
- Page 40 (Blank Page Intentional) REV: 07/11...
-
Page 41: Warranty Agreement
The normal duration of use is typically 15 to 30 minutes per resuscitation. Prolonged use of the Thumper may cause excessive wear, and void this warranty. If the attached warranty registration CARD IS NOT RETURNED, the warranty period will begin the DATE THE INSTRUMENT WAS SHIPPED FROM FACTORY. -
Page 42: Factory Service Policy
Recommended Maintenance/Service Intervals” in the Periodic Preventive Maintenance portion of Section E for recommended intervals. ® ® ® ® What to do if the Thumper CPR System requires service: A. Refer first to Section E in the Operation Manual. Do not attempt repairs that are not outlined in this manual. -
Page 43: Warranty Repairs
This fee will be charged ONLY if repairs are not authorized and the device must be returned unrepaired. We are obligated to label ® and tag as "unusable" any Thumper CPR System that requires authorized factory service. - Page 44 (Blank Page Intentional) REV: 07/11...
-
Page 45: Terms Used In Manual
SECTION G GLOSSARY TERMS USED IN MANUAL ACLS Advanced Cardiac Life Support. AED Automatic external defibrillator AHA American Heart Association. A-P Diameter Anterior-Posterior dimension of the chest. Thickness of chest over the sternum measured front to back. CPR (Cardiopulmonary Resuscitation) Resuscitation, combining both artificial circulation of the blood and artificial breathing. - Page 46 (Blank Page Intentional) REV: 07/11...
Need help?
Do you have a question about the 1007CCV and is the answer not in the manual?
Questions and answers