
Related Manuals for Medvibe Nitrofit Limber Pro


Summary of Contents for Medvibe Nitrofit Limber Pro
- Page 1 Instruction Manual ADJUSTABLE STRETCH MACHINE WITH REMOVABLE CALF BOARD Copyright © 2016 by Medvibe...
-
Page 2: Table Of Contents
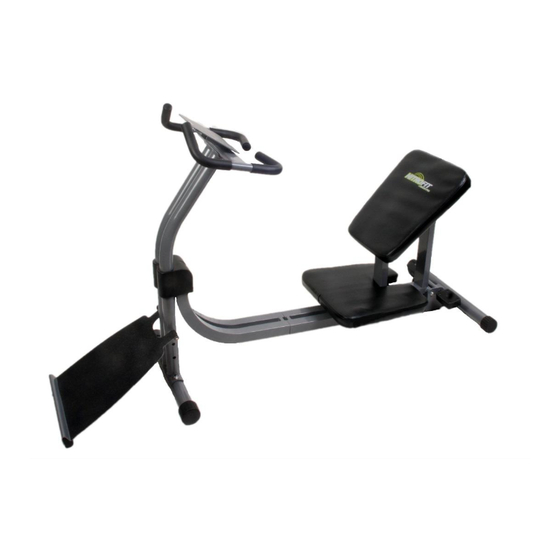
Instruction Manual Thank you for purchasing the Nitrofit Limber Pro™ stretch machine. Your machine has been designed to assist you in performing a wide variety of full body stretches. Use of this machine can help to relieve sore muscles, improve flexibility, increase range of motion, and prevent injury from exercise. -
Page 3: Precautions
Ensure that you are following the stretching instructions on the machine. 12. TRIP AND FALL WARNING: To reduce the risk of falls, remove the calf stretch board when the machine is not in use. Copyright © 2016 by Medvibe... -
Page 4: Features And Specifications
Features & Specifications Adjustable Seat/ Reach The Nitrofit Limber Pro offers more adjustability than any other stretch machine on the market. Other stretch machines are plagued by fixed seats and limited stretching capabilities. The Nitrofit Limber Pro’s has seven levels of adjustability that move the seat closer or further away from the handles. -
Page 5: Parts List
Instruction Manual Nitrofit Limber Pro Parts List Please ensure that you have all parts before beginning assembly Copyright © 2016 by Medvibe... - Page 6 8.5x2 12.5x1.6 Front Seat Bracket M8x120 support Screw Long M8x65 Front Tube Screws with integrated wheels Post cover Screws M8x55 (Rear) Post Cover Safety (Front) Straps Screws ST3.9x1 Allen Wrench Handlebar Wrench Bracket Support Foot Copyright © 2016 by Medvibe...
-
Page 7: Assembly Instructions
Let go of the knob when the pedal kit is over one of holes on the main tube. The spring loaded pin from the knob will lock into the hole. Diagram 2 Copyright © 2016 by Medvibe... - Page 8 USERS WEIGHING OVER 250 LBS (113KG) SKIP TO STEP 5-B. Slide the connection tube (#7) and the finished component of step 2 together and secure using screws (#08) spring washer, (#09) and washer (#04), as shown in diagram 5A. Diagram 5A Copyright © 2016 by Medvibe...
- Page 9 (#5), spring washer (#9) and long screws (#11). Tighten fully then clamp rear plastic cover (#12) and front plastic cover (#13) onto post as seen in diagram 6 and secure with screws (#14). Diagram 6 Copyright © 2016 by Medvibe...
- Page 10 (#9) and screws (#27). (#8) Screws go into bottom of cushion bracket, and (#27) Screws go into the back of the bracket. Diagram 8 STEP 9 Put cushion (#22), cushion (#23) and the finished component of step 8 together using screws (#20). See Diagram 9 below. Diagram 9 Copyright © 2016 by Medvibe...
- Page 11 (see FRONT VIEW 2). From the seated position pull the straps so that they hang securely around the back of the instruction display and down towards the seated area. (See TOP VIEW) Diagram 11 FRONT VIEW 1 FRONT VIEW 2 TOP VIEW Copyright © 2016 by Medvibe...
-
Page 12: Operation
While holding the calf board steady with one hand, grab the round handle of the quick pin and pull away from the machine. The board will disconnect from the front of the Nitrofit Limber Pro stretch machine. Position the calf board on the front of the machine so that the holes from the calf board align with the holes on the front post. - Page 13 Extend one leg with toes pointing towards you. Lean back. Hold and switch legs. Shoulders Cross arms and grab nearest handles with palms facing down. Lean back. Hold stretch and repeat with arms crossed in the other direction. Copyright © 2016 by Medvibe...
- Page 14 Adjust calf board to desired incline, place one foot on the slanted board. Grab handles for support and place the other foot on the calf board. Lean forward to increase the intensity of the stretch. Copyright © 2016 by Medvibe...
-
Page 15: Warranty
This warranty covers the materials and parts needed to repair, rebuild or replace the equipment, at MEDVIBE’s option, for a period of two (2) years and the cost of labor needed to repair, rebuild or replace the equipment for a period of one (1) year. The Labor clause is contingent upon the complexity of the repair. - Page 16 Instruction Manual intended, corrosion, or damage incurred during loading or shipping not provided by MEDVIBE, or by accident, fire, flood, war or acts of God. c. Maintenance activities, such as cleaning, lubricating or normal checking of parts; or installation procedures that customers can do themselves and that do not require dismantling/reassembling the equipment.
-
Page 17: Troubleshooting
Then tighten the seat down by rotating the seat adjustment handle clockwise until it is fully tightened. For technical support, spare part requests and product information please call us at: 1-888-861-0480 Copyright © 2016 by Medvibe...
Need help?
Do you have a question about the Nitrofit Limber Pro and is the answer not in the manual?
Questions and answers