
Summary of Contents for EFLOW E3 NITRO
- Page 1 Electric Bicycle Owner’s Manual Currie Technologies ® 3850A Royal Avenue, Simi Valley, CA 93063 eflowebike.com currietech.com Version 101 Last modified: December 9, 2014 2:10 PM Owner's Manual - eFlow E3Nitro.indd.indd...
-
Page 2: Table Of Contents
Battery ......10–11 Section 5 eFlow component chart . . . . . . . . . 12 Section 6 Prior to your first ride . -
Page 3: Introduction
Introduction: A word about this Owner’s Manual and your safety… Dear Customer, Currie Tech would like to thank you for purchasing our product . Cycling (electric or otherwise) can be a hazardous activity, no matter what type of bicycle you ride. Traffic, weather, distractions, and many other factors can endanger you while using any type of bicycle or vehicle . -
Page 4: Important Safety Information
Important Safety Information • Helmets: There is no single factor that works better at reducing the severity of injuries sustained in bicycle accidents more than a quality bicycle helmet . Please don’t ever ride your bicycle without one . • It’s not a tandem: Your bicycle was engineered to carry one (1), [that is a single rider,] person safely . - Page 5 AT LEAST once a year. It’s a small investment in your well-being . • Battery: We have equipped your eFlow bicycle with a state-of-the-art lithium ion battery . This is the same battery chemistry that powers your cell phone and laptop, but on a much bigger scale .
-
Page 6: Important Symbols And Terms
energy . But the battery requires care and maintenance to ensure that it will perform safely and reliably for many miles of riding . We have devoted an entire chapter of this manual to the battery . Please read and understand this important information. - Page 7 Note provides helpful or other important related information . Please read, understand and follow all Warning, Caution and Note notices on your eFlow bicycle and those included in this Manual . If you do not understand any of this important information, please contact your selling dealer or the Currie Tech Customer Service Department at 800-377-4532 .
-
Page 8: Recording Your Bicycle's Important
III. Recording Your Bicycle’s Important Serial Numbers: Your bicycle and certain key components have unique serial numbers . We urge you to record these serial numbers for warranty purposes or in case your bicycle is ever lost or stolen . Bicycle: The bicycle’s serial number is located on the underside of the frame near the pedal crank: Bicycle serial number: ______________________________... -
Page 9: Specifications
Maximum Weight: 275 lbs (125 kilograms) *Note: many factors affect speed and range capabilities of the eFlow bicycle. Terrain, average speed, rider weight, tire inflation pressure, winds, hills, etc., all have an impact on how far and how fast you go. - Page 10 • Motor o Type: TDCM brushless, gearless hub motor o Power rating: 500-watts • Standard Battery Pack o Model: HTEnergy o Chemistry: Lithium Ion o Configuration: 10S5P, 2.2 Amp-hr 18650 cells o Rated voltage: 37 Volts o Rated capacity: 11Ah (407 watt-hrs) o Weight: 3.9 kg (8.6 lbs) o Max discharge current:...
-
Page 11: Section 4 Specifications
• Charger o Model: HP8204L3(10S)/36V2A o Dimensions: 188mm x 93mm x 53mm o Weight: 850g (1 .8lb) o Input voltage: AC110V~264V/47~63HZ o Output voltage: 42±0 .5VDC o Output amperage: 2.0±0.2A o AC line fuse rating: 10 amp *Note: Specifications are subject to change without notice. 11/52... -
Page 12: Eflow Component Chart
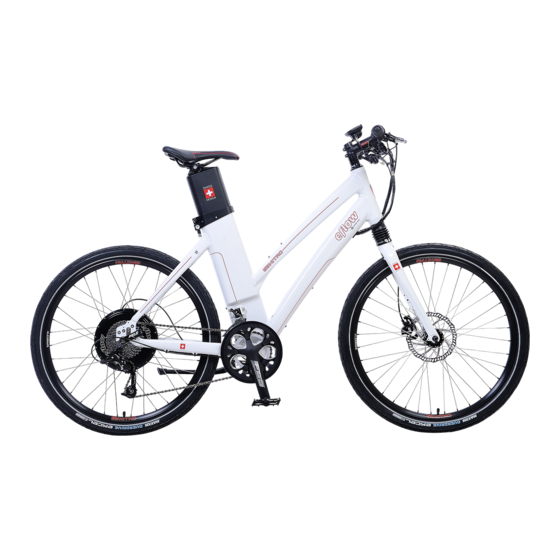
Component Chart 1 . Saddle (seat) 2 . Seat post/Battery pack 3 . Quick-release seat post clamp 4 . Adjustable handlebar stem 5 . Throttle 6. Display 7 . Front tire/wheel 8 . Front disc brake 9 . Pedal 10 . -
Page 13: Battery
8 hours before using the bicycle for the first time. Before you ride: Use the following checklist to ensure that your eFlow bicycle is ready for safe and enjoyable use . • Quick releases: Make sure that the front wheel quick release and seat height adjustment quick release are properly adjusted and tight . - Page 14 Currie Tech Customer Service Department at (800) 377-4532. Your eFlow bicycle uses quick release (QR) levers to facilitate common tasks such as front wheel removal and seat height adjustment .
-
Page 15: Installing A Quick Release Front Wheel
WHEEL QUICK RELEASE USAGE Riding with an improperly adjusted wheel quick release can allow the wheel to wobble or fall off the bicycle, which can cause serious injury or death . Therefore, it is essential that you: 1. Ask your dealer or a local bike shop to help you make sure you know how to install and remove your wheels safely . - Page 16 1 . Remove the tension adjusting nut and one of the small springs, then slide the quick release skewer through the hub . If your bicycle has a disc brake, insert the skewer starting on the side with the brake rotor . Replace the spring and tension adjusting nut (fig.
-
Page 17: Adjusting A Quick Release Seatpost Clamp
WARNING: Securely clamping the wheel takes considerable force. If you can fully close the quick release without wrapping your fingers around the fork blade for leverage, and the lever does not leave a clear imprint in the palm of your hand, the tension is insufficient. Open the lever;... - Page 18 the cam lever from rotating reduces clamping force . Less than half a turn of the tension-adjusting nut can make the difference between safe clamping force and unsafe clamping force . 1 . With the quick release clamp in the OPEN position, insert the seat post, with saddle attached, into the bicycle’s seat tube .
- Page 19 Please ensure that those reflectors are in place, properly positioned and clean before each ride . Drive chain: Your eFlow bicycle is equipped with a high quality roller chain that needs to be cleaned and lubricated regularly . 19/52...
- Page 20 • Brake cut-off switches: To maximize the effectiveness and efficiency of the braking system, and to save battery power, your eFlow bicycle uses a system that turns power to the motor “OFF” when the brakes are applied . Check the function of the brake cut-off switches before each ride .
- Page 21 Currie Tech authorized dealer, or the Currie Tech Customer Service Department at (800) 377-4532 . • Battery: Use ONLY the battery supplied with your eFlow bicycle . CAUTION: Use of any battery not supplied with your eFlow bicycle WILL void the warranty and may cause damage to the electrical system of the bicycle and the hub motor.
- Page 22 WARNING: Failure to properly use, charge and store the battery supplied with your eFlow bicycle will void the warranty and may cause a hazardous situation. Please read and follow all instructions for the use and care of the battery provided with your bicycle.
-
Page 23: Operation
VII. Operation Installing the battery Your eFlow E3Nitro electric bicycle is equipped with a battery pack that is nested in the frame in the seat tube . This unique and patented design feature allows for optimum battery placement from a weight distribution standpoint, while allowing the bike to maintain clean, aerodynamic lines . - Page 24 o Unlock the position of the seat post by opening the quick release lever . Lower the seat post to the desired riding position, then securely clamp the seat post quick release . o Refer to the instructions for the operation of the seat post quick release on Page 17 .
-
Page 25: How To Ride
How to ride Before you turn the bike on and start riding, you should understand the way the pedal torque sensor works . Mounted in the drive-side rear dropout, the torque sensor measures the very slight deflection in the dropout plate that occurs when you pedal . -
Page 26: Operating Modes
A note about operating modes: Your eFlow electric bicycle features two operating modes: 1 . Power-On-Demand Mode (POD) 2 . Pedal Assist Mode (PAS) In Power-On-Demand Mode (POD), motor power is regulated by actuation of the twist-grip throttle mounted on the right-hand side of the handlebar . -
Page 27: Display Details
Display Your eFlow E3Nitro electric bicycle is equipped with a multi- function display that also serves as a security device . By removing the Display from the handlebar, you disable the electrical system of the bicycle, preventing unauthorized use . - Page 28 Connecting the display Place the display on the handlebar display mount at a 45° angle, aligning the tabs on the bottom of the display with the slots on the face of the mount . While pushing down on the display, rotate it 45° clockwise until it stops, parallel with the handlebars .
- Page 29 Setting the clock and speed units Hold SET and “–” together for 5 seconds to enter setup mode . In setup mode, you will enter codes corresponding to the setting you wish to change . Tap SET to cycle between digits . Hold to confirm after the code is entered.
- Page 30 Using the display functions Tap SET to cycle Available in PAS between functions . mode only; sets the strength of motor assist . Displays the distance traveled on this trip . Displays the ride time for this trip . Displays the To reset all trip data, hold “+”...
- Page 31 Changing the assist mode Hold “+” for 3 seconds to change from PAS to POD . In PAS mode, the motor will activate when the system senses the rider applying pressure to the pedals . The amount of pedal pressure and the amount of motor assist are proportional;...
- Page 32 Understanding the battery gauge Each “bar” on the battery gauge represents 20% of the battery’s full charge . The gauge should show the battery level within a few moments of turning on . If the gauge still shows completely empty after a few seconds, check all connections to the controller and display, and re-connect .
- Page 33 Interpreting error messages The eFlow display shows coded error messages to help diagnose problems with the bike . These messages appear automatically if the system senses an issue . Comm Error The most common error message you may see is Error 13: “Comm Error”...
- Page 34 Changing the display battery The display can use power either from its internal battery, or from the bike’s main battery . The internal battery is used when the display is disconnected from the bike, so you can browse your ride data (like distance, time, and average speed) .
-
Page 35: Gears & Shifting
Note: The electrical system of your eFlow bicycle allows for gradual application of power, and allows for adjustment of power between OFF and FULL. This feature enables you to set the speed at which you are most comfortable. Note: The electrical system of your eFlow bicycle will provide instantaneous power whether you are pedaling or not. - Page 36 o The shifter accomplishes one gear change for each full travel motion of the shift lever, regardless of whether you are upshifting or downshifting . WARNING: Never pedal backward while shifting. This can cause the chain to derail and may cause you to lose control, resulting in an accident that could cause serious injury or death, and property damage.
-
Page 37: Range & Tips
Range o Many factors affect the range that you will experience with the bicycle . These include: Battery state-of-charge Mode setting (the bike will use less power in the PAS Mode due to the required contribution of the rider .) Tire inflation pressure Adjustment of the wheel bearings and brakes (tight bearings or a dragging brake shoe will adversely... -
Page 38: Section 7 Operation
Currie Tech authorized dealer for information regarding battery replacement . A word about hills o Your eFlow bicycle uses a high torque, precision hub motor to drive the bicycle under electric power . We have configured the electrical drive system to provide ample torque to help you climb hills . -
Page 39: Battery Care
VIII. Battery Use, Care and Maintenance For the proper use, maintenance, and storage of this battery it is crucially important that you read and understand the instructions given in this manual . WARNING: Failure to properly use, charge, and store this battery will void the warranty and may cause a hazardous situation. -
Page 40: Charging
The Battery supplied with your eFlow can be charged either while it is installed in the bike, or removed from the bike . Charging the battery outside of the bike can be convenient if there is not access to a 110-volt outlet near where you parked your bike . - Page 41 • Carefully align the connector pins and connect the charger to the battery by plugging the connector into the charger receptacle . • • Turn ON the charger using the ON/OFF switch on the charger . To charge the battery when it is not installed in the bike: • Locate the battery adapter supplied with the bike and connect it to the battery charger connector .
- Page 42 • Rotate the charger port cover clockwise or counter clockwise to cover the charger receptacle . • Your eFlow bicycle is now ready for use . Important notes about charging your battery • You can charge the battery while it is in or out of the electric bicycle .
-
Page 43: Storage
Long Term Storage • If you do not plan to use your eFlow bicycle for an extended period of time (1 month or more), remove the battery from the bicycle for storage . -
Page 44: Disposal
Battery Disposal We are confident that you will enjoy many miles of pleasurable riding with your eFlow bicycle battery . However, batteries do eventually wear out . When this happens, we urge you to properly dispose of your used battery . -
Page 45: Ix. Troubleshooting
. IX. Troubleshooting We have engineered your eFlow bicycle to be a safe and reliable transportation vehicle . However, from time-to-time, things can go wrong . The following is intended to be a general guide for diagnosing and remedying simple issues that may happen . -
Page 46: Flat Tire
Problem: Bicycle turns “ON” (start-up self test successful) but motor does not run. Cause #1: A brake lever is applied. (When the brakes are applied, a signal is sent to the controller to turn power to the motor “OFF” .) Solution #1: Do not apply the brakes when attempting to power the bicycle . - Page 47 Currie Tech Customer Service Department at (800) 377-4532. WARNING: If you are unsure about the brake set-up and adjustment procedure, please take your eFlow bicycle to your selling dealer, or any qualified bicycle mechanic, and ask for assistance in adjusting the brakes. Improperly...
- Page 48 Securely fix the quick release mechanism. See page 49 . WARNING: If you are unsure about the brake set-up and adjustment procedure, please take your eFlow bicycle to your selling dealer, or any qualified bicycle mechanic, and ask for assistance in adjusting the brakes. Improperly...
- Page 49 you are not confident that the brakes are working properly. • Using the Axle Release™ Quick-Release Adapters (rear wheel) See referenced figures on the next page. INSTALLATION: Position bicycle upside down. Using a wrench, remove and dispose of the threaded securing nut from one side of the axle if applicable (see ‘A’).
- Page 50 from the three included, press firmly between the metal cup and the nylon spacer (see ‘F’) . Slide spacer back over the bottom of the assembly (see ‘G’) and repeat steps ‘B’-‘D’ . If handle continues to be in an undesirable position, remove the assembly from the bicycle and repeat steps ‘E’-‘H’...
- Page 51 Finally… We have provided all of the information necessary for you to have an ongoing enjoyable and fulfilling experience with our electric bicycles . However, if we have overlooked some aspect of the product, or if the information presented is not clear, PLEASE do not hesitate to contact the dealer where you purchased the bicycle, or the Currie Tech Customer Service Department .
Need help?
Do you have a question about the E3 NITRO and is the answer not in the manual?
Questions and answers