
Related Manuals for SereneLife IPCAMHD62

Summary of Contents for SereneLife IPCAMHD62
- Page 1 IP Security Camera User Manual IPCAMHD62 For video setup guide and FAQs - Go to www.serenelifehome.com...
-
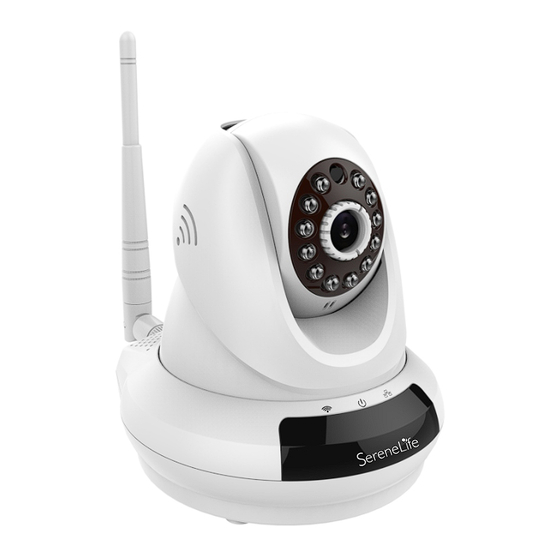
Page 2: Product Structure Diagram
Product Structure Diagram Photosensitive Sensor loudspeaker Lens IR LED Microphone Wireless Wired network Status Light Network Status Light POWER LED Wireless RESET Antenna RESET Ethernet FN Button Audio Input DC5V /Output Power Port External Input Micro SD Card Slot /Output Note: FN button has no function at this time... - Page 3 Don't forget to register your camera with us online to get a free 1 year manufacturer's warranty! Just go to www.SereneLifeHome.com ‘SereneViewer’ APP Installation A.Scan 'SereneViewer' APP QR code or search to download the app. Andriod Setup an Account Username Create your camera username -6 characters min Click “Sign Up”...
- Page 4 Create an account password - Click “Sign Up” Note: This will be used to log in to all of the cameras on your account and can be separate from the camera password 9 :17 Back User name must be at least 6-20 characters and must begin with a letter.
-
Page 5: Connect To Your Network
Connect to Your Network Choose method 1 or 2 for setup Method 1: Wired Setup -Connect power, Ethernet cable and the wireless antenna as above. -Wait 50 seconds for( on the camera to indicator flash green -After scanning QR code - select the “Ethernet Connection” option Moden/Router Power Outlet Method 2: Wi-Fi connection... -
Page 6: Web Access
Web Access: After setting up your camera on the mobile phone - you can use your account username and password to access the cameras from any device with an internet browser Log on to the website: http://cloud.serenelifehome.com/ Passwords Should you happen to forget a camera's individual password you can reset it by performing a hardware reset. -
Page 7: Add Device
Mobile App Layout The main screen is your device list. You will see a thumbnail preview for all cameras added to your account. Use this menu to -Switch between different cameras -Add new devices -Access and change app global settings App settings Add device You can change your user admin... -
Page 8: Image Settings
Camera View Page This page give you access to all camera specific actions and settings -Hold the phone vertically or horizontally to switch between full screen mode -Swipe left and right on the video to reposition the camera -Spread two fingers apart to zoom in Sound Activate to hear your cameras Image Settings... -
Page 9: Camera Recordings
Camera Recordings Enter into the interface of “information and video viewing” can see the alarm information and video of storage device(Micro SD or cloud box), users can quickly search the information and video by choose the time or category. Local Shows photos and videos recorded to the phone memory... -
Page 10: Device Settings
Device settings This screen allows you to check and set camera specific settings. If you see the red dot icon - a firmware update is available. Install available firmware updates to ensure the camera features are working as intended. About Check the camera's software version and ID number. - Page 11 CloudBox can bring. Purchase the cloud box and back up 2TB of video storage from any device on a single network and check the videos from the same login. Find the CloudBox for sale on Amazon now! Search “SereneLife CloudBox”...
- Page 12 SD Recording Note: Make sure you have a class 10 SD Micro Card 32G or less. Format must be FAT32. 1) Insert SD Card into your camera 2) Go to > camera settings > SD Card in the mobile app 3) Slide to Enable the SD card 4) Click "Format"...
- Page 13 Next you can choose your record trigger preferences between A) 24/7 recording - camera always records B) Scheduled recording - camera records during specified time frame C) Motion detection recording - camera only records when motion is detected To enable option A or B - Go to the camera settings and select "Schedule Recording"...
- Page 14 To set up "Motion Detection Recording - Go to the camera settings > "Motion Detection" Once enabled, you can select to trigger camera recording and image snapshots You can also change the "Pre-record length" which will add "X" number of seconds before the motion was detected to the video file saved.
- Page 15 Motion Detection and Notifications You can set notification settings separately for any camera in your account. To access the notification settings, select your camera, and go to the settings tap - then scroll down to "motion detection” Slide the slider to enable motion detection You can then choose what actions you would like to occur when your camera detections motion.
-
Page 16: Troubleshooting
Troubleshooting Can’t connect to WiFi -Connect the ethernet cable and check connection is working -Go to “camera settings” > “network” Check the WiFi status is enabled and “List” displays your home network - doublecheck the password. -In the Ethernet tab - disable the ethernet connection to force the camera to look for available WiFi network Still having trouble? -Try deleting the camera entry from your account... - Page 17 Troubleshooting Weak Network There are a lot of different variables in your home network that may affect wireless performance including available bandwidth, camera placement, data demands of the camera, and interference. You can use free online tools to help measure your network performance and identify opportunities for improvement.
- Page 18 Don’t miss out! Free 1 year Warranty Find the product registration form on our website www.SereneLifeHome.com...
Need help?
Do you have a question about the IPCAMHD62 and is the answer not in the manual?
Questions and answers