
Summary of Contents for Traveler DV-5000
-
Page 1: Table Of Contents
CONTENTS 02 INTRODUCTION AND PARTS LIST 03 GENERAL INFORMATION AND SAFETY INSTRUCTIONS 07 GETTING TO KNOW YOUR CAMERA 10 GETTING STARTED 12 RECORD MODE 40 PLAYBACK MODE 52 LISTENING TO MP3 MUSIC 54 VIEWING MOVIES ON A PC 55 VIEWING PICTURES AND MOVIES ON A TV 57 VIDEO FILE CONVERTER 60 BURNING A RECORDED CLIP ONTO A DVD 63 UPLOADING VIDEO FILES TO YOUTUBE... -
Page 2: Introduction And Parts List
INTRODUCTION AND PARTS LIST Congratulations on choosing to buy a Traveler product. All products brought to you by Traveler are manufactured to the highest standards of performance and safety, and, as part of our philosophy of customer service and satisfaction, are backed by our comprehensive 3 Year Warranty. -
Page 3: General Information And Safety Instructions
GENERAL INFORMATION AND SAFETY INSTRUCTIONS Trademark Information Microsoft® and Windows® are U.S. registered trademarks of the Microsoft Corporation. Pentium® is a registered trademark of the Intel Corporation. Macintosh is a trademark of Apple Inc. is a trademark. Photo Explorer and Photo Express are trademarks. Other names and products may be trademarks or registered trademarks of their respective owners. - Page 4 GENERAL INFORMATION AND SAFETY INSTRUCTIONS SAFETY INSTRUCTIONS Please read and understand all Warnings and Cautions before using this product. Warnings If foreign objects or water has entered the camera, immediately turn the power OFF and remove the batteries, as continued use in this state may result in fire or electric shock. If the camera has been dropped or its case has been damaged, turn the power OFF and remove the batteries, as continued use in this state may result in fire or electric shock.
- Page 5 GENERAL INFORMATION AND SAFETY INSTRUCTIONS Cautions Insert batteries into camera paying careful attention to polarity (+ or -) of the battery terminals. Inserting batteries with polarity inverted may cause fire and injury, or damage to surrounding area due to rupture and leakage. Do not ignite flash close to eyes, or closer than prescribed minimum distances as this may result in damage to vision.
- Page 6 GENERAL INFORMATION AND SAFETY INSTRUCTIONS Battery Usage Carefully read and strictly observe the Safety Instructions and notes described below: Different battery types and surrounding temperatures may affect the battery performance. Avoid using the batteries in extremely cold environments, as low temperatures can shorten battery life and reduce the camera’s performance.
-
Page 7: Getting To Know Your Camera
GETTING TO KNOW YOUR CAMERA Overview This video camera features high quality audio and High Defintion (HD) movie recording with clarity at 1280 x 720 resolution. Recorded video clips can be played back on the built-in 2.4 inch bright color swivel screen or directly onto a HD television using the provided HDMI cable for ultra fast transfer of HD images and audio data. -
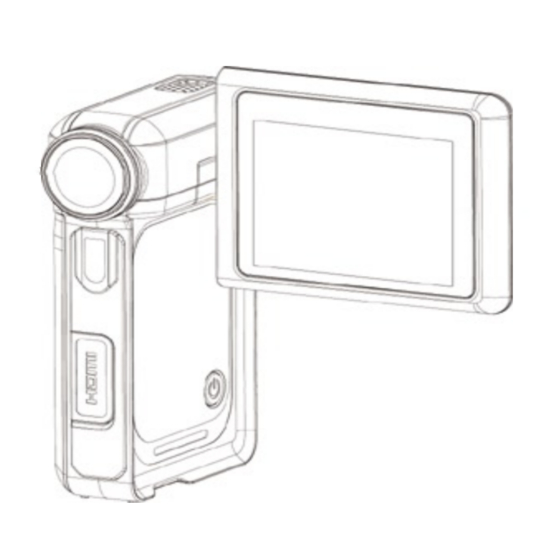
Page 8: Front View
GETTING TO KNOW YOUR CAMERA Front View Microphone Lens LCD Panel Power Button HDMI Port Rear View Movie Shutter Button Picture Shutter Button Tele Button (Up Button) OK Button Wide Button (Down Button) Right Button Left Button Record/Play Button TV/Earphone Port Mini USB 2.0 port... - Page 9 GETTING TO KNOW YOUR CAMERA Side View Macro Switch Battery Cover...
-
Page 10: Getting Started
GETTING STARTED Inserting the Battery Before using the camera, please insert the provided NP 60 battery into the battery compartment following steps 1-3 below. Slide the battery compartment door in the direction of the arrow to open. Eject Insert the battery according to the correct (+/-) polarity. -
Page 11: Protecting Data On An Sd Card
GETTING STARTED Protecting Data on an SD Card An SD card is “read only” when it is placed in the locked position. In the locked position, no pictures, movies or voice can be recorded onto the SD card. In order to take pictures, or record voice and movies, make sure the SD card is in the “writeable”... -
Page 12: Record Mode
RECORD MODE Button Functions Right Button: HD Mode Left Button: Flash Auto/ ON/ Off /Red Eye Reduction/ Light ON Tele Button (Up Button): Digital Zoom In Wide Button (Down Button): Digital Zoom out OK Button: Menu ON Power Button: Press button down for one second to turn the camera on or off. - Page 13 RECORD MODE LCD Monitor Information The following icons (see below) may appear on your LCD monitor when recording movies and taking pictures. Record Mode Movie Record Mode Picture Record Mode Voice Record Mode Motion Stabilization Two in One Mode Photo Frame Multi-Snap Mode Night Mode Backlight Mode...
-
Page 14: Movie Recording
Battery indicator: full power / medium power / low power / power empty Auto Flash Flash On Flash Off Red Eye Reduction Light on Self-timer enabled 8X digital zoom (10) Date/Time: YYYY/MM/DD HH: MM (11) Motion Detection Movie Recording Press the Movie Shutter button ( ) to start recording. -
Page 15: Voice Recording
RECORD MODE Voice Recording Press the OK Button to activate Record Menu while in Record Mode. Use the Right/Left Buttons ) to choose the Voice Pen Option. Press the Up/Down Buttons ( ) to choose “Enter” Option and press the OK button to enter Voice Record Mode. -
Page 16: Options For Record Menu
Options for Record Menu Movie Mode Camera Mode Voice Pen Effect Setting Resolution Resolution Enter Normal Sound Exposure Exposure Exit Time Setting Light Two in One Classic Format Memory Sharpness Photo Frame Negative TV System White Flash Exit Balance Language Self-timer Stabilization Default... -
Page 17: Default Setting And Validation
RECORD MODE Default Setting and Validation The following table indicates the camera’s default settings as well as the length of time changed settings remain valid. Infinite: A changed setting always remains valid. One Time: A changed setting is only valid as long as the camera is switched on. Validation Default Factory Setting Resolution... -
Page 18: Movie Mode Submenu Setting
RECORD MODE Movie Mode submenu setting The main record menu includes camera setting and other advanced settings. You can use the Right/Left Buttons to move between options and press the OK Button to validate the setting. ■ Movie Resolution To change the Movie Resolution: In the Movie/Picture Record Mode, press the OK Button to switch to the record menu screen. - Page 19 RECORD MODE ■ Exposure The camera comes pre-set and will automatically adjust the image exposure value unless manually changed by you. In certain circumstances you may wish to change/adjust the exposure compensation setting. To change the exposure setting: In the Movie/Picture Record Mode, press OK Button to switch to the record menu screen. Use the Right/Left Buttons to select Movie Mode.
- Page 20 RECORD MODE ■ Light The camera provides an LED light which can be used for recording movie clips in low light conditions. Light On Light Off To change the light setting: In the Movie/Picture Record Mode, press the OK Button to switch to the record menu screen.
- Page 21 RECORD MODE ■ Sharpness You can soften and sharpen images to achieve different effects. To change the sharpness setting: In the Movie/Picture Record Mode, press the OK Button to switch to the record menu screen. Use the Right/Left Buttons to select Movie Mode. A submenu of the Movie Mode will appear on the LCD screen.
- Page 22 RECORD MODE ■ White Balance This setting sets the white balance for a variety of lighting conditions similar to those seen by the human eye. Auto (Default) Daylight Fluorescent Tungsten To change the White Balance Setting: In the Movie/Picture Record Mode, press the OK Button to switch to the record menu screen.
-
Page 23: Motion Stabilization
RECORD MODE ■ Motion Stabilization To enable the Motion Stabilization: In the Movie/Picture Record Mode, press the OK Button to switch to the record menu screen. Use the Right/Left Buttons to select Movie Mode. A submenu of the Movie Mode will appear on the screen. -
Page 24: Motion Detection
RECORD MODE ■ Motion Detection To enable the Motion Detection: In the Movie/Picture Record Mode, press the OK Button to switch to the record menu screen. Use the Right/Left Buttons to select Movie Mode. A submenu of the Movie Mode will appear on the screen. -
Page 25: Camera Mode Setting
RECORD MODE Camera Mode Setting ■ Picture Resolution To change the Picture Resolution: In the Movie/Picture Record Mode, press the OK Button to switch to the record menu screen. Use the Right/Left Buttons to select the Camera Mode. A submenu of the Camera Mode will appear on the screen. - Page 26 RECORD MODE ■ Exposure Value(EV) The camera comes pre-set and will automatically adjust the image exposure value unless manually changed by you. To change the Exposure settings: In the Movie/Picture Record Mode, press the OK Button to switch to the record menu screen.
- Page 27 RECORD MODE ■ Two in One (Picture Record Mode Only) With the camera set on Two in One mode, you can combine two snapshots into one picture. To enable Two in One: In Movie/Picture Record Mode, press the OK Button to switch to the record menu screen. Use the Right/Left Buttons to select Camera Mode.
- Page 28 RECORD MODE ■ Photo Frame (Picture Record Mode Only) Your camera has the popular electronic photo frame. To enable this feature follow these steps. To enable Photo Frame: In the Movie/Picture Record Mode, press the OK Button to switch to the record menu screen.
- Page 29 RECORD MODE ■ Flash (Picture Record Mode Only) This camera has four flash settings. To change the flash setting press the left button or enter the Flash menu. The four flash settings are: Auto-flash ( ): In this mode, the flash fires automatically to suit the photographic conditions.
- Page 30 RECORD MODE ■ Self-timer (Picture Record Mode Only) The self-timer allows you to take pictures with a ten-second time delay. When taking a picture with the self timer enabled the LED on the front of the camera will start blinking. The speed of blinking will increase just before the picture is taken.
- Page 31 RECORD MODE ■ Sharpness You can soften and sharpen images to achieve different effects. To change the Sharpness setting: In the Movie/Picture Record Mode, press the OK Button to switch to the record menu screen. Use the Right/Left Buttons to select Camera Mode. A submenu of the Camera Mode will appear on the screen.
- Page 32 RECORD MODE ■ White Balance This sets the white balance for a variety of lighting conditions similar to those seen by the human eye. The four White Balance settings are: Auto (Default) Daylight Fluorescent Tungsten To change the White Balance Setting: In the Movie/Picture Record Mode, press the OK Button to switch to the record menu screen.
- Page 33 RECORD MODE ■ Multi-Snap (Picture Record Mode Only) With the camera set in Multi-Snap Mode, you can take five continuous pictures. To enable Multi-Snap: In the Movie/Picture Record Mode, press the OK Button to switch to the record menu screen. Use the Right/Left Buttons to select Camera Mode.
- Page 34 RECORD MODE ■ Backlight (Picture Record Mode Only) With the camera set to backlight Mode, you can take shots to counter bright light behind the subject. To enable Backlight: In the Movie/Picture Record Mode, press the OK Button to switch to the record menu screen.
-
Page 35: Night Mode
RECORD MODE ■ Date Printing (Picture Record Mode Only) To enable the Date Printing: In the Movie/Picture Record Mode, press the OK Button to switch to the record menu screen. Use the Right/Left Buttons to select Camera Mode. A submenu of the Camera Mode will appear on the screen. -
Page 36: Voice Mode
RECORD MODE Voice Mode To enable voice recording: In the Movie/Picture Record Mode, press the OK Button to switch to the record menu screen. Use the Right/Left Buttons to move to Voice Pen Option. A Voice submenu will appear on the screen. -
Page 37: Setting Menu
RECORD MODE Setting Menu The Setting submenu contains options for configuring the camera’s set up. To change the advanced settings: In the Movie/Picture Record Mode, press the OK Button to switch to the record menu screen. Use the Right/Left Buttons to move to Setting option, and then a setting Submenu will appear on the screen. -
Page 38: Time Setting
RECORD MODE ■ Time Setting To move between the Date, Time, Set and Exit use the Left/Right Buttons. Adjust date and time by using the Up/Down Buttons, and then select Set to save the changes. Select Exit to leave the Time Setting without any change. Submenu Display Screen Time Setting... -
Page 39: Selecting Interface Language
RECORD MODE ■ TV System Ensure that the appropriate TV standard for your area is selected – either NTSC or PAL. A wrong TV system setting may cause the image to flicker. NTSC standard: USA, Canada, Japan, South Korea and Taiwan etc. PAL standard: UK, Europe, China, Australia, Singapore and Hong Kong etc. -
Page 40: Playback Mode
PLAYBACK MODE Press the Record/Play Button to switch from Record Mode to the Playback Mode. The Playback Mode is for viewing and managing movies and pictures as well as listening to voice and music on the built-in memory or on an optional memory card. Operation Display Screen Press Record/Play Button (... - Page 41 PLAYBACK MODE LCD Monitor Information The following are indicators (Icon symbols) on the LCD screen while in Playback Mode: Movie resolution Indicators HD Resolution D1 Resolution QVGA Picture Resolution Indicators High Resolution Standard Resolution Low Resolution Indicates the selected movie/picture is locked. Indicates the single movie/voice/MP3 is being repeated.
-
Page 42: Movie Playback
PLAYBACK MODE Movie Playback Operation Display Screen Use Direction Buttons to select the Movie option. Press OK Button to go to the Movie Playback Mode. Use the Right/Left Buttons to go forward or backwards in this mode. Press the Movie Shutter Button to select play and press it again to pause the movie. -
Page 43: Delete Movies
PLAYBACK MODE ■ Delete Movies Operation Display Screen Use the Right/Left Buttons to select the Delete option ( Press the OK Button to enter the Delete menu. Use the Right/Left Buttons to select the movie you want to delete. Use the Up Button to delete all movies and the Down Button to delete a single movie. - Page 44 PLAYBACK MODE ■ Thumbnail Function Operation Display Screen Use the Right/Left Buttons to select the Thumbnail option ( Press the OK Button to view nine thumbnail previews of your recorded movies. To play a movie, use the Right/Left Buttons to select the movie and then press the OK Button to view.
-
Page 45: Repeat Movies
PLAYBACK MODE ■ Repeat Movies This function automatically repeats the playing of a single movie or all movies. Operation Display Screen Use the Right/Left Buttons to select the Repeat One option ( ) or Repeat All option Press the OK Button to start repeating. -
Page 46: Picture Playback
PLAYBACK MODE Picture Playback Operation Display Screen Use the Right/Left Buttons to select the Picture option. Press the OK Button to enter the Picture Playback Mode. Use the Right/Left Buttons to select the next or last picture. While the picture is selected, use the Up/ Down Buttons (Tele/Wide Buttons) ( ) to magnify a selected portion of the picture. -
Page 47: Delete Picture
PLAYBACK MODE Delete Picture Operation Display Screen Use the Right/Left Buttons to select the Delete option ( Press the OK Button to enter the Delete menu. Use the Right/Left Buttons to select the picture you want to delete. Use the Up Button to delete all pictures and the Down Button to delete a single picture. - Page 48 PLAYBACK MODE ■ Thumbnail Function Operation Display Screen Use the Direction Buttons to select the Thumbnail option ( While selecting Thumbnail option, press the OK Button to view nine thumbnail pictures. To view a picture, use the Direction Buttons to select the picture.
-
Page 49: Lock Pictures
PLAYBACK MODE ■ Lock Pictures This function can prevent the pictures from being deleted accidentally. Operation Display Screen Use Right/Left Buttons to select the Lock option ( Press OK Button to enter the Lock menu. Use the Right/Left Buttons to select the picture you want to lock. -
Page 50: Voice Playback
PLAYBACK MODE Voice Playback Direction Buttons Function ■ In Voice Playback Mode, the Direction Buttons have the following functions: Right/Left Buttons: Allows you to select the first or last voice recording. Up/Down Buttons: Adjusts the voice playback volume. OK Button: By pressing this button you can switch to voice option menu. - Page 51 PLAYBACK MODE Operation Display Screen Press the Down Button once to repeat single voice; Press twice to repeat all recordings. Press it again to disable the repeat function 10. The repeat icons will be different when selecting Repeat One option or Repeat All option.
-
Page 52: Listening To Mp3 Music
LISTENING TO MP3 MUSIC MP3 Music MP3 is a compressed audio file format. Transfer MP3 Music to the camera Connect your camera to the computer USB port. The Red LED will light up when the camera is connected to the computer and in Mass Storage Mode. -
Page 53: Listen To Mp3 Music
LISTENING TO MP3 MUSIC Listen to MP3 Music Operation Display Screen In Playback Mode, use the Right/Left Buttons to select the Music option. Use the Up/Down Buttons to locate MP3 songs you want to play, or press the Right/ Left Buttons to jump to the next/previous page. -
Page 54: Viewing Movies On A Pc
VIEWING MOVIE ON PC (COMPUTER) View Movie on PC If you want to playback the movies on your Computer, please install the Video Codec from the provided disc. Insert the CD-ROM into the computer’s CD-ROM drive. Click “Install Device Driver” and follow the on-screen instructions to complete the installation. -
Page 55: Viewing Pictures And Movies On A Tv
VIEWING PICTURES AND MOVIES ON A TV Connecting to a High-Definition(HD) TV Connect provided HDMI cable to your camera and a HD TV. Set video input source of the TV to “ HDMI” option. When the camera is connected to a television the functions are exactly the same as when you preview pictures and movies on the LCD Screen of the camera. - Page 56 VIEWING PICTURES AND MOVIES ON A TV Connecting to a regular TV set Connect one end of the AV cable to your camera’s AV Out port. Connect the other end of the cable to the television. The option menu of Earphone/TV appearson the LCD Screen. Choose the TV option and press the OK Button to validate the setting.
-
Page 57: Video File Converter
VIDEO FILE CONVERTER The provided bundled software CD contains Arcsoft Media Converter which features a video file converter to convert multiple video formats into a compatible format with your camera. In this way, you can convert various video files formats and playback your favourite movies on your camera. - Page 58 VIDEO FILE CONVERTER Select the Video file you want to convert. You can preview your media files before converting. To preview media files, use the following control functions. ■ Click to start previewing. ■ Click to stop previewing. Make sure your media files can be previewed before converting...
- Page 59 VIDEO FILE CONVERTER Click on “Start” to begin converting files. A task Report window will appear after the task is completed. Before transferring the converted file to your camera, rename the converted file to “ Clip0001. avi”. (Please note: if Clip0001.avi exists in the camera, then the converted file has to be renamed to clip0002.avi) 10.Connect your camera to PC and transfer the converted video to “My Computer\Removable Disk\DCIM\200Movie”.
-
Page 60: Burning A Recorded Clip Onto A Dvd
BURNING A RECORDED CLIP ON TO A DVD The provided bundled software CD also contains Arcsoft MediaImpression which includes features on how to burn a movie clip on to a DVD. You can preserve your precious movies on a DVD to share with family and friends. To create a DVD: Install Arcsoft MediaImpression (Refer to Section 13) Click [ Start ]... - Page 61 BURNING A RECORDED CLIP ON TO A DVD...
- Page 62 BURNING A RECORDED CLIP ON TO A DVD Click [ Start ] to start DVD burning.
-
Page 63: Uploading Video Files To Youtube
UPLOADING VIDEO FILES TO YOUTUBE The bundled software CD contains ArcSoft MediaImpression which features uploading the recorded videos to YouTube. To upload video files to YouTube: Install Arcsoft MediaImpression (Refer to Section 13) Click [Start] g [ Select Programs ] g[ Arcsoft MediaImpression ] Arcsoft MediaImpression main Screen will appear on your desktop. - Page 64 UPLOADING VIDEO FILES TO YOUTUBE Select the video file you want to upload and click the [ Upload to YouTube] option at the bottom of the menu. If this is your first time using this function, please follow the instructions on the YouTube Setting Panel.
- Page 65 UPLOADING VIDEO FILES TO YOUTUBE Go to http://www.youtube.com/login, then Log on to your YouTube account. (If you do not have a YouTube account, sign up here first.) After you log onto your YouTube account, Click [ Get Authorization ] button below.
- Page 66 UPLOADING VIDEO FILES TO YOUTUBE Then, Click [Allow] Button shown on YouTube website. Click [Save] Button to upload the video.
-
Page 67: Transferring Data To A Computer
TRANSFERRING DATA TO A COMPUTER Installing the Digital Camcorder Driver Before connecting this camcorder to a computer for the first time, you should install a driver on the computer. The driver is on the CD-ROM disc provided in the package. To install the driver: Insert the CD-ROM into the computer’s CD-ROM drive. -
Page 68: Installing Bundled Software
TRANSFERRING DATA TO A COMPUTER Installing Bundled Software The CD-ROM supplied with this camcorder contains the following software. Arcsoft Media Impression is a user-friendly application that helps you manage your media, and gives you fun and exciting ways to create and share projects featuring your photo, video and music files. -
Page 69: Specifications And System Requirements
SPECIFICATIONS AND SYSTEM REQUIREMENTS Specification Image Sensor 5 Mega Pixel Sensor, Maximum 11 Mega Pixel(interpolated) Operation Modes Movie Record, Picture Record, Voice Record, MP3 Player, PC Camera, Mass Storage Device Lens F3.2 (f = 7.0mm) Focus Range 150cm~infinite (Normal Mode) Center: 20 cm (Macro Mode) Digital Zoom Shutter... -
Page 70: System Requirements
SPECIFICATIONS AND SYSTEM REQUIREMENTS System Requirement Windows 2000/XP/Vista Pentium III 800 MHz or above 256 MB RAM CD ROM 1GB free HDD space Available USB port 16-bit Color Display Note The LCD screen is manufactured using extremely high-precision technology so over 99.99% of the pixels are operational for effective use. -
Page 71: Trouble Shooting
TROUBLE SHOOTING 1.If the LCD image is not clear when shooting, how can the focus be adjusted? You can try to switch the lens to the proper position: Landscape or Macro. 2.How to take a photo correctly? First properly adjust the focus, by pressing the shutter button halfway, the LCD shows a “funnel” marking in the center of the screen to record the image. - Page 72 Electrical and electronic equipment (EEE) contains materials,parts and substances which can be dangerous to the environment and harmful to human health if waste of electrical and electronic equipment (WEEE) is not disposed of correctly. Equipment which is marked with the WEEE logo (as shown on the left), should not be thrown away with your household waste.Contact your Local Authority Waste Disposal Department as they will be able to provide details of the recycling options available in your area...
-
Page 73: Warranty Card
WARRANTY CARD...
Need help?
Do you have a question about the DV-5000 and is the answer not in the manual?
Questions and answers
Hello, I buy a traveler de 5000 recently and when i put it in charge, there is a Little Green light but it won’t start. What does it mean ? Thanks for your answer
A blinking green LED light indicates that the Traveler DV-5000 is charging. A constant green LED means charging is complete. The camera won't start during charging because it must be turned off (screen closed) for charging to occur.
This answer is automatically generated