Table of Contents
Advertisement
Advertisement
Table of Contents

Summary of Contents for ZENDA ZD-VT1
- Page 1 ZD-VT1 User Guide ZENDA GPS Tracker ZD-VT1 User Guide...
-
Page 2: Change History
Change History File Name ZD-VT1 User Guide Created By Kyle Lv Creation Date 2016-01-08 Product ZD-VT1 Update Date 2016-02-02 Subproject User Guide Total Pages Version V1.0 Confidential External Documentation Copyright © 2016 ZENDA GPS All rights reserved. - 2 -... -
Page 3: Table Of Contents
3.3 Smart Sleep Mode ................................- 5 - 3.4 Data Compression Mode – CCC ............................- 5 - 3.5 Specifications ..................................- 6 - 4 ZD-VT1 and Accessories .................................- 6 - 5 Product View ....................................- 7 - 6 First Use ......................................- 8 - 6.1 Installing the SIM Card ................................- 8 -... -
Page 4: Copyright And Disclaimer
The user manual may be changed without notice. Without prior written consent of ZENDA, this user manual, or any part thereof, may not be reproduced for any purpose whatsoever, or transmitted in any form, either electronically or mechanically, including photocopying and recording. -
Page 5: Functions Of Optional Accessories
3.2 Smart Voice Dial the ZD-VT1 SIM card number by using an authorized mobile phone number to set the smart voice function. After dialing, the following voice prompt is played: "Hello. Arming, press 1; disarming, press 2; query arming status, press 3; query a location, press 4;... -
Page 6: Specifications
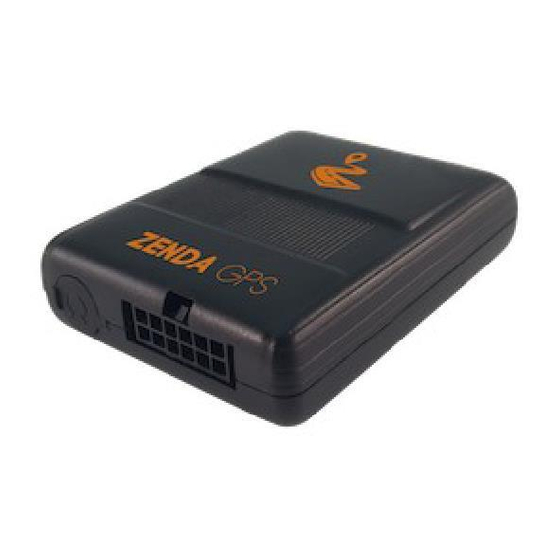
1 analog detection input 1 USB port (used for charging and parameter configuration) 4 ZD-VT1 and Accessories Standard accessories: Tracker with a built-in battery I/O cable USB cable ZD-VT1 Quick Installation Guide Copyright © 2016 ZENDA GPS All rights reserved. - 6 -... -
Page 7: Product View
ZD-VT1 User Guide Optional accessories: Buzzer GPS antenna Audio cable + Microphone 5 Product View Microphone Power & functional cable interfaces Power/GSM/GPS GPS antenna interface USB port indicators Copyright © 2016 ZENDA GPS All rights reserved. - 7 -... -
Page 8: First Use
Ensure that the phone card PIN lock has been closed properly. Ensure that the SIM card in the ZD-VT1 has subscribed the caller ID service if you want to use your authorized phone number to call the tracker. ... -
Page 9: Led Indicator
Connect the ZD-VT1 to an external power supply. Note: When the ZD-VT1 is being charged with a USB cable or by external power supply, it will operate normally. To restart the ZD-VT1, just press and hold down the power button. -
Page 10: Tracking By Mobile Phone
Press 4 on the mobile phone according to the voice prompt. The device will reply an SMS with a map link. Click the SMS link. The location will be displayed on Google Maps on your mobile phone. Note: Ensure that the ZD-VT1 SIM card number has subscribed the caller ID service. Otherwise, the caller ID will be blocked. SMS example: Now,110721 16:40,V,10,0Km/h,97%,http://maps.meigps.com/?lat=22.513015&lng=114.057235... -
Page 11: Common Sms Commands
Set by smart voice: Dial the ZD-VT1 SIM card number by using an authorized mobile phone number to set the smart voice function. After dialing, the following voice prompt is played: "Hello. Arming, press 1; disarming, press 2; query arming Copyright ©... -
Page 12: Zenda Tracking System
When Status is 1, enable the anti-theft function. While arming, opening the vehicle door and starting the ACC are not allowed. Otherwise, the ZD-VT1 will send an alarm SMS and make a call to the preset authorized phone number. ... -
Page 13: Installing The Zd-Vt1
View various reports. Send commands in batches. For details, see the ZENDA GPS Tracking System User Guide. 8 Installing the ZD-VT1 8.1 (Optional) Installing the GPS Antenna If the GPS antenna is installed in a vehicle and the signal is weak, install an external GPS antenna to improve signal reception. -
Page 14: Port View
8.2.2 Port View Digital input 1 (SOS) 8.2.3 Power Cable/Ground Wire Connect the power cable (red) and ground wire (black) to the positive and negative electrodes of the vehicle battery respectively. Copyright © 2016 ZENDA GPS All rights reserved. - 14 -... -
Page 15: Acc And Door Detection
ZD-VT1 User Guide 8.2.4 ACC and Door Detection Different models of cars may be triggered differently. Connect the door detection after a correct trigger mode is set for the tracker. Copyright © 2016 ZENDA GPS All rights reserved. - 15 -... -
Page 16: Remote Power Cut-Off
Buzzer output 8.3 Mounting the ZD-VT1 Fasten the ZD-VT1 in the vehicle by using cable ties. The portable tracker can be connected to a cigarette lighter of the vehicle through an RS232 port by using a USB cable (5V input).