
Related Manuals for iHome iPLWBT5


Summary of Contents for iHome iPLWBT5
- Page 1 Model: iPLWBT5 Docking Bluetooth Stereo FM Clock Radio with Apple Watch™ Charging QUESTIONS? Visit www.ihome.com...
- Page 2 W E L C O M E Thank you for choosing the iPLWBT5 from iHome. This user guide will get you up and running quickly and provide helpful hints to maximize enjoyment. For more information about this and other iHome products, please visit www.ihome.com...
-
Page 3: Top Panel
Manufactured and Serviced by SDI Technologies Inc. Patents: www.ihome.com/patents Made in China (DST) Switch Toll Free: 1-800-288-2792 www.ihome.com Dimmer Mode Switch FCC ID: EMOIPLWBT5 IC: 986B-IPLWBT5 Auto = automatically Dimmer Mode +1 -1 Auto adjusts display at start Auto Manual and end of Daylight... -
Page 4: C O N N E C T I N G A C A D A P T E R
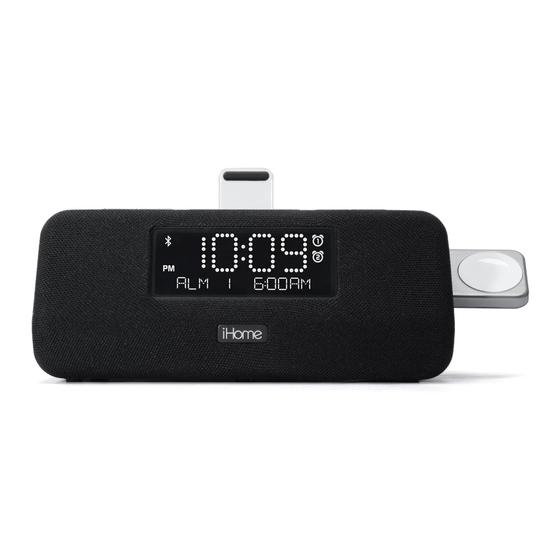
Display Time Display Bluetooth Indicator Alarm Indicators AM Indicator Low Backup PM Indicator Battery Indicator Wake-To/Mode Indicators Alarm Time/Date Display (Tone/Dock/Aux/FM Radio) C O N N E C T I N G A C A D A P T E R This unit operates on AC power using the included 100V-240V universal AC adaptor. - Page 5 B A C K U P B A T T E R Y The iPLWBT5 ships with a CR2450 battery installed for backup to provide continuous alarm operation and clock settings in the event of a power failure. Remove the pull tab from the battery compartment on the bottom of the unit before use.
-
Page 6: Setting The Time
SETTING THE TIME: TIME SYNC & MANUAL TIME SETTING DST SWITCH This unit has a Daylight Saving Time (DST) Switch on the bottom of the unit. By default, the switch is set to Auto and will automatically adjust the time at the start and end of Daylight Saving Time. -
Page 7: Setting And Using The Alarms
SETTING THE TIME (Continued) 3. Press and release the Time Sync/Time Set Button to confirm the current time setting. The YEAR will flash on the display. Press the + or – Buttons to set the correct year. 4. Press and release the Time Sync/Time Set Button to confirm the current year setting. - Page 8 (Normal) or to a custom playlist (Playlist). To wake to playlist, you must first create a custom playlist named “iHome” on your device. Press the + or – Buttons to select Normal or Playlist. Press the Alarm Button to confirm. Press the + or –...
- Page 9 CHARGING an iPhone, iPod or Apple Watch While the dock accommodates most cases, you may need to remove your case and/or the rubber docking insert for proper docking. Gently dock your iPhone or iPod into the flexible Lightning dock located on the top of the unit.
-
Page 10: Listening To Your Iphone/Ipod
1. Connect the included audio cable plug to the headphone or line-out jack on your AUX device and the other end to the AUX IN jack located on the back of the iPLWBT5. 2. Press and release the Power Button to turn on the unit, then press and release the Mode Button as needed to cycle through BT, Dock, FM radio and AUX modes. -
Page 11: Listening To Fm Radio
L I S T E N I N G T O F M R A D I O Ex tend F M an ten n a for best rece p ti on. Tuning and P l ay i n g th e Rad io Press and release the Power Button to turn on the unit, then press and release the Mode Button as needed to cycle through BT, Dock, FM radio and... - Page 12 DEVICES Pairing is the set-up process to introduce your Bluetooth-capable device to the iPLWBT5. Once your device is paired, the iPLWBT5 can recognize it and you can play your audio through it. 1. Press and hold the Bluetooth Pairing Button located on the back of the unit for 3 seconds.
-
Page 13: S N O O Z E / D I M M E R O P E R A T I O N
+ and – Buttons on the unit to adjust the snooze time to 1 - 29 minutes. 2. Press the Snooze/Dimmer Button on the iPLWBT5 after the alarm sounds. The alarm will be silenced and will come on again in about 9 minutes (default). -
Page 14: Troubleshooting
T R O U B L E S H O O T I N G Symptom Possible reason Solution Unit won’t turn on AC adaptor isn't plugged Plug the AC adaptor into a into a working wall socket working wall socket and plug the or not plugged into the connector into the supply jack on power jack on back of the... -
Page 15: Important Safety Tips
I M P O R T A N T S A F E T Y T I P S When used in the directed manner, this unit has been designed and manufac- tured to ensure your personal safety. However, improper use can result in potential electrical shock or fire hazards. - Page 16 I M PORTA NT SA FETY TIP S (CONTINU ED) 12. Periods of Nonuse – If the unit is to be left unused for an extended period of time, such as a month or longer, the backup battery should be removed from the unit to prevent damage or corrosion.
-
Page 17: Limited 1-Year Warranty
L IMITED 1 Y EA R WARRA NT Y iHome Products, a division of SDI Technologies Inc. (hereafter referred to as SDI), warrants this product to be free from defects in workmanship and materials, under normal use and conditions, for a period of one (1) year from the date of original purchase.
Need help?
Do you have a question about the iPLWBT5 and is the answer not in the manual?
Questions and answers
Why will the iPhone dock not charge my iPhone?
The iHome iPLWBT5 dock may not be charging your iPhone for the following reasons:
1. Improper Docking – Ensure that your iPhone is properly docked into the flexible Lightning dock. Incorrect placement may prevent charging and could even damage the device.
2. Power Connection – The unit must be connected to AC power for charging to work. Verify that the power source is properly connected.
3. Device Compatibility – Some devices require higher amperage USB charging ports. If using the USB port for charging, check if your device requires more than 1 Amp.
4. Faulty Cable or Port – If charging via the USB port, ensure that the USB cable is properly connected and functional.
5. Battery Status – If the iPhone is already fully charged, it may stop charging automatically.
If the issue persists, try using a different cable or power source to determine if the problem is with the dock or the iPhone.
This answer is automatically generated