Chapters
Table of Contents

Subscribe to Our Youtube Channel
Related Manuals for X-Pulse xp500.1


Summary of Contents for X-Pulse xp500.1
- Page 1 110998 Man XP500.1 RZ (D+UK) 14.10.1998 9:34 Uhr Seite 1 DIGITAL SUBWOOFER AMPLIFIER XP500.1 S t a t e t h e a r t INSTALLATIONS- & BEDIENUNGSANLEITUNG INSTALLATION & OPERATING MANUAL...
-
Page 2: Table Of Contents
Control Elements XP500.1 _ _ _ _ _ _ _ _ _ _16 Einsatz kommenden digitalen Mounting the XP500.1 _ _ _ _ _ _ _ _ _ _ _ _18 Verstärkertechnologie ist die praktisch völlig Connecting the XP500.1 _ _ _ _ _ _ _ _ _ _ _19 verlustfreie Verstärkung verbunden mit einem... -
Page 3: Auspacken
Bei nicht vollständigem Lieferumfang oder licht die Pegelanpassung des Bassbereiches sichtbaren Transportschäden bitten wir Sie, aus dem Cockpit, um eventuelle tonale sich umgehend mit Ihrem X-PULSE Händler in Unterschiede der angeschlossenen Quellen Verbindung zu setzten. (Kassette, CD, Tuner MD, etc.) oder... -
Page 4: Bedienungselemente
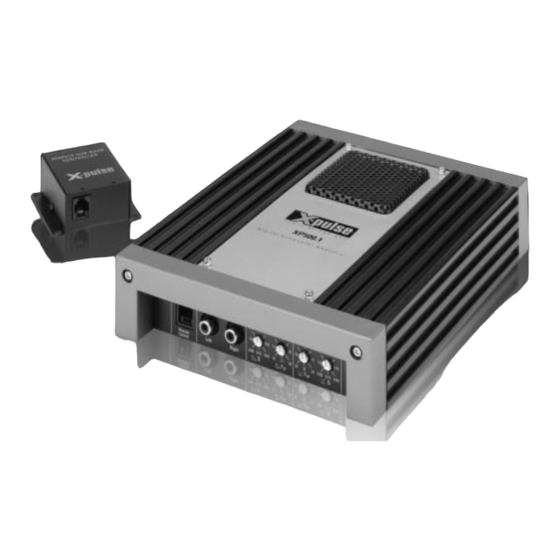
110998 Man XP500.1 RZ (D+UK) 14.10.1998 9:34 Uhr Seite 4 BEDIENUNGSELEMENTE Q-FAKTOR REGLER zur Einstellung der Dämpfung der Tiefpassflanke von Q 0,50 bis Q 1,33 OPERATING LED Die grüne Operating LED LOWPASS REGLER zur Einstellung der zeigt den normalen Endstufen-Betrieb an. - Page 5 110998 Man XP500.1 RZ (D+UK) 14.10.1998 9:34 Uhr Seite 5 FUSES XP500.1 Speaker Speaker +12 V Speaker Speaker Operating Remote On SPEAKER SPEAKER 2 x 25 A + 12 V Input Input Lowpass Subsonic XP500.1 1-CH/Mono 0.63 0.73 0.86 0.63 0.73 0.86...
-
Page 6: Montage
MONTAGE DER XP500.1 dieses Verstärkers adäquates Stromkabel. Entfernen Sie die zwei seitlichen Backen- Ein Stromkabel mit 20 mm Querschnitt stellt Profile der XP500.1 gem. Abb.1 durch den idealen Querschnitt dar. Herausdrehen der M3-Inbus-Schrauben mit Stromkabel mit kleineren Querschnitten dem mitgelieferten Inbus-Schlüssel. -
Page 7: Anschlussdiagramm
110998 Man XP500.1 RZ (D+UK) 14.10.1998 9:34 Uhr Seite 7 SUB-BASS REMOTE CONTROLLER ANSCHLUSS- STEUERGERÄT DIAGRAMM Vollbereichs- Ausgänge (Pre-Out) REMOTE ON/OFF min. 60A Hauptsicherung MASSE MASSE BATTERIE WICHTIG: Das Cinch-Eingangs-Signal sollte ein Vollbereichssignal (Fullrange Signal) sein. Beim Anschluss eines Tiefpass-Signals (Lowpass Signal) vom Steuergerät wird die Lowpass-... -
Page 8: Verkabelung
Achtung! Im Falle der gewünschten ACHTUNG! Entfernen Sie das Pluskabel vom Einspeisung eines Monosignales Pluspol der Batterie vor dem Beginn der in die XP500.1, verwenden Sie bitte dazu die Installationsarbeiten entsprechend beschriftete (1-CH / Mono) LEFT- Channel Input Cinchbuchse. Für einen sicheren und richtigen Anschluss Die Eingangssektion des Verstärkers ist mit... - Page 9 110998 Man XP500.1 RZ (D+UK) 14.10.1998 9:34 Uhr Seite 9 Verlegen Sie nun das Pluskabel von der Nun wird der Stromkreis zum Verstärker Batterie zum Verstärker +12 V. durch das Einsetzen der Hauptsicherung Das Batteriekabel wird am besten auf der geschlossen.
-
Page 10: Einstellungen
Folge wäre sonst ein eher tiefbass-armer Der REMOTE SUB LEVEL CONTROLLER kann ‘dünner’ Klang. nach erfolgter Grundeinstellung mitsamt Kabel von der XP500.1 abgezogen und für eine even- Grobeinstellung Subwoofer Trennfrequenz F tuelle spätere Nutzung aufbewahrt werden. Die zu wählende Trennfrequenz des Lowpass Wichtig! Der zuletzt gewählte Pegel-Wert am... - Page 11 110998 Man XP500.1 RZ (D+UK) 14.10.1998 9:34 Uhr Seite 11 Feineinstellung Subwoofer fallen(siehe Abb. 2). Damit kann u.U. eine Dröhnneigung des Basslautsprechers kompen- Trennfrequenz F siert werden, ohne dass eine zu tiefe Lowpass- Die zu wählende Trennfrequenz des Tiefpasses trennfrequenz gewählt werden muss. Mit einer...
-
Page 12: Störungsbehebung
Überprüfen Sie die Subsonic (F ) und Tiefpass- ) Trennfrequenzen und die entsprechenden Q-Faktor-Einstellungen Die eingestellte Tiefpass- (F Trennfrequenz an der XP500.1 ist durch ein vorgeschaltetes Tiefpass-Eingangssignal vom Steuergerät zu weit nach unten verschoben. Die POWER OPERATING-LED Kurzschluss am Verstärkerausgang leuchtet nicht auf Überhitzung des Verstärkers... -
Page 13: Technische Daten
110998 Man XP500.1 RZ (D+UK) 14.10.1998 9:34 Uhr Seite 13 TECHNISCHE DATEN XP500.1 Ausgangsleistung an 4 Ohm (13.8 V) 320 W RMS (THD < 1 %) Ausgangsleistung an 2 Ohm (13.8 V) 500 W RMS (THD < 1 %) Gesamtklirrfaktor (THD) <... -
Page 14: Introduction & Xp500.1
Control Elements XP500.1 _ _ _ _ _ _ _ _ _ _16 by the alternator - is actually transformed Mounting the XP500.1 _ _ _ _ _ _ _ _ _ _ _ _18 directly into amplifier output power and is not Connecting the XP500.1 _ _ _ _ _ _ _ _ _ _ _19... - Page 15 Depending on woofer amplifier with a power output similar to the individual requirements it is possible to the XP500.1 will usually require a physical either give the subwoofer a ‘slimmer’ or ‘fatter’ volume of around four times the size of the sound.
-
Page 16: Checking The Set Contents
(or antenna control lead). Please check the set contents of your new FUSES 2 x 25 Ampére, ATC/Mini-Fuse-type. XP500.1 Subwoofer Amplifier carefully. The ori- ginal packaging should contain: + 12 V for the connection of the amplifier to the positive pole of the car battery. - Page 17 110998 Man XP500.1 RZ (D+UK) 14.10.1998 9:34 Uhr Seite 17 FUSES XP500.1 Speaker Speaker Speaker Speaker +12 V Operating Remote On SPEAKER 2 x 25 A + 12 V SPEAKER Input Input Lowpass Subsonic XP500.1 1-CH/Mono 0.63 0.73 0.86 0.63 0.73 0.86...
-
Page 18: Mounting The Xp500.1
The location of the amplifier should be care- on the four outside corners of the XP500.1 fully selected and in the interest of passive driver and passenger safety the amplifier must Use the amplifier as a template for the mar- also be securely mounted. -
Page 19: Connecting The Xp500.1
(+12V) or remove the main fuse near the car 1-Channel/Mono-Input is effected by using battery before any wiring work! only one RCA input socket on the XP500.1. For the 1-Channel/MONO input mode the LEFT Please note that the power supply of the car... -
Page 20: System Connecting Diagram
PLEASE NOTE: It is recommended to use a full- range signal from the head-unit for the RCA Input of the XP500.1. A lowpass subwoofer pre-out sig- nal from the head-unit willalways cause a down- ward shift of the lowpass setting on the amplifier! - Page 21 RCA fire hazards from a short-circuit of the main Input of the XP500.1. A lowpass subwoofer pre- power cable with chassis ground you must out signal from the head-unit will always cause...
-
Page 22: Settings & Adjustments
110998 Man XP500.1 RZ (D+UK) 14.10.1998 9:34 Uhr Seite 22 After turning-on the head-unit - keeping the the audible parts of the low frequency range. volume level at zero - both REMOTE ON and Subsonic highpass filtering above 40 Hz should... - Page 23 XP500.1 from the power leads! LOWPASS frequency F (see fig. 2) The last Sub Bass Level Setting will be stored...
- Page 24 110998 Man XP500.1 RZ (D+UK) 14.10.1998 9:34 Uhr Seite 24 Increasing the Q value towards 1,33 will result in stressing the selected cut-off frequency point F , i.e. the response curve receives a boost right at the selected cross- over/cut-off frequency point F (see fig.
-
Page 25: Troubleshooting
TROUBLESHOOTING Symptom Cause No music signal on loudspeakers + 12 V and/or GROUND/ - 12 V) and both LEDs on XP500.1 are off and/or „Remote” lead not connected Fuse on distributor blown Main Fuse on car battery side blown No audible music/bass from subwoofer... -
Page 26: Technical Specifications
110998 Man XP500.1 RZ (D+UK) 14.10.1998 9:34 Uhr Seite 26 TECHNICAL SPECIFICATIONS XP500.1 Continuous Output Power at 4 Ohms (13.8 V) 320 W RMS (THD < 1 %) Continuous Output Power at 2 Ohms (13.8 V) 500 W RMS (THD < 1 %) Total Harmonic Distortion <... -
Page 27: Guarantee Card
Dear customer, damage caused by transport or shipment of the product. Thank you for buying this X-PULSE product. It is advisable to keep the original packing material for any future transporting of the product. Please read the guarantee specifications carefully. -
Page 28: Garantiekarte & Garantiebestimmungen
Händler, bei dem Sie das Gerät ge- kauft haben. Bitte senden Sie keine Geräte an den Hersteller. Bei Schwierigkeiten, ein geeignetes X-PULSE-Servicecenter zu finden, erhalten Sie bei ACR AG in CH-5330 Zurzach weitere Informa- X-Pulse Produkte werden entwickelt und hergestellt von: tionen. X-PULSE Schulze-Delitsch-Str. 3 Garantiebestimmungen...
Need help?
Do you have a question about the xp500.1 and is the answer not in the manual?
Questions and answers