
Summary of Contents for AJA io hd
- Page 1 Published: 5/4/11 Installation and Operation Guide B e c a u s e m a t t e r s .
-
Page 2: Trademarks
All other trademarks are the property of their respective holders. Notice Copyright © 2011 AJA Video, Inc. All rights reserved. All information in this manual is subject to change without notice. No part of the document may be reproduced or transmitted in any form, or by any means, electronic or mechanical, including photocopying or recording, without the express written permission of AJA Inc. -
Page 3: Limited Warranty
AJA Video, with shipping charges prepaid. AJA Video shall pay for the return of the product to the Customer if the shipment is to a location within the country in which the AJA Video service center is located. -
Page 5: Table Of Contents
Io HD Installation and Operation Manual — Table of Contents Table of Contents Trademarks ..............ii Notice . - Page 6 Understanding Io HD and FireWire 800 ........
- Page 7 AJA Control Panel—2nd Priority ........
-
Page 9: Chapter 1: Introduction
Apple ProRes 422 Codecs natively, in hardware, to bring production-quality HD editing to the desktop. Io HD is the only device in the world that supports Apple’s ProRes 422 in hardware, enabling true 10-bit video editing in Final Cut Studio 2—... -
Page 10: Features
Mbps (normal quality) and 220 Mbps (high quality, HQ) there is plenty of bandwidth. Only Io HD can do this since it has the Apple ProRes 422 codec implemented in hardware inside the box, allowing incoming media to be made smaller before it’s transmitted over the FireWire connection to the Mac. -
Page 11: Broadcast-Quality Conversion
While connected to the Mac, Io HD can be configured for a set of parameters and then disconnected from the Mac for use by itself as a stand-alone converter. An example would be using the Io HD in Stand Alone Mode as an SD to HD upconverter. -
Page 12: What's In The Box
• AC Power cord. • 2 FireWire cables. Either cable can be used to connect an Io HD and a Mac • Pro or Mac Book Pro. Both are FireWire 800 cables, one with a FW800 connector on one end and a FW400 on the other, and the other having FW800 connectors on both ends. -
Page 13: System Requirements
Io HD Installation and Operation Manual — System Requirements Please save the Io HD shipping box and all packaging materials. If you ever require service or want to move your system—use the packaging materials and box for safe shipment. System Requirements AJA Video recommends that your system meet minimum hardware and software requirements to achieve a satisfactory level of performance. -
Page 14: Understanding Disk Storage Methods
Understanding The Io HD with an Apple Mac Pro or Apple MacBook Pro and Final Cut Pro 6, along with a suitable storage system, offer an unprecedented level of features and Disk Storage performance for all audio/video production applications. However, to ensure... -
Page 15: Software For Striping
RAID management capabilities are provided via Apple’s Java-based RAID Admin application. Note: When creating and striping an Xserve RAID for Io HD using the Apple Disk Utility provided with OS X, use RAID 50: in other words, the internal Xserve RAID drives are set up as RAID 5;... -
Page 16: In This Manual
Chapter 1 is the introduction you’re reading, listing features, box contents, and system requirements. Chapter 2 discusses the AJA Io HD front and rear panel connections and indicators. Illustrations point out the various connectors and indicators with text discussions of each. -
Page 17: Controls And Indicators
Full installation instructions are provided in Chapter 4 later in this manual. Be sure to read that chapter before attempting to install the product. Note: The AJA Io HD should be plugged into a 3-prong AC power jack before you make connections to other equipment — although it should not be switched on. -
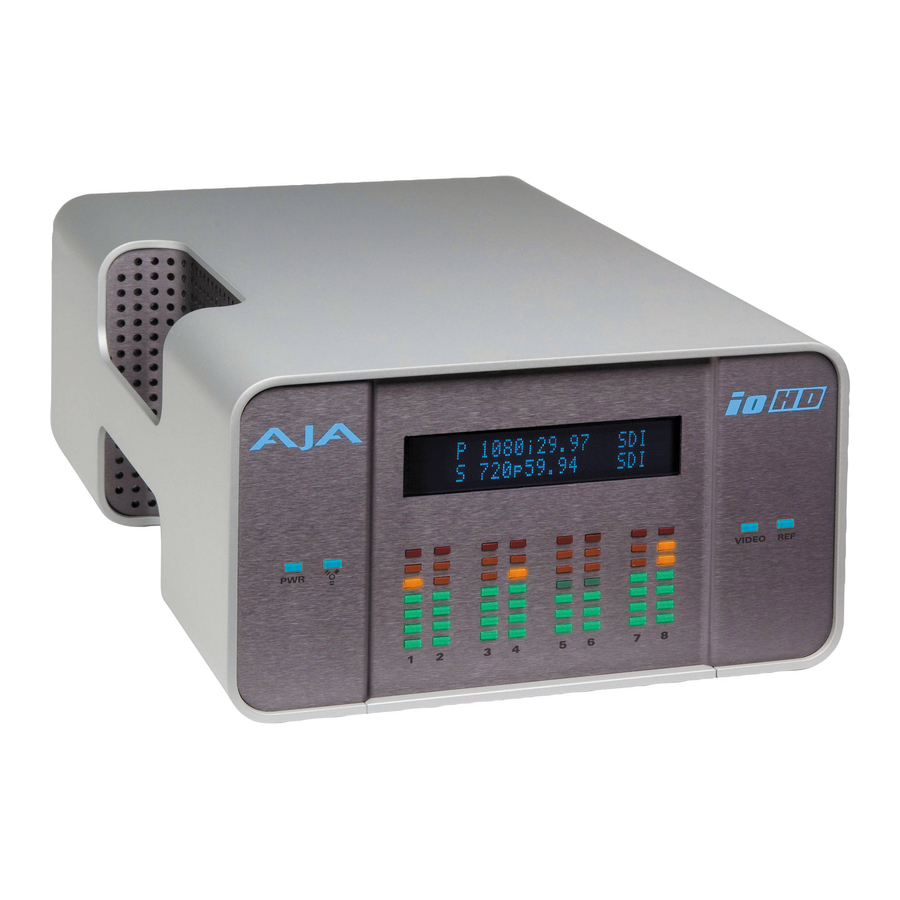
Page 18: Front Panel
Secondary source selection and format (SD or HD format and framerate) • For example, if Io HD is currently set up to do a downconvert from 1080i 29.97 to 525i 29.97, the display would look similar to this: P 1080i29.97 SDI S 525i29.97... -
Page 19: Led Indicator Descriptions
Although the default is to show Primary and Secondary formats, you can instead configure the Io HD to show the Primary format on the top line of the display and the currently configured timecode on the second line. If in an input mode, this will display the timecode at input. -
Page 20: Audio Vu Led Indicators
(stereo RCA) AJA Io HD Rear Panel Connectors About Inputs and The function of Io HD’s inputs and outputs depend on the operational mode. In the capture mode, Io HD’s inputs are selected by Final Cut Pro’s Audio Video Outputs... -
Page 21: About Bnc Connectors
HD’s outputs. When not in the capture mode, outputs change to reflect the output of Final Cut Pro. In all cases, all Io HD’s outputs are active all the time. In other words, the same output video appears simultaneously on the HDMI, SDI, composite, S- video, and component outputs. -
Page 22: Connector Descriptions
SDI Input and Outputs BNC connectors are provided for two SDI inputs (only one can be selected and routed through the Io HD at a time) and two SDI outputs (independent of the input). SDI inputs and outputs support SD-SDI and HD-SDI video and embedded 24-bit digital audio. -
Page 23: S-Video (Y/C)
1080p23.98, 1080p24, 1080p25, 1080p29.97, and 1080p30 are supported for output only. The Io HD control panel allows selection and adjustment of some HDMI parameters; please see Chapter 5—Io HD and Final Cut Pro for more information on Control Panel operation. -
Page 24: Channel Aes/Ebu Digital Audio Inputs And Outputs
ON/OFF control. Warning! The Io HD chassis has no user-serviceable parts. An internal fuse protects the circuitry; however, it can only be replaced by AJA service centers or AJA dealers. To remove power from the unit, remove the AC line cord to ensure disconnection. - Page 25 Io HD Installation and Operation Manual — Rear Panel Warning! Do not defeat the safety purpose of the polarized or grounding-type plug. A polarized plug has two blades with one wider than the other. A grounding type plug has two blades and a third grounding prong. The wide blade or the third prong are provided for your safety.
-
Page 27: Chapter 3: Getting Started
This chapter hopes to show how Final Cut Pro and Io HD can fit into the variety of workflows you currently have—and make them more efficient. -
Page 28: Understanding Typical Workflows
Workflow Scenarios Understanding Typical Workflows Io HD and Final Cut Pro allow more workflow flexibility than ever before. Users can independently select different formats and frame rates for capture. Io HD's full array of SD and HD, analog and digital connectors—with all outputs active simultaneously—make video preview and mastering an easy task. -
Page 29: Dv/Dv25 (Sd)
Quality: Good DV is commonly input to an Apple computer via FireWire. Io HD can capture directly to DV compressed media from an uncompressed SDI source. For devices that may not have FireWire (IEEE1394 or i.Link) connections, this allows the user to capture to this low data rate, yet good quality codec. -
Page 30: Uncompressed 10-Bit 4:2:2 (Sd)
It was designed by Apple for editing, rather than as a transmission/distribution codec as are most popular codecs. For HD, this is the preferred workflow for Io HD ingest into Final Cut Pro 6. Some of the advantages include: Full-size 1920-by-1080 and 1280-by-720 HD resolutions. -
Page 31: Workflow General Notes
However, if changes need to be made to the project workflow after the project has begun, the Io HD gives users easy tools that can capture to a common codec with its hardware based upconversion, downconversion and crossconversion capabilities. -
Page 33: Installation Overview
Installation & Configuration Installation Overview The installation and set up of an Io HD is very simple. Plug it in to AC mains power and connect the FireWire 800 cable to a suitable Mac Pro, MacBook Pro or Xserve’s FireWire 800 port with the cable supplied. All of the Installation and Configuration steps are documented in this chapter and summarized below:... -
Page 34: Unpacking
Final Cut Pro must be installed and have been run at least once prior to installing AJA Io HD software. You cannot use Io HD with Final Cut Pro until the AJA Io HD software has been installed on the host Mac Pro or Xserve. For the latest AJA software for your Io HD, visit www.aja.com and navigate to the support and... -
Page 35: Software Installation Procedure
Io HD. This will prevent any hardware or software conflicts. Software For the most recent version of the Io HD driver, it is best to visit the AJA website at www.aja.com, download the driver and read the details and... - Page 36 6. Click on the OK button after entering a valid user and password. 7. The installer will launch and you will see a series of installer screens. Initial Installer Screen 8. Click Continue to begin installation. 9. The next screen lets you know that the installer will check your Mac to ensure it has the hardware and software resources required (see Minimum Requirements in Chapter 1).
- Page 37 Io HD Installation and Operation Manual — Installing Io HD Software System Check Installer Screen 10. Read and agree to the Software License Agreement. Io HD Software License Agreement Screen 11. The next screen shows all the available drives on the Mac Pro (or MacBook Pro).
- Page 38 13. A system prompt will pop up with a reminder that OS X must be restarted after installation. Click the Continue Installation button to proceed. 14. The installer will run and put all the necessary Io HD drivers, Io HD Control Panel, presets and additional software on the desired hard drive.
-
Page 39: Io Hd Chassis Placement
Io HD is powered up after the computer, the AJA Control Panel application will not be able to properly control the unit. If for any reason the Io HD is power cycled while the computer remains powered, the computer must be rebooted for proper operation of the Io HD. -
Page 40: Cabling The System
These connectors are explained individually in chapter 2. Here, system interconnection is shown and described. The Io HD chassis should be plugged into AC power before you make connections — although it should not be switched on. The AC cord provides a path to ground for accidental static discharge and protects system equipment. - Page 41 4. Connect two SDI cables between Io HD and your digital VTR (Digital Betacam etc.): one from Io HD SDI In to the VTR SDI Out, and one from Io HD SDI Out (1 or 2) to the VTR SDI In. The Io HD SDI connections have embedded audio so the VTR must be configured accordingly.
-
Page 42: Typical Analog System
Your system may differ depending on VTRs, audio monitoring, and video monitoring. 1. If desired, connect your house reference sync to the Io HD Ref input connector (BNC). The Io HD Ref output connector can be connected to your VTR. -
Page 43: Genlock And Your System
Usually, this means using a black burst generator (standard definition) or Tri-level sync generator (high definition) output looped through the system. On the Io HD, house sync is connected to the “Ref ” input BNC (Reference Video). -
Page 44: Using 8-Bit Versus 10-Bit Video In Standard Definition
Using 8-bit Versus 10-bit Video in Standard Definition While both 8- and 10-bit uncompressed video are capable of providing excellent quality broadcast video, 10-bit represents a significantly higher quality and is preferable in many situations when working with standard definition video. (When working with HD, you’ll want to use Apple ProRes 422 in most cases—unless the media has already been transferred via FireWire to the Mac, in which case you might consider HDV or DVCPROHD as alternatives—although ProRes 422 will... -
Page 45: Final Cut Pro
Final Cut Pro and Other Software Final Cut Pro After you install the Io HD software on your Mac, all you need to do to begin using it is to become familiar with the AJA Control Panel and how Final Cut Pro works with Io HD. -
Page 46: Control Panel Basics
first holding down the command key (Apple key) before mouse clicking on the AJA Control Panel application on the desktop. For this reason, it is useful to leave the AJA Control Panel application on the desktop while you work in applications and simply command click into it to access it if you are unsure of a setting or wish to make a change. - Page 47 Text Color—Colored text in the block diagram provides an indication of signal type and what the Io HD is doing. Text in blue shows the values automatically selected, while text in black shows values that have been manually selected.
- Page 48 It is important to realize that inside the Macintosh many applications can use the Io HD (as you switch from window to window) and it may not always be obvious which is currently controlling it. The AJA Control Panel displays the name of the application controlling the Io HD in red text on the Format and Control tabs of the interface.
- Page 49 Yellow: reference video (black burst or other reference source) Green: indicates that Io HD is performing some kind of active change to the video, to make it different from the Primary Format (e.g., up/down/cross convert, SD-SD aspect change, etc.).
- Page 50 Mac as well as be used as a Macintosh Desktop extension. The Control Tab is where Screen you select how the Io HD directs video and is used by application software. This screen also provides control for configuring output timing with regard to external reference video and horizontal/vertical delay.
- Page 51 Default Video Output—this is where you select what Io HD will output as a default when no application has control of it, such as when the Finder is active. Since Io HD can be controlled by software applications as well as its own control panel, the output can change dynamically.
- Page 52 Freerun: In this mode, Io HD generates sync without an external reference source Ref In: Directs Io HD to use the Ref Video source for sync (usually an analog black burst video signal) Video In: Directs Io HD to use whichever video input source has been selected in the Inputs tab window for sync.
- Page 53 Io HD Installation and Operation Manual — Using The AJA Control Panel Format Tab Screen The Formats screen shows the video format currently in use by the Io HD framebuffer (called the Primary Format) and allows you to change it. All throughout the AJA Control Panel, choices are always presented based on what Io HD can do with the signals available and the inputs/outputs selected;...
- Page 54 Note: The AJA Control Panel software uses the abbreviation “sf ” instead of “Psf ” when referring to “progressive segmented frame” formats. In the manual and in other literature you may see either of these acronyms used interchangeably. Visually it is easier to discern at a glance if you are working with progressively segmented frame formats (sf in the AJA Control Panel) as compared to progressive frame formats which will show only “p.”...
- Page 55 Note: The AJA Io HD is not a standards conversion device for conversions such as NTSC to PAL or vice versa. For Upconversion the following choices are available: Anamorphic: full-screen “stretched”...
-
Page 56: Input Tab Screen
Video Input—these pulldown menus (Source, SDI and Analog) allow you to see and change what's currently selected and the video format that Io HD has detected (if any). In the example shown, it shows that video is selected at the HDMI input and the format is 1080i with a frame rate of 29.97. - Page 57 Io HD Installation and Operation Manual — Using The AJA Control Panel Component (SMPTE/EBU N10) Component (Beta) Audio Input—this pulldown menu allows you to pick where the audio comes from. Io HD supports 2 unbalanced analog audio channels (RCA), 4 balanced analog audio channels (XLR), 8 channels of HDMI embedded audio, 8 channels of AES via BNC, or 8 channels of SDI embedded audio.
- Page 58 Primary format and the other output may be the Secondary format. If an input/ output has no video, it will be indicated on the block diagram (“No Video”). AJA Control Panel, SDI Output Tab SDI Output Tab Screen Settings Separate information panes will be listed (as applicable) for SDI Outputs 1 and 2.
- Page 59 Io HD Installation and Operation Manual — Using The AJA Control Panel HDMI Tab Screen The Io HD’s HDMI input and output are shown and configured at this tab screen. The HDMI input pane shows if an HDMI input source has been detected and locked on, showing the format found.
-
Page 60: Analog Out Tab Screen
Analog Out Tab Io HD provides a high-quality analog component or composite + Y/C output, generally used for monitoring. This screen shows the current settings for that analog Screen output, and allows you to re-configure it when desired (format). Radio buttons allow you to select primary or secondary format—which could enable up/down/... -
Page 61: Setup Tab Screen
1080 material (Progressive checkbox). Note: If a prompt occurs in Final Cut Pro stating that the AJA output device is missing, this simply may be due to the Active Video Filter for a given parameter being unchecked for the format being selected in the application. - Page 62 AJA Control Panel, Audio Setup Tab Audio Setup Tab Screen Settings Lock Audio Gain To Unity—when set, the Io HD will ignore the Final Cut Pro gain setting and set the audio gain at unity. Not setting this checkbox tells the Io HD to get the audio gain setting from Final Cut Pro.
- Page 63 Io HD Installation and Operation Manual — Using The AJA Control Panel Audio Delay—Audio can be offset or delayed for certain capture or monitoring situations where this would be desirable. Audio Delay sliders controlling input and output values are provided.
- Page 64 Conversion This screen offers a variety of controls that determine how the Io HD behaves under Final Cut Pro. Tab Screen AJA Control Panel, Codec Tab Conversion Tab Screen Settings Pause On—these two choices determine what happens when Final Cut Pro is paused in stop mode: Full Frame: both fields are displayed resulting in some jitter while paused.
-
Page 65: Timecode Tab Screen
Io HD Installation and Operation Manual — Using The AJA Control Panel Timecode Tab The timecode screen is used for both monitoring the RP-188 timecode embedded in the digital data stream and for selecting a timecode offset on output (if desired). - Page 66 User Bits—for monitoring variable frame rate (VFR) timecode (for example, Varicam), you may wish to monitor the user bits embedded in the timecode. If you set this checkbox, Io HD will detect and interpret the user bits and display them next to the checkbox.
-
Page 67: Timelapse Tab Screen
Io HD Installation and Operation Manual — Using The AJA Control Panel Timelapse Tab This Tabbed screen is used for the Io HD timelapse feature. To use the timelapse capability, choose the "Enable Timelapse Capture" checkbox. This functionality is Screen enabled for all QuickTime capture applications (Final Cut Pro, VTR Xchange, etc.) - Page 68 Stand Alone Mode until is again connected to a Mac via FireWire. Note: The AJA Io HD can also be used as a converter device while it is connected to a Mac if the Default Video Output in the Control tab of the Control Panel...
-
Page 69: Info Tab Screen
Io HD LED Display—this pulldown menu configures what the front panel display on the Io HD will display. The default is to show Primary and Secondary formats as currently selected. Alternately, you can select to show the Primary format on the top line of the display and the currently configured timecode on the second line. -
Page 70: Saving Your Control Panel Presets
1. QuickTime Application 2. AJA Control Panel By “Master”, we mean a process that can control and change what the Io HD is doing and the Primary and Secondary formats that it uses (as set in the Control Panel “Formats” tab screen). -
Page 71: Quicktime Application-1St Priority
AJA Control Panel application (which typically happens), you won't be able to see the “Io HD is in use by Final Cut Pro” message displayed in the Control Panel, or be able to tell which format FCP has selected. (This is why we recommend you arrange your display so you can see the Control Panel at all times.) -
Page 72: Aja Control Panel-2Nd Priority
AJA Control Panel application, you will see an AJA product name, such as Io HD - 0 or Kona 3-0, if you have more than one product and the associated drivers installed (if only one product is installed, you’ll see no product or pulldown). -
Page 73: Easy Setups For Typical Uses
Easy Setups, from which you can choose typical system configurations. A large set of Easy Setups are supplied with Io HD and installed along with the Io HD software. These canned choices can be used directly or as the basis for making your own customized Easy Setups unique to your system. -
Page 74: Easy Setups Menu
Easy Setups Menu Both the Easy Setups menu item and the Audio/Video Settings menu item are located under the main Final Cut Pro menu. Click on the Easy Setups menu item and Final Cut Pro will present the Easy Setup dialog window: Easy Setup Dialog In the Easy Setup dialog, the Format, Rate and the currently selected Easy Setup in... -
Page 75: Easy Setups For Use With Io Hd
Io HD may playback become available. In addition to this, there are additional easy setups available on your Io HD Software CD and on the AJA website. Your list may differ as AJA is continually improving and adding functionality. -
Page 76: Audio/Video Settings Menu
Note: The AJA Io HD was specifically designed to work with the Apple ProRes 422 and ProRes 422 HQ codecs via its internal hardware. Other HD codecs can only be used with the AJA Io HD via software encoding/decoding. The AJA Io HD can be used to capture to DVCProHD compression when used in combination with the MacPro series of Apple desktop computers;... -
Page 77: To Create A New Easy Setup
Io HD Installation and Operation Manual — Easy Setups for Typical Uses Audio/Video Settings, Summary Window To Create A New Easy Setup If you have a group of presets that you’d like to use continually, then you can create a... - Page 78 Audio/Video Settings, Creating a New Easy Setup At any point in the above procedure you can go to the other tabbed windows and make additional changes. For example, in the Sequence Presets, Capture Presets, and Device Control Presets windows you can select a preset and click on an Edit button to change specific aspects of the preset.
-
Page 79: The Sequence Presets Window
Io HD Installation and Operation Manual — Easy Setups for Typical Uses The Sequence Presets Window Audio/Video Settings, Sequence Presets Window This window allows you to select an editing timebase for the current sequence. Once you add a clip to the sequence this cannot be changed. By clicking in the leftmost column (see the checkmark in the sample screen above), you select a new Sequence Preset for use. - Page 80 Factory AJA presets are easily identified by “AJA” at the beginning of their name. Since Capture Presets will be used frequently as you bring media into Io HD, we’ll discuss the edit screen next.
- Page 81 8-bit or 10-bit uncompressed video as it comes into Io HD. The Input pull-down selects the primary format Io HD will use to capture input video. The Compressor pull-down selects a codec that tells Final Cut how to process the video;...
- Page 82 AJA Control Panel application. The Rate pull-down selects a sample rate; it should always be set to 48 kHz for Io HD. By clicking on the Advanced button, a new screen will be displayed where you can select between 8- and 16-bit sampling-AJA recommends 16-bit for optimum sound quality.
- Page 83 Primary format for the Io HD board during playback. The Video Options button is greyed out for Io HD (use the AJA Control Panel for video configuration; the Options button opens a second dialog where Final Cut gives...
-
Page 84: Checking The System With A Simple Test Project Of Bars And Tone
You may wish to use a different Io HD output for final Print-to-tape from Final Cut. You can select that in this window by clicking the checkbox “Different Output for Edit to Tape/Print to Video.” This allows you to select via a pull-down menu any Io HD video output and audio output. - Page 85 Io HD Installation and Operation Manual — Checking the System with a Simple If you don’t see bars on the external video monitor and hear tone, check your connections and ensure Io HD is selected in the Easy Setups and Audio/Video Settings as necessary.
- Page 86 Bars and Tone In Sequence Window Click “Play” to Test the System Sequence Window Showing Bars and Tone Clip Dragged from Viewer If everything works properly, go ahead and try capturing audio and video media from your VTR.
-
Page 87: Chapter 6: Troubleshooting
Chapter 6: Troubleshooting If You Run Into Problems One useful way to find the source of problems is to isolate your system to the smallest size where the problem still occurs and then note all the symptoms. This serves to eliminate areas not involved in the problem and make finding the problem easier. - Page 88 VIDEO LED will light to show an input is selected. Look at the alphanumeric display and check that it is correctly showing what you were expecting as the input. Check the settings in the Input tab of the Io HD Control Panel application. Changes made to Final Cut’s Under some circumstances, Final Cut Pro may need configuration aren’t remembered or you...
-
Page 89: Updating Software
If the problem is a Final Cut Pro operational issue, Mac system issue, or Xserve RAID issue, then call Apple Customer Support for help. If the problem is an AJA Video Io HD issue, then contact AJA Video Customer Support using one of the methods listed below: Contacting by Mail Address: 180 Litton Drive, Grass Valley, CA. -
Page 91: Video Input
Appendix A: Specifications Video Input Digital: SD and HD-SDI, SMPTE-259/292/296 (2 inputs) HDMI Analog: Composite/S-Video (Y/C): NTSC, NTSCJ, PAL 12 bit A/D, 2x oversampling 3 line adaptive comb filter decoding SD Component: SMPTE/EBU N10, Betacam 525 line, Betacam 525J, RGB 12 bit A/D, 2x oversampling HD Component: YPbPr... -
Page 92: Audio Output
Audio Output Digital: 24-bit SDI embedded audio, 8 channel, 48kHz 24-bit AES audio, 8 channel, 48kHz HDMI embedded, 8 channel Analog: 24-bit D/A, 4 channel balanced XLR, 48kHz +15/18/24 dbu Full Scale Digital 2 channel unbalanced RCA (for monitoring) Timecode LTC timecode input and output via BNC Reference Input Analog Color Black, Composite Sync, or Tri-level Sync Terminated Input, buffered output... - Page 93 Io HD Installation and Operation Manual — Hardware Cross-conversion, 10-bit Hardware Cross-conversion, 10-bit Hardware 10-bit 1080i to 720P 720P to 1080i 720P to 1080PsF SD to SD Aspect Ratio Conversion Letterbox: transforms SD anamorphic to a letterboxed image. H Crop: produces a horizontally stretched effect on the image; transforms anamorphic SD to full frame.
- Page 95 Appendix B: Safety & Compliance Federal Communications Commission (FCC) Compliance Notices Class A This equipment has been tested and found to comply with the limits for a Class A digital device, pursuant to Part 15, Subpart B of the FCC Rules. These limits are designed to provide Interference reasonable protection against harmful interference in a commericial installation.
- Page 96 European Union and European Free Trade Association (EFTA) Regulatory Compliance This equipment may be operated in the countries that comprise the member countries of the European Union and the European Free Trade Association. These countries, listed in the following paragraph, are referred to as The European Community throughout this document: AUSTRIA, BELGIUM, BULGARIA, CYPRUS, CZECH REPUBLIC, DENMARK, ESTONIA, FINLAND, FRANCE, GERMANY, GREECE, HUNGARY, IRELAND, ITALY, LATVIA, LITHUANIA, LUXEMBOURG,...
- Page 97 Safety and Compliance — Korea KCC Compliance Statement Korea KCC Compliance Statement Taiwan Compliance Statement This is a Class A product based on the standard of the Bureau of Standards, Metrology and Inspection (BSMI) CNS 13438, Class A. Japanese Compliance Statement 1.
- Page 98 Before operating your Io HD unit, please read the instructions in this document Warning! Read and follow all warning notices and instructions marked on the product or included in the documentation. Avertissement ! Lisez et conformez-vous à tous les avis et instructions d'avertissement indiqués sur le produit ou dans la documentation.
- Page 99 Safety and Compliance — Before operating your Io HD unit, please read the ¡Advertencia! No instale cerca de fuentes de calor tales como radiadores, registros de calor, estufas u otros aparatos (incluidos amplificadores) que generan calor. Aviso! Não instale perto de nenhuma fonte de calor tal como radiadores, saídas de calor, fogões ou outros aparelhos (incluindo amplificadores) que produzam calor.
- Page 100 Attenzione! Questo dispositivo è un prodotto di Classe A. Il funzionamento di questo apparecchio in aree residenziali potrebbe causare interferenze dannose, nel cui caso agli utenti verrà richiesto di adottare tutte le misure necessarie per porre rimedio alle interferenze a proprie spese. Warning! Disconnect the external AC power supply line cord(s) from the mains power before moving the unit.
- Page 101 Safety and Compliance — Before operating your Io HD unit, please read the sécurité. Si la prise fournie ne s'insère pas dans votre prise femelle, consultez un électricien pour le remplacement de la prise femelle obsolète. Warnung! Der Sicherheitszweck des gepolten bzw. Schukosteckers ist zu berücksichtigen. Ein gepolter Stecker verfügt über zwei Pole, von denen einer breiter als der andere ist.
- Page 102 Betrieb vorgenommen. ¡Advertencia! No abra el chasis. El interior no contiene piezas reparables por el usuario. El abrir el chasis anulará la garantía a menos que se lo haga en un centro de servicio AJA o en un local autorizado.
- Page 103 AJA-Servicecenter oder AJA-Händler ausgetauscht werden kann. Entfernen Sie das AC- Netzkabel, um die Stromzufuhr zur Einheit zu trennen. ¡Advertencia! La carcasa del Io HD no contiene piezas reparables por el usuario. El sistema de circuitos está protegido por un fusible interno; sin embargo, dicho sistema puede ser reemplazado por centros de servicio AJA y distribuidores AJA.
- Page 104 B-10...
- Page 105 Io HD Installation and Operation Manual — Index Index Symbols Apple's FireWire technology 33 .pkg 25 Appletalk 31 Numerics aspect ratio 67 10-bit video 34 aspect ratio conversion 44 Aspect Ratio value 69 9 screen 44 audio 13 24 frames-per-second to 30 conversion 55...
- Page 106 Connectors 12, 13 Easy Setup, creating an 65 Contents 24 Easy Setups 61 Control Panel 35 Easy Setups For Use With Io HD 62 Control Panel Basics 36 Easy Setups Menu 61 Control Panel Presets 58 editing timebase 67 Control Panel, importance of keeping visible 60...
- Page 107 Io HD Installation and Operation Manual — Index full-screen 44 letterbox 44 Lock Input Audio Gain To Unity 53 Genlock 50 Log On Authenticate Prompt 25 Genlock and Your System 29 longintudinal timecode 13 Genlock/Reference Video 13 LTC 13, 71...
- Page 108 Power cord 4 Settings 61 power switch 11 Setup 52 Pre-roll 71 Setup Screen 52 Present 11 Setup Screen Settings 53 Presets 58 Shipping Box Contents 4 presets 61 sidebars 44 Presets, Control Panel 58 Simple Test Project 72 Primary 46 Single Field 55 Print-to-tape 72 SMPTE protocol 16...
- Page 109 Io HD Installation and Operation Manual — Index Timing adjustment, Control Panel 52 transforming 44 Zoom 14 troubleshooting 75 9 44 typical system interconnections 30 Zoom Letterbox 44 Typical Workflows 18 Zoom Wide 44 unbalanced audio 14 Uncompressed 10-bit 20...
Need help?
Do you have a question about the io hd and is the answer not in the manual?
Questions and answers