Table of Contents
Advertisement
Advertisement
Table of Contents

Summary of Contents for Mic AV8
- Page 1 Android Naviceiver for Volkswagen/Seat/Skoda - 1 -...
-
Page 2: Table Of Contents
Operation Manual Content Content......................................2 Foreword......................................2 Instructions...................................... 3 Safety Attention....................................3 Copyright Information..................................5 Product components graphic................................5 Parameter......................................7 Packing list....................................... 7 Wiring Diagram(Volkswagen to GOLF 6 platform ).........................9 Wiring Diagram (Volkswagen MQB new cars from GOLF 7 platform)..................10 Front Panel.....................................11 HOME...................................... -
Page 3: Instructions
For your convenience, please read the user manual carefully before use this product, in order to fully understand and master functions and features of products, and keep this user manual for future reference. Instructions This user manual as a product guidance only, does not mean hardware and software configuration description of products, product and accessories may vary by regions. - Page 4 Do not replace the power fuse or use inappropriate fuse without the guidance of professional, or else it may cause damage to this product or trigger fire alarm. For fear of violating traffic regulation, drivers are for bidden to watch program and operate this product to avoid traffic accident.
-
Page 5: Copyright Information
Notice: Defects caused by abnormal use are not covered by the manufacturer's warranty. Copyright Information This product software programs are owned by M.I.C. GmbH. Please do not copy, modify, in any form and map data transfer software. Product components graphic Note: The following product component diagram for reference only, real product design in kind shall prevail. - Page 6 Back-panel connection for VW Universal: Accessories for VW Universal: - 6 -...
-
Page 7: Parameter
Parameter Operating Voltage: 9V-16V DC Maximum operating current: <11A @14.5V Standby operating current: 6MA Operating Temperature: -25℃~+65℃ Storage Temperature: -40℃~+80℃ Relative Humidity: 5%~95%(No frost) Location mode: GPS Location accuracy: ≤15M Positioning precision of speed: ≤0.1M/S Packing list ● Standard accessories Standard spec Quantity Main unit... - Page 8 ●Optional functions Optional Accessories Universal Camera TPMS 1set OBDⅡ DVB-T/DVB-T2 1set ISDB-T 1set Remark: if not order optional accessories, we will not pack into box - 8 -...
-
Page 9: Wiring Diagram(Volkswagen To Golf 6 Platform)
Wiring Diagram(Volkswagen to GOLF 6 platform) - 9 -... -
Page 10: Wiring Diagram (Volkswagen Mqb New Cars From Golf 7 Platform)
Wiring Diagram (Volkswagen MQB new cars from Golf 7 platform) - 10 -... -
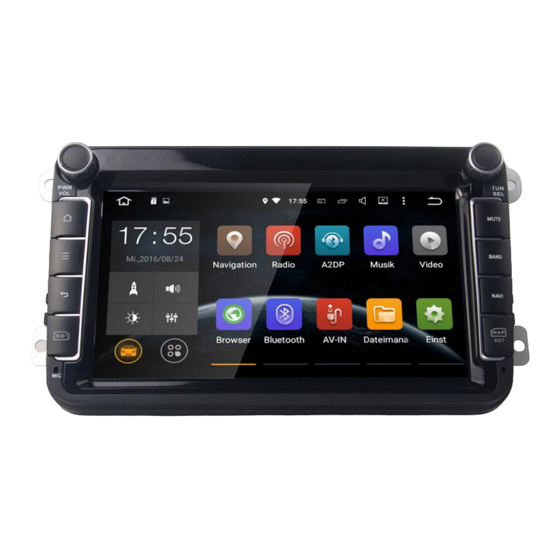
Page 11: Front Panel
Front Panel(AV8) 1. PWR: Power ON/OFF TUN: Tune(Change channels on the radio) VOL: Volume knob(Rotate the knob clockwise to SEL: Select(Rotate the knob clockwise to ① raise the sound;Instead, shift to decrease the select the previous song/video; Instead, shift to volume) select the next one). -
Page 12: Home
HOME When you turn on the player, it enters into HOME interface firstly. The interface can be slide left or right; click to return HOME interface; The APK icons would be added to or deleted from the HOME interface, as below. HOME(1) HOME(2) This product includes Navigation, Radio, Bluetooth, DVR, 3G, WiFi, Digital TV etc functions. -
Page 13: Radio
MENU(2) Radio Click to enter Radio mode, the radio has AM and FM waves ,it can be switched by click the switch button,as below. Short press to search forward 0.1m, and long press to previous radio station; Short press to search backward 0.1m, and long press to next radio station; (Remarks:for some models, there is TUNER knob on the front panel, you also can rotate it to search frequency.) Short press to search for radio stations automatically from low frequency to high frequency;... -
Page 14: Bluetooth
In FM band, press it to turn on or turn off stereo effect; FM radio signal is stronger at the center of the city,usually receive in stereo way, however, in the remote area, the radio signal is not stable, usually switch to mono mode to improve the effect to radio. - Page 15 Bluetooth Phone book call in call out missed call Bluetooth Pair Search for paired device(mobile) name Connect with searched paired device(mobile) name Disconnect selected Bluetooth pairing records Delete selected Bluetooth pairing records - 15 -...
-
Page 16: Music
Bluetooth Setting 1) Set up device name of Bluetooth 2) Set up password when connecting Bluetooth Music Click to enter music mode, as below; plays audio files from SD card or USB; supports WMA, MP3 etc. sound mode switch previous stop/play next playlist... -
Page 17: Video
Video Click to enter video play mode. It can support 1080P video play. Fullscreen button Loop playing Mode Previous chapter Play/Pause Stop Next chapter Video list AVIN Click to enter AV In mode. It supports displaying the video/image from external device, and also audio output, as below. -
Page 18: File Manage
File Manage Click to enter File manage mode.Click icon to select the files to remove, select the copy icon copy files, and the paste icon to paste; if you don’t need the file, press the delete icon to delete it. Car DVR (optional) Click to enter car DVR mode, as below. - Page 19 The video of car DVR are stored in TF card and most files are large, so please use at least 8GB TF card to record the video for long time automatically. The product can automatically detect the car DVR when it is connected vis USB interface. Click the icon to start recording video,the files can be stored automatically after stop recording.
- Page 20 click Sliding up and down to choose the storage location of device - 20 -...
-
Page 21: Browser
Browser After you connecting “hard driver”, “SD ”,“USB”,“photos”, “movie”and “Tool”,connect ,then Click“File Manager”,you will read the content . Click“Browser”Open“ Google”inter page,You can enter into different websites ,then web searching, read news,know the latest events,stock inquiries. GPS Navigation APK File Installation Setting Select the GPS Card slot path, then click the APK installation files to install the map, as the below picture: When you need use the navigation, you must click “SD”... - Page 22 Map install (e.g. Sygic) - 22 -...
-
Page 23: Tpms (Optional)
TPMS (optional) Click “TPMS” icon from Home menu, as below: Brief Introduction TPMS(Tire Pressure Monitoring System)continually measure air pressure and temperature of the tire as well as voltage of the sensor batteries, transmits these data to the receiver/DVD for presentation to the driver. - Page 24 Working environment Receiver Working temperature : -20℃~+70℃ Storage temperature : -20℃~+80℃ Working voltage: +12V TPMS sensor: Working temperature:-20℃~+85℃ Storage temperature: -20℃~+105℃ System installation (1)Receiver installation Correct installation Incorrect installation Incorrect installation Receiver installation instructions: Receiver must be 20cm away from large sources of interference such as in-car DVD, navigation, mobile TV.Data cable and receiver cannot be wound or put on DVD.
- Page 25 c. Screw LR sensor onto LR tire valve stem tightly d. Spin hexagon nut counterclockwise tightly by supplied spanner e. Make sure there is no air leak from stem. following the above step to install other sensors (3) Battery replacement Separate hexagon nut from sensors using supplied spanner.
-
Page 26: Obdⅱ(Optional)
e. Screw lid tightly onto sensor housing, return sensor onto tire valve and fix with hexagon nut. OBDⅡ(optional) OBDⅡis very good tool to monitor car condition. By Torque, it will display car RPM, speed, mile, oil etcs information, also get the compass, barometer, accelerometer etcs after it is connected to GPS via OBD2 Bluetooth;... - Page 27 Tips: 1. ELM327 is a tool to detect the state of engine based on the communication protocol of car PC. It will work if the protocol is supported, such as, detection of engine system, code reader, code clear, data stream etc; but, it is unable to provide a comprehensive list of available car models.
-
Page 28: Dab+(Optional)
DAB+(optional) Digital Audio Broadcasting is usually abbreviated to “DAB”; With CD sound quality, it can help you keep track of real-time traffic information, weather condition, and open-up of elevated ramp etc. Click Click install - 28 -... - Page 29 Click oem Click apk Click - 29 -...
- Page 30 Click SETTINGS Click Unknown sources - Allow instesllation of appS from unknown sources Click OK - 30 -...
- Page 31 Click Click NEXT - 31 -...
- Page 32 Click Install Installing Click - 32 -...
- Page 33 Click Access DAB mode Tips: The reception format of DAB varies around the world; maybe DAB abnormally works in your area. - 33 -...
-
Page 34: Photo
Photo Click to enter photo/gallery mode. Photos are from flash or SD/USB; Gallery can play photos, but also videos from SD/USB,as below. Steering Wheel Study Click to enter Steering wheel study mode, as below. It is appropriate for the original car steering wheel without canbus control. -
Page 35: Easy Connect (Mirror Link)
Easy Connect (Mirror link) Android USB: 1. Enter mobile settings---open “Developer Option”---turn on USB debugging; 2. Connect mobile to the device by USB cable; 3. Install mobile interconnection service; 4. Please keep mobile unlocked; 5. It will take a long time if mobile first connect; 6. - Page 36 - 36 -...
- Page 37 1. Wireless & network WiFi setting: Input wireless network name and password; the WIFI icon will appears at the top of status bar after the connection is successful. 3G setting: Plug the 3G dongle by USB cable, and input VPN information; the 3G icon will appears at the top of status bar after the connection is successful.
- Page 38 The player supports multi-language. You can choose different language and input method as you need. Backup and Reset: Backup the installation data, application data, other settings and account information to Google server.If the system problem happens, you can choose automatic reduction or restore the factory settings. 4.
- Page 39 1. Copy the two upgrade files to the root directory of the USB flash disk, and the USB flash disk must be in FAT32 format, other formats will upgrade fail. 2. Plug USB flask disk into USB connector of the DVD player. 3.
- Page 40 4. Click About device. 5.Click system updates。 6. Clik install Under Upgrading, please do not let it power off, and wait for 10 minutes 8. Upgrade complete, DVD player will Auto power on. - 40 -...
-
Page 41: Maintenance Instruction
Maintenance Instruction In rainy or very humid environment, steam condensation to water mist on dvd loader will make it failed to read DVD. Please turn off the DVD player till the inside moisture totally disperse, let it dry then turn on it and operate. -
Page 42: For Further Questions, Please Contact Us
SD cards can read in this system. Radio searching doesn't work Vehicle auto antenna Connect the auto antenna well disconnected For further questions, please contact us: M.I.C. GmbH Jinghai Chen Hans-Weigel-Straße 1A 04319 Leipzig Tel: 034158099135/36 Email: Info@mic-deutschland.de - 42 -...
Need help?
Do you have a question about the AV8 and is the answer not in the manual?
Questions and answers