Table of Contents
Advertisement
Advertisement
Table of Contents

Summary of Contents for ARTIST EDK260
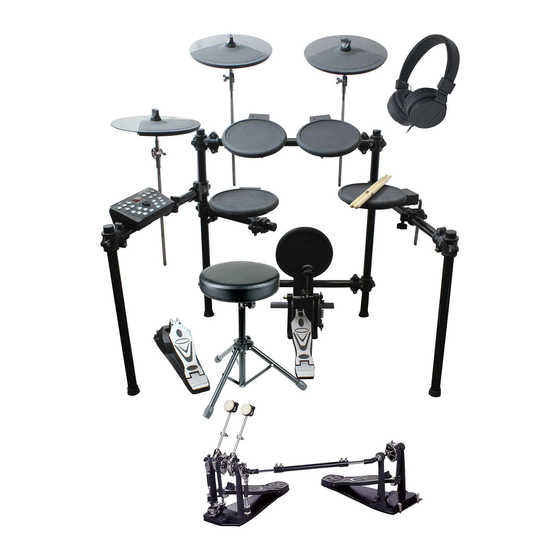
- Page 1 Artist EDK260 / EDK280 Electronic Drum Kit User manual V1.00...
-
Page 2: Table Of Contents
Contents Introduction........................................3 Features ..........................................4 Panel Control ........................................5 Front panel ....................................... 5 Rear panel ........................................7 Setting up the whole system....................................9 Setting up the Kick....................................10 Connecting the pads, the cymbals, the hi-hat pedal, and the kick......................… 11 Connecting the adapter, the headphone, the Amps, and others ......................12 Function.......................................... -
Page 3: Introduction
Introduction Thank you for purchasing the Artist Electronic Drum Kit. To help you get the most out of your new instrument, please read this manual carefully. -
Page 4: Features
Ride pad with rim trigger), 1 hi-hat control pedal, 1 kick trigger ● Voices: 260 voices (EDK260), 280 voices (EDK280) ● Drum kits: 20 preset kits, 10 user kits (EDK260), 20 user kits (EDK280) ● Demo: 20 demo for practise ●... -
Page 5: Panel Control
Panel Control Front panel: ① ⑥ ⑦ ⑧ ⑤ ④ ③ ⑩ ⑨ ② ○ ○ ○ ○ Display the information about the current menu ○ Control the volume of the device ○ Enter the voice menu ○ Enter or quit the memory status ○... - Page 6 ○ Enter the demo practice menu ○ Setup the parameters of the current pad ○ Adjust the parameters of current menu ○ Tempo increase/decrease ○ Those buttons match the drum pads ○ Turn the click on/off ○ Turn the demo practice on/off...
-
Page 7: Rear Panel
Rear panel: ○ ○ ○ ○ ○ ○ ○ ○ Power switch Switch turns the power on/off ○ DC adapter jack 9V DC ○ Headphone jack A pair of stereo headphones can be connected to this jack ○ MIDI OUT It can be connected with the external MIDI sound generator... - Page 8 ○ LINE IN Connect this to the external sound source ○ OUTPUT Jacks (L, MONO, R) Connect these to your amp or audio system. ○ TRIGGER INPUTS These inputs are to connect the pads, cymbals, kick, hi-hat control...
-
Page 9: Setting Up The Whole System
Setting up the whole system... -
Page 10: Setting Up The Kick
Setting up the Kick:... -
Page 11: Connecting The Pads, The Cymbals, The Hi-Hat Pedal And The Kick
Connecting the pads, the cymbals, the hi-hat pedal and the kick:... -
Page 12: Connecting The Adapter, The Headphone, The Amps, And Others
Connecting the adapter, headphone, amp and CD/MP3:... -
Page 13: Function
1.1 KIT: Press the KIT button to enter the kit menu. There are 20 preset kits and 10 user kits (EDK260) / 20 user kits (EDK280). Use the +/- button to choose the desired kit. The LED will display the current kit number. -
Page 14: Drum Sound
Press the DEMO PRACTISE button again to enter the DEMO VOLUME page. You can use the +/- button to change the DEMO volume. The two pages is in turn by pressing the DEMO PRACTISE button. 1.3 DRUM SOUND: Press the DRUM SOUND button to enter the DRUM SOUND menu page. There are 260 voices that can be chosen and assigned to the current pad. -
Page 15: Setup
1.4 SETUP: There are four menu pages in SETUP button, The first is the PAD SENSITIVITY page, you can adjust the pad sensitivity value by using the +/- button in this page. The second is the PAD RIM SENSITIVITY page, if the current PAD has rim, the rim sensitivity can be adjusted by using the +/- button. - Page 16 The fourth is the VELOCITY CURVE page, you can use the +/- button to choose the desired pad curve. The lower the number the easier it is to produce a more powerful stroke. The higher the number a harder stroke is required (the more sensitive the pad is to velocity).
-
Page 17: Memory
1.5 MEMORY: It has 20 memory slots to store user kit (10 for the EDK260) the +\- button be used to choose the memory area. To operate the Memory Function: 1. Load your preferred sounds for each pad 2. Press "MEMORY" (the dot will start flashing). -
Page 18: Tempo
1.7 TEMPO: Press the TEMPO+ to increase tempo of the DEMO or metronome. Press the TEMPO -/+ to adjust the tempo of the DEMO or metronome 1.8 DEMO MUTE: Press the ACCOMP button to activate or inactivate the demo mute function. When activating the demo mute, you will not hear the demo but it will continue to play internally. -
Page 19: Pad Head Shots And Rim Shots
1.10 PAD HEAD SHOTS AND RIM SHOTS: Head shot for all pads: Head shot Rim shot only for snare:... -
Page 20: Cymbal Bow Shots And Edge Shots
Rim shot 1.11 CYMBAL BOW SHOTS AND EDGE SHOTS: Bow shot for all cymbals Bow shot Edge shot only for crash & ride (EDK280 only) -
Page 21: Cymbal Choke
Edge shot 1.12 CYMBAL CHOKE: Squeezing the rim after striking the cymbal, the sound can be muted. -
Page 22: Factory Reset
FACTORY RESET To complete a factory reset of your drum module: 1. Turn the power off 2. Press and hold the + and – buttons on the front panel 3. Turn the power back on This will restore all settings to the factory settings. Caution: By doing this you will lose any saved preset drum kits. -
Page 23: Midi Implementation Chart
MIDI Implementation Chart Please note: This drum kit is designed to work only with GM (general Midi) Standard devices. Function Transmitted Recognized Remarks Basic Default 10ch × Channel : Changed × × Default MODE 3 × Mode : Messages × ×... -
Page 24: General Midi Drums-Note Assignments
General MIDI Drums-Note assignments MIDI Note Drum Sound MIDI Note Drum Sound MIDI Note Drum Sound Acoustic Bass Drum Chinese Cymbal Cabasa Bass Drum 1 Ride Bell Maracas Side Stick Tambourine Short Whistle Acoustic Snare Splash Cymbal Long Whistle Hand Clap Cowbel Short Guiro Electric Snare...
Need help?
Do you have a question about the EDK260 and is the answer not in the manual?
Questions and answers