Table of Contents
Advertisement
Rayocomp PS 10
Portable High-Performance Bio-Resonator
User Manual
Art.-Nr.: 9100EN
In spite of all the information, advice and suggestions for solving problems, this book cannot
replace a visit to an alternative practitioner or a doctor orientated to natural healing. Also,
we must point out that the classic orthodox medicine still does not accept or acknowledge
the interrelations presented in this manual.
Advertisement
Table of Contents

Related Manuals for Rayonex Rayocomp PS 10

Summary of Contents for Rayonex Rayocomp PS 10
-
Page 1: User Manual
Rayocomp PS 10 Portable High-Performance Bio-Resonator User Manual Art.-Nr.: 9100EN In spite of all the information, advice and suggestions for solving problems, this book cannot replace a visit to an alternative practitioner or a doctor orientated to natural healing. Also, we must point out that the classic orthodox medicine still does not accept or acknowledge the interrelations presented in this manual. -
Page 2: Table Of Contents
1. Contents Page 2 1. Contents 2. Conformity Declaration 3. Basics of the Rayocomp PS 10 3.1 Volume of Delivery 3.2 Technical Data 3.3 Safety Instructions as to Operation 3.4 Guarantee 3.5 Cleaning 3.6 Understanding the Device 3.6.1 Front View 3.6.2 Rear View... -
Page 3: Contents
4.7.2 Using the 10.0-Key 5. Appendix 5.1 Summary of the Integrated Test Programs 5.2 Summary of the Integrated Rayonex Programs 5.3 Summary of the Integrated Acupuncture Programs 64 5.4 Summary of the Integrated Special Programs 5.5 Summary of the Integrated Programs by Dr. Ulrich 5.7 Summary of the Modules for Integration... -
Page 4: Conformity Declaration
2. Conformity Declaration Page 4... -
Page 5: Basics Of The Rayocomp Ps
3. Basics of the Rayocomp PS 10 Page 5 Basics of the Rayocomp PS 10 3. 1 Volume of delivery The delivery volume consists of: 1. The RAYOCOMP PS 10 2. Integrated polariser 3. Integrated power pack 4. Battery charger 5. -
Page 6: Safety Instructions As To Operation
3.3 Safety Instructions as to Operation The Rayocomp PS 10 is charged with a direct current. The charging rate is 800mA. Please note that the Rayocomp PS 10 may only be used with a battery charger supplied by Rayonex. • Therefore, make sure that no humidity can penetrate the power pack (short-circuit risk). -
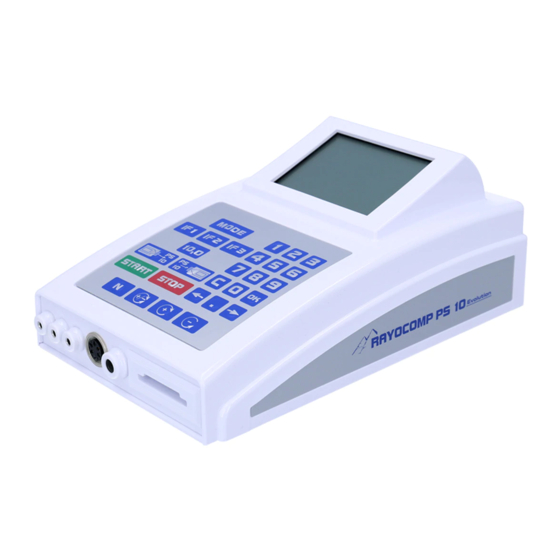
Page 7: Understanding The Device
In the chapters of this user manual, you will often find instructions referring to keys or segments of the Rayocomp PS 10. In the following, you can see pictures of the device accompanied by short descriptions in order to simplify the assignment. -
Page 8: Rear View
3.6.2 Rear View Page 8 3.6.2 Rear View Rear view of the Rayocomp PS 10 Caption: 1: ON-OFF switch 2: Charging socket 3: Charging plug which is inserted in the charging socket for the charging process 4: Interface for program updates... -
Page 9: Keyboard
3.6.3 Keyboard Page 9 3.6.3 Keyboard Keyboard of the Rayocomp PS 10 Caption: 1: Mode key for selecting the menu item 2: IF1 – IF3 keys for determining frequently used fundamental frequency values 3: 10.0 key for the rapid access to this special value and for activating the M10 test protocol. -
Page 10: Display
Display of the Rayocomp PS 10 Caption: 1/2: Numbering the modules. All in all, the Rayocomp PS 10 is intended for the activation of 12 different modules. If you select the menu item “Info” the modules already activated in the device are displayed. -
Page 11: User Manual
4. User Manual Page 11 4. User Manual 4.1 General Directions for Operation 4.1.1 Literature Relating to the Bio-Resonance According to Paul Schmidt It cannot be the ambition of a user manual to explain all facets and possibilities of a method within such a complex area as bio-resonance as developed by Paul Schmidt. -
Page 12: Charging The Integrated Power Pack
The Rayocomp PS 10 posseses an integrated battery pack to enable the application of the device without needing to connect it to the mains supply. As a matter of principle, the Rayocomp PS 10 should never be used while it is still being charged. -
Page 13: Switching The Device On And Off
4.1.3 Switching the Device On and Off Page 13 4.1.3 Switching the Device On and Off On the rear wall of the Rayocomp PS 10, you will find the switch for switching the device on and off. When switching on, please make sure that memory... -
Page 14: Selecting The Menu With The Mode Key
Page 14 4.1.4 Selecting the Menu with the Mode Key The Rayocomp PS 10 has a selection of menu items. Every menu item provides certain application possibilities. Therefore, partitioning into single menu items serves as a means for simplifying operation. The following menu items are available: 1. - Page 15 4.1.4 Selecting the Menu with the Mode Key Page 15 When the Rayocomp PS 10 is switched on, the display of the device shows the menu item “Direct”: Now press the key: The Rayocomp PS 10 changes over to menu item “F1-BnPS“...
- Page 16 4.1.4 Selecting the Menu with the Mode Key Page 16 After having pressed again, the Rayocomp PS 10 changes to the menu item “Test” and shows on the display: If the module 10 is activated, the menu item “Test RAH” will be shown on the display after the menu item “Test-BnPS”.
- Page 17 4.1.4 Selecting the Menu with the Mode Key Page 17 The Rayocomp PS 10 changes to the menu item “Setup” and shows on the display: Once again, press the key: The Rayocomp PS 10 changes over to the menu item “Info“ and displays:...
-
Page 18: Operating The Integrated Polariser And Sensor
Page 18 4.1.5 Operating the Integrated Polariser and Sensor Just like the Rayocomp PS 1000 polar, the Rayocomp PS 10 has an integrated polariser to improve comfortable operation. The functions of the integrated polariser can be activated in two different ways, with the keyboard or the sensor. - Page 19 4.1.5 Operating the Integrated Polariser and Sensor Page 19 However, the functions of the polariser can also be set to the sensor directly while testing. Moving the sensor button in direction of the connection cable backward, the current polarisation of the frequencies is altered. In the following, you will find a summary of the sensor functions (green): Wire spring Storing a resonance...
-
Page 20: Basic Information For Rah 'Green Card
, store the tested programmes of the Rayocomp PS 1000 polar on an RAH ‘Green Card’ and to give the RAH ‘Green Card’ to the patient for his home therapy with the Rayocomp PS 10. Both devices work together hand in hand. -
Page 21: Error Display
Page 21 4.1.7 Error Display Operation of the Rayocomp PS 10 is very simple indeed. Still, you may accidently press a button which has no function for this particular part of the program. In this case, the user will receive an acoustic signal. -
Page 22: Menu Item "Direct
Now set the fundamental frequency value 56.00 (example) in the menu item “Direct” to the Rayocomp PS 10. The polariser integrated in the device is set to N. Test with the sensor to find out whether you achieve a rotation (left or right motion) or a linear movement. -
Page 23: Setting Up Individual Fundamental Frequency Values
4.2.2 Setting Up Individual Fundamental Frequency Values The menu item “Direct“ provides the Rayocomp PS 10 with the functions of the former Rayometer. But now, with the new Rayocomp PS 10, it is no longer necessary to adjust the fundamental frequency value manually. You simply enter the value with the help of the keyboard and confirm with the OK-key. -
Page 24: Automatic Programme Sequence By Using A Rah 'Green Card
4.2.3 Automatic programme sequence when using an RAH ‘Green Card’ Page 24 4.2.3 Automatic programme sequence by using a RAH ‘Green Card’ In chapter 4.1.6, the advantages of an RAH ‘Green Card’ have already been described. Under the menu item “Direct”, an RAH ‘Green Card’, stored with frequency values or RAH-programmes, can be used for an automatic harmonising sequence. -
Page 25: Menu Item "F1
Sure enough you can use the classical therapy programs of the bio-resonance according to Paul Schmidt with the Rayocomp PS 10 devices, but now we have a brand new addition – the harmonising programs of the new Rayonex Analysis and Harmonising System (RAH) in the menu item F1. -
Page 26: Composing And Harmonising Various Harmonising Programs
The set-up “deleting double values” is also valid for double RAH programmes. • Please regard: The harmonising program groups listed above must be enabled, in other words, the corresponding modules must be activated in the Rayocomp PS 10. More information is available in chapter 4.7. - Page 27 77. After this, the Rayocomp PS 10 is ready for the entry of the next harmonising program, in this example it is the program 1.52. Press the following keys:...
- Page 28 Now that the two desired harmonising programs have been entered, please press the key and you can enter the harmonising time. The Rayocomp PS 10 suggests a standard of 30 seconds. But the time can also be altered individually. for example, if you want to harmonise each fundamental frequency value for one minute and thirty seconds, you only have to enter 01:30.
-
Page 29: Loading Fundamental Frequency Values From Memory Cards And Harmonising
To do so, select the menu item “F1“ with the key The display shows: Now insert the memory card in the Rayocomp PS 10 and press the following key: The Rayocomp PS 10 can now read the values stored on the memory card and harmonise with them. -
Page 30: Utilising The Harmonising Programs Of The New Rah
4.3.5 Utilising the Harmonising Programs of the new RAH Page 30 4.3.5 Utilising the Harmonising Programs of the new Rayonex Analysis and Harmonising System (RAH) An example illustrates the use of the RAH module. We chose the programs “Vitalisation, complete” and “Upper respiratory system” for our example. - Page 31 4.3.5 Utilising the Harmonising Programs of the new RAH Page 31 The illustration below shows the display of the input mask. The program number is entered here The PS 10 is waiting for the entry of a program number now. We choose the programs “Vitalisation, complete”...
- Page 32 4.3.5 Utilising the Harmonising Programs of the new RAH Page 32 If the time is lengthened to 15 minutes, for instance, the display will change as follows: Harmonisation of the first program will now take 15 minutes. The total harmonisation time will also be 15 minutes because only one program has been selected so far.
- Page 33 4.3.5 Utilising the Harmonising Programs of the new RAH Page 33 If you intend to harmonise program 70.16 for 15 minutes, too, confirm by pressing the OK button. Now that all programs have been selected, harmonising can commence. Harmonising begins as soon as you have actuated the start button. This triggers the first program.
- Page 34 Testing a RAH Harmonising Program with the Rayotensor The harmonising programs of the Rayocomp PS 10 cannot be applied for harmonising alone, you can also use them for testing. Simply select a harmonising program as described at the beginning and press the start button.
-
Page 35: Menu Item "Test
Alternatively the values can be be stored on a memory card with the following key The Rayocomp PS 10 allows access to several of these fundamental frequency value compilations, to be explained in the following. Select the menu item “Test-BnPS“ with the following key The display shows: Just like the menu item “F1”, “test”... - Page 36 The test programs 04 to 11 are special compilations of fundamental frequency values. You can use them if module 6, test programs, is activated in your Rayocomp PS 10. Important information: The fundamental frequency values tested with resonance can be saved...
-
Page 37: Testing Range Values
0.00, you start testing whether this fundamental frequency value is required for regulation. If this is the case, it is stored in the Rayocomp PS 10. Carry on by testing the fundamental frequency value 0.50, then 1.00 and so After the test, precisely those resonance values necessary for regulating the organism of the patient have been determined. -
Page 38: Testing With Memory Card Values
Select the menu item “Test“ with the key Now insert the memory card and, according to the table (Chapter 4.4), enter the number 02. The Rayocomp PS 10 reads in the values from the memory card and changes over to the test mode as described before. -
Page 39: Testing With Integrated Test Programs
Then enter the number 04 and confirm your entry with the OK key. You will receive the six most important fundamental frequency values for testing electro-magnetic pollution. Of course, the test programs 04 to 10 can only be used if the corresponding module 6 (compare chapter 5.7) is activated in your Rayocomp PS 10. -
Page 40: Rah-Module 10: Level Test
4.4.5 RAH Module 10: Level test Basics for the RAH Module M10 For the Rayocomp PS 10, the module M10 is the most effective module, which has, in addition to the module M9, numerous test functions. The module M10 offers test protocols. With these protocols, all necessary RAH- programme numbers can be provided for the user’s test at the push of a... - Page 41 (fig. 5) of 45 programmes of the highest level. For the test, the polariser of the Rayocomp PS 10 is automatically switched on N (fig. 3). There are currently no programmes selcted, that have to be harmonised, visible under fig. 4.
- Page 42 (fig. 5) of 3 programmes of the second level. For the test, the polariser of the Rayocomp PS 10 is automatically switched on N (fig. 3). There are currently no programmes selected, that have to be harmonised, visible under fig. 4.
- Page 43 04.00. The whole structure of the RAH- programmes can be analysed with the Rayocomp PS 10 as described in this chapter and – in case there is any need for harmonisation – can be stored. You can either first choose a main level, or start right in the middle.
-
Page 44: Rah Module 10: Test With Integrated Test Protocols
4.4.6 RAH Module 10: Test with integrated test protocols Page 44 4.4.6 RAH Module 10: Test with integrated test protocols The idea of the test protocols was born in the “Heilpraktikerschule der Paul- Schmidt-Akademie”. There, you can learn among other things, which organ structures and regulation ranges you have to consider regarding the respective disease. -
Page 45: Rah Module 10: Test With The Rah 'Green-Card
4.4.7 RAH Module 10: Test with the RAH ‘Green Card’ In the module 10 of the Rayocomp PS 10 it is not only possible to harmonise the RAH-programmes stored on a RAH ‘Green Card’, but also to test them. As an example, the RAH-programmes, that were selected in the last testing and stored on the RAH ‘Green Card’, could now be checked again. -
Page 46: Important Tips And Tricks For Testing With The Rah Module 10
4.4.8 Important tips and tricks for testing with the RAH Module 10 Page 46 4.4.8 Important tips and tricks for testing with the RAH Module 10 The following listed handling advices, tips and tricks are valid for the level test (chapter 4.4.5), the test with integrated test protocols (chapter 4.4.6) and the test with the RAH ‘Green Card’... - Page 47 4.4.8 Important tips and tricks for the test with the RAH Module 10 Page 47 3. Directly Altering the harmonisation time regarding a stored resonance value After storing a resonance value, it is always possible to give it an individual harmonisation time directly.
- Page 48 4.4.8 Important tips and tricks for the test with the RAH Module 10 Page 48 5. Storing the necessary RAH-programmes on a RAH ‘Green Card’ During the RAH testing, all necessary RAH-programmes and their harmonisation times can be stored on an RAH ‘Green Card’ at any time – most reasonably at the end of the testing.
-
Page 49: Menu Item "Setup
Page 49 4.5 Menu Item “Setup“ The menu item “Setup” was designed to adapt the Rayocomp PS 10 to your individual intentions by means of presettings. Available besides the alteration of presets are test functions and important and useful functions in connection with memory cards. -
Page 50: Set-Up Of Background Illumination
4.5.1 Set-Up of Background Illumination Setup Number: 10 For reasons of improved legibility, the display of the Rayocomp PS 10 was provided with background illumination. Because of this feature, the display remains perfectly visible, even if the light is dim. You can select one of three different types of background illuminations. -
Page 51: Adjusting The Attention Sound (Beep)
4.5.3 Adjusting the Attention Sound (Beep) Setup Number: 12 The Rayocomp PS 10 has been equipped with an acoustic signal. This may signalise the use of a wrong key or confirm an entry. The Rayocomp PS 10 has three different error messages or acoustic signals: 1. -
Page 52: Frequency Values
As soon as this has been confirmed with the OK-key, the step length can be pre-set, perhaps to a smaller value of 0.25. As always, the step length is confirmed with the OK-key. Here is the standard setup of the Rayocomp PS 10 on delivery: Initial value: 00.00 Final value: 99.99... -
Page 53: Activating And Deactivating Modules
Setup Number: 20 At present, a total of ten modules can be activated or deactivated, respectively, in the Rayocomp PS 10. If, for example, the harmonising programs of the acupuncture oscillation therapy are not activated on your device yet, you can use them immediately after activating them with an enabling code. -
Page 54: Storing Fundamental Frequency Values On Memory Cards
4.5.7 Storing Fundamental Frequency Values on Memory Cards Setup Number: 30 A great advantage for anyone working with the Rayocomp PS 10 is the use of memory cards. They allow you to store individual frequency compilations which can be used for testing in the menu “Test” or for harmonising in the “F1-BnPS”... -
Page 55: Displaying Memory Card Information
4.5.8 Displaying Memory Card Information Page 55 4.5.8 Displaying Memory Card Information Setup Number: 40 This setup can help you if you have an unknown memory card and have no idea how many values are stored on it, what kind of a memory card it is and so on. -
Page 56: Providing Read-Protection For A Memory Card
Please insert the memory card intended for write protection in your Rayocomp PS 10. On entering the setup number 42, the display will either show 0 (card is not write-protected) or 1 if the card already has write protection. -
Page 57: Deleting A Memory Card Completely
Please insert the memory card you want to delete in your Rayocomp PS 10. Enter the setup number 43 and wait until a 0 is displayed. For safety reasons, you must enter a 1 at this stage and confirm with the OK-key. -
Page 58: Motor Test Run Of The Frequency Module
After you have entered the setup number 50 and confirmed your entry with the OK-key, the Rayocomp PS 10 starts a trial run. You can read the progress of the trial run from your display. At the end, the device should display the... -
Page 59: Menu Item "Info
Caption: 1. At present the Rayocomp PS 10 has ten modules. You may recognise which of the modules are activated in the device by verifying whether a checkmark is shown following the number (1 to 10). Here is a list of the... - Page 60 Rayonex maintains a database with all the information concerning the device, i.e. the activated modules, the previous service date etc. If you are thinking of enabling a module in the Rayocomp PS 10, you can call us and tell us your serial number to receive an enabling code. After entering this code, you can utilise the module immediately.
-
Page 61: Special Function Keys
4.8 Special Function Keys Page 61 4.8 Special Function Keys The Rayocomp PS 10 has a total of four special keys equipped with certain functions. Important: These four keys can only be operated in the menu “Direct”. Caption: 1: three IF-keys, IF1, IF2 and IF3 2. -
Page 62: Appendix
5. Appendix Page 62 5. Appendix 5.1 Summary of the Integrated Test Programs Display Program name P 01 Testing with range values P 02 Test with memory card values P 03 Test with integrated programs P 04 Electro-magnetic pollution test P 05 Geopathy test P 06... -
Page 63: Summary Of The Integrated Rayonex Programs
5.2 Summary of the Integrated Rayonex Programs Page 63 5.2 Summary of the Integrated Rayonex Programs Display Program name P 1.01 Cerebellum P 1.02 Nerves P 1.03 Arteries P 1.04 Veins P 1.05 Cell components P 1.06 Hair P 1.07 Skin P 1.08... -
Page 64: Summary Of The Integrated Acupuncture Programs
5.3 Summary of the Integrated Acupuncture Programs Page 64 5.3 Summary of the Integrated Acupuncture Programs Display Program name P 2.01 Lung channel P 2.02 Colon channel P 2.03 Stomach channel P 2.04 Spleen channel P 2.05 Heart channel P 2.06 Channel of the small Intestines P 2.07 Bladder channel... -
Page 65: Summary Of The Integrated Special Programs
5.4 Summary of the Integrated Special Programs Page 65 5.4 Summary of the Integrated Special Programs Display Program name P 3.01 Check-up P 3.02 Scar interference suppression P 3.03 Bacteria / viruses P 3.04 Parasites P 3.05 Global screen system P 3.06 Water veins P 3.07... -
Page 66: Summary Of The Integrated Programs By Dr. Ulrich
5.5 Summary of the Integrated Programs by Dr. Ulrich Page 66 5.5 Summary of the Integrated Programs by Dr. Ulrich Anzeige Programmname P 4.01 Allergy program P 4.02 Stress program P 4.03 Ozone protection program P 4.04 Learning program P 4.05 Fungal program P 4.06 P 4.07... -
Page 67: Summary Of The Modules For Integration
14 Acupuncture oscillation therapy 2040 22 Programs according to Dr. Ulrich 2050 9 special programs 2070 11 Test programs Rayonex Analysis and Harmonising programme 2080 (RAH), Module 8 Rayonex Analysis and Harmonising programme 2090 (RAH), Module 9 Rayonex Analysis and Harmonising programme... -
Page 68: Summary Of The Possible Error Messages
5.7 Summary of the Possible Error Messages Page 68 5.7 Summary of the Possible Error Messages No. Description 11 Wrong memory card type 12 Invalid memory card 13 No card inserted 14 Harmonising time must be at least 1 second 15 This setup item is vacant 16 Invalid module enabling code 17 Card initialising is faulty... - Page 69 89 More than 500 values selected in F1 90 This F1 program is non-existent (see program list) This module cannot be activated by the present hardware version. In case you are interested in the RAH-Module, please contact the Rayonex company. 99 Program error...
-
Page 70: Private Documents
6. Private Documents Page 70 6. Private Documents... - Page 71 6. Private Documents Page 71 6. Private Documents...
- Page 72 Rayonex Schwingungstechnik GmbH Sauerland-Pyramiden 1 • 57368 Lennestadt Tel.: +49 2721 6006–0 • Fax: +49 2721 6006-66 Internet: www.rayonex.de • E-mail: info@rayonex.de FB-146 • Rev28 • Stand: 15. September 2011...
Need help?
Do you have a question about the Rayocomp PS 10 and is the answer not in the manual?
Questions and answers