Table of Contents
Advertisement
Quick Links
Advertisement
Table of Contents

Subscribe to Our Youtube Channel
Related Manuals for Mia Moda COMPAGNO 1700

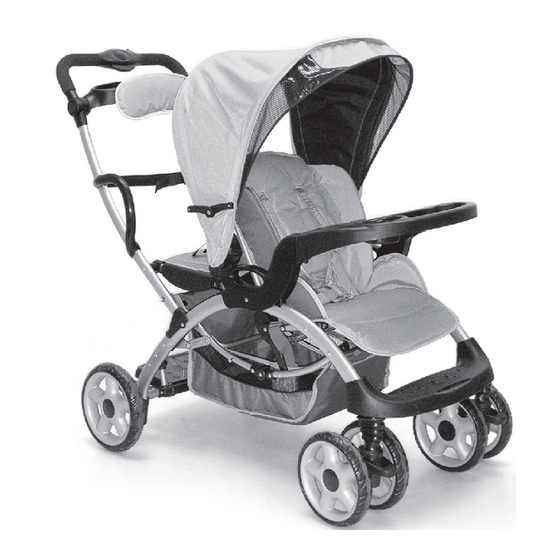
Summary of Contents for Mia Moda COMPAGNO 1700
- Page 1 1700...
- Page 2 Dea r Cust omer, Thank you for purchasing your new Mia Moda stroller. We are pleased that you have chosen this product and hope you will be completely satisfied with the service you receive from this item. We advise you to read the instructions BEFORE assembly and USE of the product, then KEEP THEM IN A SAFE PLACE FOR FUTURE USE.
-
Page 3: Care And Maintenance
Care & Maintenance 1. This product frame is manufactured according to ASTM-F833, nationally recognized standards and also JPMA certified. To ensure the safety of your product, the moving components and pivot points must be lubricated regularly. Note : Use only sili con-oil or sili con-spray for lubricating this stroller. -
Page 4: Parts List
Parts List WARNING Adult assembly is required for this product. This package contains small parts. Keep all small parts away from children during assembly. No Tools Required. Check that you have all the parts for this model before assembling this stroller. If any parts are missing, call Customer Service at 1-866-Mia-Moda (642-6632). -
Page 5: Stroller Assembly
Stroller Assembly 1. Carefully remove stroller and all parts from the box and plastic bag. 2. Discard all packaging materials properly. 3. Remove all plastic coverings from areas of the product and discard. Hook 4. DO NOT allow children to play with any packaging materials and contents. - Page 6 Stroller Assembly 6. Attaching the Front Wheels. Insert the front wheels into the tube of the frame until you hear a click. Repeat for other wheel. Pull to confirm it is assembled securely. See Figure 4. 7. Assembling the Rear Wheels. Ensure that the brake is engaged (see Functions section).
- Page 7 Stroller Assembly 9. Attaching Child Tray. Insert the ends of the child tray into receiving points on the stroller. Check that the tray is securely latched in place. See Figure 8. 10. Attaching Parent Tray. Fit the parent tray in the upright position at the top of the handle bar below the grip.
- Page 8 Functions 1. Front Swivel Locks. The front wheels can be either in the swivel mode or locked mode. To put front wheels in locked mode, first pull down the lever and rotate each wheel so that the wheels are pointed straight forward. To put front wheels in swivel mode, pull up the lever and release the lock.
- Page 9 Functions 5. Adjusting the Canopy. To open the canopy, pull forward on the front edge of the canopy while holding the back edge in place. Once the canopy is fully opened, push down on BOTH side hinges to lock it in the open position. The canopy with rotate forward or backward to help block the sun.
- Page 10 Functions WARNING The rear stand-on platform and the rear bench seat are designed for a child that is at least a 2 ½ years old but LESS than 40 inches tall and no more than 45 lbs. Use of the stroller with child in the front seat weighing more than 40 lbs and a child in the rear weighing more than 45 lbs,...
- Page 11 Functions 9. Using the Rear Seat Bench. Push the rear seat to its most rear position. Position the canopy to its most forward position. Position the child on the bench seat facing backward with their feet on the platform with BOTH hands on the rear handles.
-
Page 12: Fitting The Harness
Fitting the Harness WARNING Never leave child unattended. Avoid serious injury from falling or sliding out. Always use seat belt. Check frequently to make sure it is secure. Belts must be threaded exactly as shown. Failure to follow these instructions could result in the serious injury or death of your child. 1. - Page 13 Car Seat Adaptor bar locks into place before attaching the car seat. See Figure 22. 3. The Mia Moda infant car seat has tabs located below the handle on each side, which fit into the attachment points on the armrests. Lower the car seat in a REAR FACING POSITION.
- Page 14 Install Infant Car Seat- Mia Moda Viva 6. Use the carrier restraining straps to buckle the seat through the seat belt slots on your car seat. Adjust the straps so they are tight around the carrier but AWAY from the child's neck. See Figure 24 and 25.
- Page 15 Install Infant Car Seat- Other Manufacturer WARNING Avoid serious injury from falling. Do NOT use the Universal Car Seat Adaptor if it is not securely locked onto both sides of the stroller. Always install the infant carrier in a REAR FACING POSITION.
- Page 16 4. When you remove the infant carrier from the stroller, be sure to replace the restraining straps back into their storage compartment. IMPORTANT NOTE: The following infant car seat models are compatible with the Mia Moda Compagno Tandem Stroller: Mia Moda Viva Graco® Snug Ride Graco®...
-
Page 17: Folding The Stroller
Folding the Stroller Do not allow children near stroller while folding. 1. Remove any infant carrier that has been installed. 2. Close the canopy and push it to its most forward position. See Figure 31. 3. Position the stroller with the handle bar closest to you. 4. -
Page 18: Unfolding The Stroller
Folding the Stroller 7. The Compagno stroller comes with convenient carry handles located on either side of the armrest. Unfolding the Stroller Hook Do not allow children near stroller while unfolding. 1. Position the stroller with the handle bar closest to you. 2. - Page 19 WARNING 1. Adult assembly is required. This stroller contains small parts, which are for adult assembly only. Keep small children away while assembling the stroller. 2. Remove protective material and plastic bags and dispose of them before assembling the stroller. 3.
- Page 20 WARNING 12. NEVER leave child unattended while in the stroller. DO NOT allow child to crawl out under or over the child tray or stand in the stroller. 13. DO NOT lift stroller with child inside. 14. The backrest should be adjusted by the adult. 15.
Need help?
Do you have a question about the COMPAGNO 1700 and is the answer not in the manual?
Questions and answers