Table of Contents
Advertisement
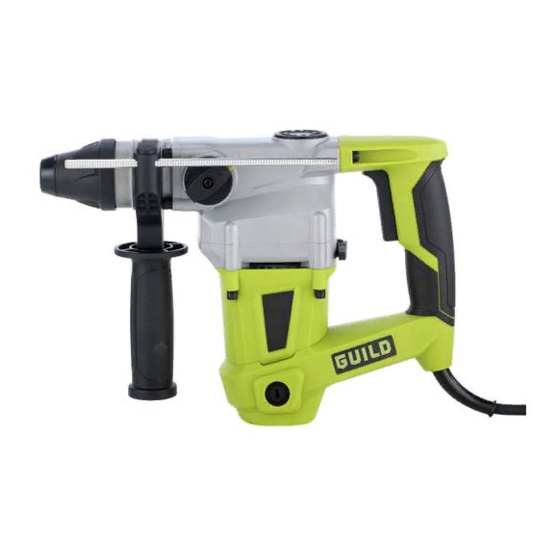
GUILD
1000W Rotary Hammer
Instruction Manual
Important
- Please read these instructions fully before operating or maintaining your Guild rotary hammer
These instructions contain important information that will help you get the best from your Guild
rotary hammer, ensuring it remains safe to operate.
If you need help or have damaged or missing parts, call the Customer Helpline on 0333 3201989
After Sales Support
UK/Ireland 0333 3201989
Help@guildpowertools.co.uk
PDH26G
Advertisement
Table of Contents

Subscribe to Our Youtube Channel
Summary of Contents for Guild PDH26G
- Page 1 Important - Please read these instructions fully before operating or maintaining your Guild rotary hammer These instructions contain important information that will help you get the best from your Guild rotary hammer, ensuring it remains safe to operate. If you need help or have damaged or missing parts, call the Customer Helpline on 0333 3201989...
-
Page 2: Table Of Contents
Contents Safety Information.....................3 In The Box........................6 Accessories........................6 Operating Instructions....................7 Working Hints For Your Rotary Hammer ..............11 Maintenance......................12 Trouble Shooting......................12 Technical Data......................13 Environmental Protection..................14 Guarantee........................14 Declaration of Conformity..................15 Plug Replacement (Uk & Ireland Only)..............15 Customer Helpline 0333 3201989... -
Page 3: Safety Information
Safety Information Important - Please read these instructions fully before starting assembly Warning Symbols The following warning symbols appear throughout this assembly manual and indicate the appropriate safety measures you should take when assembling and operating the rotary hammer. To reduce the risk of injury, Please read the instruction manual Warning Wear ear protection Wear eye protection... - Page 4 Safety Information Important - Please read these instructions fully before starting assembly General Power Tool Safety Warnings WARNING! Read all safety warnings and all instructions. Failure to follow the warnings and instructions may result in electric shock, fire and/or serious injury. Save all warnings and instructions for future reference.
- Page 5 Safety Information Important - Please read these instructions fully before starting assembly General Power Tool Safety Warnings e) Do not overreach. Keep proper footing and balance at all times. This enables better control of the power tool in unexpected situations. f) Dress properly.
-
Page 6: In The Box
In The Box Parts Locking sleeve On / Off Switch SDS Chuck Hammer and drilling action selector Auxiliary Handle Depth Gauge Dust cover Hammer and chisel action selector Grease box cover Accessories Auxiliary handle Dust cover Depth gauge Point chisel (14x250mm) Flat chisel (14x250mm) SDS drill bits (8/10/12x150mm) Customer Helpline 0333 3201989... -
Page 7: Operating Instructions
Operating Instructions NOTE: NOTE: Before using the tool, read the instruction book carefully. Intended Use This tool is intended for hammer drilling in concrete, brick and stone as well as for light chiseling work. It is also suitable for drilling without impact in wood, metal, ceramic and plastic. - Page 8 Operating Instructions into the handle. Slide the depth gauge until the distance between the depth gauge end and the drill bit end is equal to the depth of hole/screw you wish to make.. Release the locking button to tighten. Note: Make sure that the toothed side of the depth gauge needs to be directed to the toothed side of hex hole in the handle as shown in the figure.
- Page 9 Operating Instructions 5. ON/OFF SWITCH (SEE FIG E) Depress the switch to start the tool and release it to stop your tool. 6. FUNCTION MODE SELECTION Hammer drill function (SEE FIG F1, F2) 1)For drilling concrete, masonry etc, press the lock button (a) and rotate the selector switch to make sign “...
- Page 10 Operating Instructions Drilling function (SEE FIG G1, G2) 1)Press the lock button (a) and rotate the selector switch to make sign “ “ point to the triangle. (SEE FIG G1) 2) Turn the hammer or drilling action selector switch pointing to the drilling action “ “...
-
Page 11: Working Hints For Your Rotary Hammer
Operating Instructions 7. OVERLOAD PROTECTION If the tool insert becomes caught or jammed, the drive to the drill spindle is interrupted. Because of the forces that occur, always hold the power tool firmly with both hands and provide for a secure stance. Working Hints For Your Rotary Hammer Reduce the pressure on the drill bit when it is about to break through. -
Page 12: Maintenance
Maintenance Remove the plug from the socket before carrying out any adjustment, servicing or maintenance. There are no user serviceable parts in your power tool. Never use water or chemical cleaners to clean your power tool. Wipe clean with a dry cloth. Always store your power tool in a dry place. -
Page 13: Technical Data
Technical Data Technical Data Table Voltage 230 -240V~50 Hz Power input 1000 W No load speed 1050 /min Impact rate 5000 /min Impact energy 3.5J Max drilling capacity in Steel 13 mm Masonry 26 mm Wood 40 mm Protection class Weight 4.00 kg Noise Information... -
Page 14: Environmental Protection
Technical Data Vibration Information This tool may cause hand-arm vibration syndrome if its use is not adequately managed. WARNING: To be accurate, an estimation of exposure level in the actual conditions of use should also take account of all parts of the operating cycle such as the times when the tool is switched off and when it is running idle but not actually doing the job. -
Page 15: Declaration Of Conformity
Declaration of Conformity This Guild 1000W Rotary Hammer model number PDH26G fully complies with the Machinery Directive 2006/42/EC, Electromagnetic Compatibility Directive 2004/108/ EC(before 2016/04/20) and 2014/30/EC(since 2016/04/20), RoHS Directive 2011/65/EU and the following harmonized EU standards EN 60745-2-1:2010 EN 60745-1: 2009 + A11: 2010...
Need help?
Do you have a question about the PDH26G and is the answer not in the manual?
Questions and answers
Hi there, I’ve lost the pin spanner for this drill (PDH26G). I cannot find similar products on the internet that are exactly the correct size. Do you know how/where I can find the correct one for this drill? Many thanks, Stewart.