Table of Contents
Advertisement
Quick Links
Advertisement
Table of Contents

Related Manuals for GEA Omni

Summary of Contents for GEA Omni
- Page 1 Control panel GEA Omni™ Instruction Manual E_806550_2...
- Page 2 All Rights reserved. cal changes during the course of further develop- No part of this publication may be copied or pub- ment of the GEA Omni™ shown in this product infor- lished by means of printing, photocopying, microfilm mation. or otherwise without prior written consent of Illustrations and drawings in this product information are simplified representations.
- Page 3 Hint! Stands for an important tip whose attention is important for the desig- nated use and function of the device. GEA Refrigeration North America, Inc. | E_806550_2 | Generated 12.01.2016...
- Page 4 Instruction Manual | GEA Omni™ Control panel GEA Refrigeration North America, Inc. | E_806550_2 | Generated 12.01.2016...
-
Page 5: Table Of Contents
Instruction Manual | GEA Omni™ Control panel TABLE OF CONTENTS SAFETY AND CONFORMITY Safety Instructions Safety note concerning the connection of the GEA Omni™ with the starter panel Conformity - CE marking (Europe) Conformity - UL marking (USA, Canada) USER INTERFACE Menu Navigation Status Bar 2.2.1... - Page 6 Oil Still Control Parameters 3.2.1 Oil Still Condenser Sequencer Control Parameters 3.3.1 Schedule 3.3.2 Wet Bulb Control 3.3.3 Discharge Pressure 3.3.4 Condenser Control 3.3.5 Water Pump Lockout Condenser Device Control Parameters GEA Refrigeration North America, Inc. | E_806550_2 | Generated 12.01.2016...
- Page 7 List and Description of VTrac Warnings 4.2.8 List and Description of Refrigerant Sensor Warnings 4.2.9 List and Description of Oil Still Warnings 4.2.10 List and Description of Other Warnings Notifications GEA Refrigeration North America, Inc. | E_806550_2 | Generated 12.01.2016...
- Page 8 Volume Slide Position Calibration Compressor Motor Current Calibration Capacity Slide Sensor Calibration 5.6.1 Capacity Slide Calibration with External Oil Pump 5.6.2 Capacity Slide Calibration without External Oil Pump LIST OF ABBREVIATIONS GEA Refrigeration North America, Inc. | E_806550_2 | Generated 12.01.2016...
- Page 9 Main sequencer tab (Control level) fig. 51 Main sequencer tab (Compressor device) fig. 52 Sequencer Schedule Tab fig. 53 Sequencer Schedule Table fig. 54 Sequencer Control Buttons fig. 55 Sequencer Timer Control Display GEA Refrigeration North America, Inc. | E_806550_2 | Generated 12.01.2016...
- Page 10 Oil system details options fig. 108 Motor options fig. 109 Remote Set Point Options fig. 110 Suction options fig. 111 Discharge options fig. 112 Economizer details options fig. 113 Forward acting capacity control GEA Refrigeration North America, Inc. | E_806550_2 | Generated 12.01.2016...
- Page 11 Temperature Probe Calibration Pad fig. 117 Capacity Slide Calibration Pad fig. 118 Capacity Slide Calibration Pad (Step Variable Vi) fig. 119 Volume Slide Calibration Pad fig. 120 Motor Current Calibration Pad GEA Refrigeration North America, Inc. | E_806550_2 | Generated 12.01.2016...
- Page 12 Instruction Manual | GEA Omni™ Control panel GEA Refrigeration North America, Inc. | E_806550_2 | Generated 12.01.2016...
-
Page 13: Safety And Conformity
GEA Omni™. Warning! GEA Omni™ can cause hazard in case of improper or unintended use. A malfunction indica- tion on the touch screen cannot be ignored. A personal injury or damage to the machine or plant can be the result. -
Page 14: Safety Note Concerning The Connection Of The Gea Omni™ With The Starter Panel
Safety note concerning the connection of the GEA Omni™ with the starter panel Hint! It is not permitted to add an external controller between the GEA Omni™ and the power panel; this would compromise the safety interlocks designed for protecting personnel and equip- ment. -
Page 15: Conformity - Ce Marking (Europe)
CE mark Conformity - UL marking (USA, Canada) The UL marking of the GEA Omni™ takes place according to the UL certification process and confirms the com- pliance with national standards in the United States and Canada. With affixing the UL marking, the manufacturer confirms the GEA Omni™ is built to the guidelines of UL. -
Page 16: User Interface
Control panel USER INTERFACE The screen shown below will appear when the GEA Omni™ panel is powered on. The central portion of the screen will change depending on the current display of the panel. The menu bar on the left displays options used for navigation between displays or interfaces. The status bar at the bottom displays important information regarding the status of the panel and its devices. -
Page 17: Menu Navigation
Main menu bar The menu bar is used to navigate through the various user interfaces available on the GEA Omni™ panel. Each option will display a new screen on the panel. For full information on a given option, see the associated section of the document. - Page 18 User interface Instruction Manual | GEA Omni™ Menu Navigation Control panel Section 2.15, Page 97 Panel Settings Section 2.16, Page 103 Panel Info GEA Refrigeration North America, Inc. | E_806550_2 | Generated 12.01.2016...
-
Page 19: Status Bar
Operator or Service, or yellow if the user’s access level is Admin. Hint! Admin level is only for use by GEA certified technicians. GEA Refrigeration North America, Inc. | E_806550_2 | Generated 12.01.2016... -
Page 20: Fig. 8 Remote Icon
The default passwords for the Operator, Service and Admin access levels are displayed in the table shown to the below. It is advisable to change these passwords once startup is completed. Access level Default password Operator Service 123654 Admin 1236547890 GEA Refrigeration North America, Inc. | E_806550_2 | Generated 12.01.2016... -
Page 21: Current State
The section shown in the middle of the sub-screen when the status bar is clicked displays a list of all devices controlled by the panel, such as compressors and evaporators and their current status. GEA Refrigeration North America, Inc. | E_806550_2 | Generated 12.01.2016... -
Page 22: Notifications, Warnings And Shutdowns
However, if the condition that caused the annunciation in the first place has not been resolved, the annunciation will reappear in the list. Any annunciation that is tracked by the Omni Historian Section 2.10, Page 61 will also appear with a History button, which may be pressed to automatically open the historical table. -
Page 23: General Navigation
User interface Control panel General Navigation General Navigation The user interface (UI) for the GEA Omni™ makes use of a number of different navigation methods. The follow- ing is a brief description of each of these methods. 2.3.1 Tile Navigation fig.13:... -
Page 24: Keyboard
The letter keys may be used in the same manner as a normal keyboard. The &123 button changes the display of the keyboard to the one shown below, which is used to add numbers or frequently used symbols to the string. fig.15: Keyboard Display (Numbers and symbols) GEA Refrigeration North America, Inc. | E_806550_2 | Generated 12.01.2016... -
Page 25: Keypad
Drop down lists are differentiated from text boxes by a downward pointing arrow on the far right. These fields have a predetermined list of possible values which appear in a vertical list when the arrow is clicked, from which the user may select the desired value. GEA Refrigeration North America, Inc. | E_806550_2 | Generated 12.01.2016... -
Page 26: Omniview
User interface Instruction Manual | GEA Omni™ OmniView Control panel OmniView fig.17: Main OmniView screen GEA Refrigeration North America, Inc. | E_806550_2 | Generated 12.01.2016... -
Page 27: Main Viewing Application
The information dis- played, from top to bottom, includes: • Control value • Set point • Status • Current step • Fans running • Pumps running fig.19: Condenser sequencer tile GEA Refrigeration North America, Inc. | E_806550_2 | Generated 12.01.2016... -
Page 28: Fig. 20 Evaporator Tiles
Control level tile Touching any control level tile will open the overview screen for the sequencer. Refer to Instruction Man- ual Section 2.8, Page 50 for full details on compressor sequencing. GEA Refrigeration North America, Inc. | E_806550_2 | Generated 12.01.2016... -
Page 29: Compressor
AUTO This button is illuminated whenever the compressor is set to control its capacity automatically based on the control signal. Touching the button will switch the compressor to Automatic mode. GEA Refrigeration North America, Inc. | E_806550_2 | Generated 12.01.2016... -
Page 30: Fig. 23 Hold Position Options
Touching the button will force the compressor’s capacity mode into External mode. This button will be illuminated when the capacity of the compressor is being controlled remotely from an external device. GEA Refrigeration North America, Inc. | E_806550_2 | Generated 12.01.2016... -
Page 31: Main Tab
Tab detailed in section "Overview Tab" (not yet available at the moment). If no tile has been selected in the over- view screen, this screen will display the first compressor. The display is divided into three parts: GEA Refrigeration North America, Inc. | E_806550_2 | Generated 12.01.2016... - Page 32 Basic View, which may be clicked a second time to only display the editable parameter data. For details on individual control parameters, refer to Section 3.1, Page 104. GEA Refrigeration North America, Inc. | E_806550_2 | Generated 12.01.2016...
-
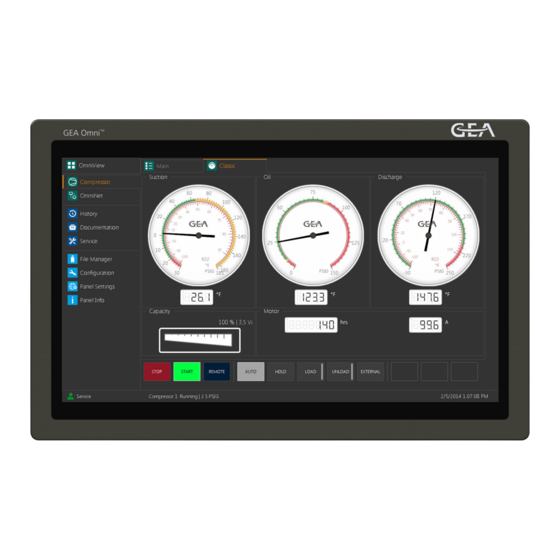
Page 33: Classic Tab
The text of the view button is dependent on the view format currently displayed. The text will read Spectrum View while the damage view format is displayed, and the will instead read Damage View while the spectrum view format is displayed. GEA Refrigeration North America, Inc. | E_806550_2 | Generated 12.01.2016... -
Page 34: Fig. 26 Vtrac Damage View
When a channel is selected from the list, the graph will rescale to display only the measurement point or points associ- ated with it. GEA Refrigeration North America, Inc. | E_806550_2 | Generated 12.01.2016... -
Page 35: Fig. 27 Vtrac Spectrum View
The options are dependent on the selected panel units. fig.28: VTrac Options display Touching the Options button displayed in the bottom right hand corner in either view will bring up the options screen shown above. The options are: GEA Refrigeration North America, Inc. | E_806550_2 | Generated 12.01.2016... -
Page 36: Starter Tab
This option is used when frequency should be measured in Cycles per minute. – This option is used when frequency should be measured in Hertz. 2.5.4 Starter tab fig.29: Starter tab display GEA Refrigeration North America, Inc. | E_806550_2 | Generated 12.01.2016... -
Page 37: Condenser
This table displays the control parameters read from the starter. Each starter has its own unique parameters list. For more information regarding the specific function of each parameter, refer to the manual associated with the starter in use by the panel. Condenser GEA Refrigeration North America, Inc. | E_806550_2 | Generated 12.01.2016... -
Page 38: Overview Tab (Condenser Sequencer)
For variable speed devices, the current speed will also be displayed. The type of device is indicated by the symbol. The different types of devices are: Fans GEA Refrigeration North America, Inc. | E_806550_2 | Generated 12.01.2016... -
Page 39: Main Tab (Condenser Sequencer)
The display will change depending on whether it is currently showing the status of the sequencer or an individual device. When the sequencer tile is touched, the main tab will display the screen shown below: GEA Refrigeration North America, Inc. | E_806550_2 | Generated 12.01.2016... -
Page 40: Fig. 34 Main Condenser Tab (Condenser Sequencer)
For more information regarding the specific function of each parameter, refer to Section 3.3, Page 157. When a device tile is touched, the main tab display will instead appear as shown below. GEA Refrigeration North America, Inc. | E_806550_2 | Generated 12.01.2016... -
Page 41: Fig. 35 Main Condenser Tab (Condenser Device)
Touching the Main tab displayed at the top of the screen will bring up the display corresponding to the most recently selected tile. If no tile has been previously selected in the Overview tab, the panel will bring up the infor- mation of the condenser sequencer by default. GEA Refrigeration North America, Inc. | E_806550_2 | Generated 12.01.2016... -
Page 42: Schedule Tab
This button controls whether or not the three initial columns of the schedule table, containing the time delays used while the sequencer is running automatically, are displayed. Schedule selection This drop down list is used to select which schedule is currently displayed. GEA Refrigeration North America, Inc. | E_806550_2 | Generated 12.01.2016... -
Page 43: Fig. 37 Condenser Schedule Table
This option is only available for single speed fans and pumps. It will cause the device to activate during the associated step. – Stop This option is available for all devices. It will cause the device to deactivate during the asso- ciated step. – Hold GEA Refrigeration North America, Inc. | E_806550_2 | Generated 12.01.2016... -
Page 44: Fig. 38 Condenser Control Buttons
The values in the table display may be modified by touching the appropriate cell of the table. When- ever a cell containing a timer is touched, the sub-window below will be displayed. GEA Refrigeration North America, Inc. | E_806550_2 | Generated 12.01.2016... -
Page 45: Fig. 39 Condenser Timer Control Display
For certain options which require a percentage of the maximum capacity to be specified, the second options block will be enabled. A percentage between 0% and 100 %, incremented in values of 5%, may be selected from this list. GEA Refrigeration North America, Inc. | E_806550_2 | Generated 12.01.2016... -
Page 46: Main Tab (Condenser Water Cooled)
The defrost cycle for an Evaporator zone may be initiated in one of three ways: GEA Refrigeration North America, Inc. | E_806550_2 | Generated 12.01.2016... -
Page 47: Overview Tab
The behavior and view on this screen may be modified using the buttons found in the lower right hand corner of the window. The functions of the buttons are detailed below. GEA Refrigeration North America, Inc. | E_806550_2 | Generated 12.01.2016... -
Page 48: Main Tab
Touching the Close button in the bottom right hand corner of the screen will return the Overview screen to the main tile display. 2.7.2 Main tab This screen is used to display the current status and control parameters of an individual evaporator zone. GEA Refrigeration North America, Inc. | E_806550_2 | Generated 12.01.2016... -
Page 49: Fig. 44 Evaporator Main Tab
While the zone is defrosting, the button will be colored red and the text will change to Defrost Stop. Touching the button again will immediately stop the zone from defrosting. GEA Refrigeration North America, Inc. | E_806550_2 | Generated 12.01.2016... -
Page 50: Evaporator For Chiller
This table contains the parameters used to control the evaporator. The values can be manually changed by touching a row. For more information regarding the specific function of each parameter refer Section 3.5.6, Page 171. Sequencer GEA Refrigeration North America, Inc. | E_806550_2 | Generated 12.01.2016... -
Page 51: Overview Tab
The number in the upper right hand corner of the tile indicates which control level the compres- sor is associated with. A sample compressor tile is shown below. GEA Refrigeration North America, Inc. | E_806550_2 | Generated 12.01.2016... -
Page 52: Fig. 48 Compressor Device Tile
This text box is used to enter the network location where the local panel controlling the compressor may be found. This field will only be enabled if the This Panel switch is disabled. GEA Refrigeration North America, Inc. | E_806550_2 | Generated 12.01.2016... -
Page 53: Main Tab
This tile displays the current status, set point, current step and control value of the control level. 2. Level enabled This switch is used to toggle whether or not compressors on the selected level are currently permitted to be sequenced. GEA Refrigeration North America, Inc. | E_806550_2 | Generated 12.01.2016... -
Page 54: Fig. 51 Main Sequencer Tab (Compressor Device)
Refer back to Section 2.8.1, Page 51 for the functions of each field. The fields are: • This panel • Brand ID • IP address • Compressor selection • Level • Unit ID • Device Name GEA Refrigeration North America, Inc. | E_806550_2 | Generated 12.01.2016... -
Page 55: Schedule Tab
This button controls whether or not the three initial columns of the schedule table, containing the time delays used while the sequencer is running automatically, are displayed. Level Selection This drop down list is used to select which level is currently displayed. GEA Refrigeration North America, Inc. | E_806550_2 | Generated 12.01.2016... -
Page 56: Fig. 53 Sequencer Schedule Table
If the timer has not fully elapsed, the sequencer will wait for the timer to finish before instructing the compressor to stop. – Load GEA Refrigeration North America, Inc. | E_806550_2 | Generated 12.01.2016... -
Page 57: Fig. 54 Sequencer Control Buttons
When this button is touched, the sequencer will immediately switch from the current step to the previous step above it in the table. If the sequencer is already on the first step, touching this button will have no effect. GEA Refrigeration North America, Inc. | E_806550_2 | Generated 12.01.2016... -
Page 58: Omninet
For certain options which require a percentage of the maximum capacity to be specified, the second options block will be enabled. A percentage between 0% and 100 %, incremented in values of 5%, may be selected from this list. OmniNet GEA Refrigeration North America, Inc. | E_806550_2 | Generated 12.01.2016... -
Page 59: Omnilink™ Tab
Disconnect, which will return the user to the tile display when clicked. Find Network Panel(s) This button will query the network and locate any other GEA Omni™ panels. Any panel found in this manner will appear as a new tile in the display and may be viewed or controlled normally. -
Page 60: Modbus Tcp Tab
Checking a row and touching the Edit Connections button will populate the fields in the upper right hand corner of the screen. The Name field is locked, but the IP Address and Node Number fields may be modified. GEA Refrigeration North America, Inc. | E_806550_2 | Generated 12.01.2016... -
Page 61: History
View - Table when clicked. Edit View This button is used to customize what data is displayed in the RT-Trend, Chart and Annunciations tabs. Touching the button will display the screen shown below. GEA Refrigeration North America, Inc. | E_806550_2 | Generated 12.01.2016... -
Page 62: Fig. 60 Edit View Display
RT-Trend tab. The Save Data button is not used in this tab, and it is replaced with a date range field which displays the period of time shown in the current view. The field will always contain a forty eight hour period. The GEA Refrigeration North America, Inc. | E_806550_2 | Generated 12.01.2016... - Page 63 Chart tab. The Analysis and Report tabs do not contain a row of buttons at the bottom of the screen. For more detailed information regarding the functionality of each tab, refer to the specific sections below. GEA Refrigeration North America, Inc. | E_806550_2 | Generated 12.01.2016...
-
Page 64: Rt-Trend Tab
All pens are updated every five seconds while viewing this screen. The total range of time displayed at any given time is ten minutes. fig.63: RT-Trend tab display (View - Table) GEA Refrigeration North America, Inc. | E_806550_2 | Generated 12.01.2016... -
Page 65: Chart Tab
The total range displayed by default on this screen covers a period of forty eight hours. fig.65: Chart tab display (View - Table) GEA Refrigeration North America, Inc. | E_806550_2 | Generated 12.01.2016... -
Page 66: Annunciations Tab
Annunciations Tab The Annunciations tab displays common notifications, warnings and shutdowns that have been triggered on the panel. The figure below displays a sample annunciations control. fig.66: Annunciations tab display GEA Refrigeration North America, Inc. | E_806550_2 | Generated 12.01.2016... - Page 67 The user may view this information by selecting the picture embedded into the grid’s cell. These will not be generated during panel startup. Manual RT-Trend snapshots are also displayed in this format and appear in the table as notifications. GEA Refrigeration North America, Inc. | E_806550_2 | Generated 12.01.2016...
-
Page 68: Analysis Tab
The user can select between any of these preset time periods to change the date range. The Date Range option is also available, which displays the entire period that the panel has been active. GEA Refrigeration North America, Inc. | E_806550_2 | Generated 12.01.2016... -
Page 69: Reporting Tab
This will display every notification that has been issued or cleared. It will list the description, type and date. Preview Report This will generate a temporary pdf file displaying all of the selected information. GEA Refrigeration North America, Inc. | E_806550_2 | Generated 12.01.2016... -
Page 70: Documentation
This screen is used to display all manuals and supplementary documents associated with the panel arranged in a tile display. Touching a tile will bring up a new screen which will display the associated document. A sample screen is shown below. GEA Refrigeration North America, Inc. | E_806550_2 | Generated 12.01.2016... -
Page 71: Fig. 70 Sample Document Display
This section shows the page that is currently displayed, the total number of pages in the document and the document title. Close This button exits the document viewer and returns the user to the tile display. GEA Refrigeration North America, Inc. | E_806550_2 | Generated 12.01.2016... -
Page 72: Videos Tab
When the video is finished playing, the screen will automati- cally close and return to the tile display, but the user may exit the video early by touching the close button. GEA Refrigeration North America, Inc. | E_806550_2 | Generated 12.01.2016... -
Page 73: Service
If in doubt, contact trained personnel. Hint! If outputs are forced, the module will return to its original value after a thirty minute interval. GEA Refrigeration North America, Inc. | E_806550_2 | Generated 12.01.2016... -
Page 74: Fig. 74 Sample Digital Input Slice Display
To enable manual control, the switch displayed next to the channel must be touched. While a channel is in manual mode, its state may be changed by touching the LED on the display. fig.76: Compressor motor start notification GEA Refrigeration North America, Inc. | E_806550_2 | Generated 12.01.2016... -
Page 75: Fig. 77 Sample Analog Input Slice Display
The options in the drop down list include Auto and manual output values measured in mA. The manual values range from 0 mA to 20 mA in incre- ments of 4 mA. GEA Refrigeration North America, Inc. | E_806550_2 | Generated 12.01.2016... -
Page 76: Maintenance Tab
This button displays the screen shown below, which contains a list of all tasks associated with the given interval. Touching the check box next to a task will mark it as complete. GEA Refrigeration North America, Inc. | E_806550_2 | Generated 12.01.2016... -
Page 77: Fig. 80 Service Task Form Display
Service Report Edit Service Tasks This button is used to create or edit custom maintenance tasks for the selected compressor. Touching it will bring up the display shown below. GEA Refrigeration North America, Inc. | E_806550_2 | Generated 12.01.2016... -
Page 78: Fig. 81 Edit Service Tasks Display
This field will only be enabled if the Service Type selection is set to Measure. It contains a drop down list which may be used to select the units of the desired measurement. GEA Refrigeration North America, Inc. | E_806550_2 | Generated 12.01.2016... -
Page 79: Fig. 82 Service Maintenance Display
Save Service Change button. If the Ignore Service Notifications option is checked, the panel will not annunciate notifications relating to serv- ice intervals. fig.82: Service maintenance display GEA Refrigeration North America, Inc. | E_806550_2 | Generated 12.01.2016... -
Page 80: Activity Log Tab
Configuration Changed • Settings Changed • Commands • File Handling • Power • Network • Error Log This option is only available for a user with service level or higher permissions. GEA Refrigeration North America, Inc. | E_806550_2 | Generated 12.01.2016... - Page 81 A count for each of these conditions can be found to the left of the buttons, and the Clear Packets button may be used to return the count to zero. GEA Refrigeration North America, Inc. | E_806550_2 | Generated 12.01.2016...
-
Page 82: Touch Panel Tab
This fea- ture may only be accessed by a user with Service level or higher permissions. GEA Refrigeration North America, Inc. | E_806550_2 | Generated 12.01.2016... -
Page 83: Logic Tab
The lines between nodes also change to display their current value or state. Connections between digital nodes will either appear as a solid green line for an energized signal, or a dotted red line for a GEA Refrigeration North America, Inc. | E_806550_2 | Generated 12.01.2016... -
Page 84: File Manager
This tab is used to export historical or control data from the panel. Data exported from this screen is automati- cally saved to a USB plugged into the panel, if applicable. The functions that may be accessed from this screen are detailed below. GEA Refrigeration North America, Inc. | E_806550_2 | Generated 12.01.2016... - Page 85 Historical Data button displayed to the far right of the section may be clicked, which will save a histor- ian file, of file type .ohist, to the GEA RT folder of the USB. If no GEA RT folder is found, one will be created automatically.
- Page 86 This button is used to save the current values of all custom parameters on the panel to an .oprms file in the GEA RT folder on the USB. If such a folder does not exist, it will be created automatically. The default name of the file is the number of the configuration, but a custom name may be entered into the text field above the button.
-
Page 87: Documents Tab
This button is used to save the current values of all custom parameters on the panel to an .oprms file in the GEA RT folder on the panel hard drive. If such a folder does not exist, it will be created auto- matically. - Page 88 Delete File(s) button will remove all selected files from the panel’s memory. Touching the Copy File(s) button will save a copy of each selected file to a USB plugged into the panel. GEA Refrigeration North America, Inc. | E_806550_2 | Generated 12.01.2016...
-
Page 89: Program Tab
Program tab display This tab may be used to update or save a back up of the GEA Omni™ software and the configuration file. Back up data may be saved to either an external USB or to the panel itself. -
Page 90: Fig. 90 Update/Back Up Software Display
A back up of the current software loaded on the panel will be saved to the attached USB. The back up folder will be saved to the GEA RT folder. If no such folder exists, one will be created automati- cally. -
Page 91: Fig. 91 Update/Back Up Configuration Display
A back up of the current configuration loaded on the panel will be saved to the attached USB. The back up folder will be saved to the GEA RT folder. If no such folder exists, one will be created auto- matically. -
Page 92: System Tab
2.13.4 System Tab fig.92: System tab display This tab is used to back up or restore all files on the panel or set the panel to its factory default settings. GEA Refrigeration North America, Inc. | E_806550_2 | Generated 12.01.2016... -
Page 93: Fig. 93 Update/Back Up System Display
This button will save all panel data files to an attached USB. The files will be saved in a System Backup folder located in a subfolder of the GEA RT folder corresponding to the project number of the panel. If any or all of these folders are not present, they will be created automatically. -
Page 94: Apps Tab
Apps tab display This tab allows the user to download GEA applications to an attached USB so they may be installed on a sepa- rate PC. Each button will copy the installer for the chosen application to the USB. The upper button corresponds to the GEA OmniLink™... -
Page 95: Configuration
Only a user with admin level permissions may change these options, and only while no compressors are running. For more information on individual configuration options, refer to Section 3.8, Page 183. GEA Refrigeration North America, Inc. | E_806550_2 | Generated 12.01.2016... -
Page 96: Sensors Tab
This column contains the value that is added to the reading displayed in the Raw Scaled column to obtain the measured value for the sensor. 8. Raw Signal This column contains the unscaled value received by the sensor. GEA Refrigeration North America, Inc. | E_806550_2 | Generated 12.01.2016... -
Page 97: Panel Settings
For more information on calibrating specific types of sensors, refer to Chapter 5, Page 225. 2.15 Panel Settings The Panel Settings screen is used to customize the appearance and display of the GEA Omni™ panel. The options are divided across four tabs which are detailed below. 2.15.1 Localization Tab fig.98:... -
Page 98: Users Tab
2.15.2 Users Tab fig.99: Users tab display This tab displays information regarding all users that may log into the panel. It also contains functionality to add or remove users. GEA Refrigeration North America, Inc. | E_806550_2 | Generated 12.01.2016... - Page 99 User Access Timeout This field contains a drop down list which is used to select the amount of time the panel must remain idle before the current user is logged out. GEA Refrigeration North America, Inc. | E_806550_2 | Generated 12.01.2016...
-
Page 100: Network Tab
VNC client access is enabled for the panel and the switch on the right toggles whether a password is required. If a password is required, it may be changed by typing a new password into the Password and Confirm Password fields and touching the Change Password button below. GEA Refrigeration North America, Inc. | E_806550_2 | Generated 12.01.2016... - Page 101 Baud Rate, Parity, Data Bit, Stop Bit and Node Number for the communication. Hint! The Motor Starter Communication protocol is only available if it has been enabled in the con- figuration. GEA Refrigeration North America, Inc. | E_806550_2 | Generated 12.01.2016...
-
Page 102: Email Tab
Additionally, as long as one or more recipients are selected, the Delete Email Recipient Address button will be enabled, which will permanently remove the selected recipients from the table. GEA Refrigeration North America, Inc. | E_806550_2 | Generated 12.01.2016... -
Page 103: Panel Info
Additionally, this screen contains the Name, Location, Phone number and Email Address to be used for product service and support. The information in these fields may only be modified by a user with service level or higher permissions. GEA Refrigeration North America, Inc. | E_806550_2 | Generated 12.01.2016... -
Page 104: Control
Control panel CONTROL Compressor Control Parameters Control parameters are displayed on the main Omni Compressor screen detailed in Section 2.5.1, Page 31. Below is a list of all control parameters and a brief description of their function. 3.1.1 Capacity Control The panel supports three sets of capacity parameters. - Page 105 Measured in the panel pressure units as selected in the Panel Settings screen. • Temperature Measured in the panel temperature units as selected in the Panel Settings screen. • Remote Capacity Slide Measured in percent. GEA Refrigeration North America, Inc. | E_806550_2 | Generated 12.01.2016...
- Page 106 Measured in the panel pressure units as selected in the Panel Settings screen. • Temperature Measured in the panel temperature units as selected in the Panel Settings screen. • Remote Capacity Slide Measured in percent. GEA Refrigeration North America, Inc. | E_806550_2 | Generated 12.01.2016...
- Page 107 Measured in the panel pressure units as selected in the Panel Settings screen. • Temperature Measured in the panel temperature units as selected in the Panel Settings screen. • Remote Capacity Slide Measured in percent. GEA Refrigeration North America, Inc. | E_806550_2 | Generated 12.01.2016...
- Page 108 Measured in the panel pressure units as selected in the Panel Settings screen. • Temperature Measured in the panel temperature units as selected in the Panel Settings screen. • Remote Capacity Slide Measured in percent. GEA Refrigeration North America, Inc. | E_806550_2 | Generated 12.01.2016...
-
Page 109: Control
Fast Unload Timer Seconds 60 s External Capacity Mode Selection – See Description Remote Control Interface Selection – See Description Suction Check Valve Close Assist Seconds 120 s 10 s Pulse Timer GEA Refrigeration North America, Inc. | E_806550_2 | Generated 12.01.2016... - Page 110 This parameter is used to select the units of measurement that will be used for remote set point control. The parameter will only be visible if the Remote Set Point option is enabled in the panel configuration. The options are: • Pressure • Temperature • Slide Valve GEA Refrigeration North America, Inc. | E_806550_2 | Generated 12.01.2016...
- Page 111 6. Maximum Capacity Slide To Allow Start Override For GEA Grasso Small and Medium compressors, if the compressor capacity slide position remains above the Maximum Capacity Slide To Allow Start parameter during the period of time dictated by the Capacity Slide Failed to Unload Shutdown Timer, the panel will compare the slide position to this value.
- Page 112 This parameter is used to select the type of control panel which will sequence this compressor. The options are: • GEA Omni – This option indicates that the compressor will be sequenced by another GEA Omni panel. • GEA FES Legacy Panel – This option indicates that the compressor will be sequenced by an older gen- eration of GEA control panel.
-
Page 113: Variable Vi
Vi slide is loading or unloading and the Vi slide position is within the range defined by a set proportional band. The proximity of the Vi slide to the optimum position determines for which portion of the period the compressor will be loading. The value is measured in seconds. GEA Refrigeration North America, Inc. | E_806550_2 | Generated 12.01.2016... -
Page 114: Motor
3.1.4 Motor Parameter Units Minimum Maximum Default Accumulated Runtime Hours Hours 0.0 h 0.0 h 1.0 x 10 Motor Start to Start Delay Minutes 0.0 min 9999.0 min 20.0 min GEA Refrigeration North America, Inc. | E_806550_2 | Generated 12.01.2016... -
Page 115: Motor Power
Motor Power Parameter Units Minimum Maximum Default kW Demand Metering Ratio 0.0 kW 3200.0 KW 0.0 kW kWh Input Pulse Weight kWh Estimated Usage 0.0 kWh 0.0 kWh 10 x 10 GEA Refrigeration North America, Inc. | E_806550_2 | Generated 12.01.2016... -
Page 116: Motor Current
10 s Timer High Motor Current Warning Offset Amps 300 A 20 A Illegal Compressor Motor Current Percent 20 % 15 % Shutdown Low Motor Current Run Delay Seconds 30 s GEA Refrigeration North America, Inc. | E_806550_2 | Generated 12.01.2016... - Page 117 This parameter is used to select the set point for the Low Motor Current Shutdown. If the motor current falls below this value for a user defined period of time, a Low Motor Current Shutdown will be annunciated. The value is measured in amps. GEA Refrigeration North America, Inc. | E_806550_2 | Generated 12.01.2016...
-
Page 118: Motor Interlock
3.1.8 Motor Speed Parameter Units Minimum Maximum Default Proportional Term Unitless Integral Term 1.0 s/R 250.0 s/R 40.0 s/R Mode Selection – See Description Percent 100 % Manual Mode Position GEA Refrigeration North America, Inc. | E_806550_2 | Generated 12.01.2016... - Page 119 This parameter is only visible if the configuration indicates that the compressor is equipped with a variable speed motor and a separate motor speed input. The value is measured in rpm. GEA Refrigeration North America, Inc. | E_806550_2 | Generated 12.01.2016...
-
Page 120: Motor Temperature
This parameter will only be visible if motor bearing temperature monitoring is selected in the Motor Temperature Safeties field motor section of the configuration. The value is measured in the panel temperature units as selected on the Panel Settings screen. GEA Refrigeration North America, Inc. | E_806550_2 | Generated 12.01.2016... - Page 121 This parameter will only be visible if motor winding temperature monitoring is selected in the Motor Temperature Safeties field motor section of the configuration. The value is measured in the panel temperature units as selected on the Panel Settings screen. GEA Refrigeration North America, Inc. | E_806550_2 | Generated 12.01.2016...
-
Page 122: Oil Pump
0.00 kg/cm²A 10.20 kg/cm²A 7.71 kg/cm2A barG -1.01 barG 8.99 barG 6.55 barG barA 0.00 barA 10.00 barA 7.56 barA Oil Pump Cycle Off PSIG 29.9 inHg 130.3 PSIG 95.0 PSIG GEA Refrigeration North America, Inc. | E_806550_2 | Generated 12.01.2016... - Page 123 This parameter is used to select the number of times the oil pump will attempt to start to build oil pressure. If this number is exceeded, a Low Oil Differential Shutdown will be annunciated. This parameter will only be enabled if the compressor brand is set to Grasso. GEA Refrigeration North America, Inc. | E_806550_2 | Generated 12.01.2016...
- Page 124 This parameter is used to select the period of time during startup that the oil pump must maintain a valid oil differential pressure value before the compressor will be permitted to start. This parameter is fixed on Grasso compressors and will not be visible. The value is measured in seconds. GEA Refrigeration North America, Inc. | E_806550_2 | Generated 12.01.2016...
- Page 125 This parameter is used to select the period of time the oil pump will run during a circulation cycle. It is only visible if the Oil Pump Circulation Mode parameter is set to Time. The value is measured in minutes. GEA Refrigeration North America, Inc. | E_806550_2 | Generated 12.01.2016...
-
Page 126: Oil Pump Interlock
Units Minimum Maximum Default barG 1.00 barD barA PSIG 14.5 PSID PSIA High Oil Differential Pressure Shut- See Description See Description down kPaG 100 kPaD kPaA MPaG 0.500 MPaD MPaA GEA Refrigeration North America, Inc. | E_806550_2 | Generated 12.01.2016... - Page 127 See Description Warning Timer barG -3.00 barD 10.00 barD barA PSIG Low Oil Differential Pressure Shut- -43.5 PSID 145.0 PSID See Description down PSIA kPaG -300 kPaD 1000 kPaD kPaA GEA Refrigeration North America, Inc. | E_806550_2 | Generated 12.01.2016...
- Page 128 The default value of this parameter is dependent on the selected compressor manufacturer. The value is measured in the panel pressure units as selected on the Panel Set- tings screen. GEA Refrigeration North America, Inc. | E_806550_2 | Generated 12.01.2016...
- Page 129 Low Oil Differential Pressure Warning will be annunciated. The value is measured in the panel pressure units as selected on the Panel Settings screen. GEA Refrigeration North America, Inc. | E_806550_2 | Generated 12.01.2016...
-
Page 130: Oil Filter Pressure
20.00 barD 1.38 barD PSIG 72.5 PSID 14.9 PSID High Oil Filter Differential Warning 1.5 PSID Offset PSIA 290.1 PSID 20.0 PSID kPaG 10 kPaD 500 kPaD 103 kPaD kPaA GEA Refrigeration North America, Inc. | E_806550_2 | Generated 12.01.2016... - Page 131 This parameter is used to select for what period of time the High Oil Filter Differential parameters will be ignored after the compressor is started. The value is measured in seconds. GEA Refrigeration North America, Inc. | E_806550_2 | Generated 12.01.2016...
-
Page 132: Oil Separator
Seconds 300 s Timer Low Oil Separator Level Else Shut- Seconds 900 s 180 s down Timer Low Oil Separator Level Stop Shut- Seconds 900 s 30 s down Timer GEA Refrigeration North America, Inc. | E_806550_2 | Generated 12.01.2016... - Page 133 Low Oil Separator Level Shutdown will be issued. This parameter is only visible if the Oil Level Min option is selected in the level section of the Configuration. The value is measured in seconds. GEA Refrigeration North America, Inc. | E_806550_2 | Generated 12.01.2016...
-
Page 134: Oil Temperature
This parameter is used to select for what period of time the low oil temperature parameters will be ignored after the compressor is started. This value is measured in seconds. GEA Refrigeration North America, Inc. | E_806550_2 | Generated 12.01.2016... -
Page 135: Suction Pressure
98 kPaA MPaG -0.091 MPaG 1.278 MPaG -0.003 MPaG MPaA 0.010 MPaA 1.379 MPaA 0.098 MPaA kg/cm²G 684.8 mmHg 13.03 kg/cm²G 24.8 mmHg kg/cm²A 0.10 kg/cm²A 14.06 kg/cm²A 1.00 kg/cm²A GEA Refrigeration North America, Inc. | E_806550_2 | Generated 12.01.2016... - Page 136 1.379 MPaA 0.010 MPaA kg/cm²G 684.8 mmHg 13.03 kg/cm²G 684.8 mmHg kg/cm²A 0.10 kg/cm²A 14.06 kg/cm²A 0.10 kg/cm²A barG Low Suction Pressure Warning Off- 0.00 barD 5.00 barD 0.14 barD barA GEA Refrigeration North America, Inc. | E_806550_2 | Generated 12.01.2016...
- Page 137 0.00 kg/cm²D 5.10 kg/cm²D 0.01 kg/cm²D kg/cm²A barG 0.00 barD 5.00 barD 0.01 barD barA Limitation Suction Pressure Force Unload Offset PSIG 0.0 PSID 72.5 PSID 0.1 PSID PSIA GEA Refrigeration North America, Inc. | E_806550_2 | Generated 12.01.2016...
- Page 138 The value is measured in the panel pressure units as selected on the Panel Settings screen. GEA Refrigeration North America, Inc. | E_806550_2 | Generated 12.01.2016...
-
Page 139: Discharge Pressure
-1 kPaG Shutdown kPaA 100 kPaA 1859 kPaA 100 kPaA MPaG -0.001 MPaG 1.758 MPaG -0.001 MPaG MPaA 0.100 MPaA 1.859 MPaA 0.100 MPaA kg/cm²G 9.8 mmHg 17.93 kg/cm²G 9.8 mmHg GEA Refrigeration North America, Inc. | E_806550_2 | Generated 12.01.2016... - Page 140 MPaG 0.000 MPaD 1.000 MPaD 0.138 MPaD MPaA kg/cm²G 0.00 kg/cm²D 10.20 kg/cm²D 1.41 kg/cm²D kg/cm²A Limitation Discharge Pressure Load barG 0.00 barD 10.00 barD 1.38 barD Inhibit Offset GEA Refrigeration North America, Inc. | E_806550_2 | Generated 12.01.2016...
- Page 141 The shutdown will only be issued if the compressor is running. The maximum allowable value for this parameter is set in the configuration. The value is measured in the panel pressure units as selected on the Panel Settings screen. GEA Refrigeration North America, Inc. | E_806550_2 | Generated 12.01.2016...
-
Page 142: Discharge Temperature
Shutdown will be annunciated. The shutdown will only be issued if the compressor is running. The value is measured in the panel temperature units as selected on the Panel Settings screen. GEA Refrigeration North America, Inc. | E_806550_2 | Generated 12.01.2016... -
Page 143: Oil Cooling
This parameter is used to select which temperature value will be referenced for control of the oil cooling sol- enoid. The options are: • Discharge Temperature • Inlet Oil Temperature GEA Refrigeration North America, Inc. | E_806550_2 | Generated 12.01.2016... - Page 144 This parameter is used to select the pulse period of the Liquid Injection Solenoid. The parameter will only be visible if the oil cooling type is set to Yosaku Pulsed Liquid Injection in the configuration. The value is meas- ured in seconds. GEA Refrigeration North America, Inc. | E_806550_2 | Generated 12.01.2016...
-
Page 145: Inlet Temperature
84.0 °C Low Outlet Temperature Shutdown Seconds 300 s 120 s Timer Kelvin 0.0 K 50.0 K 5.0 K Low Outlet Temperature Warning Offset °F 32.0 °F 122.0 °F 41.0 °F GEA Refrigeration North America, Inc. | E_806550_2 | Generated 12.01.2016... - Page 146 Low Outlet Temperature Warning condition will be annunciated. The parameter will only be visible if the control signal of the compressor is currently set to Outlet Temperature. The value is measured in sec- onds. GEA Refrigeration North America, Inc. | E_806550_2 | Generated 12.01.2016...
-
Page 147: Loss Of Remote Start Signal
Default Power Failure Restart Mode Selection – See Description Power Failure Restart Delay Seconds 8000 s 10 s Power Failure Restart Abort Timer Minutes 0.0 min 480.0 min 10.0 min GEA Refrigeration North America, Inc. | E_806550_2 | Generated 12.01.2016... -
Page 148: Superheat
180.0 °F High Suction Superheat Seconds 900 s 80 s Shutdown Timer Kelvin 0.0 K 100.0 K 0.0 K Low Suction Superheat Shutdown °F 0.0 °F 180.0 °F 0.0 °F GEA Refrigeration North America, Inc. | E_806550_2 | Generated 12.01.2016... - Page 149 Low Suction Superheat parameter before a Low Suction Superheat Shutdown is annunciated. This parameter will only be visible if the Superheat Annunciations parameter has been set to Enabled. The value is measured in seconds. GEA Refrigeration North America, Inc. | E_806550_2 | Generated 12.01.2016...
-
Page 150: Economizer
This parameter is used to select the position of the capacity slide below which the economizer solenoid will be de-energized. This parameter will only be visible if the economizer option in the configuration is not set to Disabled. The value is measured in percent. GEA Refrigeration North America, Inc. | E_806550_2 | Generated 12.01.2016... -
Page 151: Pump Down
0 kPaA MPaG -0.101 kPaG 9.899 kPaG -0.101 kPaG MPaA 0.000 kPaA 10.000 kPaA 0.000 kPaA kg/cm²G 759.8 mmHg 100.94 kg/cm²G 759.8 mmHg kg/cm²A 0.00 kg/cm²A 101.98 kg/cm²A 0.00 kg/cm²A GEA Refrigeration North America, Inc. | E_806550_2 | Generated 12.01.2016... - Page 152 This parameter is used to select whether the pump down process will run any time the suction pressure exceeds the Pump Down Cycle On Set Point, or if it will only execute a single time. The options are: • Continuous • Once GEA Refrigeration North America, Inc. | E_806550_2 | Generated 12.01.2016...
-
Page 153: Capacity Outputs
This parameter is used to select the capacity slide valve position above which Capacity Output 1 should be energized. 2. Capacity Output 1 Off This parameter is used to select the capacity slide valve position below which Capacity Output 1 should be de-energized. GEA Refrigeration North America, Inc. | E_806550_2 | Generated 12.01.2016... -
Page 154: Vtrac
The parameter will only be visible if the compressor is configured for VTrac monitoring. The value is measured in percent. 3.1.29 Compressor Service Parameter Units Minimum Maximum Default Compressor Service Notification Selection – See Description GEA Refrigeration North America, Inc. | E_806550_2 | Generated 12.01.2016... -
Page 155: Oil Still Control Parameters
158 °F Oil Drain Seconds 3600 s 30 s Drain Delay Seconds 21600 s 70 s Oil Return Seconds 3600 s 20 s Return Delay Seconds 21600 s 80 s GEA Refrigeration North America, Inc. | E_806550_2 | Generated 12.01.2016... - Page 156 This parameter is used to select the period of time that the oil still will wait before entering Oil Drain. It is only visible on Oil Stills utilizing Berlin style control. The value is measured in seconds. GEA Refrigeration North America, Inc. | E_806550_2 | Generated 12.01.2016...
-
Page 157: Condenser Sequencer Control Parameters
Measured in the panel pressure units as selected in the Panel Settings screen. • Condenser Control Temperature Measured in the panel temperature units as selected in the Panel Settings screen. GEA Refrigeration North America, Inc. | E_806550_2 | Generated 12.01.2016... -
Page 158: Wet Bulb Control
PSIG 0.00 PSID 30.0 PSID 0.00 PSID PSIA Wet Bulb Set Point Split kPaG 0.00 kPaD 207 kPaD 0.00 kPaD kPaA MPaG 0.00 MPaD 0.207 MPaD 0.00 MPaD MPaA GEA Refrigeration North America, Inc. | E_806550_2 | Generated 12.01.2016... -
Page 159: Discharge Pressure
-1.01 barG 24.13 barG 8.27 barG barA 0.00 barA 25.14 barA 9.28 barA Low Discharge Pressure Warning PSIG -29.9 PSIG 350.0 PSIG 105.3 PSIG PSIA 0.00 PSIA 364.6 PSIA 134.6 PSIA GEA Refrigeration North America, Inc. | E_806550_2 | Generated 12.01.2016... -
Page 160: Condenser Control
The value is measured in seconds. 3.3.4 Condenser Control Parameter Units Minimum Maximum Default Schedule Selection Selection – See Description GEA Refrigeration North America, Inc. | E_806550_2 | Generated 12.01.2016... -
Page 161: Water Pump Lockout
23.58 kg/cm²G kg/cm²A 5.27 kg/cm²A 24.61 kg/cm²A 24.61 kg/cm²A barG 4.16 barG 23.12 barG 23.12 barG Water Pump Lockout Discharge Pressure Override End barA 5.17 barA 24.13 barA 24.13 barA GEA Refrigeration North America, Inc. | E_806550_2 | Generated 12.01.2016... - Page 162 This parameter is used to select the value that the discharge pressure of the condenser must fall below after the water pump lockout has been overridden before the override will end. The value is measured in the panel pressure units as selected on the Panel Settings screen. GEA Refrigeration North America, Inc. | E_806550_2 | Generated 12.01.2016...
-
Page 163: Condenser Device Control Parameters
This parameter is used to select the period of time that a two speed fan device will wait before switching from high to low speed. The value is measured in seconds. Hint! This parameter will only appear on two stage fan devices. GEA Refrigeration North America, Inc. | E_806550_2 | Generated 12.01.2016... -
Page 164: Variable Speed Fan/Variable Speed Pump
This parameter will only appear if the Mode parameter is set to Manual. 3.4.3 Water cooled condenser Parameter Units Minimum Maximum Default 0 = None Start Condition None 1 = Compressor controlled Feedback Condenser Unit Warning Seconds 300 s Delay GEA Refrigeration North America, Inc. | E_806550_2 | Generated 12.01.2016... -
Page 165: Evaporator Control Parameters
100 °C 2.0 °C Dead Band °F 0.0 °F 180.0 °F 3.6 °F °C 0.00 °C 40.0 °C 2.0 °C Temperature High Warning Offset °F 0.0 °F 72.0 °F 5.0 °F GEA Refrigeration North America, Inc. | E_806550_2 | Generated 12.01.2016... - Page 166 This parameter is used to select the period of time for which a low evaporator temperature condition must persist before a warning condition will be annunciated. The value is measured in seconds. GEA Refrigeration North America, Inc. | E_806550_2 | Generated 12.01.2016...
-
Page 167: Fan Cycling
The value is measured in minutes. 3.5.3 Defrost Parameter Units Minimum Maximum Default Liquid Solenoid Runtime Defrost Selection – See Description Liquid Solenoid Valve Runtime Minutes 0 min 32000 min 120 min Until Defrost GEA Refrigeration North America, Inc. | E_806550_2 | Generated 12.01.2016... - Page 168 3. Liquid Solenoid Valve Runtime This parameter is used to display the amount of time that the zone’s liquid valve has run since the previous defrost. The value is measured in minutes. GEA Refrigeration North America, Inc. | E_806550_2 | Generated 12.01.2016...
- Page 169 Defrost Termination Temperature Parameter. Hint! This parameter requires the use of a surface mount temperature sensor which is placed on the coldest section of the evaporator coil associated with the zone. GEA Refrigeration North America, Inc. | E_806550_2 | Generated 12.01.2016...
-
Page 170: Suction Valve Settings
This parameter is used to select whether the Hot Gas solenoid output is inverted. The options are Disabled, where the solenoid functions normally, and Enabled, where the solenoid output is inverted. GEA Refrigeration North America, Inc. | E_806550_2 | Generated 12.01.2016... -
Page 171: Evaporator For Chiller
50.0 % High Level Warning Delay (Liquid Feed Maximum Level Warning Seconds 60 s Delay) High Level Shutdown Delay (Liquid Feed Maximum Level Shutdown Seconds 60 s 15 s Delay) GEA Refrigeration North America, Inc. | E_806550_2 | Generated 12.01.2016... - Page 172 Secondary Refrigerant Feedback Pump Delay This parameter is used to select the amount of time the panel will wait to trigger an Secondary Refriger- ant Pump Feedback Warning. The value is measured in seconds. GEA Refrigeration North America, Inc. | E_806550_2 | Generated 12.01.2016...
- Page 173 This parameter is used to select the period of time for which a Maximum Level condition must persist before a Max Liquid Level Shutdown condition will be annunciated. The value is measured in seconds. GEA Refrigeration North America, Inc. | E_806550_2 | Generated 12.01.2016...
-
Page 174: Refrigerant Sensor Control Parameters
The heading of each set of refrigerant parameters will be the name of the associated sensor as entered in the Configuration screen. For further information, refer to Section 2.4, Page 26 GEA Refrigeration North America, Inc. | E_806550_2 | Generated 12.01.2016... - Page 175 This parameter is used to select the period of time for which a high refrigerant warning condition must persist before an annunciation will be triggered. It will only appear if the Refrigerant Sensor High Warning parameter is set to Enabled. The value is measured in seconds. GEA Refrigeration North America, Inc. | E_806550_2 | Generated 12.01.2016...
-
Page 176: Compressor Operating Data
Enabled. The value is measured in seconds. Compressor Operating Data Operating Data is displayed on the main Omni Compressor screen detailed in Section 2.5.1, Page 31. Below is a list of standard operating variables and a brief description of their functions. -
Page 177: Analog Inputs/ Outputs
This value displays the current reading of the capacity slide position sensor. The Capacity Slide Position value is displayed in percent. This point may monitor either a 4-20 mA signal or a potentiometer input. GEA Refrigeration North America, Inc. | E_806550_2 | Generated 12.01.2016... -
Page 178: Standard Calculated Values
This value displays the remaining time before the compressor will restart automati- Cycle On Timer cally. It will only be visible if Automatic Start/Stop is enabled in the configuration. The value is measured in seconds. GEA Refrigeration North America, Inc. | E_806550_2 | Generated 12.01.2016... -
Page 179: Digital Inputs/ Outputs
If this input ever becomes de-energized while the compressor is running, or energized while the compressor is stopped, an interlock alarm condi- tion will be triggered. The states are On or Off. GEA Refrigeration North America, Inc. | E_806550_2 | Generated 12.01.2016... - Page 180 This input monitors a miscellaneous shutdown condition for the compressor. It will Auxiliary Shutdown #2 be energized for normal panel operation. If this input ever becomes de-energized, a shutdown annunciation will be triggered. The states are On or Off. GEA Refrigeration North America, Inc. | E_806550_2 | Generated 12.01.2016...
- Page 181 This output signalizes whether the motor start to start timer is currently active. It Motor Start To Start Timer will be energized while the timer is running and de-energized at all other times. Active The states are On or Off. GEA Refrigeration North America, Inc. | E_806550_2 | Generated 12.01.2016...
- Page 182 This output activates the red lamp on the panel light stack. If the panel has annun- Red Lamp ciated a shutdown condition, this point will be energized. Otherwise, it will be de- energized. The states are On or Off. GEA Refrigeration North America, Inc. | E_806550_2 | Generated 12.01.2016...
-
Page 183: Configuration
Project Number This text box is used to display the GEA project number that corresponds to the project. The number stored in this field will be displayed in the window’s title and on the tile displayed in the main options screen. - Page 184 This drop down list is used to select the type of package controlled by the panel. This option may not be modified in the field. Some common options include: • • • SPduo GEA Refrigeration North America, Inc. | E_806550_2 | Generated 12.01.2016...
-
Page 185: Fig. 105 Panel Details Options
• Remote This option indicates that the panel is intended to house additional I/O and does not contain a pro- cessor. Control is handled through another GEA Omni™ panel. • Satellite This option indicates that the panel is configured as a remote access point for the rest of the system, allowing other panels to be viewed and controlled from a separate location. - Page 186 This is used to display the text string that will appear whenever the Auxiliary Shutdown is triggered. Auxiliary Warning Text This is used to display the text string that will appear whenever the Auxiliary Warning is triggered. GEA Refrigeration North America, Inc. | E_806550_2 | Generated 12.01.2016...
-
Page 187: Compressor Configuration
Compressor This drop down list is used to select the type of compressor the package contains. The options are: • Screw • Recip • Centrifugal GEA Refrigeration North America, Inc. | E_806550_2 | Generated 12.01.2016... - Page 188 This drop down list is used to select the type of device that will control the package’s primary capacity slide valve. This option may only be modified in the field for certain compressor brands and series. The options are: • Dual Solenoids • Single Solenoids GEA Refrigeration North America, Inc. | E_806550_2 | Generated 12.01.2016...
- Page 189 Disabled • Manual • Auto Suction Filter Combo Solenoid This drop down list is used to enable control of the suction filter combo solenoid. Most GEA compressors will use this control. The options are: • None • Normally Open •...
- Page 190 This check box is used to enable control of a double balance piston solenoid. This option is only used for HE series compressors. This option may not be modified in the field. GEA Refrigeration North America, Inc. | E_806550_2 | Generated 12.01.2016...
-
Page 191: Fig. 107 Oil System Details Options
Oil Pressure Location This drop down list is used to select the location where the oil pressure is measured. This option is only available on GEA compressors. This option may not be modified in the field. Oil Cooling This drop down list is used to select the type of oil cooling on the package. - Page 192 This drop down list is used to set the number of heaters that installed on the oil separator. Oil Separator Temperature Probe This check box is used to select whether the oil separator is equipped with a dedicated temperature sen- sor or not. GEA Refrigeration North America, Inc. | E_806550_2 | Generated 12.01.2016...
-
Page 193: Fig. 108 Motor Options
This check box is used to select whether the system is equipped with a high oil level float switch. Low Oil Level This check box is used to select whether the system is equipped with a low oil level float switch. Motor fig.108: Motor options GEA Refrigeration North America, Inc. | E_806550_2 | Generated 12.01.2016... - Page 194 This is used to select the voltage required by the motor heater, if available. This option may not be modi- fied in the field. Package Mounted Starter This is used to select whether a motor starter is mounted on the package. GEA Refrigeration North America, Inc. | E_806550_2 | Generated 12.01.2016...
-
Page 195: Fig. 109 Remote Set Point Options
Suction Temperature Max This is used to select the maximum value that may be assigned to the suction temperature parameters of the compressor. The value is measured in degrees Fahrenheit. Discharge GEA Refrigeration North America, Inc. | E_806550_2 | Generated 12.01.2016... -
Page 196: Fig. 111 Discharge Options
This drop down list is used to select the range of the economizer pressure sensor, if one exists. Economizer Temperature This check box is used to select whether the economizer is equipped with a dedicated temperature sen- sor. GEA Refrigeration North America, Inc. | E_806550_2 | Generated 12.01.2016... -
Page 197: Normal Operating States
7. Check Discharge Check Valve During this step, the panel will check to ensure that the motorized discharge check valve, if applicable, has opened within an acceptable period of time. GEA Refrigeration North America, Inc. | E_806550_2 | Generated 12.01.2016... -
Page 198: Running Description
3.10 Additional Operating States This section details additional compressor states which may occur during operation. GEA Refrigeration North America, Inc. | E_806550_2 | Generated 12.01.2016... -
Page 199: Screw Compressor Capacity Control
The graphs below display a visual representation of both types of capacity control. Forward Forward acting capacity control manages the compressor control pulses via a time-proportioning scheme, as illustrated below. GEA Refrigeration North America, Inc. | E_806550_2 | Generated 12.01.2016... -
Page 200: Fig. 113 Forward Acting Capacity Control
Conversely, if the value of the control signal falls below the set point, the compressor will use unload pulses to move the slide valve. Reverse Reverse acting capacity control manages the compressor control pulses via a time-proportioning scheme, as illustrated below. GEA Refrigeration North America, Inc. | E_806550_2 | Generated 12.01.2016... -
Page 201: Variable
3.12 Variable Vi GEA Grasso compressors may be configured for continuous variable Vi control. The type variable Vi control used in a given project is dependent on the manufacturer and model of the compressor. These options are set in the Package Details section of the Compressor Configuration. -
Page 202: Types Of Vi Control Systems
Types of Vi Control Systems GEA Grasso Compressors use one of two different systems for combined Vi partial load control. All GEA Vi sys- tems utilize an optimum Vi slide position which is calculated based on the type of refrigerant in use, the operating mode of the compressor and the current Capacity Slide Position using a proprietary formula. - Page 203 The physical position of the Vi slide is displayed as Volume Slide Position, which appears on the Operating Data table as a percent. The GEA Omni™ is programmed to proportionally load or unload the Volume slide as needed until its percentage falls within a range of the calculated optimum Vi per- centage defined by the Vi Deadband parameter, at which point the compresor is considered to be operating at the optimum Vi Setting.
- Page 204 For example, if the com- pressor has accumulated 18 seconds of Unload pulses in Vi Mode #2 and begins loading, 18 seconds of load pulses must accumulate prior to returning to Vi Mode #3. GEA Refrigeration North America, Inc. | E_806550_2 | Generated 12.01.2016...
-
Page 205: Lubrication System
Both of these conditions must be satisfied prior to the panel issuing a compressor start command. Once the compressor enters the running state, the oil pump will be stopped. GEA Refrigeration North America, Inc. | E_806550_2 | Generated 12.01.2016... -
Page 206: No Pump
At its minimum position, the valve is permitted to open slightly to prevent liquid from becoming trapped between the valve and the shutoff solenoid. GEA Refrigeration North America, Inc. | E_806550_2 | Generated 12.01.2016... -
Page 207: Annunciations
High Discharge Pressure Shut- This annunciation will be triggered if the discharge pressure reading of the down compressor exceeds the value entered in the High Discharge Pressure Shut- down parameter. GEA Refrigeration North America, Inc. | E_806550_2 | Generated 12.01.2016... - Page 208 Shutdown a dual pump system becomes energized while the lead pump start output is de-energized. This annunciation will only be enabled if the compressor is configured with dual oil pumps. GEA Refrigeration North America, Inc. | E_806550_2 | Generated 12.01.2016...
- Page 209 Shutdown value falls below the value of the High Discharge Superheat Shutdown parameter. This shutdown will only be issued if superheat annunciations have been enabled through the Superheat Annunciations parameter. GEA Refrigeration North America, Inc. | E_806550_2 | Generated 12.01.2016...
- Page 210 This annunciation will be triggered if, after receiving an instruction to open, Open the suction check valve has not indicated that it is fully open within the period of time defined by the Suction Check Failed To Open Shutdown Delay parameter. GEA Refrigeration North America, Inc. | E_806550_2 | Generated 12.01.2016...
- Page 211 Minimum Male Rotor Position This annunciation will be triggered if the current position of the male com- pressor rotor has fallen below the value of the Male Rotor Minimum Shut- down Position parameter. GEA Refrigeration North America, Inc. | E_806550_2 | Generated 12.01.2016...
-
Page 212: List And Description Of Condenser Shutdowns
This annunciation will be triggered if the Condenser Discharge Pressure falls Pressure below the Condenser Low Discharge Pressure Shutdown parameter for the period of time defined by the Low Discharge Pressure Shutdown Delay parameter. GEA Refrigeration North America, Inc. | E_806550_2 | Generated 12.01.2016... -
Page 213: List And Description Of Evaporator Shutdowns
This annunciation will be triggered if a situation occurs which requires the down compressor sequencing control to be disabled. Condenser Sequencer Shut- This annunciation will be triggered if a situation occurs which requires the down condenser sequencing control to be disabled. GEA Refrigeration North America, Inc. | E_806550_2 | Generated 12.01.2016... -
Page 214: List And Description Of Other Shutdowns
All warning annunciations are momentary and will only remain triggered for as long as the condi- tion that caused them persist. GEA Refrigeration North America, Inc. | E_806550_2 | Generated 12.01.2016... -
Page 215: List And Description Of Compressor Warnings
This annunciation will be triggered if the calculated oil filter differential exceeds the value obtained by subtracting the High Oil Filter Differential Warning Offset parameter from the High Oil Filter Differential Shutdown parameter. GEA Refrigeration North America, Inc. | E_806550_2 | Generated 12.01.2016... - Page 216 This annunciation will be triggered if the calculated oil differential pressure Warning falls below the value obtained by adding the Low Oil Differential Pressure Warning Offset parameter to the Low Oil Differential Pressure Shutdown parameter. GEA Refrigeration North America, Inc. | E_806550_2 | Generated 12.01.2016...
- Page 217 This annunciation will be triggered if the temperature measured at the drive End Bearing Temperature end of the male compressor rotor rises above the value of the calculated High Male Rotor Temperature Warning set point. GEA Refrigeration North America, Inc. | E_806550_2 | Generated 12.01.2016...
-
Page 218: List And Description Of Limitation Warnings
This annunciation will be triggered if the compressor discharge pressure rises above the set point calculated by subtracting the value of the Limitation Motor Current Load Inhibit Offset parameter from the High Motor Current Shutdown parameter. GEA Refrigeration North America, Inc. | E_806550_2 | Generated 12.01.2016... - Page 219 Limi- tation Ammonia Storage Pressure Force Unload Offset parameter from the Low Ammonia Storage Pressure Shutdown parameter. GEA Refrigeration North America, Inc. | E_806550_2 | Generated 12.01.2016...
-
Page 220: List And Description Of Condenser Warnings
Secondary Refrigerant Feed- This annunciation will be triggered if no flow is detected while the secondary back Flow refrigerant pump is running. GEA Refrigeration North America, Inc. | E_806550_2 | Generated 12.01.2016... -
Page 221: List And Description Of Profibus Gateway Warnings
Warning Explanation Lost Communication With Gate- This annunciation will be triggered if the communications between the GEA Omni™ panel and the Profibus Gateway are interrupted. LiveBit Time Communication This annunciation will be triggered if the Livebit is not changing while com- With Gateway munication with the Profibus Gateway. -
Page 222: List And Description Of Refrigerant Sensor Warnings
Math Block Units Mismatch This annunciation will be triggered if a Math block in the logic diagram is receiving two different unit types as input. GEA Refrigeration North America, Inc. | E_806550_2 | Generated 12.01.2016... -
Page 223: Notifications
Detected Invalid Entries In Con- This annunciation will be triggered if the action selected for a condenser denser Schedule device in the sequencing schedule is not a valid command for that type of device. GEA Refrigeration North America, Inc. | E_806550_2 | Generated 12.01.2016... -
Page 224: List And Description Of Other Notifications
Notification Explanation Need Updated Drawings This annunciation will be triggered if any change is made to the panel or con- figuration that will necessitate a change to the electrical drawings. GEA Refrigeration North America, Inc. | E_806550_2 | Generated 12.01.2016... -
Page 225: Sensor Calibration
Pressure Transducer Calibration SENSOR CALIBRATION All sensors providing data to the GEA Omni™ panel may be calibrated from the Sensors tab of the Configuration screen. For more information Section 2.14.2, Page 96. GEA recommends that transducer calibrations be checked annually. -
Page 226: Ictd Temperature Transducer Calibration
9. Complete calibration for the sensor by touching the Enter button. GEA Refrigeration North America, Inc. | E_806550_2 | Generated 12.01.2016... -
Page 227: Capacity Slide Position Calibration
Section 5.3.2, Page 228 for compressors without an exter- nal oil pump. Hint! Step variable Vi compressors manufactured by Mycom, Frick or Kobe will require a different procedure, which is detailed in Section 5.3.3, Page 230. GEA Refrigeration North America, Inc. | E_806550_2 | Generated 12.01.2016... -
Page 228: Compressor Capacity Slide Input Calibration With External Oil Pump
1. Ensure that the control panel is in Service Mode and the compressor is Stopped. 2. Touch the Capacity Slide Position entry in the Sensor Calibration display to bring up the calibration pad. GEA Refrigeration North America, Inc. | E_806550_2 | Generated 12.01.2016... - Page 229 Capacity Slide Position Calibration 3. Verify that the compressor is physically fully unloaded. The GEA Omni™ will allow the compressor to start if it has a slide valve reading less than 70 %. Otherwise, the slide valve mechanism must be mechanically adjusted to less than 70 % to allow the compressor to be initially started.
-
Page 230: Calibration For Capacity Slide For Step Variable Vi Compressors
1. Ensure that the control panel is in Service Mode and the compressor is Stopped. 2. Verify that the compressor is physically fully unloaded. The GEA Omni™ will only allow the compressor to start if it has a slide valve reading less than the value of the Maximum Capacity to Allow Start parameter. -
Page 231: Volume Slide Position Calibration
12. Automatic or manual control will resume depending on the control parameter setting. 13. Calibration of the Vi slide is complete. 14. The compressor may be taken out of Service mode and Stopped if desired. GEA Refrigeration North America, Inc. | E_806550_2 | Generated 12.01.2016... -
Page 232: Compressor Motor Current Calibration
Section 5.3, Page 227. 5.6.1 Capacity Slide Calibration with External Oil Pump 1. Ensure that the control panel is in Service Mode and the compressor is Stopped. GEA Refrigeration North America, Inc. | E_806550_2 | Generated 12.01.2016... -
Page 233: Capacity Slide Calibration Without External Oil Pump
4. Before proceeding the transducer must have been powered for at least one minute. 5. The red LED should be flashing at about a ½ second rate if the indicator is functional. Ignore any green LED activity until the calibration is complete. GEA Refrigeration North America, Inc. | E_806550_2 | Generated 12.01.2016... - Page 234 Instruction Manual | GEA Omni™ Control panel 6. Verify that the compressor is physically fully unloaded. The GEA Omni™ will prevent the compressor from starting if the slide valve position displayed is greater than 70 %. The Slide Valve Position may need to be temporarily recalibrated to 0 % to allow the machine to start.
-
Page 235: List Of Abbreviations
Proportional Integral Control Process Loop Control Pulse Period Parallel Slide PSID Pounds per Square Inch Differential PSIG Pounds per Square Inch Gauge Revolutions per Minute Real Time Resistance Temperature Detector GEA Refrigeration North America, Inc. | E_806550_2 | Generated 12.01.2016... - Page 236 List of Abbreviations Instruction Manual | GEA Omni™ Control panel Real Time Automation Set Point Tandem Slide User Interface Compressor Unloading Unload Pulse Volume Index Virtual Network Computing GEA Refrigeration North America, Inc. | E_806550_2 | Generated 12.01.2016...
- Page 237 Instruction Manual | GEA Omni™ List of Abbreviations Control panel GEA Refrigeration North America, Inc. | E_806550_2 | Generated 12.01.2016...
Need help?
Do you have a question about the Omni and is the answer not in the manual?
Questions and answers
Is there a EDS file for GEA OMNI? Where can I download it?