CareFusion MicroRPM Operating Manual
Respiratory pressure meter
Hide thumbs
Also See for MicroRPM:
- Operating manual (76 pages) ,
- Operating manual (77 pages) ,
- Operating manual (76 pages)
Table of Contents
Troubleshooting

Related Manuals for CareFusion MicroRPM

Summary of Contents for CareFusion MicroRPM
- Page 1 MicroRPM (Respiratory Pressure Meter) Operating Manual – English Operating Manual – Manuel d’utilisation – Français Benutzerhandbuch – Deutsch Manual de funcionamiento – Español...
-
Page 3: Table Of Contents
Contents Introduction - English ..........4 Contents .................. 5 PUMA PC Software ..............6 Contraindications ..............7 Warnings and Cautions .............. 7 Indications for Use ..............8 Operation – Mouth Pressures (PImax/MIP + PEmax/MEP) ....9 PImax (MIP) Test ..............9 PEmax (MEP) Test .............. - Page 4 Indications for Use ..............33 Operation – Mouth Pressures............ 34 Operation – Sniff Nasal Inspiratory Pressure ......36 Switching Off ................. 37 Battery Low Voltage Indication ..........37 Battery Replacement ............... 38 Cleaning Instructions .............. 39 External Surfaces of the Spirometer .......... 39 Cleaning accessories ...............
- Page 5 Entretien ................67 Diagnostic des pannes ............. 67 Certificat de sécurité selon la norme CEI 60601-1 ....... 68 Compatibilité électromagnétique (CEM) à la norme EN60601- 1:2007 .................. 69 Symboles................74 Spécifications ................. 76 Pièces De Rechange / Accessoires ..........77 Einführung - Deutsch ..........
- Page 6 Technische Daten ..............104 Verbrauchsartikel und Zubehör ..........105 Introducción - Español ..........108 Contenido ................110 Software PUMA para PC ............111 Contraindicaciones ..............112 Advertencias y precauciones ...........112 Indicaciones de uso..............113 Funcionamiento: presiones bucales (PImáx/MIP + PEmáx/MEP) ..114 Prueba PImáx (MIP) ...............115 Prueba PEmáx (MEP) ..............116 Funcionamiento: SNIP (Presión de inhalación nasal) ....117 Prueba SNIP ................118 Apagado ................118...
-
Page 7: I Introduction - English
MicroRPM (Respiratory Pressure Meter) Operating manual Introduction - English The respiratory pressure meter is a hand held instrument designed for rapid assessment of inspiratory and expiratory muscle strength. The unit can measure the maximum inspiratory and expiratory mouth pressures, MIP and MEP, and the Sniff Nasal Inspiratory Pressure, SNIP. -
Page 8: Contents
Contents The MicroRPM is supplied as follows: MicroRPM Microcomputer Unit Rubber Flanged Mouthpiece Cat. No. 36-MTH6400 Alkaline battery (type 6LR61) Cat. No. 36-BAT1002 Expiratory Pressure Valve Assembly Cat. No. 36-ASS1221 Inspiratory Pressure Valve Assembly Cat. No. 36-ASS1222 Calibration Screwdriver Cat. No. 36-MEC1299... -
Page 9: Puma Pc Software
PUMA PC Software The functionality of the portable MicroRPM is greatly increased when connected to the PUMA PC Software, via an RS232 cable to the Serial Port on the side of the unit. PUMA PC Software is available as a free download from www.carefusion.com/micromedical. -
Page 10: Contraindications
Note: The Repiratory Pressure Meter should only be connected to a computer that is manufactured in accordance with EN 60601-1. Note: Keep the PC out of reach of the patient at all times. Contraindications Pathological conditions resulting in relatively large pressure swings in the abdomen or thorax ... -
Page 11: Indications For Use
CAUTION: Bacterial filters are single patient use. If used on more than one patient there is a risk of cross-infection. Repeat use may increase air resistance and lead to an incorrect measurement. PLEASE NOTE: The product and the battery you have purchased should not be disposed of as unsorted waste. -
Page 12: Operation - Mouth Pressures (Pimax/Mip + Pemax/Mep)
Slide the MicroRPM switch from ‘Off’ to ‘MIP/MEP’, whilst applying no pressure to the mouthpiece. Rotating segments will be displayed whilst the unit performs an auto-zero function. When the MicroRPM is ready a ‘beep’ will be heard and ‘0’ displayed. -
Page 13: Pemax (Mep) Test
The subject should then exhale to RV (Residual Volume), lungs empty, then perform a ‘Mueller’ manoeuvre, a forced inhalation against the MicroRPM with as much effort as possible for as long as possible (minimum 2 seconds). The display will report the result, the maximum average inspiratory pressure sustained over a 1 second period of the test, in centimetres of water (cmH2O). -
Page 14: Operation - Snip (Sniff Nasal Inspiratory Pressure)
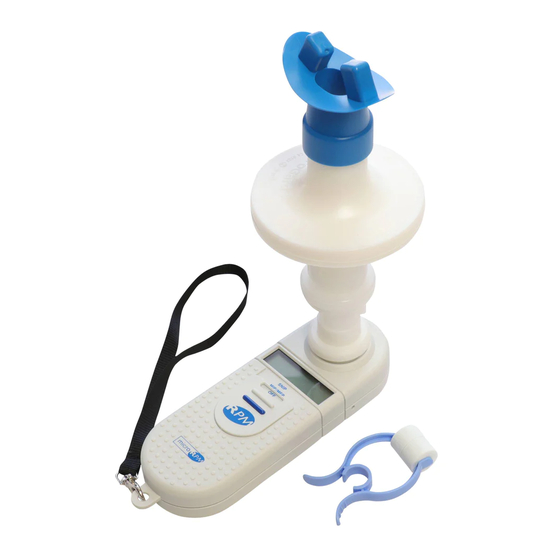
To repeat either the PImax or PEmax tests the MicroRPM must firstly be returned to the ‘Off’ position. Operation – SNIP (Sniff Nasal Inspiratory Pressure) Insert the battery into the rear of the MicroRPM. Fit the Nasal Probe Adapter into the MicroRPM and then attach the correct size Nasal Probe, as shown below. -
Page 15: Snip Test
Nasal Probe. Rotating segments will be displayed whilst the unit performs an auto-zero function. When the MicroRPM is ready a ‘beep’ will be heard and ‘0’ displayed. To perform the test, instruct the subject to insert the chosen Nasal Probe firmly into a nostril, whilst ensuring the other nostril remains open throughout the test. -
Page 16: Battery
The battery level is automatically checked when the unit is switched When the battery is low ‘bAt’ will be displayed before the auto-zero procedure. The MicroRPM may be used when this occurs, but the battery should be replaced as soon as possible. -
Page 17: Cleaning Instructions
Cleaning accessories The MicroRPM unit is protected from contamination by the Bacterial Filter (36-FIL6050) during mouth pressures measurements. The Rubber Flanged Mouthpiece (36-MTH6400), the Expiratory and... -
Page 18: Calibration
S y r i n g e M a n o m e t e r c m H O Slide the MicroRPM switch from ‘Off’ to ‘SNIP’ whilst applying no pressure to the unit. Gently fill the syringe until negative pressure of between 200 and 300cmH2O is read on the Water Manometer. -
Page 19: Servicing
Please Note: Calibration can only be adjusted in a positive direction, as the MicroRPM measures the highest peak value. Therefore, if the reading was greater than that on the Water Manometer, the calibration screw must be turned anti-clockwise first, before calibration is attempted. -
Page 20: Trouble Shooting Information
Trouble Shooting Information Should you encounter problems operating your MicroRPM unit, please consult the table below: Problem Possible Cause Solution unit will not turn on Battery is Replace the battery exhausted Slide switch Return unit for connetion servicing. Display shows reading... -
Page 21: Safety Designation Per Iec 60601-1
IEC 60601-1 for medical electrical systems. During measurements, connect the MicroRPM only to computers that comply with IEC/EN 60601-1 / ANSI/AAMI ES60601-1:2005. WARNING: The user must not touch any voltage-carrying parts and the... -
Page 22: Electromagnetic Compatibility (Emc) To En60601-1:2007
(including other medical devices). The purpose of this testing is to ensure that the MicroRPM is not likely to adversely affect the normal operation of other such equipment and that other such equipment is not likely to adversely affect the normal operation of the MicroRPM. - Page 23 Guidance and Manufacturer’s Declaration – Electromagnetic Emissions The MicroRPM is intended for use in the electromagnetic environment specified below. The customer or the user of the MicroRPM should assure that it is used in such an environment Emission Test Compliance...
- Page 24 Surge +/- 1 kV Not Applicable Mains power quality IEC 61000-4-5 line(s) to line should be that of a typical commercial or hospital environment. +/- 2 kV line(s) to earth Voltage dips, < 5% UT Not Applicable Mains power quality short (>95% dip in should be that of a...
- Page 25 Guidance and Manufacturer’s Declaration – Electromagnetic Immunity The MicroRPM is intended for use in the electromagnetic environment specified below. The customer or the user of the MicroRPM should assure that it is used in such an environment. Immunity Compliance Electromagnetic Environment...
- Page 26 To assess the electromagnetic environment due to fixed RF transmitters, an electromagnetic site survey should be considered. If the measured field strength in the location in which the MicroRPM is used exceeds the applicable RF compliance level above, the MicroRPM should be observed to verify normal operation.
-
Page 27: Symbols
Symbols Type B device In accordance with Directive 93/42/EEC 0086 Disposal in compliance with WEEE Consult the instructions for use Caution: Consult the accompanying documents Date of Manufacture Manufacturer Serial number Single patient use... -
Page 28: Specifications
Federal U.S. law restricts this device to sale by or on the order of a physician. (Rx only) Nationally Recognized Test Laboratory (NRTL) officially recognized by the American Occupational Safety and Health Administration (OSHA) for OSHA Electrical safety and compliance. Specifications Maximum Expiratory Pressure (MEP) Measurements... -
Page 29: Consumables And Accessories
PLEASE NOTE: USE ONLY CAREFUSION ACCESSORIES Please Note: Information in this manual is subject to change without notice and does not represent commitment on the part of CareFusion 232 UK Ltd. The software may be used or copied only in accordance with the terms of that agreement. - Page 31 MicroRPM (Respiratory Pressure Meter) Operating manual Federal (USA) law restricts this device to sale by or on the order of a physician or licensed practitioner. CareFusion, 22745 Savi Ranch Parkway, Yorba Linda CA 92887-4668...
-
Page 32: Introduction - U.s
Introduction – U.S The respiratory pressure meter is a hand held instrument designed for rapid assessment of inspiratory and expiratory muscle strength. The unit can measure the maximum inspiratory and expiratory mouth pressures, MIP and MEP, and the Sniff Nasal Inspiratory Pressure, SNIP. -
Page 33: Package Contents
Package Contents The respiratory pressure meter is supplied with the following items:- 1. Microcomputer unit 2. Rubber mouthpiece 3. Alkaline PP3 battery 4. Expiration pressure valve assembly 5. Inspiration pressure valve assembly 6. Calibration screwdriver 7. Nasal probe sizes 1 to 4 8. -
Page 34: Puma Pc Software
PUMA PC Software The functionality of the portable MicroRPM is greatly increased when connected to the PUMA PC Software, via an RS232 cable to the Serial Port on the side of the unit. PUMA PC Software is available as a free download from www.carefusion.com/micromedical. -
Page 35: Contraindications
Note: The Repiratory Pressure Meter should only be connected to a computer that is manufactured in accordance with EN 60601-1. Note: Keep the PC out of reach of the patient at all times. Contraindications Pathological conditions resulting in relatively large pressure swings in the abdomen or thorax ... -
Page 36: Indications For Use
CAUTION: Bacterial filters are single patient use. If used on more than one patient, there is a risk of cross-infection. Repeated use may increase air resistance and lead to an incorrect measurement. PLEASE NOTE: The product and the battery you have purchased should not be disposed of as unsorted waste. -
Page 37: Operation - Mouth Pressures
Operation – Mouth Pressures Insert the battery into the battery compartment at the rear of the unit, fit the flanged rubber mouthpiece over the required valve assembly and insert into the respiratory pressure meter as shown below: Two valve assemblies are provided. The one marked expiration pressure allows the patient to inspire fully through the valve, which then closes during expiration to allow the meter to measure the maximum expired pressure averaged over one second. - Page 38 To measure the maximum expiratory pressure (PEmax), slide the switch from the “off” position to the MIP/MEP position. Rotating segments will be displayed whilst the unit performs an auto-zero function. During this time there should be no applied pressure. When the unit is ready for use 0 will be displayed. To perform an expiratory pressure test instruct the subject to insert the mouthpiece into the mouth ensuring that the flange is positioned over the gums and inside the lips and that the “bite blocks”...
-
Page 39: Operation - Sniff Nasal Inspiratory Pressure
Operation – Sniff Nasal Inspiratory Pressure Before commencing a test the correct size of nasal probe to be used must be ascertained. The unit is supplied with four sizes designed to cover a wide range of nostrils. Select the size that appears to be the most appropriate, connect it to the unit as shown below, and ask the subject to insert the probe firmly into a nostril. -
Page 40: Switching Off
Before repeating the measurement, the instrument must be reset by sliding the switch to the “off” position. Switching Off The MicroRPM is switched off by sliding the switch back to the ‘Off’ position. Battery Low Voltage Indication The battery level is checked when the unit is switched on. -
Page 41: Battery Replacement
Battery Replacement Locate the sliding cover situated on the rear of the unit, towards the bottom of the device. Place your thumb over the round thumb indent, press gently and slide the cover to the right to remove it from the unit. Lift the old battery out, and holding the battery terminal by the plastic body, pull it off the old battery. -
Page 42: Cleaning Instructions
Cleaning accessories The MicroRPM unit is protected from contamination by the Bacterial Filter (36-FIL6050) during mouth pressures measurements. The Rubber Flanged Mouthpiece (36-MTH6400), the Expiratory and... -
Page 43: Calibration
Important note: Used mouthpieces and Nasal Probes, which are not sterilized, must be disposed off immediately after each use. If there are changes on the material surfaces (cracks, brittleness) the respective parts must be disposed off. Calibration Calibration is factory set and should remain stable indefinitely. However, calibration may be checked by connecting the device to a manometer as shown below: C o n n e c t i n g... - Page 44 If adjustment is required then the following procedure must be followed. The calibration may only be adjusted in a positive direction as the meter monitors the peak pressure value. Therefore if the respiratory pressure meter reading was greater than the manometer reading the calibration screw must be turned anti-clockwise a few turns before calibration is attempted.
-
Page 45: Servicing
If your unit requires service or repair please see page 137 for contact details. A full service manual including circuit diagrams and parts list is available on request. Trouble Shooting Information Should you encounter problems operating your MicroRPM unit, please consult the table below: Problem Possible Cause Solution... -
Page 46: Safety Designation Per Iec 60601-1
IEC 60601-1 for medical electrical systems. During measurements, connect the MicroRPM only to computers that comply with IEC/EN 60601-1 / ANSI/AAMI ES60601-1:2005. WARNING: The user must not touch any conductive parts and the... -
Page 47: Electromagnetic Compatibility (Emc) To En60601-1:2007
(including other medical devices). The purpose of this testing is to ensure that the MicroRPM is not likely to adversely affect the normal operation of other such equipment and that other such equipment is not likely to adversely affect the normal operation of the MicroRPM. - Page 48 Guidance and Manufacturer’s Declaration – Electromagnetic Emissions The MicroRPM is intended for use in the electromagnetic environment specified below. The customer or the user of the MicroRPM should assure that it is used in such an environment Emission Test Compliance...
- Page 49 NOTE UT is the a.c. mains voltage prior to application of the test level. Guidance and Manufacturer’s Declaration – Electromagnetic Immunity The MicroRPM is intended for use in the electromagnetic environment specified below. The customer or the user of the MicroRPM should assure that it is used in such an environment. Immunity Compliance...
- Page 50 To assess the electromagnetic environment due to fixed RF transmitters, an electromagnetic site survey should be considered. If the measured field strength in the location in which the MicroRPM is used exceeds the applicable RF compliance level above, the MicroRPM should be observed to verify normal operation.
- Page 51 Recommended separation distances between portable and mobile RF communications equipment and the MicroRPM The MicroRPM is intended for use in an electromagnetic environment in which radiated RF disturbances are controlled. The customer or the user of the MicroRPM can help prevent electromagnetic interference by maintaining a...
-
Page 52: Symbols
Symbols Type B device Consult the instructions for use Caution: Consult the accompanying documents Date of Manufacture Manufacturer Serial number Single patient use Federal U.S. law restricts this device to sale by or on the order of a physician. (Rx only) Nationally Recognized Test Laboratory (NRTL) officially recognized by the American Occupational Safety and Health Administration (OSHA) for OSHA Electrical safety... -
Page 53: Specifications
Specifications Maximum Expiratory Pressure (MEP) Measurements Maximum Inspiratory Pressure (MIP) Sniff Nasal Inspiratory Pressure (SNIP) Maximum Rate of Pressure With Puma™ Development (MRPD) Maximum Rate of Relaxation (MRR) Operating Pressure: +/- 300cmH2O (±5PSID) Burst Pressure: +/- 700cmH2O (±20PSID) Accuracy: +/-3% Resolution: 1cmH2O Power Supply:... -
Page 54: Consumables / Supporting Products
(Makes 5 litres of solution) Pressure Calibration Kit Interface Cable for PUMA Software To place an order for consumables/supporting products or for general enquiries please contact CareFusion or contact your local CareFusion dealer For US Customer Care: Toll Free 1-800-231-2466, phone 1-714- 283-2228... -
Page 55: Introduction - Français
Manuel d’utilisation III. Introduction - Français Le manomètre respiratoire de CareFusion est un instrument portable conçu pour évaluer rapidement le niveau des forces musculaires inspiratoires et expiratoires. L’appareil mesure les pressions buccales inspiratoires et expiratoires maximum (PImax et PEmax), et la pression inspiratoire nasale (SNIP). -
Page 56: Contenu De L'emballage
Contrôle de qualité du test Mesure de la variabilité du test Contenu De L’emballage Le manometer MicroRPM de CareFusion est livré avec les pièces suivantes: 1. Unité Centrale MicroRPM 2. Embout buccal élastomère 3. Pile alcaline 9 V de type 6LR61 4. - Page 57 SNIP MIP / MEP...
-
Page 58: Le Logiciel Puma
Le logiciel PUMA Les fonctionnalités du MicroRPM portable sont largement plus nombreuses et avantageuses lorsqu’il est connecté à un ordinateur PC équipé du logiciel PUMA, via un câble RS232 série qui se branche sur le côté de l’appareil. Le logiciel PUMA est disponible auprès du représentant Care Fusion dans votre pays. -
Page 59: Contre-Indications
Remarque : l'analyseur de pression respiratoire ne doit être connecté qu’aux ordinateurs fabriqués en accord avec la Norme EN 60601-1. Remarque : gardez l’ordinateur à tout moment hors de portée du patient. Contre-indications Pathologies entraînant des variations de pression relativement importantes dans l'abdomen ou le thorax ... -
Page 60: Indications D'utilisation
MISE EN GARDE : les filtres antibactériens sont à usage unique. Si on les utilise pour plusieurs patients, il y a risque d'infection croisée. Une utilisation répétée peut entrainer une augmentation de la résistance à l'air et fausser les mesures. À... -
Page 61: Mode D'emploi - Pressions Buccales
Mode D’emploi – Pressions Buccales Introduire la pile dans le compartiment situé à l’arrière de l’appareil, placer l’embout buccal sur le filtre lui-même inséré dansr la valve adéquate et enfoncer dans l’analyseur selon les illustrations ci- dessous: Mouthpiece Embout buccal Mouth pressure bacterial filter Filtre buccal anti-bactérien Valve assembly... - Page 62 L’appareil est livré avec deux valves. Celle qui est destinée à la pression d’expiration (les deux valves se distinguent par leur inscription respective) permet au patient d’inspirer complètement par la valve qui se referme ensuite durant l’expiration pour que l’analyseur puisse mesurer la pression expirée maximale moyenne sur une seconde.
-
Page 63: Mode D'emploi - Pression Inspiratoire Sniff Nasale
Avant de recommencer l’analyse ou d’effectuer un test inspiratoire, l’instrument devra être réinitialisé en déplaçant le bouton sur la position off. Pour mesurer la pression inspiratoire maximale (PImax) il suffit également de suivre les instructions ci-dessus après avoir branché la valve de pression inspiratoire sur l’appareil. - Page 64 N a s a l p r o b e N a s a l p l u g a d a p t e r M i c r o c o m p u t e r u n i t Nasal probe Sonde nasale Nasal plug adapter...
-
Page 65: Mise Hors Tension
Avant de recommencer l’analyse, l’instrument devra être réinitialisé en déplaçant le bouton sur la position off. Mise hors tension Le MicroRPM se met hors tension en faisant revenir l'interrupteur en position d'arrêt. Témoin Du Niveau De Charge De La Pile Le niveau de la pile est contrôlé... -
Page 66: Instructions De Nettoyage
La désinfection des pièces contaminées n'est effective que si elles ont été soigneusement pré-nettoyées. Pour le pré-nettoyage et la désinfection, CareFusion recommande la solution testée de poudre stérilisante PeraSafe (amonium quaternaire). En cas d'utilisation d'une solution différente, veuillez suivre les instructions du fabricant de cette solution. -
Page 67: Surfaces Extérieures Du Spiromètre
été trempé dans une solution de stérilisation froide. Accessoires de nettoyage Le MicroRPM est protégé de la contamination par le filtre antibactérien (36-FIL6050) au cours des mesures de la pression buccale. En revanche, l'embout buccal élastomère, la valve de pression expiratoire et inspiratoire, ainsi que les sondes nasales, peuvent être... -
Page 68: Etalonnage
Etalonnage L’appareil est étalonné en usine et est conçu pour rester stable indéfiniment. Cependant, l’étalonnage pourra être testé en branchant l’appareil à un manomètre suivant l’illustration ci-dessous: C o n n e c t i n g F e m a l e N a s a l p l u g l i n e L u e r... - Page 69 Au cas où un réglage soit nécessaire, réglez l’appareil selon les instructions suivantes: L’étalonnage ne pourra être effectué que dans le sens positif étant donné que l’analyseur contrôle la pression de crête. Ainsi, si le résultat de l’analyseur est supérieur à celui du manomètre, la vis d’étalonnage devra être tournée dans le sens inverse des aiguilles d’une montre avant de procéder à...
-
Page 70: Entretien
Un manuel d’entretien complet avec les diagrammes des circuits et une liste des pièces est disponible sur demande. Diagnostic des pannes Si vous rencontrez des problèmes dans l'utilisation de votre appareil MicroRPM, veuillez consulter le tableau ci-dessous : Problème Cause possible Solution L'appareil ne s'allume pas. -
Page 71: Certificat De Sécurité Selon La Norme Cei 60601-1
à l'appareil, assurez-vous toujours que l'ensemble est conforme à la norme de sécurité internationale CEI 60601-1 pour les appareils électromédicaux. Lors des mesures, ne connectez le MicroRPM qu'aux ordinateurs conformes à la norme CEI/EN 60601-1 / ANSI/AAMI ES60601-1:2005. AVERTISSEMENT : l'utilisateur ne doit pas toucher en même temps... -
Page 72: Compatibilité Électromagnétique (Cem) À La Norme En60601-1:2007
à fonctionner dans un environnement contenant d'autres équipements électriques/électroniques (y compris d'autres appareils médicaux). Le but de ce test est de garantir que le MicroRPM n'est pas susceptible de porter atteinte au fonctionnement normal d'un tel autre équipement et qu'un autre équipement... - Page 73 AVERTISSEMENT : le MicroRPM ne doit pas être utilisé à proximité de ou empilé sur un autre équipement. S'il est nécessaire de l'utiliser à proximité de ou empilé sur un autre équipement, le MicroRPM et l'autre équipement doivent être observés / surveillés, afin de vérifier leur fonctionnement normal dans la configuration d'utilisation.
- Page 74 40 % d’alimentation l'utilisateur (creux 60 % en CEI 61000-4-11 MicroRPM exige un fonctionnement sur 5 cycles continu pendant les interruptions 70 % UT courant, (creux 30 % en recommandé d'alimenter cycles...
- Page 75 Directives et déclaration du fabricant – Immunité électromagnétique MicroRPM destiné à être utilisé dans l'environnement électromagnétique spécifié ci-dessous. Le client ou l'utilisateur du MicroRPM devra s'assurer que celui-ci est utilisé dans un tel environnement. Test Niveau de Niveau de Environnement d'immunité test CEI conformité...
- Page 76 électromagnétique dû à des émetteurs RF fixes, une étude électromagnétique du site devrait être envisagée. Si la force de champ mesurée sur le lieu d’utilisation du MicroRPM excède la conformité RF applicable, le fonctionnement normal du MicroRPM doit être vérifié. Si des anomalies sont observées, des mesures supplémentaires peuvent être...
-
Page 77: Symboles
REMARQUE 1 A 80 MHz et 800 MHz, la distance de séparation pour la bande de fréquence supérieure s’applique. REMARQUE 2 Ces indications ne s’appliquent pas dans toutes les situations. La propagation électromagnétique est affectée par l'absorption et la réflexion des structures, des objets et des personnes. - Page 78 Symboles Appareil de catégorie B Conforme à La directive 93/42/EEC 0086 Disposition conformément à WEEE Consulter les instructions d'utilisation Mise en garde : consulter les documents d'accompagnement Date de fabrication Fabricant Numéro de série À usage unique...
-
Page 79: Spécifications
La loi fédérale des États-Unis limite la vente de cet appareil par un médecin ou à la demande de celui-ci. (Ordonnance uniquement) Laboratoire de test national (NRTL) officiellement reconnu par l'American Occupational Safety and Health Administration (OSHA) pour la sécurité et la conformité... -
Page 80: Pièces De Rechange / Accessoires
Pièces De Rechange / Accessoires N° D’article Description 36-MTH6400 Embout buccal caoutchouté 36-ASS1221 Valve de pression d’expiration 36-ASS1222 Valve de pression d’inspiration 36-FIL6050 Filtres anti-bactériens de pression buccale (50 unités par boîte) 36-NPROBE01 Sondes nasales très petit calibre (10 unités par boîte) 36-NPROBE02 Sondes nasales petit calibre (10 unités par boîte) 36-NPROBE03... - Page 81 Représentant en France EOLYS SAS Matériel médical 8 rue de la Grange 69009 LYON – France Tél. +33 (0) 4 37 644 750 Fax +33 (0) 4 37 644 759 E-Mail contact@eolys.fr Site web http://www.eolys.fr...
-
Page 82: Einführung - Deutsch
MicroRPM (Atemdruckmessgerät) Benutzerhandbuch Einführung - Deutsch Das Atemdruckmessgerät ist ein tragbares Gerät zur schnellen Bewertung der inspiratorischen und exspiratorischen Muskelstärke. Das Gerät kann den maximalen inspiratorischen und exspiratorischen Munddruck, MIP und MEP, und den Einatemnasendruck, SNIP, messen. Das Ergebnis jeder Messung wird als Messdruck in der Einheit cmH2O auf dem Flüssigkristallbildschirm angezeigt. -
Page 83: Inhalt
Inhalt Das MicroRPM wird wie folgt geliefert: MicroRPM Mikrocomputer Mundstück mit Gummiflansch Kat. Nr. 36-MTH6400 Alkaline-Batterie (Typ 6LR61) Kat. Nr. 36-BAT1002 Exspiratorische Druckventileinheit Kat. Nr. 36-ASS1221 Inspiratorische Druckventileinheit Kat. Nr. 36-ASS1222 Schraubendreher für die Kalibrierung Kat. Nr. 36-MEC1299 Nasensonden Größe 1-4 Nasensondenadapter Kat. -
Page 84: Puma-Pc-Software
PUMA-PC-Software Die Funktionalität des tragbaren MicroRPM wird deutlich gesteigert, wenn es mit einem RS232-Kabel über den seriellen Anschluss an der Seite des Geräts an die PUMA-PC-Software angeschlossen wird. Die PUMA-PC-Software kann kostenlos unter www.carefusion.com/micromedical heruntergeladen werden. Bitte kontaktieren Sie den Technischen Service bei Fragen zur Installation und zu den Systemanforderungen. -
Page 85: Gegenanzeigen
Grafiken, Vitalkapazität, Druckformate, Animationen, Tendenzen, Vergleiche nach Medikation oder körperlicher Anstrengung und zusätzliche Müdigkeitsindikatoren. Hinweis: Das Atemdruckmessgerät sollte nur an einen Computer angeschlossen werden, der die Anforderungen der Norm EN 60601-1 erfüllt. Hinweis: Halten Sie den PC jederzeit außer Reichweite des Patienten. Gegenanzeigen ... - Page 86 VORSICHT: Handbuch vor der Inbetriebnahme vollständig durchlesen. VORSICHT: Batterien nicht laden, falsch anschließen oder durch Verbrennen entsorgen, da Auslauf- oder Explosionsgefahr besteht. Herstellerempfehlungen zu einer ordnungsgemäßen Entsorgung beachten. WARNUNG: Das Gerät ist nicht für die Verwendung in Gegenwart explosiven oder brennbaren Gasen, brennbaren...
-
Page 87: Gebrauchsanweisung
Gebrauchsanweisung Das MicroRPM (Respiratory Pressure Meter, Atemdruckmessgerät) ist ein tragbares Diagnosegerät für die schnelle Bewertung der inspiratorischen und exspiratorischen Muskelstärke. Das Gerät kann den maximalen inspiratorischen und exspiratorischen Munddruck, MIP und MEP, und den Einatemnasendruck, SNIP, messen. Das System ist für den Einsatz bei pädiatrischen und erwachsenen Patienten ab 3... -
Page 88: Betrieb - Munddruck (Pimax/Mip + Pemax/Mep)
Legen Sie die Batterie in das Batteriefach auf der Rückseite des MicroRPM ein. Stecken Sie die erforderliche Druckventileinheit ('Inspiratorisch' für PImax (MIP), 'Exspiratorisch' für PEmax (MEP)) in das MicroRPM; setzen Sie einen neuen Bakterienfilter in die Druckventileinheit und dann das Mundstück mit Gummiflansch auf den Bakterienfilter wie unten dargestellt. -
Page 89: Pimax (Mip) Test
Druck auf das Mundstück ausgeübt wird. Solange das Gerät eine automatische Nullstellung ausführt, wird eine rotierende Grafik angezeigt. Wenn das MicroRPM bereit ist, ertönt ein Piepton und es wird '0' angezeigt. Um den Test durchzuführen, weisen Sie den Probanden an, das Mundstück in den Mund zu nehmen und sicherzustellen, dass sich der... -
Page 90: Pemax (Mep) Test
Druck auf das Mundstück ausgeübt wird. Solange das Gerät eine automatische Nullstellung ausführt, wird eine rotierende Grafik angezeigt. Wenn das MicroRPM bereit ist, ertönt ein Piepton und es wird '0' angezeigt. Um den Test durchzuführen weisen Sie den Probanden an, das Mundstück in den Mund zu nehmen und sicherzustellen, dass sich der... -
Page 91: Betrieb - Snip (Einatemnasendruck)
Betrieb – SNIP (Einatemnasendruck) Legen Sie die Batterie auf der Rückseite des MicroRPM ein. Stecken Sie den Nasensondenadapter in das MicroRPM und befestigen Sie dann die Nasensonde in der richtigen Größe wie unten dargestellt. Die richtige Größe (1-4) kann ermittelt werden, indem eine Nasensonde am Gerät befestigt wird und dann fest in ein Nasenloch... -
Page 92: Snip Test
Druck auf die Nasensonde ausgeübt wird. Solange das Gerät eine automatische Nullstellung ausführt, wird eine rotierende Grafik angezeigt. Wenn das MicroRPM bereit ist, ertönt ein Piepton und es wird '0' angezeigt. Um den Test durchzuführen weisen Sie den Probanden an, die gewählte Nasensonde fest in ein Nasenloch zu führen und... -
Page 93: Batterie
Der Batterieladestand wird beim Einschalten des Geräts automatisch geprüft. Wenn die Batterie fast leer ist, wird 'bAt' angezeigt, bevor die automatische Nullstellung ausgeführt wird. Das MicroRPM kann dann zwar weiterhin benutzt werden, die Batterie sollte jedoch so bald wie möglich ersetzt werden. -
Page 94: Reinigungsanleitung
Das Außengehäuse des Atemdruckmessgeräts darf mit sterilen Tüchern oder einem feuchten Tuch, das mit einer Kaltsterilisierlösung getränkt wurde, abgewischt werden. Reinigungszubehör Das MicroRPM ist während der Munddruckmessungen durch den Bakterienfilter (36-FIL6050) vor Kontamination geschützt. Das Mundstück mit Gummiflansch (36-MTH6400), die exspiratorische und inspiratorische Druckventileinheit (36-ASS1221, 36-ASS1222) und die Nasensonden (36-NPROBE01, 36-NPROBE02, 36-NPROBE03, 36-NPROBE04) können hingegen in eine Kaltsterilisierlösung wie z. -
Page 95: Kalibrierung
PeraSafe (36-SSC5000A) gegeben werden. Spülen Sie sie gut ab und lassen Sie sie trocknen, bevor sie wieder eingesetzt werden. Wichtiger Hinweis: Gebrauchte Mundstücke und Nasensonden, die nicht sterilisiert werden, müssen sofort nach dem Gebrauch entsorgt werden. Wenn Veränderungen an den Materialoberflächen bemerkt werden (Risse, Sprödigkeit), müssen die entsprechenden Teile entsorgt werden. - Page 96 Füllen Sie die Spritze vorsichtig, bis ein negativer Druck zwischen 200 und 300 cmH2O auf dem Druckmessgerät angezeigt wird. Prüfen Sie, ob der Wert auf dem MicroRPM nicht mehr als 3% davon abweicht. Bitte beachten: Die Kalibrierung kann nur in positiver Richtung angepasst werden, da das MicroRPM den höchsten Spitzenwert misst.
-
Page 97: Wartung
Druck zu erhalten. Um die Kalibrierung zu verändern, drehen Sie die Kalibrierungsspritze langsam im Uhrzeigersinn, bis der gleiche Wert auf dem MicroRPM angezeigt wird. Wartung Die Kontaktdaten für die Wartung oder Reparatur Ihres Geräts finden Sie auf Seite 137. -
Page 98: Sicherheitsbezeichnung Gemäß Iec 60601-1
Hinweis: Wenn Sie andere Geräte an diesem Gerät anschließen, müssen Sie stets sicherstellen, dass die gesamte Einheit die internationale Sicherheitsnorm IEC 60601-1 für elektrische Medizingeräte erfüllt. Das MicroRPM während der Messungen nur an Computer anschließen, die die Norm IEC/EN 60601-1/ ANSI/AAMI ES60601-1:2005 erfüllen. -
Page 99: Elektromagnetische Verträglichkeit (Emv) Gemäß En60601-1:2007
Trotz der Tests, denen das MicroRPM unterzogen wurde, kann der normale Betrieb des MicroRPM durch andere elektrische/elektronische Geräte sowie tragbare und mobile HF-Kommunikationsgeräte beeinträchtigt werden. Da es sich bei dem MicroRPM um eine Medizingerät handelt, sind besondere Vorsichtsmaßnahmen bezüglich der EMV (Elektromagnetischen Verträglichkeit) erforderlich. - Page 100 Entfernung des Produkts aus der Nähe von Quellen, die Interferenzen verursachen, das Problem lösen. WARNUNG: Das MicroRPM sollte nicht neben anderen Geräten betrieben oder mit diesen gestapelt werden. Besteht die Notwendigkeit, das Gerät direkt neben anderen Geräten zu verwenden oder mit diesen zu stapeln, müssen das MicroRPM und die anderen Geräte beobachtet/überwacht...
- Page 101 Leitlinien und Erklärung des Herstellers – elektromagnetische Immunität MicroRPM dient Anwendung nachstehend beschriebenen elektromagnetischen Umfeld. Der Kunde oder der Bediener des MicroRPM sollte sicherstellen, dass es in einer solchen Umgebung betrieben wird. Störfestig- IEC 60601- Compliance- Elektromagnetisches keitstest Testniveau Ebene Umfeld –...
- Page 102 Testspannung. Leitlinien und Erklärung des Herstellers – elektromagnetische Immunität MicroRPM dient Anwendung nachstehend beschriebenen elektromagnetischen Umfeld. Der Kunde oder der Bediener des MicroRPM sollte sicherstellen, dass es in einer solchen Umgebung betrieben wird. Störfestig- Complian Elektromagnetisches Umfeld keitstest 60601- ce-Ebene –...
- Page 103 Leistungs-HF 3 Vrms d = 1,2 x √P IEC61000-4- 150 kHz bis 80 MHz 3 V/m d = 1,2 x √P 80 MHz bis 800 Strahlungs- IEC 61000-4- 3 Vrms d = 2,3 x √P 800 MHz bis 2,5 80 MHz bis 2,5 GHz Wobei P gemäß...
- Page 104 Umgebung von ortsfesten HF-Transmittern sollte eine Standortaufnahme für elektromagnetische Geräte durchgeführt werden. Wenn die gemessene Feldstärke an dem Ort, an dem das MicroRPM verwendet wird, die Werte der anwendbaren Hochfrequenzauflagen übersteigt, sollte das MicroRPM beobachtet werden, um einen einwandfreien Betrieb sicherzustellen. Wenn Abweichungen von der normalen Funktion festgestellt werden, sind u.
- Page 105 Empfohlener Abstand zwischen tragbaren und mobilen Hochfrequenzkommunikationsgeräten und dem MicroRPM Das MicroRPM ist für den Einsatz in einer elektromagnetischen Umgebung konzipiert, in der ausgestrahlte Hochfrequenzstörungen begrenzt sind. Der Käufer oder Benutzer des MicroRPM kann elektromagnetische Interferenzen verhindern, indem er je nach maximaler Ausgangsleistung des Kommunikationsgeräts, wie nachfolgend empfohlen, einen Mindestabstand...
-
Page 106: Symbole
Symbole Gerätetyp B In Übereinstimmung mit der Richtlinie 93/42/EWG 0086 Beseitigung gemäß WEEE Lesen Sie die Bedienungsanleitung Vorsicht: Lesen Sie die Begleitdokumente Herstellungsdatum Hersteller Seriennummer Nur zur Verwendung an einem Patienten... -
Page 107: Technische Daten
Nach US-amerikanischem Recht darf dieses Gerät nur an Ärzte bzw. auf ärztliche Anordnung verkauft werden. (nur für den behandelnden Arzt) Nationally Recognized Test Laboratory (NRTL) offiziell anerkannt von der American Occupational Safety and Health Administration (OSHA) für die elektrische Sicherheit und Compliance (OSHA). Technische Daten Messungen Maximaler Exspiratorischer... -
Page 108: Verbrauchsartikel Und Zubehör
(ergibt 5 Liter Lösung) 36-ASS1234 Druckkalibrierungskit 36-CAB1000 Schnittstellenkabel für PUMA-Software Für weitere Informationen oder um eine Bestellung für Verbrauchsartikel/Zusatzprodukte aufzugeben, wenden Sie sich an CAREFUSION, Ihren lokalen Fachhändler oder besuchen Sie unsere Webseite unter www.carefusion.com/micromedical HINWEIS: VERWENDEN SIE AUSSCHLIESSLICH ZUBEHÖR VON CAREFUSION... - Page 109 Bitte beachten: Die Informationen in diesem Handbuch können ohne vorherige Ankündigung geändert werden. Sie sind seitens CareFusion 232 UK Ltd. nicht bindend oder verpflichtend. Die Software darf nur in Übereinstimmung mit den Vertragsbedingungen verwendet oder vervielfacht werden. Dieses Handbuch darf weder vollständig noch in Auszügen in jeglicher Form oder über jegliche Medien, elektronisch...
-
Page 111: Introducción - Español
MicroRPM (Medidor de presión respiratoria) Manual de funcionamiento Introducción - Español El medidor de presión respiratoria es un instrumento portátil diseñado para realizar una evaluación rápida de la fuerza de los músculos inspiratorios y espiratorios. La unidad puede medir las presiones bucales inspiratorias y espiratorias máximas (MIP y MEP), así... - Page 112 La funcionalidad de la unidad se puede incrementar considerablemente si se conecta a un PC con el software PUMA. Esta aplicación dispone de muchas funciones avanzadas, entre ellas: Visualización en tiempo real de curvas de tiempo/presión Superposición de curvas sucesivas ...
-
Page 113: Contenido
Contenido El MicroRPM se suministra con los siguientes componentes: Microordenador MicroRPM Boquilla con reborde de goma N.º cat. 36-MTH6400 Batería alcalina (tipo 6LR61) N.º cat. 36-BAT1002 Conjunto de válvulas de presión espiratoria N.º cat. 36-ASS1221 Conjunto de válvulas de presión inspiratoria N.º... -
Page 114: Software Puma Para Pc
Software PUMA para PC La funcionalidad del MicroRPM portátil se incrementa considerablemente si se conecta a un PC con software PUMA, mediante un cable RS232 al puerto serie ubicado en el lateral de la unidad. Puede descargar el software PUMA para PC de manera gratuita desde www.carefusion.com/micromedical. -
Page 115: Contraindicaciones
formatos de impresión, incentivos, tendencias, comparaciones de ejercicios o medicación posterior e indicadores de fatiga adicionales. Nota: El medidor de presión respiratoria solo debe conectarse a un ordenador fabricado en conformidad con EN 60601-1. Nota: Mantenga el PC fuera del alcance del paciente en todo momento. -
Page 116: Indicaciones De Uso
IEC/EN 60601-1 / ANSI/AAMI ES60601-1:2005. Indicaciones de uso El MicroRPM (medidor de presión respiratoria) es un instrumento portátil diseñado para realizar una evaluación rápida de la fuerza de los músculos inspiratorios y espiratorios. La unidad puede medir las presiones bucales inspiratorias y espiratorias máximas (MIP y MEP),... -
Page 117: Funcionamiento: Presiones Bucales (Pimáx/Mip + Pemáx/Mep)
MicroRPM. Coloque el conjunto de válvulas de presión necesario ("Inspiratory" para PImáx (MIP), "Expiratory" para PEmáx [MEP]) en el MicroRPM; introduzca un nuevo filtro bacteriano en el conjunto de válvulas de presión y, a continuación, la boquilla con reborde de goma en el filtro bacteriano, tal y como se muestra a continuación. -
Page 118: Prueba Pimáx (Mip)
Segmentos giratorios se visualizarán mientras la unidad realiza una puesta a cero automática. Cuando el MicroRPM esté listo, se escuchará un pitido y se mostrará el valor "0". Para realizar la prueba, indique al sujeto que introduzca la boquilla en la boca, asegúrese de que el reborde está... -
Page 119: Prueba Pemáx (Mep)
Segmentos giratorios se visualizarán mientras la unidad realiza una puesta a cero automática. Cuando el MicroRPM esté listo, se escuchará un pitido y se mostrará el valor "0". Para realizar la prueba, indique al sujeto que introduzca la boquilla en la boca, asegúrese de que el reborde está... -
Page 120: Funcionamiento: Snip (Presión De Inhalación Nasal)
Funcionamiento: SNIP (Presión de inhalación nasal) Introduzca la batería en la parte trasera del MicroRPM. Coloque el adaptador de sonda nasal en el MicroRPM y, a continuación, conecte la sonda nasal del tamaño correcto, como se muestra a continuación. Para determinar el tamaño correcto (1-4), conecte la sonda nasal a la unidad y, a continuación, coloque la sonda nasal en el orificio nasal. -
Page 121: Prueba Snip
Segmentos giratorios se visualizarán mientras la unidad realiza una puesta a cero automática. Cuando el MicroRPM esté listo, se escuchará un pitido y se mostrará el valor "0". Para realizar la prueba, indique al sujeto que introduzca la sonda nasal seleccionada firmemente en el orificio nasal, asegúrese de que... -
Page 122: Batería
Cuando la batería está baja, se visualiza el indicador "bAt" antes del procedimiento de puesta a cero automática. Cuando esto ocurra, se puede utilizar el MicroRPM, pero la batería se debe sustituir lo antes posible. Cuando la batería está completamente agotada, la unidad producirá... -
Page 123: Instrucciones De Limpieza
Accesorios de limpieza La unidad MicroRPM está protegida frente a la contaminación mediante el filtro bacteriano (36-FIL6050) durante las mediciones de presión bucal. Sin embargo, la boquilla con reborde de goma (36-MTH6400), el conjunto de válvulas de presión inspiratoria y espiratoria... -
Page 124: Calibración
Enjuague bien y deje secar antes de volver a montar los componentes. Nota importante: Las boquillas y las sondas nasales usadas, que no están esterilizadas, se deben desechar inmediatamente tras su uso. Si observa cambios en las superficies de los materiales (grietas, fragilidad), se deben desechar las piezas correspondientes. - Page 125 Llene la jeringa cuidadosamente hasta que se lea la presión negativa de entre 200 y 300 cmH2O en el manómetro de agua. Compruebe que la lectura en el MicroRPM no se diferencie más de un 3 % de esta lectura.
-
Page 126: Mantenimiento
MicroRPM. Mantenimiento Si su unidad necesita mantenimiento o reparación, consulte la página 137 para obtener los datos de contacto. Un manual de mantenimiento completo que incluye los diagramas de... -
Page 127: Información Para Solución De Problemas
Información para solución de problemas En caso de detectar problemas del funcionamiento de su unidad MicroRPM, consulte la siguiente tabla: Problema Causa posible Solución La unidad no se Se ha agotado la Sustituya la batería. enciende. batería. Conexión del Devuelva la unidad interruptor para su reparación. -
Page 128: Designación De Seguridad Conforme A Iec 60601-1
IEC 60601-1 para sistemas eléctricos médicos. Durante las mediciones, conecte el MicroRPM solamente a ordenadores que cumplan con IEC/EN 60601-1 / ANSI/AAMI ES60601-1:2005. ADVERTENCIA: El usuario no debe tocar al mismo tiempo una pieza... -
Page 129: Compatibilidad Electromagnética (Cem) De Acuerdo Con En60601-1:2007
Los cambios o las modificaciones en el MicroRPM pueden dar lugar a un aumento en las emisiones o a una reducción en la inmunidad del MicroRPM en relación con el rendimiento de la CEM. - Page 130 ADVERTENCIA: El MicroRPM no debe utilizarse junto a otro equipo ni apilarse con él. Si este tipo de uso es necesario, el MicroRPM y el otro equipo deben controlarse para verificar el funcionamiento normal en la configuración en la que se utilizarán.
- Page 131 Directrices y declaración del fabricante: inmunidad electromagnética El MicroRPM está diseñado para su uso en el entorno electromagnético especificado a continuación. El cliente o usuario del MicroRPM debe asegurarse de que se utilice en este tipo de entorno. Prueba de...
- Page 132 Directrices y declaración del fabricante: inmunidad electromagnética El MicroRPM está diseñado para su uso en el entorno electromagnético especificado a continuación. El cliente o usuario del MicroRPM debe asegurarse de que se utilice en este tipo de entorno.
- Page 133 Los equipos de comunicación por RF portátiles o móviles no se deben usar a una distancia de separación de cualquier pieza del MicroRPM, incluidos los cables, inferior a la recomendada. Esta separación se calcula a partir de la ecuación aplicable a la frecuencia del transmisor: Distancia de separación...
- Page 134 RF fijos, se debe efectuar una inspección electromagnética del sitio. Si la intensidad de campo medida en la ubicación en la que se utiliza el MicroRPM supera el nivel de conformidad de RF aplicable descrito anteriormente, el dispositivo MicroRPM debe someterse a una inspección para verificar que funciona correctamente.
-
Page 135: Símbolos
Distancias de separación recomendadas entre los equipos de comunicaciones por RF móviles y portátiles, y el MicroRPM El MicroRPM está diseñado para su uso en un entorno electromagnético en el que las alteraciones de RF radiada están controladas. El cliente o el usuario del MicroRPM pueden ayudar a evitar las interferencias electromagnéticas si... - Page 136 Eliminación de acuerdo con RAEE Consulte las instrucciones de uso Precaución: Consulte los documentos anexos Fecha de fabricación Fabricante Número de serie Uso de un solo paciente Las leyes federales estadounidenses solo permiten la venta de este dispositivo por parte de un médico o por prescripción facultativa.
-
Page 137: Especificaciones
Especificaciones Presión espiratoria máxima(MEP) Pruebas Presión inspiratoria máxima(MIP) Presión de inhalación nasal (SNIP) Índice máximo de desarrollo de la Con Puma™ presión (MRPD) Índice máximo de relajación (MRR) Constante de tiempo Presión de funcionamiento: +/- 300 cmH2O (± 5 PSID) Presión de ráfagas: +/- 700 cmH2O (±... -
Page 138: Consumibles Y Accesorios
36-CAB1000 Cable de interfaz para software PUMA Para obtener más información o para hacer un pedido de productos desechables o de apoyo, póngase en contacto con CAREFUSION o con su distribuidor local, o visite nuestro sitio web www.carefusion.com/micromedical TENGA EN CUENTA: USE SOLAMENTE ACCESORIOS... - Page 139 Tenga en cuenta: La información presente en este manual está sujeta a cambios sin previo aviso y no establece ningún compromiso por parte de CareFusion 232 UK Ltd. El software puede utilizarse o copiarse exclusivamente de acuerdo con los términos de este contrato.
-
Page 140: Customer Contact Information
Customer contact information UK Customers only For all Sales Order processing for products, training and spare parts, Service and Technical Support enquiries, please contact the following: CareFusion UK 232 Ltd UK Customer Service & Support The Crescent Jays Close Basingstoke... - Page 141 Customer Service Sales Enquiries: Telephone: 0049 931 4972 670 Email: micro.internationalsales@carefusion.com Factory Repair and Administration Enquiries: Telephone: 0049 931 4972 867 Email: support.admin.eu@carefusion.com Technical Support Enquiries: Telephone: 0049 931 4972 127 Email: support.rt.eu@carefusion.com...
- Page 142 Notes:...
- Page 143 Notes:...
- Page 144 CareFusion UK 232 Ltd., The Crescent Jays Close Basingstoke RG22 4BS U.K. 0086 JDE no. 36-MAN1294 Drg no. 064-45 WW (Part 1) Issue 1.2 January 2014 © CareFusion 2014 carefusion.com/micromedical...
Need help?
Do you have a question about the MicroRPM and is the answer not in the manual?
Questions and answers
Buenos días . Quosieta saber precio. De equipo PiMax Pemax