
Summary of Contents for Aquavibe SP3
- Page 1 Operation / Installation Manual MUTE MODE FM/AM ALARM CLOCK DIMMER MENU Bluetooth AM/FM Waterproof Entertainment Center...
-
Page 2: Table Of Contents
Introduction Please take the time to read all of the information in this manual. Familiarity with operation and installation procedures will help you obtain the best possible performance from your new Entertainment Center. WARNING! • FCC REGULATIONS STATE THAT ANY UNAUTHORIZED CHANGES OR MODIFICATIONS TO THIS EQUIPMENT MAY VOID THE USER’S AUTHORITY TO OPERATE IT. -
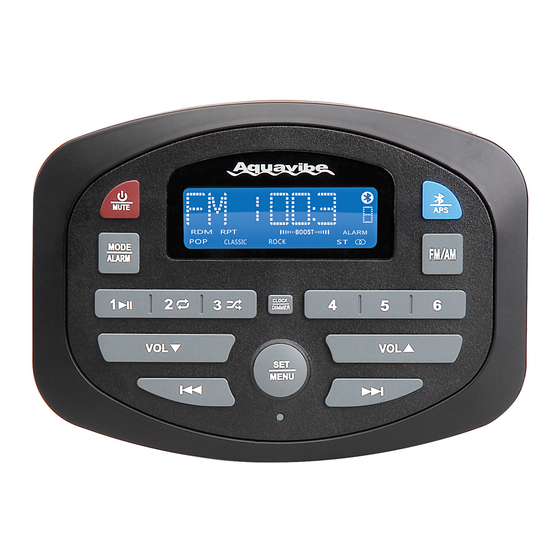
Page 3: Button Locations And Functions
Button Locations and Functions MUTE MODE FM/AM ALARM CLOCK DIMMER MENU 1. Power and Mute Button: : Press to Repeat One, press again to Repeat All, press again to turn Repeat Off. Power Button: Press to turn the entertainment : Press to Random Shuffle the playback. center on. -
Page 4: Button Locations And Functions
Button Locations and Functions (Continued) 11. Seek Up Button Radio Mode: Short press to automatically seek for next higher tunable frequency. Press and hold to move into manual tuning mode. Bluetooth Mode: Press to search for the beginning of the next track. 12. -
Page 5: Remote Control Button Locations And Functions
Selection, Stereo / Mono and Alarm On / Off. Pairing the Wireless Remote Controller: 6. Volume: Press to increase or decrease the 1. To pair the wireless remote with the SP3 push volume level. Use up and down volume and hold the MODE button on the remote buttons to adjust to desired settings within controller until “PAIR”... -
Page 6: General Operation
General Operations Power On: Press the / MUTE button to turn the unit on. Power Off: MUTE Press the / MUTE button for 3 seconds to turn MODE FM/AM ALARM the unit off. CLOCK DIMMER Mute: A short press of the / MUTE button will mute MENU the audio. -
Page 7: Sound Controls
Sound Controls Volume: Increase the volume by pressing the button. MUTE Decrease the volume by pressing the button. MODE FM/AM ALARM CLOCK DIMMER MENU Bass, Treble, Balance, Fader, DSP, Boost and Volume Control Select the desired sound mode by pressing the SET/MENU button. The modes will be displayed in the following order: Bass, Treble, Balance, Fader, DSP, Boost and Volume. -
Page 8: Sound Controls
Sound Controls (continued) DSP: Press the SET/MENU until the “DSP” (Digital Signal Processor - Equalizer) options appears in the display. MUTE MODE The Equalizer presets to choose from are: “DSP OFF”, FM/AM ALARM “POP”, “ROCK” or “CLASSIC”. CLOCK DIMMER Immediately use the to adjust to MENU desired DSP preset. -
Page 9: Clock And Alarm Operations
Setting the Clock 1. Press and hold the CLOCK/DIMMER button until the clock appears in the display. MUTE 2. Press and hold again until the time begins flashing. MODE FM/AM ALARM CLOCK DIMMER 3. Immediately use the to set the minutes and to set the hour. -
Page 10: Radio Operations
Radio Operations Selecting the Radio Play Source: Press the MODE/ALARM button until “RADIO” appears in the display. MUTE MODE FM/AM ALARM CLOCK DIMMER MENU Selecting FM or AM: Press the FM/AM button repeatedly to select from: FM1, FM2, FM3, MUTE MODE AM1 or AM2 FM/AM... -
Page 11: External Aux Rear Audio Input
MENU Note 2: The volume setting of the connected audio device has an effect on the overall loudness of the SP3. For optimum sound quality make sure the media volume on the device is set at 75% or greater. -
Page 12: Bluetooth Operations
MUTE 2. Activate Bluetooth from your mobile device and MODE FM/AM ALARM Select “AquaVibe-SP3” which will, if in range, auto- CLOCK matically appear in your list of Bluetooth devices. DIMMER 3. Press the MODE or the button on the SP3 until MENU “BT AUDIO”... -
Page 13: Installation
3. Insert cable from remote controller through the uneven surface and the remote control. hole and then mounting bracket. 4. Slide mounting bracket onto mounting studs. Wing Mounting Mounting Nuts Bracket Studs Cable Go to www.magnadynestore.com to purchase the optional remote controller for the SP3. -
Page 14: Wiring
Wiring White/Black Wire Gray/Black Wire Left Right Front Front Speaker Speaker White Wire Gray Wire (Front) Wired Remote (Optional) External Automotive Go to www.magnadynestore.com to purchase. Type Antenna MENU (Optional) MODE Wiring Harness 10 Amp Model: SPA-HAR Fuse (Sold Separately) Right Black Wires Audio In... - Page 15 Warranty ONE (1) YEAR LIMITED WARRANTY Magnadyne Corporation or its authorized agents will within one year from the date of sale to you, repair, replace or refund the retail sales price of said product or any part thereof, at the option of the Magnadyne Corporation or its authorized agents, if said product or part is found defective in materials or workmanship, when properly connected and operating on the correct power requirements designated for the specific product.
- Page 16 © Copyright 2015 SP3-UM Magnadyne Corporation Rev. A 10-27-15...
Need help?
Do you have a question about the SP3 and is the answer not in the manual?
Questions and answers