Table of Contents
Advertisement
Advertisement
Table of Contents

Summary of Contents for SkyVision WCM-758DVR
- Page 1 SKYVISION WCM-758DVR WIRELESS 7" DVR MONITOR USER MANUAL...
- Page 3 Broadcast-specific features include safety frame markers and multiple display formats. The SkyVision can also be used for wired monitoring via its HDMI and composite video inputs, as well as composite video loop-through via its video output.
- Page 4 • Do not attempt to disassemble or • All photos are for illustrative purposes repair this product. only. • Do not place or store the SkyVision facedown, since this can damage the screen. • Handle this product with care. Avoid any unnecessary impacts to this product.
-
Page 5: Table Of Contents
TABLE OF CONTENTS Product Contents ..............6 Overview ................7-8 Powering Options ..............9-10 Using the WCM-758DVR ............11 Wired Input And Loop-Through ........12-13 Monitoring Sound ..............14 The Sunshade .................15 The Menu ................16 Color Menu ................17 OSD Menu ................18 Function Menu ...............19 Sound Menu................20... -
Page 6: Product Contents
PRODUCT CONTENTS · 7" Wireless DVR · Mini HDMI to Monitor HDMI cable · Antenna · Dip Switch Quick Reference Card · Sunshade · User manual NOTE: Additional battery plates and/or battery adapters compatible with other popular brands can be purchased by visiting www.elvidcinema.com... -
Page 7: Overview
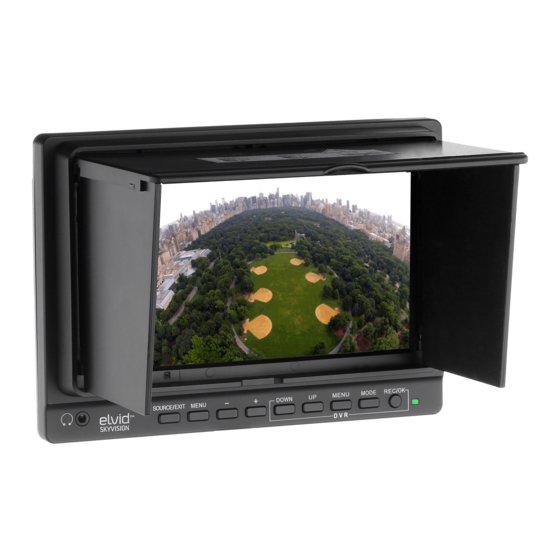
MENU MENU Headphone jack Rec/OK button Screen Status LED Source/Exit button Mode button Menu button Minus DVR Menu Button SKYVISION WCM-758DVR Made in China Picture Size: 7 inch - - - Operation Volts: 6V < Power Consumption: 8W Down Plus... - Page 8 SOURCE/EXIT REC/OK MENU MENU SKYVISION WCM-758DVR Made in China Picture Size: 7 inch - - - Operation Volts: 6V < Power Consumption: 8W Speaker Dip-Switch Chart MicroSD Card Slot Battery mounting plate 1/4″-20 Threaded socket DC Input terminal Composite video output...
-
Page 9: Powering Options
There are two ways to power the SkyVision: AC or a Sony L-series battery. AC POWER To run the SkyVision via AC power, use the Elvid 12 V DC adapter to connect the SkyVision’s DC power input to your AC power source. - Page 10 To install a compatible battery, slide the battery forward until it locks into place. To turn on the SkyVision, press the power switch to the On position. The SkyVision will turn on and enter standby mode, and the power indicator LED will glow red.
-
Page 11: Using The Wcm-758Dvr
Before setting the signal, screw the antenna into the antenna terminal. Use the DIP switches on the SkyVision to set the proper channel. Make sure the SkyVision and your 5.8 GHz composite video transmitter are set to the same channel. -
Page 12: Wired Input And Loop-Through
LED will glow green. COMPOSITE VIDEO INPUT The SkyVision also has a composite video input for use as a wired standard-definition video monitor. Use a composite video input cable to connect your composite video source to the SkyVision’s composite video and audio inputs,... - Page 13 Note: When using the composite video input, your composite audio cable must be plugged into the SkyVision’s composite audio input in order to monitor the sound. Loop-Through: The SkyVision offers composite video loop- through, also known as pass-through. To loop the video...
-
Page 14: Monitoring Sound
MONITORING SOUND You can monitor sound via the integrated speaker or the 3.5 mm stereo headphone jack. To monitor via the headphone jack, plug in a pair of compatible headphones. For more information on volume control, refer to Volume under the Sound Menu section on page 20 and Right Button under the Using the DVR section on page 21 . -
Page 15: The Sunshade
SUNSHADE The sunshade prevents glare on the monitor’s screen by blocking out stray light. It is especially useful when shooting outdoors. 1. Insert the sunshade’s pegs into the monitor’s sunshade slots. 2. Slide the sunshade down until it locks into place. To deploy the sunshade, fully open its lid and wings. -
Page 16: The Menu
THE MENU To get the most out of the SkyVision, make sure the monitor’s settings are properly configured. All of the setting configurations are located in the main menu, which has four submenus: Color, Onscreen Display (OSD), Function, and Sound. The submenus are located in the left column of the main menu window. -
Page 17: Color Menu
You can select red, green, blue, or mono. In mono, a grayscale image will appear onscreen. Color Temp: When using the SkyVision as a wired HDMI monitor, you can select from the presets 9300, 7500, and 6500 K. You can also configure your own custom setting, which is labeled User in the Color Temp menu. -
Page 18: Osd Menu
OSD MENU Language: You can set the onscreen language to English (default), simplified Chinese, French, Italian, German, Spanish, Japanese, Korean, Russian, and Portuguese. H Position: Adjust the horizontal position of the onscreen menu. V Position: Adjust the vertical position of the onscreen menu. OSD Timeout: Use this setting to set the length of time the onscreen menu is displayed. -
Page 19: Function Menu
Display Ratio: You can set the aspect ratio for the onscreen image. The options are 16:9 and 4:3. The default setting is 16:9, which is the SkyVision’s native aspect ratio. The 4:3 setting will scale the image to fit that aspect ratio. The screen will momentarily go dark when you switch ratios. -
Page 20: Sound Menu
SOUND MENU Volume: Adjust the monitoring volume of the SkyVision from 0 to 100. Focus: Use this setting to check the areas of the image that are in focus. Activating this setting increases the sharpness and contrast of the monitor and exaggerates in-focus areas. -
Page 21: Using The Dvr
USING THE The DVR can record your incoming wireless video to a microSD card. Before getting started, make sure the DVR settings are properly configured. The settings are located in the three DVR menus: Video, Setup, and Playback. The DVR system has its own set of buttons that function separately from the Video buttons. -
Page 22: Video Menu
VIDEO MENU To access the Video menu, press the Menu button when the DVR is in recording mode. Resolution: Select the video resolution. You can choose D1 (720 × 576), VGA (640 × 480), or QVGA (320 × 240). Higher resolution will produce a sharper image, however the file size will increase as the resolution increases. - Page 23 Date Stamp: This setting superimposes a date stamp on the video and is useful for security or legal applications because it cannot be altered or hidden after recording. See page 24 on how to set the date and time. Recording Audio: Choose to record audio along with video. Image Quality: The higher the image quality, the sharper and more detailed the image but the larger the file size.
-
Page 24: Setup Menu
SETUP MENU Format: This formats the microSD card inserted in the SkyVision, and will erase all data on the card. To optimize the file system, it is recommended to format the microSD card in the monitor before use. Date/Time: Set the SkyVision’s internal clock. Use the Up and Down buttons to make adjustments, and the Rec/OK button to advance to the next field. -
Page 25: Recording And Playback
SD” onscreen, and a memory card icon will appear in the bottom right corner of the screen. 2. Set the SkyVision to RF mode and make sure it’s receiving a signal from your wireless video source. For more information, refer to Setting the Signal on page 11. -
Page 26: Playback Menu
PLAYBACK MENU To access the Playback menu, press the Mode button to switch to playback mode, and then press the Menu button. Delete: Use the Down or Up button to highlight "Delete Current" (a single file) or "Delete All" (every file) on the inserted microSD card. - Page 27 To play back video from the DVR, follow these steps: 1. Switch the SkyVision to DVR playback mode. 2. Use the Up and Down buttons to cycle through the video and photo files on the inserted microSD card. Videos are indicated by a film icon in the top right corner of the screen, and photos are indicated by a camera icon.
-
Page 28: Specifications
SPECIFICATIONS MONITOR Panel Size 7" Panel Type Backlight Resolution 1024 × 600 Brightness 250 cd/m² Contrast ratio 700:1 Viewing angle L/R: 75°/75° U/D: 70°/75° Dot pitch (W × H) 0.05 × 0.15 mm Display ratio 16:9 Input RF, HDMI, composite video, mono audio Output Composite video,... - Page 29 MONITOR (CONTINUED) Supported formats 480i, 480p, 576i, 576p, (50/60 Hz) 720p, 1080i Threaded socket 1/4″-20 Input voltage 6 to 24 V DC Power consumption ≤8 W Battery type Sony L-series RF receiving 5.8 GHz broadband FM frequency A/V synchronization, 32 channels RF wireless receiving -90 dBm typical value...
-
Page 30: Troubleshooting
AC power source is reliable. Try switching AC power sources. • Make sure the SkyVision is not in standby mode. See Powering Options on page 9 for further reference. The SkyVision is in RF •... - Page 31 PROBLEM SOLUTION The SkyVision is • If you are using the SkyVision as a wired monitor, make sure turned on but there is the HDMI or composite video no onscreen image or cable is securely plugged into the image is weak.
- Page 32 • Check whether the aspect ratio is set correctly. • Make sure that the correct input signal is selected. • If you are using the SkyVision as a wired monitor, check your cables to make sure they are properly connected and that they are reliable.
-
Page 33: Dip-Switch Chart
DIP SWITCH DIP-SWITCH Switch position is indicated CHART CHART by the white box. BAND 1 BAND 2 BAND 3 BAND 4 5865 5733 5705 5740 5845 5752 5685 5760 5825 5771 5665 5780 5805 5790 5645 5800 5785 5809 5885 5820 5765 5828... -
Page 34: Fcc Statement
FCC STATEMENT This device complies with Part 15 of the FCC Rules. Operation is subject to the following two conditions: (1) this device may not cause harmful interference, and (2) this device must accept any interference received, including interference that may cause undesired operation. -
Page 35: Warranty
ONE-YEAR LIMITED WARRANTY This Elvid product is warranted to the original purchaser to be free from defects in materials and workmanship under normal consumer use for a period of one (1) year from the original purchase date or thirty (30) days after replacement, whichever occurs later. The warranty provider’s responsibility with respect to this limited warranty shall be limited solely to repair or replacement, at the provider’s discretion, of any product that fails during normal use of this product in its intended...
Need help?
Do you have a question about the WCM-758DVR and is the answer not in the manual?
Questions and answers