
Related Manuals for iCraig CMP801SP-16OD


Summary of Contents for iCraig CMP801SP-16OD
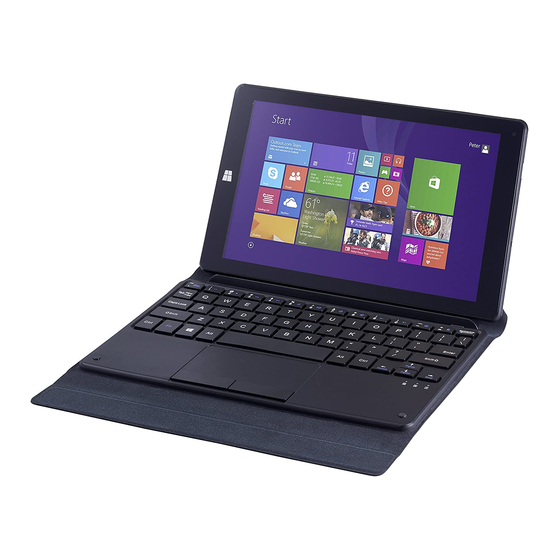
- Page 1 8.95 INCH HIGH DEFINITION TABLET 8.95 INCH HIGH DEFINITION TABLET with Windows 10 and Pin Docking Keyboard with Windows 10 and Pin Docking Keyboard Owner's Manual PLEASE READ BEFORE OPERATING THIS EQUIPMENT. Model: CMP801SP-16OD...
- Page 5 This manual contains important safety precautions and information for correct usage. Please be sure to read this manual carefully before use to avoid any damage to the device. Do not place the product in hot, wet or dusty environments. Do not place the product in hot environments. Especially in summer, do not place it in a car with all the windows closed or in the sun.
-
Page 6: Location Of Controls
Location of Controls Volume - Button Volume + Button Power On/Off Button Front Camera Mini HDMI Port Micro USB Port (For battery charging &OTG ) Headphone Jack Micro SD Card Slot Docking (For Keyboard connection) 10. Rear Camera 11. Speaker... - Page 7 Keyboard Operation: 1. Connect the docking pin from the Tablet to docking plug of Keyboard. F (Function) Button’s assignment: Other Button’s assignment: (Mainly for Microsoft Edge) Fn+F2-Play and Pause F1- Press Fn+ F1 for Microsoft voice assistant Fn+F3-Stop F2-Rename Fn+F4-Previous F3-Search File Fn+F5-Next F4-Select the Edge Address bar...
-
Page 8: Turn On Or Wake
Turn on or Wake To turn on your tablet, press and hold the power key for 3 seconds. Once the screen loads, connect to your Wi-Fi network. To wake, press the power button and the lock screen will appear. Swipe up to unlock and sign in. Charging Fully charge your tablet for 6 hours before the first use. -
Page 9: Getting Started
icon. Then display: The bottom right corner of the Desktop taskbar. Touch the Attention: Plug your tablet into the charger when you see a low battery warning. Getting Started Windows 10 start screen: On the start screen, you can see many programs fixed in the screen. -
Page 10: Image Slide Applications
Image slide applications Slide to right Slide to left Slide to the right from the left side Slide to the left from the right side of the screen to start the application screen to start Charm menu column. program in running. Reduce Enlarge On the touch screen, narrow two fingers... -
Page 11: Introduction To App Interface
Slide upward In the start screen, slide upward from the bottom of the screen to visit all application program (APPS) interfaces. Introduction to app Interface Besides the application programs already fixed on the start screen, you can also start other application programs in all application programs, such as other software application programs attached to the Tablet PC. - Page 12 If you want to add more application programs to the start or taskbar, see the operation in the figure below lightly touch, press and hold the application program magnet for one second and then let go, and select To add to the start screen. You can also use an electromagnetic pen to replace the previous operation Conversely, if you want to cancel or delete a certain application in the start screen: ...
-
Page 13: Charm Menu Column
Take away from taskbar. function to change the ICON size. Charm menu column Slide it to the left from the right side of the screen to start Charm menu column. - Page 14 Lightly touch the ICON to turn ON/OFF the function. Tablet mode : You can turn on tablet mode by lightly touching. Rotation lock: Lock the screen that the screen will not rotation when you tilting the tablet. Note: Turn or turn off the note. All settings: Touch to show All setting ICON to set your tablet.
-
Page 15: Search Menu
VPN: Add a VPN connection. Bluetooth: Turn on/off Bluetooth. Backlight: 25% 50% 75% 100%. 4 level for single tap action. If want to select other ratio, tap and hold few second until “Go to setting” display, tap on it to enter setting menu to select it. -
Page 16: Close Apps
Close apps (Figure 1), slide it inward from the left side of the screen to right side. All running apps will display on screen (Figure 1) (Figure 2), press close button to close the apps. -
Page 17: Basic Operations
(Figure 2) Basic Operations Sleep, restart and shut down... - Page 18 Tablet mode and windows mode If you turn on the tablet mode , the desktop will disappear. Turn off tablet mode can come in windows mode; the desktop will appear with “Start Menu button” Sound. icon, can adjust the sound The bottom right corner of the Desktop taskbar.
-
Page 19: Uninstall Apps
Networking WI-FI can only be used when it connects with a WI-FI Access Point (AP) or a free unsecured WI-FI hotspot. icon. Then will appear as Touch the bottom right corner of the Desktop taskbar. Touch the below. Then choose desired network you want to connect (input password if it requires). Uninstall Apps Press and hold an app until the app is highlighted, and app commands pop up near the app. -
Page 20: Microsoft Office
Open up some Apps to better familiarize yourself with your new tablet. Tap the Alarm app to access your Alarm, World Clock, Timer, or Stopwatch. Camera Tap the camera app to take pictures and videos to share with your friends and family. -
Page 21: Troubleshooting
1. In the Settings Charm, tap on All Settings. 2. Tap on Update and security. Below screen will appear, tap Recovery. 3. In Reset this PC section, choose “Get Started” and choose “Remove everything” Warning: Reset deletes all your personal files and settings. The tablet restores to manufacturer stage. -
Page 22: Technical Specifications
Check the tablet’s power level. Please charge it before starting it. If your tablet still cannot be turned on, you may reset it before you turn it on. No sound from earphones. Check if volume is set to ‘0’. Or earphone may be broken, please try another one. ... -
Page 24: Limited Warranty
LIMITED WARRANTY Craig warrants this product to be free from manufacturing defects in material and workmanship under normal use for a period of 90 days from date of purchase. If service is required, please return the product to the store where it was purchased for exchange; or, pack the unit in the original packing material with all accessories if applicable, a copy of your sales receipt and a Cashier’s check or Money Order for $20.00 (to cover shipping and handling costs) payable to Craig Electronics Inc.
Need help?
Do you have a question about the CMP801SP-16OD and is the answer not in the manual?
Questions and answers
Icons aren't showing up