Advertisement
Quick Links
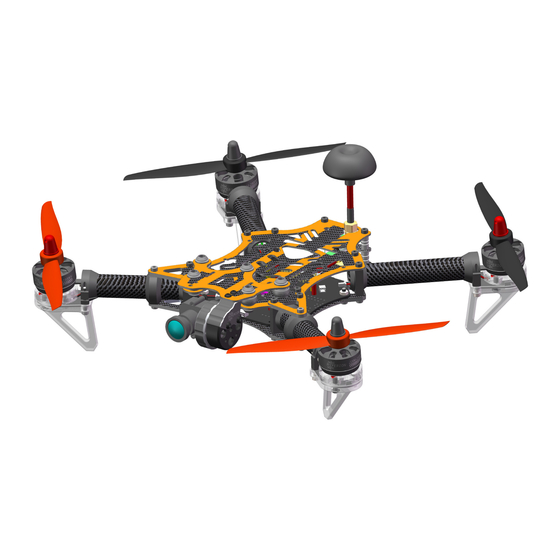
●Fully Assembled: No building or firmware loading
necessary!
●On-Screen Display (OSD): Program or set up your
Vengeance on-the-fly, no computer needed.
●In-Flight-Adjustable Single-Axis Camera Gimbal, Self-
leveling during flight.
●Vibration Dampened Second-Camera Mount.
●Robust, Pure Carbon-Fiber Frame with Carbon
Exoskeleton Reinforcements.
●Stress-Flex Designed to Withstand Impacts, Mass
centralized for high-rate turning.
●Black-Anodized, High-Strength CNC Aluminum Boom
Mounts.
●Tough, Translucent Polymer Landing Legs with Built-in
Directional Red-Green LED.
●8°Forward-Tilt Motor Mounts for Aerodynamic
Efficiency and Top Speed Performance.
●Four 2204, 2300Kv High-Output Brushless Motors.
●Custom Compact BL-Heli 20A Motor Controllers (ESC).
●Visual LED Flight Mode Indicator. Easy to confirm your
flight mode.
●Pre-loaded with Three Flight Modes: Normal, Altitude
Hold, or Acro Mode.
280 Size
FPV Racer
●NAZE Spec 32 Bit Flight Controller 7DOF (with
BMP sensor).
●Altitude Hold via Integrated Barometric Pressure
Sensor (BMP).
●3S and 4S Battery Compatible. Hyperion G6 HV
LiPo Suggested.
●5.8GHz Auto-Scan 40CH Video Transmitter
(VTX) w/ Race Band VTX selectable for either
25mw/200mw output.
●Tuned 5.8GHz CloverLeaf Skew-Planar Antenna.
●Plug-n-Play Ready for Optional GPS modules.
●Built-in Low-voltage Audible Alarm.
●Compatible with Single Wire* or Traditional
Receivers (*S-Bus, Horizon Spektrum™ Satellite, or
Hyperion Compatible receivers).
●Box includes Carry Handle and Foam Racer
Cradle + Parts Holder, for service as field case.
●One Set 6x4 CC/CCW Propellers Included.
Advertisement

Summary of Contents for VENGEANCE HYPERION FPV RACER
- Page 1 FPV Racer ●Fully Assembled: No building or firmware loading necessary! ●On-Screen Display (OSD): Program or set up your Vengeance on-the-fly, no computer needed. ●In-Flight-Adjustable Single-Axis Camera Gimbal, Self- leveling during flight. ●NAZE Spec 32 Bit Flight Controller 7DOF (with ●Vibration Dampened Second-Camera Mount.
- Page 3 229mm 212mm 255mm 216mm •••••••••• 33.2mm ○ Specifications •••••••••• ○ Length:216mm Channels:6~8ch Motors:Hyperion 2204-2300kVㄈ ○ Width:255mm Camera:600tvl 1/3" CMOS Camera ESC:BL Heli 20A ○ Diagonal Base:280mm VTX:5.8Ghz 25-200 0mW selectable w/ 40Ch's Propellers:6040 CW & CCW ○ Weight:435g(w/o battery) Battery:3~4S Compatible Controller:Naze32 w/ OSD &...
- Page 4 Clamps ×4 Front Arm Reinforcement Clamps ×2 Camera Mounting Plate Lower Rear Reinforcement Plates VTX Mounting Plate ▲Vengeance Carbon Fiber Frame Kit ▲Rear Frame Standoff ▲Rear Frame Standoff 9mm ×2 10mm ×2 ▲6x4 CW + CCW Prop Set (Black) ▲ H y p e r i o n S i l i c o n ▲Front Arm Tubes 15×73mm ×2...
- Page 5 1.Motor & Arm The Vengeance's unique motor mount design allows for superb forward flight and cornering performance. Please note that during installation that you install each arm in the proper location and the angle of motors and motor rotation corresponds to the picture enclosed.
- Page 6 BL Heli 20Amp ESC 2~4S LED Landing Gear PCB Translucent Landing Gear Motor Mount Arm Clamps M3 x 10mm Self-tapping Screw 15mm Arm Tubes Arm 1 & 3 use 15×73mm M2.5 × 10mm Hex Screw Arm 2 & 4 use 15×83mm M2.5 ×...
-
Page 7: Main Frame Assembly
3.Main Frame Assembly Frame Mount Clamps M2.5 Self Locking Nut Frame Mount Clamps Flight Controller Front Arm Reinforcement Clamps M2.5 Self Locking Nut Lower Rear Reinforcement Lower Front Reinforcement Plates Plates Lower Main Carbon Fibre Frame M2.5×8mm M2.5×4mm Hex Screws Hex Screws M2.5×8mm Hex Screws... - Page 8 4. Main Arm Assembly ←Make sure that the landing gear plate is 90° to the main frame plate. 90° to Main Frame Plate ↑Once you have confirmed the landing gear plate is 90° to the main frame plate you can then fasten the clamp screw.
- Page 9 Gimbal Mount Bracket Vengeance Silicone Dampeners (Soft) ×5 M2.5×4mm Hex Screws M2.5×6mm Hex Screws Vengeance Gimbal Motor with Sensor (1-axis Pitch) 1/3" 600tvl CMOS Camera Left Reinforcement Plate Right Reinforcement Plate Main Carbon Fibre Frame M2.5 Self Locking Nut M2.5×6mm Hex Screws M2.5×6mm...
- Page 10 6. Frame Final Assembly #2 Nut rotation #1 Nut rotation 5.8GHz Cloverleaf RHCP Antenna (RP-SMA) #1 Propeller rotation #4 Nut rotation #2 Propeller rotation #4 Propeller rotation #3 Nut rotation #3 Propeller rotation NOTE: Do not power on the the VTX without installing the antenna first.
-
Page 11: Receiver Connection
AUX2(Camera Gimbal) Normal Flight that your "Channel Map" is consistent with your brand of 1 2 3 4 5 6 AUX3 Transmitter. DO NOT ARM Vengeance with propellers on AUX4 OSD Programming & for the first time without checking! Upgrade Setting &... - Page 12 Drivers" A f t e r p r o p e r l y c o n n e c t i n g t h e Vengeance via the Micro USB plug to CleanFlight Software the program should resemble your quadcopters position.
- Page 13 Satellite Receiver or PPM input you may select the type of Receiver here. For example: Spektrum PPM or Futaba S.BUS. By default the Vengeance is setup to use standard PWM signal. The user must use a 6Ch Transmitter to utilize the Vengeances standard f u n c t i o n s ( 5 C h .
- Page 14 1100 and more than 1900. If your Transmitters Travel Adjustment is not properly setup than your Vengeance will not ARM. To ARM your Vengeance move your YAW/RUDDER stick to the Bottom and RIGHT position for 1-2 seconds. DO NOT ARM Vengeance with propellers on for the first time!
- Page 15 DO NOTE: Mode switching cannot be remembered by the gimbal after unplugging the battery. When you unplug the battery from the Vengeance the gimbal will reset to "Race Mode" by default. Mode Change Button RACE MODE (Default): While in Race Mode the camera will...
- Page 16 If you wish to increase the sensitivity of the Vengeance's ROLL / PITCH/ YAW you may increase the PID s e t t i n g s t o n o m o r e t h a n 0 . 8 , otherwise it will be difficult to control.
- Page 17 The Vengeance uses four different motors and ESC's. Sometime there might be a inconsistent distrubtion of power among your Vengeance which could lead to poor flight performanc and handling. To reset your ESC and tune them properly please follow the below steps: 1.
- Page 18 10.How to bind Spektrum satellite receiver? 1. Go to the "Ports" page. Under the UART2 page area activate the "Serial RX" tab. (Press Save and Reboot) 2 . G o t o t h e " C o n f i g u r a t i o n " page.
- Page 19 Push button for less than 1 Second: Change Frequency Range 5645-5945 Frequency Channel. Operating Voltage FX795T-L/ 25mW The Vengeance's VTX utilizes a 25mW and 5 Supply current FX795T-2/200mW 250mW selectable VTX. In most European and Output Voltage(VOUT) VOUT=5V Western Countries 25mW is the maximum Rf Operating Temperature -10℃...
Need help?
Do you have a question about the HYPERION FPV RACER and is the answer not in the manual?
Questions and answers