Avery Dennison Monarch 9415 Operator's Handbook Manual
Food freshness system
Hide thumbs
Also See for Monarch 9415:
- Operator's handbook manual (62 pages) ,
- Maintenance instructions (2 pages)

Related Manuals for Avery Dennison Monarch 9415


Summary of Contents for Avery Dennison Monarch 9415
- Page 1 Operator's Handbook Monarch 9415™ ® Food Freshness System 28028 10/15 TC9415MCDOH Rev. A ©2007 Avery Dennison Corp. All rights reserved.
- Page 2 Although Avery Dennison has made every effort to provide complete and accurate information in this manual, Avery Dennison shall not be liable for any omissions or inaccuracies. Any update will be incorporated in a later edition of this manual.
-
Page 3: Table Of Contents
T A B L E O F C O N T E N T S Getting Started ..............1-1 Using This Manual ............1-1 Audience ................. 1-1 Unpacking the Freshness System ........1-2 Installing the System ............1-3 Connecting the System’s Power Supply ....... 1-4 Loading Labels .............. - Page 4 Changing Printer Settings ............. 4-1 Setting the Time and Date ..........Adjusting the Touch Screen ..........Selecting a Language ............Changing the Password ............. Adjusting the Distance to Tear Bar ........Adjusting the Print Position ..........Using the Edit Utility ............. 5-1 Installing the Edit Utility .............
- Page 5 Care & Maintenance .............. 6-1 Clearing Label Jams ............Cleaning the Printhead ............Cleaning the Touch Screen Display ........Cleaning the System ............Troubleshooting ..............7-1 Technical Support ............. Specifications ..............A-1 System Specifications ............A...
-
Page 7: Getting Started
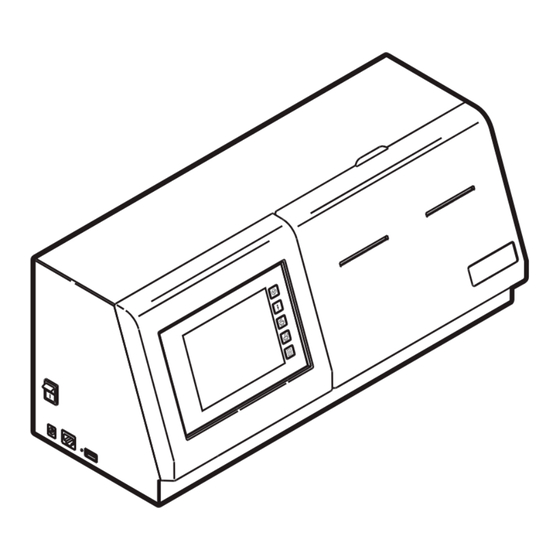
G E T T I N G S T A R T E D Use the Monarch 9415™ Food Freshness System (M0TPMCD) for product freshness and to label inventory. Information in this document supercedes information in previous versions. Check our Web site for the latest documentation and release information. -
Page 8: Unpacking The Freshness System
U n p a c k i n g t h e F r e s h n e s s S y s t e m After you unpack the system, you should have the following: ♦ 9415 system ♦... -
Page 9: Installing The System
I n s t a l l i n g t h e S y s t e m To install the system on the wall: Select a suitable location for the system on a wall. Leave enough room on the left side to connect a USB drive for updating. -
Page 10: Connecting The System's Power Supply
C o n n e c t i n g t h e S y s t e m ’ s P o w e r S u p p l y To connect the power supply to the system: Turn off the system. -
Page 11: Loading Labels
L o a d i n g L a b e l s Dual printer: Printer 1 is located on the left and Printer 2 is located on the right. Printer 1 is the default printer. Single printer: Printer 1 (located on the left) is the only available printer. - Page 12 Make sure the supply clip is in the correct position to touch the edge of the supply. This clip guides the labels through the supply slot so they do not shift while printing. Supply Holder Guide Printer 2 Supply clip Supply slot Printer 1 Dual printer show n...
-
Page 13: Printing Labels
P R I N T I N G L A B E L S This chapter describes how to use the application calibrate the touch screen print freshness labels print Use First labels. Printing Labels 2-1... -
Page 14: About The System
A b o u t t h e S y s t e m There are five control buttons located on the right side of the touch screen. Button Action Stops/cancels the current print job. Advances supply for the selected printer. Selects which printer feeds the supply. -
Page 15: Calibrating The Touch Screen
C a l i b r a t i n g t h e T o u c h S c r e e n Calibrate the touch screen so the buttons respond correctly when pressed. Do this the first time you turn on the printer after receiving it and whenever the screen does not correctly respond to your touch. -
Page 16: Printing Freshness Labels
P r i n t i n g F r e s h n e s s L a b e l s Use the application to label any product for freshness. All products are listed under their corresponding category. Select a new category by touching one of the color-coded home keys on the right side of the screen. - Page 17 Press any product button. Use the numeric buttons to enter the quantity of labels you need to print or press Enter to print only one label and return to the product menu. Press Back to backspace one character. Press Cancel to return to the product screen without printing labels Press Enter to print labels in the quantity you entered.
-
Page 18: Printing Use First Labels
P r i n t i n g U s e F i r s t L a b e l s Apply a “Use First” label to any product on the shelf that needs to be used first. Press the Use First button on the right side of the screen. -
Page 19: Configuring The System
C o n f i g u r i n g t h e S y s t e m Use the Configure menu to set the date and time, add/remove or edit product buttons, adjust the touch screen settings, and select a language. Instructions for using these options are also located under Manager Help. - Page 20 Press Manager Help. Scroll through the text to the instructions you need. See Chapter 3, “Using Edit Mode” and Chapter 4, “Changing Printer Settings” for more information. 2-8 Operator’s Handbook...
-
Page 21: Using Edit Mode
U S I N G E D I T M O D E This chapter tells you how to enter and exit Edit Mode. add or remove product buttons. edit product descriptions. save changes. Edit Mode is for Managers and Supervisors Note: only. -
Page 22: Entering Edit Mode
E n t e r i n g E d i t M o d e You must be in Edit Mode to make changes to the product buttons that appear on the display. You can also use the Edit Utility to make changes. See Chapter 5, “Using the Edit Utility”... - Page 23 Press Mode. Press Edit. The Edit Home Keys button appears. To edit the product buttons only, press OK. To edit the home keys, press Edit Home Keys, then OK. See “Editing Home Keys” for more information. Press Return. You return to the product screen. “Edit Mode” appears across the top of the screen.
-
Page 24: Adding And Removing Products
A d d i n g a n d R e m o v i n g P r o d u c t s You must be in Edit Mode to add or remove product buttons. To add a product: Press any empty product button. -
Page 25: To Remove A Product
Complete the boxes for descriptions, if needed. Set the expiration offset. Press OK. The new product appears on the selected button. You must save your data when you change Note: product buttons. See “Saving Product Changes” for more information. To remove a product: Press any product button, then press Delete. -
Page 26: Editing Product Descriptions
E d i t i n g P r o d u c t D e s c r i p t i o n s You must be in Edit Mode to change the button caption, description, or expiration offset of an existing product. -
Page 27: Editing Home Keys
E d i t i n g H o m e K e y s You must be in Edit Home Keys Mode to change the home key captions. See “Entering Edit Mode” for more information. Press the home key you need to edit. The key appears in the center of the screen. -
Page 28: Saving Product Changes
S a v i n g P r o d u c t C h a n g e s After you make changes to the product screen, you must return to the Configure screen to save your changes. Press Enter the Manager Password and press Enter. -
Page 29: Exiting Edit Mode
E x i t i n g E d i t M o d e You must exit Edit Mode and return to Print Mode to print labels. Press Enter the Manager Password and press Enter. The default password is 1234. The Configure screen appears. - Page 30 3-10 Operator’s Handbook...
-
Page 31: Changing Printer Settings
C H A N G I N G P R I N T E R S E T T I N G S This chapter tells you how to ♦ set the time and date. ♦ adjust the touch screen display. ♦... -
Page 32: Setting The Time And Date
S e t t i n g t h e T i m e a n d D a t e Press Enter the Manager Password and press Enter. The default password is 1234. The Configure screen appears. Press System. 4-2 Operator’s Handbook... - Page 33 Press Set Time/Date. Use the drop down menu to select a format for the date to appear on the printed label. Use the left and right arrows to set the month, day, year, day of the week, hour, and minute fields.
-
Page 34: Adjusting The Touch Screen
A d j u s t i n g t h e T o u c h S c r e e n To adjust the screen contrast and backlight: Press Enter the Manager Password and press Enter. The default password is 1234. The Configure screen appears. -
Page 35: Selecting A Language
S e l e c t i n g a L a n g u a g e The prompts and menus are available in English, Chinese, French, German, and Spanish. Press Enter the Manager Password and press Enter. The default password is 1234. The Configure screen appears. -
Page 36: Changing The Password
C h a n g i n g t h e P a s s w o r d A password is required to make any changes to the printer settings or product screens. To change the Manager Password: Press Enter the Manager Password and press Enter. -
Page 37: Adjusting The Distance To Tear Bar
A d j u s t i n g t h e D i s t a n c e t o T e a r B a r You can set the distance the labels feed past the tear bar to remove the labels. -
Page 38: Adjusting The Print Position
A d j u s t i n g t h e P r i n t P o s i t i o n You can adjust the horizontal (X) and vertical (Y) position of the text on a label. The adjustments are in dots (0.0049 inch) and the defaults are +10 for horizontal and +5 for vertical. -
Page 39: Using The Edit Utility
U S I N G T H E E D I T U T I L I T Y This chapter tells you how to ♦ install the Edit Utility. ♦ configure the network settings. ♦ upload printer data files to your computer. ♦... -
Page 40: Installing The Edit Utility
I n s t a l l i n g t h e E d i t U t i l i t y Install the Edit Utility on a computer with Microsoft Windows XP. Download the Edit Utility from our Web site on your computer. -
Page 41: Configuring The Network Settings
C o n f i g u r i n g t h e N e t w o r k S e t t i n g s The Edit Utility’s IP address must match the IP address of the printer. On the printer: Connect the printer to your computer’s Internet port through a network hub. -
Page 42: On Your Computer
Press Enter. You return to the Internet Setup menu. Press the next field for the IP address, enter the value, and press Enter. Continue entering field values until all fields are completed for IP address, Subnet Mask, and your network’s Default Gateway. Press OK to save the settings. -
Page 43: Uploading The Data File
U p l o a d i n g t h e D a t a F i l e To make changes to the printer’s data file with the Edit Utility, upload the data file to your computer. When you make changes to the product data file on a printer, you can upload the data file from the printer to your computer and save it on a jump drive to update other printers. -
Page 44: Editing The Data File
E d i t i n g t h e D a t a F i l e You can make changes to the product screens by editing the data file using the Edit Utility. You can also edit the data file directly on the printer. See Chapter 3, “Using Edit Mode”... - Page 45 Enter a button caption, description, and expiration time. Use the Language menu to change the language of a selected field. Click the Home Keys on the right to edit product buttons in other categories. Click OK when finished. Click File, then Save to save changes. The data file must be saved as a unicode text file (.dat) to be loaded into a printer.
-
Page 46: Updating With Usb
U p d a t i n g w i t h U S B Use a jump drive no greater than 1 GIG capacity and formatted to FAT or FAT32. Save the latest application and data file on the jump drive. - Page 47 5. Press Update. 6. Press Software to update the application file. This may take several minutes. When the update is complete, the printer restarts. Press Product Data to update the data files. This may take several minutes. The USB Update screen indicates when the update is complete.
-
Page 48: Killing Data Files
K i l l i n g D a t a F i l e s Kill Data Files in the Configure menu deletes all data files from the printer. Data files include product button information, password, and printer configuration. You may need to delete data files when there are errors in the current data files. -
Page 49: Reading Data Files
R e a d i n g D a t a F i l e s The Read Data option in the Configure menu reads the data file from the printer’s memory and overwrites any unsaved configurations or changes to product buttons. -
Page 50: Updating With Ethernet
U p d a t i n g w i t h E t h e r n e t You can also download files directly to the printer from your computer. Updating the Data File Start the Edit Utility. Click Update, DataFile. - Page 51 R e a d i n g D a t a F i l e s The Read Data option in the Configure menu reads the data file from the printer’s memory and overwrites any unsaved configurations or changes to product buttons.
- Page 52 U p d a t i n g w i t h E t h e r n e t You can also download files directly to the printer from your computer. Updating the Data File Start the Edit Utility. Click Update, DataFile.
-
Page 53: Care & Maintenance
C A R E & M A I N T E N A N C E This chapter tells you how to clear label jams clean the platen roller and printhead clean the system. Care & Maintenance 6-1... -
Page 54: Clearing Label Jams
C l e a r i n g L a b e l J a m s To clear a jam: Lower the supply door. Remove any previously loaded labels. Slide the roll of labels off the supply holder. Remove the jammed labels. Caution: Do not use sharp or pointed objects to remove labels. - Page 55 C l e a n i n g t h e P l a t e n R o l l e r a n d P r i n t h e a d Clean the platen roller and printhead after every five rolls of labels or when you see voids in the print.
- Page 56 Clean the platen roller and printhead using a cotton swab moistened with isopropyl alcohol. Allow time for the parts to dry. Replace the platen roller. Snap the cover into place. Reload the labels. See “Loading Labels” in Chapter 1 for more information. 6-4 Operator’s Handbook...
-
Page 57: Cleaning The Touch Screen Display
C l e a n i n g t h e T o u c h S c r e e n D i s p l a y Use a non-ammonia glass cleaner and a soft cloth to clean the touch screen display. If a stronger cleaner is needed, use a mixture of 50% isopropyl alcohol and water. -
Page 59: Troubleshooting
T R O U B L E S H O O T I N G This chapter lists some common problems and their solutions. Problem Action The screen is off Check the power connections when the printer is from the power supply to the turned on. -
Page 60: Technical Support
Problem Action The label exits partially Clear a label jam. See “Clearing out of the printer or the Label Jams” in Chapter 6 for printer skips a label. more information. Load the labels correctly and make sure they are the FreshMarx labels recommended for your application. -
Page 61: Specifications
S P E C I F I C A T I O N S S y s t e m S p e c i f i c a t i o n s Height: 7.75” (197 mm) Width: 17.75" (451 mm) Depth: 7.0”... - Page 64 28028 http://www.monarch.averydennison.com/mcdonalds/HK_home.html http://www.monarch.averydennison.com/mcdonalds/franke_home.html For supplies and sales, H&K Norwood at 1-800-521-3987 or www.mcd.kitchen24.com. Franke at 1-800-423-5247 or www.frankeparts.com. For technical support call Avery Dennison at 1-800-543-6650.
Need help?
Do you have a question about the Monarch 9415 and is the answer not in the manual?
Questions and answers