
Subscribe to Our Youtube Channel
Summary of Contents for Badgy 100
-
Page 1: User Guide
USER GUIDE Evolis © 2015 All rights reserved. November 2015. Ref. KU-BDG2-044-ENG-B1... -
Page 2: Copyright Information
TRADEMARKS ® Badgy and Badgy Premium Suite are trademarks of Evolis Card Printer. All other trademarks belong to their respective holders. WARRANTY Refer to the warranty notice supplied in digital format with your printer for warranty terms and conditions and limitations. -
Page 3: Warranty Registration
ABOUT YOUR NEW PRINTER Using your new Badgy printer, you will be able to create a wide variety of high-quality cards and personalized badges which can be printed in various thicknesses, colors and styles. This printer uses consumables and accessories that are available from your Badgy reseller. For further details, visit our website www.badgy.com. -
Page 4: Getting Started 1
A consumables kit made up of a color ribbon and PVC cards If any of these components is missing, please contact your Badgy reseller. Only use the power supply unit provided with your Badgy printer (SWITCHBOX type F10723-A or CWT type KPL-065M). Only use the USB cable supplied with your Badgy printer. -
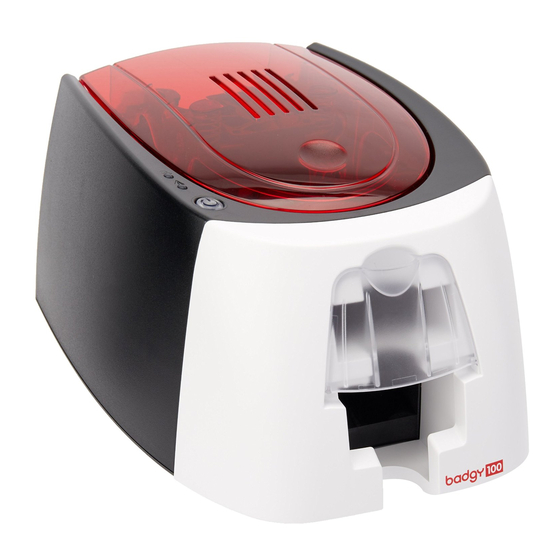
Page 5: Description Of The Printer And Its Functions
1-2 DESCRIPTION OF THE PRINTER AND ITS FUNCTIONS Warning lights Cards and ribbon Printer Control button - Card feeder - USB port - Output hopper - Power cable socket - Control panel - Kensington lock... - Page 6 - Thermal print head - Serial number label The machine should always be disconnected from the power supply (unplugged) before any work is carried out on it.
-
Page 7: Installation
Watch the getting started video for the machine described in this section, also available at www.badgy.com The Badgy printer must be placed in a dry location, protected from dust and drafts but well-ventilated. Take care to keep your printer on a fl at, sturdy surface able to bear its weight. -
Page 8: Connecting The Usb Cable
To save energy, the printer will automatically switch itself to standby mode after 10 minutes of inactivity. The standby times can be confi gured in the Badgy Print Center. In standby mode, sending a print request restarts the printer. Hibernation mode can also be confi gured; briefl y pressing the control button (for 1 second) takes the printer out of this mode. -
Page 9: Fitting The Ribbon
For optimum print quality, it is recommended that you fully clean the Badgy printer once a year, or after a period of inactivity. See the Servicing and Maintenance section of this manual. -
Page 10: Loading The Cards
1-3c Cards For optimum quality, the cards used must be ISO 7810 certifi ed. Only use the card types recommended for Badgy. Avoid touching the printable surface of the cards in order to preserve print quality. Do not use cards that have been damaged, folded, embossed or dropped on the fl oor. -
Page 11: Removing Printed Cards
Removing printed cards Once the print cycle is complete, the cards are issued into the output hopper below the card feeder. This output hopper is designed to collect the printed cards. The printer is equipped with an output hopper with a maximum capacity of 25 cards that are 0.76 mm thick and 40 cards that are 0.50 mm thick. Using cards that are 0.76 mm thick after extended use of cards that are 0.50 mm thick may require the rollers to be cleaned. -
Page 12: Installing The Driver
Follow the installation procedure scrupulously. All versions of Windows require the user to have administrator rights to install the driver. Installing the driver requires the installation of the Badgy Print Center by default. This will help you to confi gure your machine. - Page 13 A graphic application called Badgy Print Center is available to help you change certain predefi ned settings, if needed. To access this application: From the Start button on the bottom left of your screen in the Windows task bar, select All programs, Evolis Card Printer, Badgy Premium Suite, Badgy Print Center.
- Page 14 Right-click on the printer name, then select Properties to access the confi guration space, or double-click on the printer name. Pay attention to the settings defi ned under the driver Properties settings and do not hesitate to contact your Badgy reseller for any advice and...
- Page 15 2-3 NOTIFICATION OF MESSAGES AND WARNINGS Through visual notifi cations on the computer, the Badgy Printer Manager provides information about the printer, and alerts you when your attention is required. There are several types of message: Messages and alerts associated with the ribbons, their compatibility with your printer, and the nature of your print requests.
- Page 16 2-4 PRINTING CARDS WITH BADGE STUDIO Your printer is delivered with software for creating badges and cards. The Evolis Badge Studio allows you to easily personalize your badges and cards. You can add various items: Logos and illustrations Identifi cation photos Text Barcodes, QR codes etc.
- Page 17 In order to get the most from your printer, cleaning is recommended. We recommend regular cleaning of the different printer parts: rollers and print head. The "T" cards and Evolis cleaning pens are available at your Badgy reseller. Do not hesitate to clean the printer in the event of any printing problems.
-
Page 18: Cleaning The Printer
3-1 Cleaning the Printer Recommended cleaning cycle: Once a year. However, we do recommend more regular cleaning if your printer is located in a dusty place or if you use it intensively. Servicing accessory: impregnated "T" shaped card. Follow the procedure below to proceed with cleaning: Open the printer cover. - Page 19 Remove the "T" shaped card Printer cleaning may also be carried out from the Badgy Print Center by clicking on "Start cleaning." Warning, the "T" shaped card must be used immediately after the bag is opened. A dry "T" card would not be operational, and may damage your printer.
-
Page 20: Cleaning The Print Head
3-2 Cleaning the Print Head Recommended cleaning cycle: If you notice poor-quality printing or after a period of inactivity. Servicing accessory: cleaning pen from the Evolis High Trust ® brand. Unplug the printer from its power supply before cleaning the print head. Follow the cleaning cycles scrupulously. - Page 21 The cleaning pen can be used up to 8 times for cleaning the print head. Warning! Like the "T" cards, the cleaning pen should not be allowed to dry out or it will no longer work. Follow the procedure below: Remove the cover from the cleaning pen.
-
Page 22: Warnings And Diagnosis
Badgy technical support. 4-1 WARNINGS AND DIAGNOSIS Although the Badgy printer was designed to work independently, keeping user involvement to a minimum, it may nonetheless prove useful to gain some familiarity with the main warnings. - Page 23 Check the condition of the ribbon any other problems, contact your STEADY LIGHT in the printer. If you have a print Badgy reseller. job in progress, this restarts with a new card. FLASHING For optimum use of your printer, we advise you to use the recommended ribbons and cards.
- Page 24 For more STEADY LIGHT details, refer to section 4-3b. If the problem persists, contact technical support at www.badgy.com FLASHING COOLING MODE FIRMWARE UPDATE The cooling system has been The printer is updating its activated.
-
Page 25: Diagnosis Help
The printed card is ejected into the output hopper. Printing the technical test card can also be launched from the Badgy Print Center. To do this, open the Badgy Print Center, double-click on your printer or right-click on "Properties" and go to "System details" then "Testing cards."... -
Page 26: 4-2B Printing A Graphic Test Card
To print the graphic test card, check fi rst of all that a ribbon and card are present in the printer. Go to the Badgy Print Center, select System details, and click on the Testing cards tab. Then click on the Graphical test card button. The card is printed and the printed card is ejected into the output hopper. -
Page 27: Troubleshooting
Check that the ribbon is not fi nished or damaged. Replace it or re-install it if necessary. The print head may be damaged Print a test card. www.badgy.com. If the test card does not print, contact Badgy technical support or visit the website... -
Page 28: Poor Print Quality
Use of incompatible cards. Check that the cards used match the specifi cations. We recommend that you obtain your cards from a Badgy reseller. Use of cards from a different brand is liable to adversely affect print quality and/or damage the print head. -
Page 29: Partial Or Incorrect Printing
Check the print settings Check that no area of the card design to be printed is outside the print margins. Check the document orientation (portrait or landscape) in the Badgy Print Center confi guration. Check the interface cable If irregular characters are printed, check that you are using the USB cable supplied with your printer. -
Page 30: 4-3B Freeing Jammed Cards
4-3b Freeing Jammed Cards Control panel displays: MECHANICAL ERROR MECH Card jammed in the printer. Print jobs are interrupted. The printer warning light and control button light up. Do not turn your printer off, as this cancels pending print jobs in the printer’s memory. Remove the card as follows: Open the printer cover and remove the ribbon. -
Page 31: 4-3C Updating The Firmware
Check the connection cables and run a new update However, if you experience problems while updating the fi rmware with the Badgy Print Center, please contact your Badgy reseller who can provide a new fi le to install the fi rmware. - Page 32 Check the connection cables and run a new update. However, if you experience problems while updating the fi rmware with the Badgy Print Center, please contact your Badgy reseller who can provide a new fi le to install the fi rmware.
-
Page 33: 4-3D Updating The Driver
Updating the driver is a task that is required in order to fi x malfunctions or gain the benefi t of new options. Before any update, please contact your Badgy reseller who will be able to guide you on whether it is advisable to carry out this operation. -
Page 34: Technical Support
A description of the incident that occurred A description of the steps that you took to resolve the problem. The Badgy website also provides driver updates, FAQs , educational videos, our special offers, and general information. FAQs: Frequently Asked Questions... -
Page 35: Specifications
Appendix SPECIFICATIONS This section presents your printer’s specifi cations. Print area Printing close to the edge with a margin of 1.35 mm Edge-to-edge printing Print speed 45 s per card (80 cards an hour) 38 s per card (95 cards an hour) YMCKO color Monochrome (K) 16 s per card (180 cards an hour) -
Page 36: Warranty Conditions
® for Windows: • Driver • Badgy Print Center for administering, managing, and confi guring the printer • Badgy Printer Manager for two-way graphic notifi cation • Compatible with Windows: XP SP3, Vista, 7 & 8 (32 & 64 bits) Requires .net 4.0 client profi... -
Page 37: Power Supply
CE, FCC, IEC, VCCI, CCC, KC* ROHS Available in September 2014 Power supply Power supply unit: 100-240 volts AC, 50-60 Hz, 1.7 A Printer: 24 volts DC, 2.7 A Environment Min./max. operating temperature: 15°/30° C (59°/86° F) Humidity: 20% to 65% non-condensing Min./max. -
Page 38: Declaration Of Conformity
Appendix DECLARATION OF CONFORMITY This section will provide certifi cations of your Evolis printer. Concerning Safety and Electromagnetic Compatibility of Radio Equipment (R&TTE 1999/5/EC, 2006/95/EC FCC Statement (For U.S.A.) & 2004/108/EC Directives and (RoHS2) 2011/65/EU) Federal Communications Commission Radio Frequency Interferences Statement Manufacturer’s name: Evolis Card Printer Badgy100 / Badgy200 model conforms to the following specifi...
Need help?
Do you have a question about the 100 and is the answer not in the manual?
Questions and answers