Table of Contents
Advertisement
Available languages
Available languages
Advertisement
Table of Contents

Related Manuals for Logic3 PSU448

Summary of Contents for Logic3 PSU448
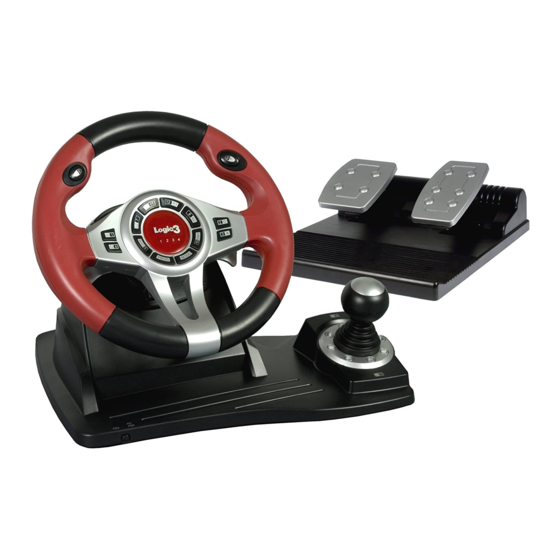
- Page 1 Instruction Manual PSU448/PSU449 TopDrive GT (3in1) / TopDrive FreeBird RF (3in1)
- Page 2 Thank you for purchasing the Logic3 PSU448/PSU449. As with all Logic3 products it has been built to the highest manufacturing standards and tested throughout its development, to ensure you get the best possible product. Please read through and familiarize yourself with this manual before you use the PSU448/PSU449.
- Page 3 Type PS2/Digital PS2/Analog ○ ○ ○ □ □ □ Action key D-PAD DOWN DOWN DOWN DOWN ‘Logic3’ LEFT LEFT LEFT LEFT RIGHT RIGHT RIGHT RIGHT START START START Function Key SELECT SELECT SELECT ←/→ ←/→ □ □...
- Page 4 PS3 Connection NOTE: Please ensure that your console is turned OFF before connecting or disconnecting the TOPDRIVE. 1. Connect the accelerator/brake pedal unit into the socket at the rear of the TOPDRIVE Wheel. 2. Connect the USB plug into port 1 of your console . 3.
- Page 5 Calibrate the Topdrive as described in the calibration section of the game controller window. The USB driver will only have to be installed once, after this has been done whenever you connect the Topdrive to your USB port the “USB Steering Wheel” will appear within the “Gaming Options” window. To ensure the Topdrive works correctly please re-calibrate the Topdrive before use.
- Page 6 4. Press the Select button to enter the sensitivity adjustment. 5. Press the Select button again to select between the following: Middle (Green-LED illuminates) Highest (Green-LED flashing quickly) Lowest (Green-LED flashing slowly) 6. Press the UP button on the D-pad to exit. Button Relocation The TOPDRIVE Steering Wheel incorporates a very useful feature called Button Relocation to re-map any control button to the most convenient and useful button configuration for the user.
- Page 7 Should you have any setup problems with the Top Drive Wheel (PSU448/449) please contact our Technical Support Hotline on +44 (01923) 471 000 – National/International call rates apply or Email support@logic3.com...
- Page 8 Merci d’avoir choisi le PSU448/PSU449 de Logic3. À l’instar des autres produits Logic3, il répond aux standards de fabrication les plus élevés. Les tests qu’il a subits tout au long de son développement vous garantissent en outre le meilleur produit possible. Veuillez vous familiariser avec ce guide avant d’utiliser le PSU448/PSU449.
- Page 9 PS2/Numérique PS2/Analogique ○ ○ ○ □ □ □ Touche d’action HAUT HAUT HAUT HAUT Pad Directionnel ‘Logic3’ GAUCHE GAUCHE GAUCHE GAUCHE DROITE DROITE DROITE DROITE START START START Touche de fonction SELECT SELECT SELECT ←/→ ←/→ □...
- Page 10 6. Appuyez sur la touche MODE pour connecter le volant 7. Appuyez et maintenez enfoncé le bouton MODE pendant 2 secondes pour accéder à la fenêtre d’accueil de la PS3 8. Le voyant indiquant un numéro au niveau du Volant correspond au numéro auquel le Volant est affecté...
- Page 11 Pedale Y Axis 1. Appuyez sur la touche de programmation pendant trois secondes, jusqu’à ce que le voyant lumineux devienne vert 2. Appuyez sur la touche GAUCHE du pad directionnel 3. Appuyez sur la Pédale Clear the pedal relocation 1. Appuyez sur la touche de programmation pendant trois secondes, jusqu’à ce que le voyant lumineux devienne vert 2.
- Page 12 Remappage des boutons Le volant comporte une fonctionnalité très utile appelée Remappage des boutons, laquelle permet de réassigner un bouton de commande vers la configuration de bouton la plus pratique et la plus utile pour l’utilisateur. 1. Appuyez sur la touche de programmation (ou START et SELECT) pendant trois secondes, jusqu’à ce que le voyant lumineux devienne vert 2.
- Page 13 TopDrive redondant. Conformité La société Logic3 plc certifie que l’article TopDrive Freebird RF Wheels & Pedals, est conforme aux exigences fondamentales et autres dispositions pertinentes de la directive 1999/5/EC. Pour recevoir la déclaration de conformité complète, veuillez contacter l’adresse indiquée sur la dernière page.
- Page 14 Vielen Dank, dass Sie sich für das PSU448/PSU449 von Logic3 entschieden haben. Wie alle Produkte von Logic3 wurde es mit den höchsten Produktionsstandards hergestellt und während der gesamten Entwicklung gründlich getestet, um sicherzustellen, dass wir Ihnen das bestmögliche Produkt bieten können. Lesen Sie dieses Handbuch gründlich durch und machen Sie sich mit dem Inhalt vertraut, bevor Sie das...
- Page 15 ○ ○ □ □ □ Aktionstaste PFEIL OBEN OBEN OBEN OBEN PFEIL UNTEN UNTEN UNTEN UNTEN RICHTUNGSTASTEN ‘Logic3’ PFEIL LINKS LINKS LINKS LINKS PFEIL RECHTS RECHTS RECHTS RECHTS START START START Funktionstaste SELECT SELECT SELECT ←/→ ←/→...
- Page 16 ANSCHLUSS HINWEIS: Stellen Sie vor dem Anschließen oder Entfernen des TOPDRIVE sicher, dass Ihre Konsole ausgeschaltet ist. 1. Schließen Sie die Gas-/Bremspedaleinheit über die Buchse an der Rückseite des -Lenkrads an. 2. Stecken Sie den USB-Stecker in Anschluss 1 Ihrer Konsole. 3.
- Page 17 Kalibrieren Sie das Topdrive wie im Abschnitt „Kalibrierung“ des Spielsteuerungsfensters beschrieben. Der USB-Treiber muss nur einmal installiert werden. Danach wird beim Anschluss des PC Topdrive an den USB- Port immer die Mitteilung „USB-Lenkrad“ im Fenster „Spieloptionen“ erscheinen. Um die korrekte Funktion des Topdrive sicherzustellen, kalibrieren Sie das Topdrive vor Gebrauch erneut.
- Page 18 3. Drücken Sie die Select-Taste, um die Empfindlichkeitsstufe zu wählen. 4. Drücken Sie die Select-Taste erneut, um eine der folgenden Einstellungen zu wählen: Mittel (grüne LED leuchtet auf) Hoch (grüne LED blinkt schnell) Niedrig (grüne LED blinkt langsam) 5.
- Page 19 Warnungsmeldung: Schwache Batterie – PSU449 Wenn die Batterien des Lenkrad schwach werden, beginnen die LEDs auf dem Lenkrad zu blinken, um anzuzeigen, dass die Batterien gewechselt werden müssen. WICHTIG: Bitte achten Sie darauf, dass die Batterien korrekt eingelegt sind. Sind sie nicht korrekt eingelegt, können Verletzungen oder Beschädigung Ihres Lenkrad die Folge sein.
- Page 20 (AT)) gesetzt sein, schaltet es für Sie automatisch und macht damit die TopDrive Schaltung überflüssig. Konformität Hiermit erklärt die Logic3 plc, dass sich das Artikel TopDrive Freebird RF Wheels & Pedals, in Übereinstimmung mit den grundlegenden Anforderungen und den übrigen einschlägigen Bestimmungen der Richtlinie 1999/5/EC befindet.
- Page 21 Grazie per aver acquistato il PSU448/PSU449 prodotto da Logic3. Come tutti i prodotti Logic3, è stato realizzato seguendo i più alti standard di produzione e testato durante tutta la sua realizzazione per assicurare un prodotto di elevata qualità. Consigliamo di leggere attentamente questo manuale prima di...
- Page 22 Tipo PS2/Digitale PS2/Analogico ○ ○ ○ □ □ □ Tasto azione GIÙ GIÙ GIÙ GIÙ D-PAD ‘Logic3’ SINISTRA SINISTRA SINISTRA SINISTRA DESTRA DESTRA DESTRA DESTRA START START START Tasto funzione SELECT SELECT SELECT ←/→ ←/→ □ □...
- Page 23 5. I quattro LED inizieranno a lampeggiare. 6. Premi il tasto MODE per connettere il volante. 7. Premere il tasto MODE (modalità) per 2 secondi per accedere alla schermata iniziale della PS3 8. Il numero indicato dal led sul Volante rappresenta ogni numero del Volante a cui sono rispettivamente assegnati: Led 1 –...
- Page 24 Pedale - Y Axis 1. Tieni premuto il tasto per la programmazione per 3 secondi fino a quando il LED verde si illumina 2. Premi il tasto SINISTRA sul D-pad 3. Premi il Pedale Clear the pedal relocation 1. Tieni premuto il tasto per la programmazione per 3 secondi fino a quando il LED verde si illumina 2.
- Page 25 Riprogrammazione dei Pulsanti: Il Topdrive è dotato di una caratteristica utilissima denominata Riprogrammazione dei Pulsanti, che consente di reimpostare la funzione dei vari pulsanti per adattarla alle esigenze del giocatore. 1. Tieni premuto il tasto per la programmazione (o “Start” e “Select”) per 3 secondi fino a quando il LED verde si illumina.
- Page 26 Connessione forzata – PSU449 Il tasto di connessione forzata può essere utilizzato per collegare manualmente il volante con il relativo ricevitore. 1. Collegare il ricevitore alla porta del controller PS2 o ad una porta USB del PS3 / PC. 2. Premere il tasto “Select + GIU” sul volante. 3.
- Page 27 TopDrive . Conformità Con la presente la Logic3 plc dichiara che il dispositivo TopDrive Freebird RF Wheels & Pedals, è conforme ai requisiti fondamentali e alle disposizioni pertinenti in materia della direttiva 1999/5/EG. La dichiarazione di conformità...
- Page 28 Gracias por adquirir el PSU448/PSU449 de Logic3. Como todos nuestros productos, se ha sometido a pruebas exhaustivas que garantizan su calidad. Antes de usarlo, te recomendamos que leas con detenimiento este manual. PSU448 Volante 3 en 1 compatible con las consolas PlayStation3 y PlayStation2 y PC ...
- Page 29 (analógico) ○ ○ ○ □ □ □ Acción ARRIBA ARRIBA ARRIBA ARRIBA ABAJO ABAJO ABAJO ABAJO Dirección ‘Logic3’ IZQUIERDA IZQUIERDA IZQUIERDA IZQUIERDA DERECHA DERECHA DERECHA DERECHA START START START Función SELECT SELECT SELECT ←/→ ←/→ □ □...
- Page 30 5. Comprueba que los cuatro indicadores parpadean. 6. Pulsa el botón MODE (modo) para conectar el volante. 7. Mantenga pulsado el botón MODE durante 2 segundos para entrar en la página de inicio de la PS3 8. El indicador de número del LED en el Volante representará el número de controlador al que se asigna el controlador: LED 1 –...
- Page 31 Pedals - Y Axis 1. Mantén pulsado el botón PROG (programa), durante 3 segundos hasta que se encienda el indicador verde. 2. Pulsa hacia IZQUIERDO el mando de dirección 3. Pulsa hacia Pedal Clear the pedal relocation 1. Mantén pulsado el botón PROG (programa), durante 3 segundos hasta que se encienda el indicador verde.
- Page 32 Reubicación de botones: Reubicación de botones: El Volante incorpora una función muy útil denominada Reubicación de botones para reasignar cualquier botón de control al botón más adecuado y útil para el usuario. 1. Mantén pulsado el botón PROGRAM (programa), o bien los botones SELECT (selección) y START (inicio), durante 3 segundos hasta que se encienda el indicador verde.
- Page 33 TopDrive . Declaración de conformidad Por la presente Logic3 plc declara que el artículo TopDrive Freebird RF Wheels & Pedals, está en conformidad con los requisitos y demás regulaciones de la directiva 1999/5/EC. La declaración de conformidad en su versión completa pueden obtenerla en la dirección indicada en la última página.
- Page 34 Obrigado por adquirir o Logic3 PSU448/PSU449 Como todos os produtos Logic3, foi construído segundo os mais altos padrões de fabrico e testado durante o seu desenvolvimento, para assegurar que é o melhor produto possível. Por favor leia este manual e familiarize-se com ele, antes de utilizar o XXXXXX PSU448 ...
- Page 35 PS2/Digital PS2/Analógico ○ ○ ○ □ □ □ Tecla de acção CIMA CIMA CIMA CIMA BAIXO BAIXO BAIXO BAIXO D-PAD ‘Logic3’ ESQUERDA ESQUERDA ESQUERDA ESQUERDA DIREITA DIREITA DIREITA DIREITA START START START Tecla de função SELECT SELECT SELECT ←/→ ←/→...
- Page 36 5. Os quatro LEDs começam a piscar. 6. Carrega no botão MODE para ligar o volante. 7. Prima e mantenha premido o botão MODE durante 2 segundos para entrar na janela principal da PS3 8. A indicação numérica do LED no Volante representa o número do Volante ao qual este está atribuído: LED 1 –...
- Page 37 1. Mantém premido o botão de programação durante 3 até que o LED verde se acenda 2. Carrega no botão para ESQUERDA do D-pad 3. Carrega no Pedal Clear pedal relocation 1. Mantém premido o botão de programação durante 3 até que o LED verde se acenda 2.
- Page 38 O Volante inclui uma função bastante útil denominada Atribuição dos Botões para redefinir qualquer botão de controlo de acordo com a configuração mais conveniente e útil para o utilizador. 1. Mantém premido o botão de programação (ou START e SELECT) durante 3 até que o LED verde se acenda 2.
- Page 39 TopDrive redundante Declaração de conformidade A sociedade Logic3 plc certifica que o artigo Logic3 PSU448 / PSU449 é conforme às exigências fundamentais e outras disposições relevantes da diretiva 1999/5/EC. Para receber a declaração de conformidade completa, quer contatar o endereço indicado sobre a última página.
- Page 40 As a result, some features and the appearance of the product may vary from those shown on this packaging. Copyright in this manual is owned by Logic3 International Ltd. Rhodes Way,...
Need help?
Do you have a question about the PSU448 and is the answer not in the manual?
Questions and answers