Table of Contents
Advertisement
Quick Links
Advertisement
Table of Contents

Subscribe to Our Youtube Channel
Related Manuals for NAVICOM PACK RT311

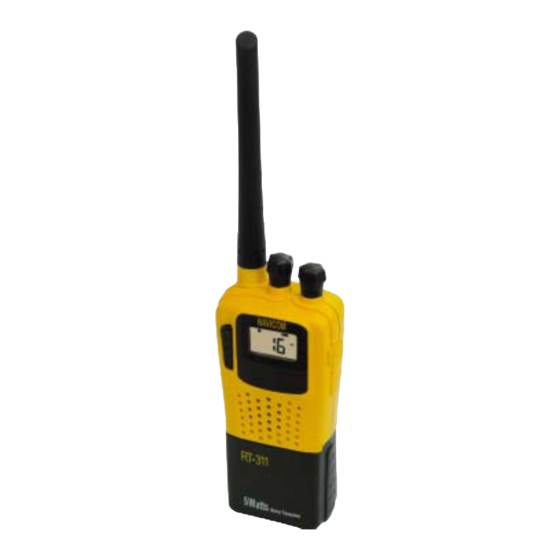
Summary of Contents for NAVICOM PACK RT311
- Page 1 VHF Marine Radio PACK RT-311 INSTALLATION AND OPERATION GUIDE Navicom plaisance: Z.A. des Boutries, 78700 Conflans Ste Honorine Tel: 01.39.72.19.90 Fax: 01.39.19.28.98 Navicom Pro: 3, rue J. Cugnot, Z.A.C Petit Guelen, 29000 Quimper Tel: 02.98.94.64.70 Fax: 02.98.94.69.71...
-
Page 2: Table Of Contents
TABLE OF CONTENTS Equipment Description…………………………………..……….…..…2 Introduction….…………………………………..………..………………..2 Safety Information……………………………………………….………..3 Using The Radio…………………………………………..…….…….…3 Display...………………………………………………………….……..3 Function And Location Of The Controls……………………….…….….4 Basic Operation………………………………………..……….…..…4 Turning On/Off Your Transceiver……………………………….……….5 Adjusting Squelch…………………………………...…...…………….…5 Selecting High/Low Power or Lock keypad………………....…5 Selecting a Channel………………………………………………………5 Transmitting and Receiving………………………………………………5 Scanning Features………………………………………………………..6 Adding Channels to Memory………………………………………..7 Using the Monitor Modes………………………………………….……..7 Dual Watch…………………………………………………………..…...7... -
Page 3: Equipment Description
Equipment Description INTRODUCTION Your marine transceiver PACK RT311 represents the state-of-the-art in high-tech engineering. Designed for international operation. This allows you to transmit and receive on all international channels in the VHF marine band, as assigned by the international Union (ITU). This unit is a quality piece of electronic equipment, skillfully constructed with the finest components. -
Page 4: Safety Information
transceiver’s battery pack. Backlit LCD Display -------- allows you to operate the transceiver in dark environment. Memory Channels ---- lets you store channels as memory channels. Du/Tri ---- lets you to select DW/normal mode or Tri/normal mode. We recommend you record your transceiver’s serial number here. This number is on the transceiver’s back panel. -
Page 5: Function And Location Of The Controls
FUNCTION AND LOCATION OF THE CONTROLS DU/TRI SCAN BASIC OPERATION Before operating your transceiver, you should make the following preparations. You should install the battery pack on to the main unit and fully charge your 7.2V Ni-MH battery pack or charge it separately before its being attached onto the radio, then you can use it after making sure to attach the antenna on your radio. -
Page 6: Turning On/Off Your Transceiver
Rotate SQ knob to adjust squelch threshold level. Squelch is used to eliminate static and background noise and allows for silent operation of the PACK RT311 until a transmission is received. If the squelch is too high, only the strongest transmissions can be heard, and when too low, intermittent static and noise are heard. -
Page 7: Scanning Features
SCANNING FEATURES The PACK RT311 is equipped with three types of scan options: All Scan, Saved(Memory) Scan and Priority Scan. If there are no channels in memory, the default is All Scan. This function automatically searches for transmissions on the channel set being scanned. -
Page 8: Adding Channels To Memory
The Watch Modes monitor the programmed Priority Channel and other user selected channel(s). The watch is halted when activity is detected on a monitored channel. The PACK RT311 is equipped with 2 types of monitor operations: Dual Watch and Tri Watch. -
Page 9: Tri Watch
Press and hold the Du/TRI button to terminate Dual Watch mode and go into Tri Watch mode. Press and release the 16 button to terminate Dual Watch mode and switch to the Priority channel. Note: During Dual Watch mode, the SCAN and Channel ▲/▼ (UP/DOWN) button are inactive and sounds an error beep if pressed. -
Page 10: Attaching And Charging Your Battery Pack
Attaching and Charging Your Battery Pack Before attaching the pack, you should detach the belt clip first, then aligningly place the pack on the unit and secure it using the supplied screw. The design of the battery pack let you can charge it either when it is attached on the radio or being detached. -
Page 11: Technical Specifications
TECHNICAL SPECIFICATIONS Channels…………………………………..All International Channels Frequency Method………………………….………….Phase Lock Loop Frequency Range…………………………..TX 156.025~157.425 MHz RX 156.300~162.000 MHz Antenna Impedance……………..……………………………..50 Ohm Power Supply…………………………………………..………7.2VDC Operating Temperature………………………..-20℃ to +55℃ Dimensions (HWD)………………..…… (With 7.2V Battery Pack) ‘ 148mm(H)*60mm(W)*39mm(D) Weight (with Battery Pack)…….… (With 7.2V Battery Pack) 421.5g TRANSMITTER Power Output……………….………0.8 or 5 Watts (Switch Selectable) Modulation Type……………………………………….…….…...…….FM... -
Page 12: Frequency Charts
FREQUENCY CHARTS Unit: MHz 156.050 160.650 156.100 160.700 156.150 160.750 156.025 160.625 156.200 160.800 156.075 160.675 156.250 160.850 156.125 160.725 156.300 156.300 156.175 160.775 156.350 160.950 156.225 160.825 156.400 156.400 156.275 160.875 156.450 156.450 156.325 160.925 156.500 156.500 156.375 156.375 156.550 156.550 156.425... -
Page 13: Cigarette Lighter Battery Compartment, Cigarette Lighter Battery Charging And Earphone Manual
PACK RT311 Cigarette Lighter Battery compartment, Cigarette Lighter Battery Charging and Earphone Manual PACK RT311 Cigarette Lighter Battery compartment using: 1. Install the battery case with DC-DC supply to the main unit. 2. Plug the Cigarette Lighter Battery compartment into the socket of the battery.
Need help?
Do you have a question about the PACK RT311 and is the answer not in the manual?
Questions and answers