
Related Manuals for Option Wireless Technology GlobeSurfer III

Summary of Contents for Option Wireless Technology GlobeSurfer III
- Page 1 GlobeSurfer ® Quick Start Guide...
-
Page 2: Additional Security
2G or 3G cellular network. GlobeSurfer III is compatible with GSM and 3G mobile networks and supports GPRS, EDGE, UMTS, HSDPA and HSUPA technologies. With ‘Receive Diversity’ on all the high as well as low bands, the signal strength and overall 3G reception is unparalleled. - Page 3 WArNING • The GlobeSurfer III is intended for use only when powered by the external power supply shipped together with the equipment or via a replacement ® power supply available from Option. The use of any other power supply may invalidate regulatory approval of this equipment. Refer to the table below for applicable power supplies.
-
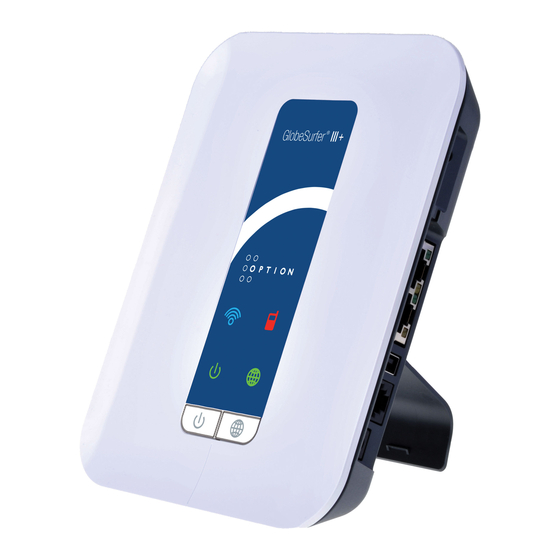
Page 4: Getting Started
GlobeSurfer ® GettING StArted Guidelines for safe and efficient use GlobeSurfer III contains sensitive electronic components as used in mobile phones and wireless routers. For safe and efficient use, please follow these ® guidelines: • Handle the unit carefully and store it in a clean and dust-free place. •... - Page 5 First time use You need a SIM card from your mobile operator to use GlobeSurfer III. Please insert the SIM card before you plug in the power adapter. ® Step 1: Insert the SIM card. Insert the SIM card into the slot beneath the GlobeSurfer III.
- Page 6 GlobeSurfer ® Select the language you want to use. The ‘User name’ for the default account is ‘admin’, the Password for the default account is also ‘admin’ (or depending on your configuration, the password field should be left blank). Changing the Password, and adding new Users can be achieved in the Quick Start section of the GUI interface.
- Page 7 Step 8: Connect to the Internet. From the Browser “Home Overview” screen, click ‘Connect’. Tip: Press the Connect button (right button on front panel) on GlobeSurfer III as an alternative. ® The status shows ‘Connecting’ and then ‘Connected’. Open a new browser window and go to a page on the Internet.
-
Page 8: Configure Your Computers
GlobeSurfer ® coNfIGure Your comPuterS Using Ethernet LAN Once GlobeSurfer III is configured as above, it is ready to be used. If you are only using the Ethernet LAN connection with GlobeSurfer III, ® ® no further configuration is needed. Simply open a new browser window and use your computer to ‘surf’ the Internet with GlobeSurfer III. - Page 9 GlobeSurfer III. Questions and answers can be found on our Support web-site: ® http://support.option.com/support/faq.php To register please go to: http://support.option.com/support/register.php To post technical questions after you have registered please use the online support at: http://support.option.com/support/newticket.php...
Need help?
Do you have a question about the GlobeSurfer III and is the answer not in the manual?
Questions and answers