
Summary of Contents for K9 4SK-K9
- Page 1 Item No.: 4SK-K9 User’s Manual Thank you for purchasing The Original Dash Cam K9. Please review this guide fully before use. For any questions not answered in this guide, please visit www.GetDashCam.com...
-
Page 2: Fcc Declaration Of Conformity
FCC declaration of conformity Responsible party: 4Sight, Inc. 3325 E. Shelby St. Ontario, CA 91764 (909) 944-5511 Fax: (866) 285-5828 This device complies with Part 15 of the FCC Rules. Operation is subject to the following two conditions: (1) This device may not cause harmful interference, and (2) This device must accept any interference received, including interference that may cause undesired operation. -
Page 3: Notes On Installation
Memory card comes pre-inserted. Please be sure memory card is in unit before recording. TODC K9 supports microSD cards up to 32GB When the battery is depleted, TODC K9 will display, “Out of Battery Power” and power off. For questions or technical support, visit www.GetDashCam.com... -
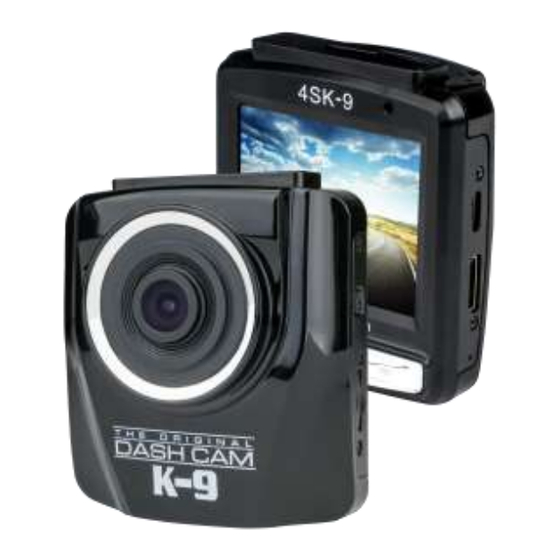
Page 4: Product Overview
1 Introduction 1.1 Product Overview Button Description POWER / A long press of this button will power on or off the Dash SCREEN Cam. While recording, a short press will turn on/off the Dash Cam’s LCD display. ON/OFF MicroSD Slot The microSD card is inserted here. - Page 5 While recording, press this button to mute or unmute the Dash Cam’s microphone Scroll down when navigating the Dash Cam’s menus. DOWN Use this button to start or stop recording. In still photo OK / RECORD mode, use this button to take a still snapshot. When navigating menus, use this button as the “ok”...
-
Page 6: Getting Started
2.1 Inserting the Memory Card Insert memory card with both the pins on the memory card and the screen of TODC K9 facing up, as illustrated below. Push the memory card in until a click sound is heard, indicating the card is locked in position. -
Page 7: Installing In Vehicle
Dash Cam. Note: 1. The Seller or Manufacturer of The Original Dash Cam K9 4SK107 shall not be held responsible for any traffic violations related to the positioning or improper use of this product. -
Page 8: Connecting To Power
2.3 Connecting to Power Use the included 12v car charger to power on TODC K9 and charge the built-in battery (TODC K9 is made to be plugged in continuously while driving; doing so will not harm TODC K9’s battery). Connect the micro USB end of the car charger to the USB/Power connector port on TODC K9. -
Page 9: Led Indicator
Dash Cam to power it down before leaving the vehicle. 2. At full charge, TODC K9’s battery will record for roughly 20 minutes unplugged. This function is designed so that should an incident occur, the driver can remove TODC K9 from the mount and capture evidence from outside the vehicle. -
Page 10: Powering The Device On / Off
2.5 Powering the Device On / Off 2.5.1 Auto Power On/Off The Original Dash Cam K9’s default settings are for TODC K9 to automatically power on and begin recording when TODC K9 is connected to a power source. Once the vehicle’s 12v outlet is powered on, and TODC K9 is connected, TODC K9 will automatically turn on and begin recording. -
Page 11: Formatting The Microsd Card
Formatting the microSD Card To format the microSD card follow these instructions: First be sure TODC K9 is NOT recording. Press and hold the Menu Button to enter the Video Settings Menu and then press the Menu Button a second time to enter the Setup Settings Menu. -
Page 12: Basic Setup
OK Button to select OK. Note: 1. It is recommended you perform a format before using TODC K9 for the first time. 2. Caution: Formatting the microSD card will delete all files on the card, including locked video files. - Page 13 Press the Menu Button a second time to enter TODC K9’s main Setup Menu. Use the Down Button until, “Date/Time” is highlighted and press the OK Button. Use the Up and Down Buttons to adjust the highlighted number to the correct date or time.
- Page 14 Menu Button to return to the main recording screen. Note: 1. The Original Dash Cam K9 runs on a 24 hour military clock. 1:00pm shows as 13:00 on TODC K9’s clock. For questions regarding the 24 clock, contact TODC at...
-
Page 15: Recording Videos
12v outlet stays active when the vehicle is powered off, it is recommended to power off or unplug TODC K9 manually when exiting the vehicle. 2. TODC K9 features loop recording; when the memory card is full, the oldest video file is deleted and overwritten with the newest. You can choose between 1, 2, 3, 5 or 10 minute video clips. - Page 16 The Original Dash Cam K9 has a built in emergency recording function which, when activated, prevents video files from being overwritten by TODC K9’s Loop Recording feature. To manually activate the Emergency Recording function, do the following: While TODC K9 is recording, press the Emergency Lock /...
-
Page 17: The Recording Screen
3.1.3 The Recording Screen Icon Item Description Video When on screen, indicates you are Mode in video mode. Icon Loop Indicates the currently selected Recording video loop length. Icon Indicates your currently selected Exposure Exposure Value (EV). Date Indicates the current date. Stamp Indicates the current time. - Page 18 Time on the microSD card. When red, Indicator indicates the recording time of the current video file. Indicates whether TODC K9 is Audio recording sound. When TODC K9 Record is muted, a red line will appear Indicator through the icon.
-
Page 19: Motion Detection
3.1.4 Motion Detection When Motion Detection is enabled and TODC K9 is powered on, TODC K9 will detect any motion in front of the lens and TODC K9 will begin to record. TODC K9 will continue to record as long as there is motion detected. - Page 20 G-sensor may trigger frequently, in this case it is recommended to turn the G-Sensor off and lock videos manually). To adjust the G-Sensor settings: Be sure TODC K9 is NOT recording. Press and hold the Menu Button to enter the Video Settings Menu.
-
Page 21: Parking Mode
You can adjust the movement sensitivity of the Parking Mode feature, or turn it completely off. To adjust the Parking Mode settings: Be sure TODC K9 is NOT recording. Press and hold the Menu Button twice to enter the Setup Menu. -
Page 22: Taking Still Photos
Menu Button to return to the recording screen 3.2 Taking Still Photos 3.2.1 Taking Snapshots To take a still picture, follow these instructions: Be sure TODC K9 is NOT recording. Short press the Menu / Mode Button, TODC K9 will enter Still Photo Mode. - Page 23 Once in Still Photo Mode, use the OK button to take a still snapshot. 3.2.2 The Still Photo Screen Icon Item Description Still Photo Indicates you are in Sill Photo Mode Icon Mode.
-
Page 24: Playback Videos
Icon Item Description Indicates your currently selected Exposure Exposure Value (EV). White Indicates chosen white Balance balance level. Indicator Indicates current Indicator chosen Battery Indicates the current status of Indicator the battery. SD Card When screen, indicates Indicator microSD card IS inserted. Quality Indicates the quality chosen. -
Page 25: The Playback Screen
To playback video files on TODC K9’s LCD screen, follow these instructions: Be sure TODC K9 is NOT recording. Press the Menu / Mode Button twice to enter Video Playback Mode. Use the OK Button to begin playing back the currently selected video. -
Page 26: Deleting Files
Video Time Indicates the current video Video Time Indicator time. 3.3.3 Deleting Files To delete file(s), do the following: Be sure TODC K9 is NOT recording. Press the Mode Button twice to enter Video Playback Mode. - Page 27 Use the Down Button to highlight Delete Current to delete the currently selected video, or highlight Delete All to delete all footage from TODC K9. You will be asked to confirm your Deletion, if you are sure, use the Down Button to highlight OK and press the OK button.
-
Page 28: Adjusting The Settings
Use the Up / Down Buttons to highlight different menu options in the Video Settings Menu. Press the OK Button to enter the highlighted settings sub-menu. Accessing the Still Photo Menu Be sure TODC K9 is NOT recording. Short press the Mode Button, TODC K9 will enter Still Photo Mode. - Page 29 Still Photo Menu. Press the OK Button to enter the highlighted settings sub-menu. Accessing the Setup Settings Menu Be sure TODC K9 is NOT recording. Press and hold the Menu Button to enter the Video Settings Menu then press the Menu Button a second time to access...
-
Page 30: Menu Items
Use the Up / Down Buttons to highlight different menu options in the Setup Settings Menu. Press the OK Button to enter the highlighted settings sub-menu. Note: You can access the setup settings menu from either Video or Still Photo Mode. 4.2 Menu Items Available Menu... - Page 31 Exposure. 0, -1/3, -2/3, let in by TODC K9’s Lens. -1.0, -4/3, -5/3, -2.0 Motion Turn on/off. On/Off Detection When TODC K9 will record sound. Record When off, On/Off Audio TODC K9 will record sound. Watermark Date video files with...
- Page 32 Available Menu Setting Description Options Still Photo Menu 2MHD 1.3M When TODC K9 will take sequence Sequence On/Off three pictures with one press button. Fine Adjust Quality Normal image quality. Economy Strong Adjust Sharpness image Normal sharpness. Soft Auto Adjusting...
- Page 33 Available Menu Setting Description Options +2.0, +5/3, +4/3, +1.0, Adjust +2/3, +1/3, Exposure long the lens is +0.0, -1/3, open. -2/3, -1.0, -4/3, -5/3, -2.0 Anti-Shakin Image Stabilization When allows you to Quick briefly view the Date Review photo after Date/Time taking Watermark...
- Page 34 Available Menu Setting Description Options When TODC K9 will Auto power 1 Minute Power Off automatically 3 Minutes if it is not recording. When TODC K9’s screen will shut off after chosen amount 3 Minute Screensav time. TODC 5 Minutes...
- Page 35 Menu Setting Description Options Choose 60Hz North 50Hz Frequency 60Hz America, 50Hz for Europe. Perform format when powering TODC K9 for the first time. If experiencing memory issues, formatting the SD Card Format card OK/Cancel troubleshoot (Caution: performing format will...
-
Page 36: Transferring Videos To Pc
5.1 Using USB Cable Follow these instructions to transfer videos to your PC: Connect the micro USB tip of a mini USB cable to TODC K9. Connect the full size USB tip to the USB port on your laptop or desktop (after completing this step, TODC K9 will automatically power on and the below will appear on screen).
Need help?
Do you have a question about the 4SK-K9 and is the answer not in the manual?
Questions and answers