Table of Contents

Related Manuals for Toro 22615


Summary of Contents for Toro 22615
- Page 1 Form No. 3404-446 Rev A SGR-13 Stump Grinder Model No. 22615—Serial No. 316000001 and Up Model No. 22615G—Serial No. 316000001 and Up Model No. 22615HD—Serial No. 316000001 and Up *3404-446* A Register at www.Toro.com. Original Instructions (EN)
- Page 2 California to cause cancer, birth defects, product damage. You are responsible for operating the or other reproductive harm. product properly and safely. You may contact Toro directly at www.Toro.com for product and accessory information, help finding a dealer, or to register DANGER your product.
-
Page 3: Table Of Contents
Safety This manual uses 2 words to highlight information. Important calls attention to special mechanical information and Note emphasizes general information worthy of special Improper use or maintenance by the operator or owner attention. can result in injury. To reduce the potential for injury, comply with these safety instructions and always pay attention to the safety alert symbol , which... - Page 4 Make any necessary repairs before restarting. • • Use only genuine Toro replacement parts to ensure that Before grinding, have the area marked for underground utilities, and do not grind in marked areas. original standards are maintained.
-
Page 5: Safety And Instructional Decals
Safety and Instructional Decals Safety decals and instructions are easily visible to the operator and are located near any area of potential danger. Replace any decal that is damaged or lost. 117-2718 119-4692 1. Warning—shut off the engine; use both hand holds to lift the grinder. - Page 6 119-4701 1. Warning—read the Operator's Manual. 5. Crushing hazard of hand—stay away from moving parts, keep all guards and shields in place. 2. Warning—do not operate this machine unless you are trained. 6. Explosion hazard; electrical shock hazard—do not dig in areas with buried utility lines;...
-
Page 7: Product Overview
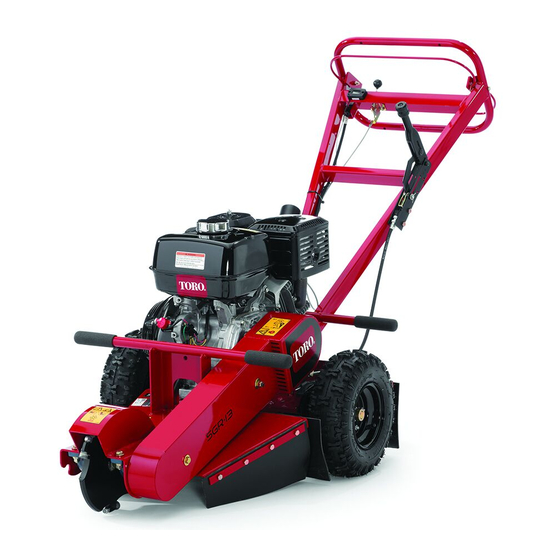
Product Overview Figure 4 1. Throttle—Disengage 2. Throttle—Engaged position position Figure 3 Parking Brake 1. Throttle lever 8. Cutting wheel The parking brake holds the left wheel from turning to secure 2. Hour meter 9. Belt cover the machine and for easy movement of the machine from side 3. -
Page 8: Specifications
Specifications Operation Note: Specifications and design are subject to change Note: Determine the left and right sides of the machine without notice. from the normal operating position. Cutting Depth 30 cm (12 inches) Important: Before operating, check the fuel and oil Length 193 cm (76 inches) level, and remove debris from the machine. -
Page 9: Adding Fuel
Adding Fuel because the fuel system could be damaged. Do not mix oil with fuel. Use unleaded fuel (87 pump octane minimum). Leaded, regular fuel may be used if unleaded is not available. Using Stabilizer/Conditioner DANGER Use a fuel stabilizer/conditioner in the machine to provide the following benefits: In certain conditions, fuel is extremely flammable •... -
Page 10: Checking The Engine-Oil Level
Checking the Engine-Oil Level Starting and Shutting Off the Engine Service Interval: Before each use or daily 1. Tilt the machine so the engine is level, and shut off Starting the Engine the engine. 2. Allow the engine to cool. 1. -
Page 11: Grinding A Stump
Grinding a Stump DANGER The machine will cut and amputate hands and feet. • Stay in the operator's position while the machine is running and keep away from the cutting wheel. • Keep all bystanders a safe distance from the machine. - Page 12 6. Raise the cutting wheel, release the parking brake, and move the machine forward a few centimeters (inches). Set the parking brake. 7. Repeat steps 5 and 6 until you have completely removed the stump (E through H in Figure 8.
-
Page 13: Maintenance
Maintenance Note: Determine the left and right sides of the machine from the normal operating position. Important: You can tip the machine backward or on its side to clean or service it, but no longer than 2 minutes. If you hold the machine this position for too long, fuel can drain into the crankcase and damage the engine. Should this happen, perform an extra oil change on the engine. -
Page 14: Engine Maintenance
Engine Maintenance Servicing the Air Cleaner Service Interval: Before each use or daily The cyclone air filter collects the largest contaminant particles, which collect in the container. When you can see a layer of dirt at the bottom of the container, clean the cyclone housing, air channels, and air-intake screen. -
Page 15: Servicing The Engine Oil
Servicing the Engine Oil Cleaning the Sediment Cup Service Interval: Every 100 hours Oil Type: Detergent oil with an API service of SJ or higher. Yearly or before storage Crankcase Capacity: 2 L (2.1 qt) Underneath the fuel valve is a sediment cup to catch dirt in Viscosity: SAE 10W-30 is recommended for general use. -
Page 16: Brake Maintenance
Removing the Spark Plug Brake Maintenance 1. Lower the grinder and shut off the machine; Refer to Shutting Off the Engine (page 10). Adjusting the Parking Brake 2. Pull the wire off the spark plug (Figure 15). 1. Loosen the set screw on side of brake lever knob. 2. -
Page 17: Belt Maintenance
Belt Maintenance 6. Lay a straightedge across clutch and flywheel pulleys, tighten belt-tension bolt so there is 1 cm (0.40 inch) of flex in the belt when pushing down with 6.8 kg (15 lb) Adjusting the Drive-Belt force, at mid-span (when re-tensioning a belt in use) or with 8 kg (18 lb) force when installing a new belt Tension (Figure... -
Page 18: Grinder Maintenance
Grinder Maintenance Replacing the Teeth Service Interval: Before each use or daily—Check the condition of the teeth; rotate or replace any that are worn or damaged and torque the nuts for all teeth. Due to the high amount of wear placed on the teeth, you need to rotate and replace them periodically (Figure 20). -
Page 19: Cleaning
Cleaning Storage Storing the Machine Removing Debris from the For storage over 30 days, prepare the machine as follows: Machine 1. Remove dirt and grime from the external parts of Regular cleaning and washing increases the life span of the the entire unit, especially the engine. -
Page 20: Troubleshooting
Troubleshooting Problem Possible Cause Corrective Action The engine does not start. 1. The safety bale is in the O position. 1. Hold the safety bail against the handle. 2. If your model is equipped with an 2. Move the switch to the O position. - Page 21 Notes:...
- Page 22 Notes:...
- Page 23 Notes:...
- Page 24 Toro importer. If all other remedies fail, you may contact us at Toro Warranty Company. Australian Consumer Law: Australian customers will find details relating to the Australian Consumer Law either inside the box or at your local Toro Dealer.
Need help?
Do you have a question about the 22615 and is the answer not in the manual?
Questions and answers