Table of Contents
Advertisement
Advertisement
Table of Contents

Related Manuals for Magnat Audio M.ONE


Summary of Contents for Magnat Audio M.ONE
- Page 1 MAGNAT M. ONE Home Entertainment System...
-
Page 2: Important Safety Instructions
IMPORTANT SAFEGUARDES Explanation of Symbols This symbol is intended to This symbol is intended to WARNING alert the user of the pres- alert the user of the pres- To prevent fire or shock hazard, do not ence of important operat- ence of uninsulated expose this appliance to rain or moisture. -
Page 3: Table Of Contents
TABLE OF CONTENTS GENERAL INFORMATION ........................ 03--15 Important Safeguards and Precautions .................... 03--04 Features ............................. 04 Types of Disc that can be played on Your DVD Receiver ..............05-06 Selecting the Type of Disc for the Type of Connected TV ................ 07 Definition of Terms .......................... - Page 4 TABLE OF CONTENTS SPECIAL FUNCTIONS ........................34--39 Direct Selection of Scenes ....................... 34-35 • Selecting Scenes by Title Number ....................... 34 • Moving from the Menu Screen to the Titles .................... 34 • Direct Skip Function ........................... 34 • DVD Discs ............................34 •...
-
Page 5: General Information
GENERAL INFORMATION IMPORTANT SAFEGUARDS AND PRECAUTIONS IMPORTANT SAFEGUARDS AND PRECAUTIONS Power Cord Protection CAUTION To avoid any malfunctions of the unit, and to protect against BEFORE OPERATING YOUR NEW DVD RECEIVER, electric shock, fire or personal injury, please observe the PLEASE CAREFULLY READ THIS OPERATION MANUAL following. -
Page 6: Features
GENERAL INFORMATION FEATURES IMPORTANT SAFEGUARDS AND PRECAUTIONS • Plays DVD, video CD and CD (Digital Audio) discs. If There is Noise Interference on the TV While a Broad- • Built-in Dolby Digital (AC-3) decoder supporting Dolby Pro cast is being Received Logic* decoding and Virtual Surround. -
Page 7: Types Of Disc That Can Be Played On Your Dvd Receiver
GENERAL INFORMATION Types of Disc that can be played on Your DVD Receiver The unit can play back discs bearing any of the following marks: See NOTE-1 Sss NOTE-2 ( 8 cm disc / 12 cm disc ) See NOTE-3 See NOTE-2 Video CDs ( 8 cm disc / 12 cm disc ) - Page 8 GENERAL INFORMATION Types of Disc that can be played on Your DVD Receiver NOTE-2 • The specific playback functionality for some DVD and video CD discs which is determined by the disc manufacturer. Because this DVD Receiver plays disc data in accordance with the disc manufacturer’s guidelines, some functions may not be available on some discs.
-
Page 9: Selecting The Type Of Disc For The Type Of Connected Tv
GENERAL INFORMATION Selecting the Type of Disc for the Type of Connected TV Both DVD discs and video CDs have the material recorded in the PAL and NTSC systems. Refer to the table below to select the correct disc type for the type of connected TV. Connecting to the Multi-system TV Disc TV Monitor... -
Page 10: Definition Of Terms
GENERAL INFORMATION Definition of Terms Angle Recorded onto some DVD discs are scenes which have been simultaneously shot from a number of different angles (the same scene is shot from the front, from the left side, from the right side, etc.). With such discs, the ANGLE button can be used to view the scene from different angles. -
Page 11: Disc Handling And Maintenance
GENERAL INFORMATION Disc Handling and Maintenance Handling Precautions • To hold the disc by the edges so the surface will not be soiled with fingerprints. • Fingerprints, dirt and scratches can cause skipping and distortion. • Do not write on the label side with a ball-point pen or other writing utensils. •... -
Page 13: Rear Panel Connections
GENERAL INFORMATION REAR PANEL CONNECTIONS REAR PANEL CONNECTIONS 1. S-VIDEO OUT 9. DIGITAL1 IN (OPTICAL) Connect your monitor TV here. The signal is S-VIDEO If your player has an optical digital output, connect it to out. the OPTICAL jack on this unit. 2. - Page 14 GENERAL INFORMATION SUBWOOFER REAR PANEL CONNECTIONS SUBWOOFER REAR PANEL CONNECTIONS 14. DIN-S Connect the DVD Receiver with din cable for signal output. 15. DIN-L Connect the DVD Receiver with din cable for power supply. 16. LEFT SPEAKERS (8ohm) Connect left front speaker here. 17.
-
Page 15: Rear Panel Connections
GENERAL INFORMATION REAR PANEL CONNECTIONS 1. Plug the FM Antenna into the FM terminal of the Main Unit. NOTE: Push and hold Speaker terminal tab down to insert wire. Release tab to lock wire in terminal. Make sure the insulation is completely removed from the ends of the speaker wires at all connection points. -
Page 16: Connecting The Speakers
GENERAL INFORMATION CONNECTING THE SPEAKERS CONNECTING THE SPEAKERS Connecting the SURROUND speakers At the rear of each speaker, you will find two click fit con- Connect the right surround speaker to the surround speaker nectors on speakers’ rear panel, a black one marked (-) ″... -
Page 17: Positioning The Speakers
GENERAL INFORMATION POSITIONING THE SPEAKERS POSITIONING THE SPEAKERS Avoid positioning the speakers in corners, as this will boost Positioning the CENTER speaker too much the bass tones. The center speaker should be placed centrally between the Placing the speaker behind curtains, furniture etc. will re- front speakers, e.g. -
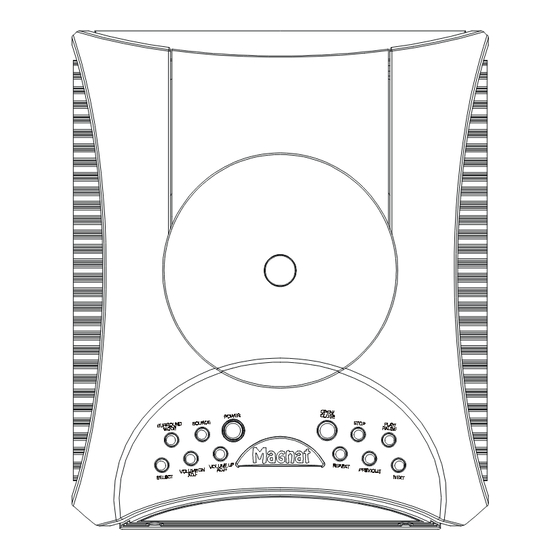
Page 18: Functional Overview
FUNCTION OVERVIEW FRONT PANEL RecotonV.11... - Page 19 FUNCTION OVERVIEW FRONT PANEL FRONT PANEL 1. POWER 11. STOP Press the POWER button to switch power of the unit Press to stop playback. Pressing once enables ON or OFF. playback to resume from a point shortly before the location where it stopped. Pressing twice causes the 2.
- Page 20 FUNCTION OVERVIEW FRONT PANEL FRONT PANEL 13. SENSOR 17. PHONE jack The sensor behind this window receives infrared signals Plug headphones into jack. Press the volume up or from the remote control. Aim the remote at this area down to adjust the sound level. and do not block or cover it unless an external remote sensor is installed.
-
Page 21: Fluorescnt Display
FUNCTION OVERVIEW FLUORESCENT DISPLAY FLUORESCENT DISPLAY 1. RDS DIGITAL Illuminates if you press RDS/CT button in POWER ON Illuminates if the AC-3 mode is selected. mode. 7. FM ST. 2. PTY Lights when a broadcast is being received in stereo. llluminates if the PTY mode is selected. -
Page 22: Remote Control
FUNCTION OVERVIEW REMOTE CONTROL 6. DISPLAY In disc playing mode, using this button, you can view the time, chapter/track and title information of the disc being playing. Detail see page 39. In RDS mode, press to read the message indicator appear in the display if PTY code is found. - Page 23 FUNCTION OVERVIEW REMOTE CONTROL 16. SOURCE DN Press to toggle through list of sources: DIGIT 2, DIGIT 1, VCR, VCR, TV/SAT, AUX/TAPE, FM, DVD/CD. 17. SURR. MODE Press to cyclically select Listening Mode. 18. OPEN/CLOSE Press to open or close the disc tray. 19.
- Page 24 FUNCTION OVERVIEW REMOTE CONTROL / STATION DN and SLOW Use to move through the options on menu screens and to change settings. STATION DN: In TUNER mode, press to select the required preset station. SLOW: Each time the button is pressed, the slow motion speed changes from 1X, 2X, 3X to play.
-
Page 25: Remote Control
FUNCTION OVERVIEW REMOTE CONTROL 36. VOL+ Press to adjust the sound level up. 37. VOL- Press to adjust the sound level down. 38. MUTE Press to turn the sound off. Press again to return the sound to its previous level. If press the VOLUME UP or DN button will release the muting. -
Page 26: Setting Up
SETTING UP SETUP SETUP GENERAL SETUP: TV DISPLAY Using Setting Menu 1. Use the button to highlight GENERAL SETUP Using the menu allows the user to select the play mode item. setting the various outputs, etc. In each menu page, select the menu on the left. Use SETUP MENU - - MAIN PAGE go to the option list or setting on the right. -
Page 27: Setup
SETTING UP SETUP SETUP NOTE: GENERAL SETUP: ANGLE MARK • You must also set the screen mode on your wide-screen 1. Use the button to highlitht ANGLE MARK TV to “FULL”. item. • If [WIDE] is selected and a NORMAL TV is connected, 16:9 content will appear distorted during playback - - GENERAL PAGE - - (objects look thin). - Page 28 SETTING UP SETUP SETUP GENERAL SETUP: OSD LANG NOTE: • Some DVDs may be set to display subtitle in a different 1. Use the button to highlitht the OSD LANG item. language than you selected. - - GENERAL PAGE - - GENERAL SETUP: SCREEN SAVER TV DISPLAY 1.
-
Page 29: General Setup
SETTING UP SETUP SETUP SETUP MENU: PREFERENCES NOTE: • AUDIO: This function is used to select a language 1. Use the to move the screen cursor to for audio (where available). PREFERENCES. PREFERENCE: SUBTITLE SETUP MENU - - MAIN PAGE 2. - Page 30 SETTING UP SETUP SETUP PREFERENCES: PARENTAL PREFERENCES: PASSWORD 8. Use the button to move the screen cursor to 10. Use the to move the screen cursor to PARENTAL. PASSWORD. -- PREFERNECES PAGE -- - - PREFERNECES PAGE - - AUDIO AUDIO SUBTITLE SUBTITLE...
-
Page 31: Display Information
SETTING UP SETUP DISPLAY INFORMATION PREFERENCE: DEFAULTS Disc Error Indicator A disc error appers when the tray is closed and: 11. Use the to move the screen cursor to 1. The disc type is not DVD, VCD or CD. DEFAULTS. 2. - Page 32 SETTING UP DISPLAY INFORMATION Display Example TV Screen Front Panel Display Remarks NO DISC If no disc is loaded or an unplayable disc is loaded when DISC ERROR the player is switched on Tray open OPEN CLOSE Tray closed DISC LOADING PRESS PLAY TO CONTINUE The time indicator Stopped...
-
Page 33: Basic Operations
BASIC OPERATIONS DVD Playback DVD Playback Preparations • You can press TITLE button on the remote control Switch on the TV set’s power, and select “VIDEO” as to involve Title Menu, then press the cursor controls the TV input. Refer to the operation manual for your TV button to hghlight selected Title Menu entry and press for details. -
Page 34: Resume Function
BASIC OPERATIONS DVD Playback DVD Playback Resume Function Track up When you have stopped a disc during playback, the While you are playing a disc, this function jumps forward Resume function allows you to go back and start playing to the beginning of the next chapter and automatically the disc at a point just prior to the scene in which it was starts playing that chapter. -
Page 35: Vcd And Cd Playback
BASIC OPERATIONS VCD (Video CD) and CD (Audio CD) Playback • To prepare for playing DVD discs, perform step 1 to 5 in “Basic Play”. • To prepare for playing VCD and CD discs, please refer to the operations about DVD playback. They have the similar operations. -
Page 36: Special Functions
SPECIAL FUNCTIONS Direct Selection of Scenes Direct Selection of Scenes <DVD Discs> <DVD Discs> Selecting Scences by Title Number Time Direct Skip NOTE: • Press GOTO button on the remote control to enable • This function only operates on DVD discs that have the Search Menu. -
Page 37: Vcd (Video Cds) And Cd (Audio Cds)
SPECIAL FUNCTIONS Direct Selection of Scenes Direct Selection of Scenes NOTE: 5. The player skips to track 5 within 2 seconds and If the entered chapter does not exist on the disc, the begins playing. number is ignored and the symbol displays on the NOTE: screen when the ENTER button is pressed. -
Page 38: Repeat Playback
SPECIAL FUNCTIONS Repeat Playback Repeat Playback A-B Repeat <VCD and CD> Repeats any specified section on the disc. • Press the REPEAT button while a disc is playing to select Repeat function. It has 3 modes. 1. While you are playing a disc, press the A-B button Repeat One Track Repeat All Tracks on the remote control one time at the beginning of... -
Page 39: Angle Selection (Dvd Only)
SPECIAL FUNCTIONS Angle Selection (DVD only) NOTE: • This function can only be used for discs on which scenes shot from multiple angles have been recorded. • Some DVD discs contain scenes which have been shot simutaneously from a number of different angles. For these discs, the same scenes can be viewed from each of these different angles using the ANGLE button. -
Page 40: Audio Selection
SPECIAL FUNCTIONS Audio Selection <DVD Discs> • This function can only be used for discs on which the sound has been recorded in multiple formats. • On some discs, the sound is recorded in both Dolby Digital (5.1 channels) and Linear PCM. Use the procedure below to select the type of playback 1. -
Page 41: Advanced Playback
SPECIAL FUNCTIONS Advanced Playback Advanced Playback Playing Information Display Picture Zooming 1. Press the ZOOM button on the remote control during • Using the DISPLAY button, you can view the time, normal, slow or still playback. chapter/track and title information of the disc being If you further press the ZOOM button repeatedly, the playing. -
Page 42: Sound Mode
SOUND MODE Dolby Digital (AC-3) mode 3 STEREO Dolby Digital is the official term for the AC-3 mode, and it is Use this feature when you wish to play movies and music a system developed by Dolby Laboratories to transmit the without using the surround speakers. -
Page 43: Dts
SOUND MODE DTS MODE Night Mode DTS employs digital discrete system in which each chan- Night mode (DR COMP) is a function for compressing the nel is treated as a separate entity. It is used for the DVDs dynamic range (reproduction level range) of audio signals. which are a new-generation AV media, and it represents It is used to review movie software late at night or at other the new format which supports not only laser discs but... -
Page 44: Test Tone
SOUND MODE AUDIO VOLUME ADJUSTING TEST TONE With the SELECT and ADJ UP or DN on the remote con- Use the TEST TONE function to set the correct balance trol, you can select and adjust desired audio sound sources. level between the the left, right, center, left surround, right surround and subwoofer speakers. -
Page 45: Tuner
TUNER AUTO(automatic) MANUAL TUNING AUTO(automatic) MANUAL TUNING PRESET MEMORY PRESET MEMORY 1. Press the POWER button to switch on the system. STORING PRESET STATIONS Select the FM function by pressing the SOURCE but- You can store preferred station in the FM′s memory (total ton on the front panel, the system will switch to FM 32 stations). -
Page 46: Rds Operation
TUNER RDS OPERATION RDS OPERATION The RDS (Radio Data System) in the system include CT (Clock Time) Search: three functions: PS (Program Service), PTY (Program Type), CT (Clock Time). There are two ways to do CT search. RDS (Radio Data System) Station Search: 1. -
Page 47: Rds Operation
TUNER RDS OPERATION 2. While “PTY SEL ” is displayed, press the STATION UP or DN button on the remote to select any Program Type (PTY) from the following list you want to search for: TRAFFIC, NEWS, AFFAIRS, INFO, SPORT, EDU- CATE, DRAMA, CULTURE, SCIENCE, VARIED, POP M, ROCK M, M.O.R. -
Page 48: Troubleshooting
TROUBLESHOOTING AND SPECIFICATIONS TROUBLESHOOTING Please make these simple checks before calling service. These tips can save you time and money. NO POWER • Make sure the power cord is inserted fully into a 230V/50Hz outlet. • Check to be sure outlet is not controlled by a wall switch. •... - Page 50 Wir gratulieren Ihnen! Durch Ihre kluge Wahl sind Sie Besitzer eines Magnat HiFi-Produktes geworden. Magnat HiFi-Produkte erfreuen sich aufgrund der hohen Qualität eines ausgezeichneten Rufes weltweit. Dieser hohe Qualitätsstandard ermöglicht es für Magnat HiFi-Produkte 2 Jahre Garantie zu gewähren. Die Produkte werden während des gesamten Fertigungsvorganges laufend kontrolliert und geprüft. Im Servicefall beachten Sie bitte folgendes: 1.
- Page 51 ARANTIEKARTE ARRANTY Typ/ Type Serien-Nr./Serial-No. Name und Anschrift des Händlers /Stempel Name and address of the dealer/stamp Käufer/Customer Name/Name Straße/Street PLZ, Ort /City Land /Country Kaufdatum / buying date Nur gültig in Verbindung mit Ihrer Kaufquittung! No warranty without receipt!
- Page 52 Magnat Audio-Produkte GmbH Lise-Meitner-Str. 9 · D-50259 Pulheim Phone +49 2234 807-0 · Fax +49 2234 807-399 Internet: http://www.magnat.de...
Need help?
Do you have a question about the M.ONE and is the answer not in the manual?
Questions and answers